Highlights (Key Facts & Solutions)
- Multi-User Fix Priority: The initial and most efficient fix for network errors (H202, H303, H505) is running the automated QuickBooks File Doctor from the Tool Hub .
- Hosting Rule: Multi-user errors often result from hosting conflicts; hosting must be disabled on all workstations and enabled only on the server computer.
- Core Server Services: Both the QuickBooksDBXX and QBCFMonitorService must be running and set to Automatic startup in Windows Services (
services.msc) for multi-user stability. - Network Validation: The final step to confirm a fix is to ‘ping’ the server from the workstation to verify zero packet loss, confirming the network path is open.
- Cash Flow Forecast: The Cash Flow Planner offers a reliable 90-day forecast of cash inflows and outflows using bank data and open invoices/bills.
- Scenario Planning: Items added or changed within the Cash Flow Planner are for risk-free scenario testing only and do not create transactions or impact the official General Ledger.
- Payroll Compliance: FICA errors (Social Security/Medicare) are primarily resolved by using Employees > Get Payroll Updates to download the latest Payroll Tax Table and verifying the correct item calculation order in the Payroll Item List.
Overview
Encountering QuickBooks Multi-User Mode not working error while switching from single-user mode to multi-user mode? If yes, here’s the solution to all your problems: stay connected till the end.
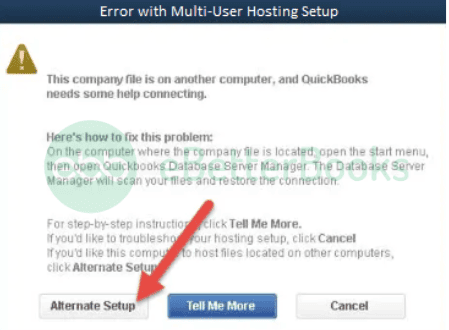
When the users try to switch from single-user mode to multi-user mode, they might notice some errors like QuickBooks Error H202, Error H303, and Error H505 on their computer screens. Such kinds of errors prevent them from using the software in multi-user mode.
Multi-user mode is an exclusive feature of QuickBooks software that allows several users to work on the same company file simultaneously. But for this, every user must have a QuickBooks License on the workstation.
QuickBooks Multi-User Mode not Working issue occurs due to poor network connectivity or interruptions while accessing the company file by the users. This error commonly arise when the multi-user setup fails to establish a connection with company files on the network.
This error may also slow down your productivity and your business growth; hence, it must be rectified at the earliest.
What Gives Rise to QuickBooks Multi-User Mode Error?
There are several reasons why this Multi-User Mode QuickBooks error may appear, such as:
- The Database servers are unable to open the company file.
- QuickBooks is improperly installed on the server.
- The Hosting settings are misconfigured.
- Windows file permissions are not correctly set.
- Firewall or antivirus software may be interrupting communication between user computers.
How to Determine QuickBooks Multi-User Mode Not Working Issue?
Being a regular QB user, it’s important to identify and spot the issue to more efficiently deal with it.
Let’s have a look:
- Switching to multi-user mode becomes more challenging.
- You’re unable to access the company file stored on another PC.
- Error codes H101, H202, and H303 may appear on your screen.
- QuickBooks not only performs sluggishly but also crashes and freezes periodically.
- Windows Operating System also doesn’t work normally.
Pointers to Be Considered Before Fixing QuickBooks Multi-User Mode Error!
Before proceeding with the solutions for QuickBooks multi-user mode not working, consider the following points:
- Make sure you install the same QB Database Server Manager version currently used in QuickBooks.
- Verify the Windows File Permissions as an Admin.
- Avoid opening multiple company files on the same workstation, as it causes issues in enabling multi-user mode.

Effective Troubleshooting Methods to Fix QuickBooks Multi-User Mode Not Working Error!
Here are some steps and solutions that will help you fix this QuickBooks multi-user mode not working error:
Solution 1: Download and Run QuickBooks File Doctor from the Tool Hub
If you are getting QuickBooks multi-user mode error due to improper installation of the software, carry out the steps inclined below:
Step 1: Download and Install QuickBooks Tool Hub
- To begin with, shut down QuickBooks.
- Now, download the latest QuickBooks tool hub version and save the file where it can be accessible easily, such as your Downloads folder or your Windows desktop.
Note: If you’ve installed Tool Hub earlier, you can discover which version you use. For this, hit the Home tab, and the version will pop up on the bottom.
- After this, open the file you downloaded with the extension QuickBooksToolHub.exe.
- Follow all the on-screen prompts to install and agree to the terms and conditions.
- Once the installation finishes, click the QuickBooks Tool Hub icon twice to access the tool hub program.
Step 2: Run QuickBooks File Doctor Tool
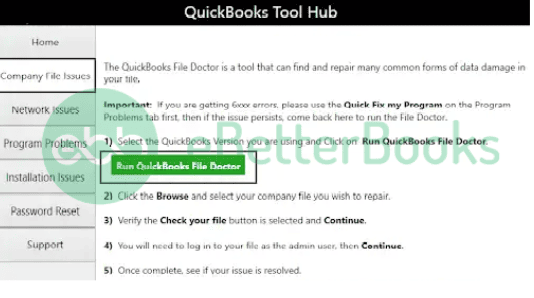
- At first, click on Company File Issues from the tool hub program.
- Now, select Run QuickBooks File Doctor. It may take up to one minute for the file doctor to open. It is to be noted that if the QuickBooks File Doctor doesn’t open, look for QuickBooks Desktop File Doc and try accessing it manually.
- In QuickBooks File Doctor, choose your company file from the drop-down menu. If you don’t spot your file, hit Browse and Search to locate your file.
- After this, click Check your file (middle option only) and press Continue.
- Enter your QuickBooks admin password and then hit the Next tab.
- The scan time relies on your file size, and it may take up to 10–15 minutes.
- Once done, open QuickBooks and your company file.
Solution 2: Use QuickBooks Database Server Manager
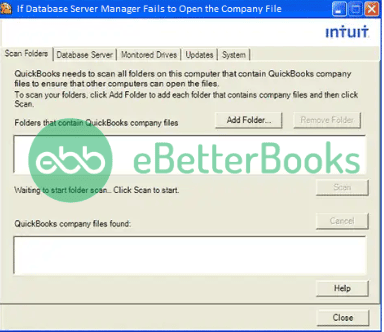
To get over this, you need to scan for the folders holding them before you share your files.
Here’s how:
- The initial step is to navigate to the Windows Start menu on your server computer that hosts your company file.
- Now, type Database into the search bar and open QuickBooks Database Server Manager.
- Select the Scan Folders tab.
- Click Browse to choose the folders that hold your company files (QBW).
- After this, press OK.
- When you’re ready, hit the Start Scan icon.
Once the scanning is over, the folders display in the QB company files found section. You can now open the company files in such folders from other computers on your network.
Solution 3: Set up Multi-User Host Settings
Check Host Mode Settings on all Server Computers to tackle multi-user mode errors.
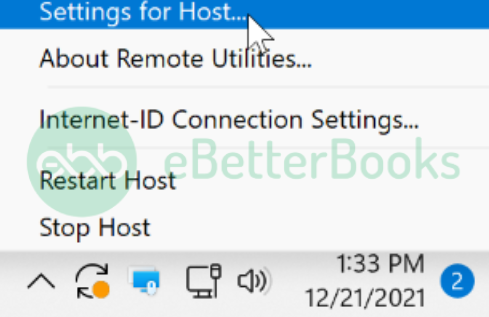
- Navigate to the QuickBooks File menu on your system and then open the Utilities section.
- If the “Host Multi-User Access” option appears on the list, go to a different computer. This indicates that the system you had earlier was not that one hosting the company file.
- However, if you spot “Stop Multi-User Access” on the list, select Disable Hosting to turn on the QuickBooks single-user mode.
- After this, press Yes to confirm the changes you made.
- Once you disable the hosting mode on all systems, check whether the QuickBooks Multi-User Mode Not Working error still stands its ground.
Solution 4: Check the Windows File and Folder Permissions
At this point, you need to verify that the folders that host the company file should have the right permissions so that they can be accessed through other systems on the network.
Follow the below-listed steps to check whether the Windows Permissions are set correctly. If not, then do the following:
- Hover over the Windows Start menu and then hold and press Windows + E keys on your keyboard to open File Explorer.
- Now, hit right-click on the folder that stores the company file. Then choose Properties.
- Go to Security and click Advanced.
- Select QBDataServiceUserXX and press Edit.
Set all the below-listed settings to Allow:
- Create Folders/Append Data
- Create Files/Write Data
- List Folder/Read Data
- Read Permissions
- Read Extended Attributes
- Read Attributes
- Traverse Folder/Execute File
- Write Extended Attributes
- Write Attributes
If your permissions are set incorrectly:
- Click right on the folder containing the company file and then choose Properties.
- Press Security, then hit the Edit tab.
- Select QBDataServiceUserXX and click Full Control, then Allow.
- Hit Apply, then press the OK button.
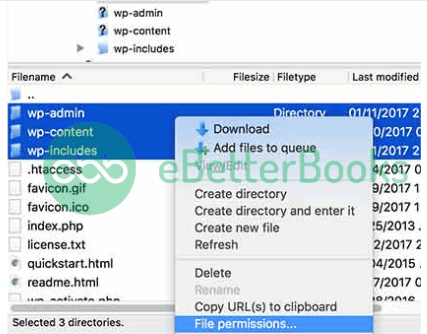
Solution 5: Configure Firewall Settings on Your Server
Windows Firewall settings, if not configured properly, can hamper every single operation on Windows. Below are the instructions to re-configure Windows Firewall settings so QuickBooks can run in multi-user mode.
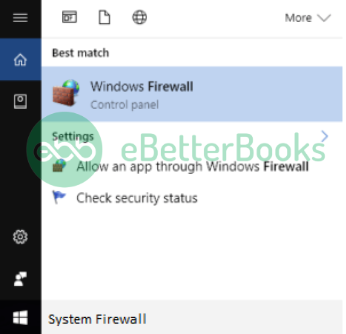
Step 1: Include Firewall Port Exception for QuickBooks
If you’re using multiple QuickBooks Desktop versions on the same computer, implement the following steps for each version.
- Head to the Windows Start menu.
- Enter “Windows Firewall” into the search box and open Windows Firewall Settings.
- Select Firewall Advanced options from the left sidebar.
- Under Advanced Settings, you get the inbound and outbound rules.
- After this, hit right-click on Inbound Rules and then choose the New Rule option.
- Click on Port in the New Rule window and then press Next.
- Next, be sure that TCP is selected.
Enter the particular ports in the Specific local ports field required for the QuickBooks year version you are currently using:
- Enter 8019, XXXXX for QuickBooks Desktop 2020 and later.
- Type 8019, XXXXX for QuickBooks Desktop 2019.
- Enter 8019, 56728, 55378-55382 for QuickBooks Desktop 2018.
- Type 8019, 56727, 55373-55377 for QuickBooks Desktop 2017.
QuickBooks Desktop 2019, 2020, and later versions use dynamic ports.
Here’s how to get a dynamic port number:
- Once you write down the port number, press Next.
- Choose Allow the Connection and then hit the Next tab.
- If you’re prompted, ensure all profiles are marked. Click Next again.
- Create a rule and name it “QBPorts(year).”
- When all set, select Finish.
- Re-perform the same steps to create outbound rules.
Step 2: Create Windows Firewall Exceptions for QuickBooks Programs
QuickBooks uses executable files (.exe) to perform various tasks. Perform these steps to create exceptions for each executable on the table:
- Navigate to the Windows Start menu and type Windows Firewall into the search bar, then open Windows Firewall.
- Now, choose Advanced Settings.
- Hit right-click on Inbound Rules and then hit the New Rule tab.
- Select Program and then press Next.
- Afterward, choose This Program Path and then click Browse.
- Locate and select any one executable file from the table listed below. Then click Next.
- Moving ahead, choose Allow the Connection and then hit Next.
- If prompted, you need to review that all profiles are marked. Later on, press the Next button.
- Create a rule and name it “QBFirewallException(name.exe)“.
- And lastly, repeat the same steps to create outbound rules.
Here’s a list of some executable files along with their locations:
| Executable files | Location |
| IntuitSyncManager.exe | C:\Program Files\Common Files\Intuit\Sync |
| QBCFMonitorService.exe | C:\Program Files\Common Files\Intuit\QuickBooks |
| AutoBackupExe.exe | C:\Program Files\Intuit\QUICKBOOKS YEAR |
| QBW32.exe | C:\Program Files\Intuit\QUICKBOOKS YEAR |
| QBLaunch.exe | C:\Program Files\Common Files\Intuit\QuickBooks |
| OnlineBackup.exe | C:\Program Files\QuickBooks Online Backup |
| FileManagement.exe | C:\Program Files\Intuit\QUICKBOOKS YEAR |
Once done, open QuickBooks Desktop and try switching to multi-user mode.
Solution 6: Make Sure QuickBooks Services are Running Properly
You need to ensure that QuickBooks services are running on your server computer. Follow these steps to check QuickbooksDBXX. Then repeat them for QBCFMonitorService.
Step 1: Go to the Windows Start Menu on your server computer.
Step 2: Type “Run” into the search and open it.
Step 3: Enter “services.msc” into the Run window, then hit the Enter tab.
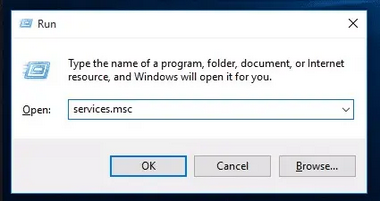
Step 4: Locate and double-click QuickBooksDBXX on the list. (XX represents the version number like QuickBooks 2023 is QuickBooksDB33)
Step 5: Click Automatic for the Startup Type.
Step 6: Check the Service status under the General section. It should be either Running or Started. If it’s neither, click Start.
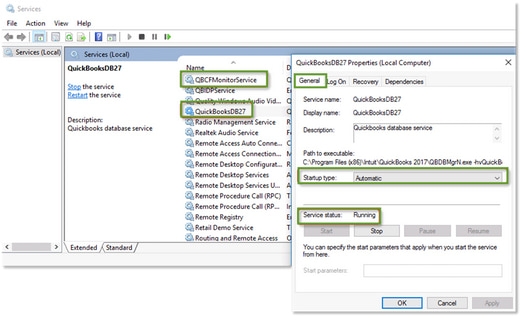
Step 7: Hit the Recovery tab.
Step 8: Select Restart the Service from each of these dropdown menus: First failure, Second failure, and Subsequent failures.
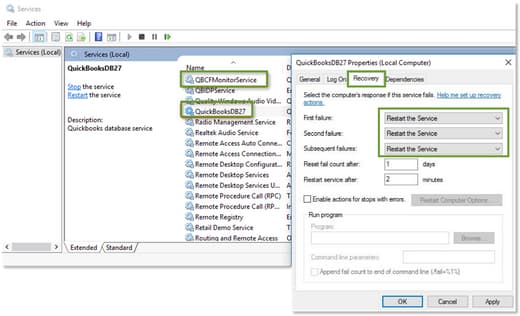
Step 9: Press Apply and then hit OK to save the changes.
Step 10: Repeat the same steps for QBCFMonitorService.
When you’re done, open QuickBooks on each workstation. Navigate to the File menu and choose Switch to Multi-user Mode. If everything opens smoothly, the problem is fixed.
Solution 7: Ping your Server from a Workstation
Ping your server from a workstation to check the connection. Ping your server from each workstation getting Multi-user mode not working error.
Step 1: Head to the Windows Start menu on your server and workstations.
Step 2: Type “Network” into the search bar and open Network and Sharing Center.
Step 3: Choose to Change advanced sharing settings.
Step 4: Ensure that the Turn on network discovery is selected in the Network Discovery and File and Printer sharing sections.
Step 5: Next, get your server name from your server:
- Open the Windows Start menu on your server computer.
- Type “Run” into the search and open the same.
- Enter “CMD” into the Run window, then hit the Enter tab.
- Write down “ipconfig/all” into the CMD window, then press Enter.
- Locate the Host Name in the Windows IP Configuration section. Your server name is on the right.
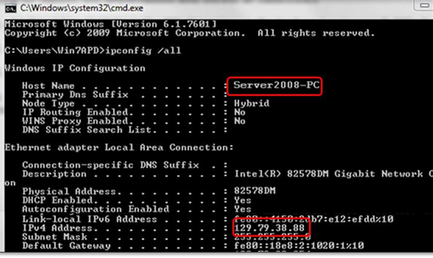
- Enter the host name, or copy it to a word document so you can access it quickly.
Return to your workstation to test the server and go through the steps below:
Step 1: Move to the Windows Start menu from a workstation.
Step 2: Enter “Run” into the search and open Run.
Step 3: Type “CMD” into the Run window, and then hit the Enter key.
Step 4: Write down “ping [your server name],” and then press Enter. Don’t include the brackets around your server name just like this:

Step 5: Repeat these steps for each workstation that gets multi-user mode not working error.
Solution 8: Repair the QuickBooks Program
Step 1: Restart your system.
Step 2: Open the Windows Start menu and then click the Control Panel.
Step 3: Select Programs and Features, then Uninstall a Program.
Step 4: Choose QuickBooks from the list of Programs, then hit the Uninstall/Change tab.
Step 5: Press Continue, or Next.
Step 6: Click Repair, then Next.
Step 7: Once it’s done, hit the Finish icon.
Step 8: If prompted, restart your computer to complete the repair.
Summing-Up!
Hopefully, the information given above will be useful to you. But if you are still facing any kind of issues with your software and need professional assistance regarding accounting, bookkeeping & accounting software-related issues, then feel free to get technical support with us at +1-802-778-9005, or you can email us at support@ebetterbooks.com
Frequently Asked Questions
1. What is the fundamental difference between the H202, H303, and H505 error codes that prevent multi-user access?
The H-series errors (H101, H202, H303, H505) all indicate a failure to connect to the company file, but they represent different locations or severities of the network blockage.
- Error H202: This is the most common error, indicating that QuickBooks Desktop cannot communicate with the server hosting the company file. It suggests an immediate firewall or connectivity block.
- Error H303: This indicates a more complex networking issue, suggesting that the workstation can reach the server, but the server’s multi-user setup (or the network path itself) is improperly configured, often involving multiple hops or faulty Server Manager settings.
- Error H505: This is a serious error often related to hosting conflicts or server-side restrictions that completely block access, frequently seen when multiple copies of QuickBooks are trying to host or when file permissions are severely restricted.
2. Why is running the QuickBooks File Doctor the essential first step before manually checking firewall and folder settings?
The QuickBooks File Doctor, accessed via the QuickBooks Tool Hub , is the primary diagnostic tool and should always be run first because it automates solutions for the most common causes of multi-user failure.
- Automated Repairs: It automatically attempts to fix basic company file damage, resolves issues with the Windows firewall related to QuickBooks ports, and verifies that the QuickBooks Database Server Manager is running correctly.
- Time Savings: By running this tool, users can often resolve the H-series errors in 10 to 15 minutes without needing to execute complex manual steps like checking Windows services or firewall rules manually.
3. What is the purpose of the QuickBooks Database Server Manager, and why must it be running on the host computer?
The QuickBooks Database Server Manager is the specialized service that enables workstations to access the company file over the network. It must be running correctly on the host server.
- Function: It is responsible for translating user requests from workstations into data requests for the company file (.QBW) and vice versa. It manages file locking, security, and concurrent access.
- Requirement: If the Server Manager service is stopped or misconfigured (e.g., set to manual startup instead of automatic), no workstation will be able to connect, resulting in an H-series error.
- Scanning Function: The Manager also includes a “Scan Folders” function which ensures the correct network paths to the company file are registered and accessible to all workstations.
4. What are the specific TCP ports that the Windows Firewall must be configured to allow for multi-user access?
The Windows Firewall often blocks the specific TCP ports that QuickBooks uses for multi-user communication, requiring explicit port exceptions to be added.
- Static Port: Port 8019 is a static port required for all versions of QuickBooks to initiate the connection.
- Dynamic Ports: Most recent versions (2019 and later) use a dynamic port range that QuickBooks sets during installation. Users must find this dynamic port number using the Database Server Manager.
- Example Port Ranges:
- QuickBooks Desktop 2018: 8019, 56728, 55378-55382
- QuickBooks Desktop 2017: 8019, 56727, 55373-55377
Note: For each version, these ports must be added as both Inbound and Outbound rules in the Windows Firewall Advanced Settings on the server computer.
5. When troubleshooting, why is it critical to disable hosting on all workstations except the main server?
QuickBooks is designed to allow only one computer to “host” the company file and the multi-user mode. Enabling hosting on multiple computers causes immediate H-series errors.
- Hosting Conflict: If a workstation accidentally turns on the “Host Multi-User Access” setting, it attempts to become the server, creating a conflict with the dedicated Database Server Manager.
- Verification: Users must check the File > Utilities menu on every workstation. If “Stop Multi-User Access” is visible, the workstation is hosting. The user must select it to disable hosting on that machine.
- Server Only: The “Host Multi-User Access” option must only be visible and active on the single computer designated as the QuickBooks server.
6. If I resolve the error, what is the best practice for configuring the QuickBooksDBXX service for continued reliability?
Ensuring the two critical QuickBooks services, QuickBooksDBXX and QBCFMonitorService, are configured for reliable restart is key to preventing the error from recurring after a server reboot or crash.
- Automatic Startup: Both services must be set to Automatic startup type in the Windows Services console (
services.msc). - Recovery Configuration: For guaranteed reliability, navigate to the Recovery tab for each service and set the following dropdowns to Restart the Service :
- First failure
- Second failure
- Subsequent failures
- Benefit: This configuration ensures that if the service fails due to a temporary network glitch or an unexpected system event, Windows will automatically attempt to restart the service, restoring multi-user access without manual intervention.
7. After all troubleshooting steps, why should I use the ‘ping’ command, and what result confirms a successful fix?
The ‘ping’ command is the final and most authoritative network diagnostic tool to confirm that a workstation can successfully communicate with the server hosting the QuickBooks file.
- Function: The command sends small data packets to the server’s Host Name (or IP address) to test basic network connectivity, latency, and packet loss.
- Verification: On the workstation, open the Command Prompt (CMD) and enter
ping [your server name]. - Successful Fix: A successful result will show “Replies from [IP address]” and report “Sent = 4, Received = 4, Lost = 0” (or similar with 0 percent loss). Any indication of packet loss (e.g., 25 percent loss) or a “Request timed out” message means the network path is still blocked, likely by a firewall or antivirus setting that requires further configuration.
Disclaimer: The information outlined above for “Fix “QuickBooks Multi-User Mode Not Working” Error” is applicable to all supported versions, including QuickBooks Desktop Pro, Premier, Accountant, and Enterprise. It is designed to work with operating systems such as Windows 7, 10, and 11, as well as macOS.
