Excerpt:
The QuickBooks Database Server Manager (QBDSM) is a critical utility installed exclusively on the host server machine to enable multi-user access for QuickBooks Desktop. Its primary function is to publish the company file's location to the network by creating the vital Network Data (.nd) file and managing client connections. Proper setup requires ensuring the QBDSM version matches or exceeds the company file version and running the necessary Windows Service (QuickBooksDBXX) in the background. The most common point of failure, the firewall, must be configured manually to allow the required static port 8019 and dynamic port ranges specific to the QuickBooks year to guarantee stable communication between the server and all client workstations.
Highlights (Key Facts & Solutions)
.qbw) is stored; client workstations do not need it.QuickBooksDBXX) is running and set to Automatic startup using the services.msc console.Overview
QuickBooks Database Server Manager (QDBSM) is an important tool that is used for setting up QuickBooks servers for multiuser access, productivity within the group, and boosting effectiveness for a group or entity.
QuickBooks Database Server Manager is an important utility that allows users to share company files across multiple computers on the same network. It enables effective communication between the QuickBooks Desktop application and the company files stored on a network server. It also helps you monitor your multi-user network.
This tool makes it super easy for the users to create network data files for each company file on the host system. You can’t access multi-user mode in QuickBooks without having this tool.
QBDSM tool is used to share the company files with other systems over the network. At present, you can access this tool through more than one version of QuickBooks Desktop software. Also, multiple users can work on the same company file at the same time using this exclusive utility.
Here’s what QuickBooks Database Server Manager allows QB users to implement:
Remember: The QuickBooks Desktop needs excellent file performance on the network so you can install and set up the tool on your system at the company files’ location.
In this section, we have mentioned all the essential info about QuickBooks database server manager; let’s take a look:
Note: You need to make sure that the latest QuickBooks database server manager version is installed on your PC.
QuickBooks Database Server Manager (QBDSM) is an essential tool for businesses that use QuickBooks Desktop in multi-user mode. It helps manage and host company files on a centralized server, ensuring seamless access and collaboration. Below are the key features that make QBDSM an important part of your QuickBooks setup.
If your business relies on QuickBooks Desktop multi-user mode, this tool is essential for:
Improved collaboration – Multiple users can work on files at the same time.
Better data management – Reduces file access errors and ensures secure storage.
Optimized performance – Keeps your QuickBooks database running smoothly.
Before moving further, you need to know that QuickBooks Database Server Manager allows you to share your company files across multiple computers on the same network. To enable file access for users, it’s essential to run the Database Server Manager when setting up your network. It also helps you monitor your multi-user network.
Here’s how to download and install the QuickBooks Database Server Manager on your server computer (the computer that hosts your company files).
Note: The Database Server Manager is integrated into QuickBooks Desktop. To ensure it stays updated, simply download and update QuickBooks Desktop, and the Database Server Manager will automatically update as well.
You can’t download the QuickBooks Database Server Manager separately, as it is a part of the QuickBooks Desktop file. To ensure you have the latest version, simply update QuickBooks Desktop.
Here’s how:
By following these steps, you’ll have the updated Database Server Manager along with QuickBooks Desktop!
Here’s how to Install the QuickBooks Database Server Manager on your server computer. This is the computer that hosts your company files:
Note: If you’re an accountant who hosts multiple versions of QuickBooks Desktop on your network, it is advisable to install them in order, i.e., install the oldest version first and end with the latest one.
Note: The Express option can install QuickBooks Desktop over your previous QuickBooks Desktop version, which may be needed for comparison and troubleshooting purposes.
Remember: Your existing company file data won’t overwrite if QuickBooks Desktop is already downloaded to your server.
Note: QuickBooks creates a new Windows user for each Database Server Manager version, i.e., Database Server Manager 2023 shows up as QBDataServiceUser33. Thus, you need to allow QBDataServiceUserXX (XX is the user number) to access the folders that hold your company files.
Once you have installed the QBDSM, now it’s time to configure it. The steps for this are as follows:
Note: This process can be skipped if you want to use the default settings.
After downloading the QuickBooks database server manager, configure firewall settings manually so that you can easily run QuickBooks in a multi-user environment. Adhere to the below-given steps:
Step 1: Add Firewall port exception for QuickBooks
If you’re using multiple QuickBooks Desktop versions on the same computer, go through the following steps for each version.


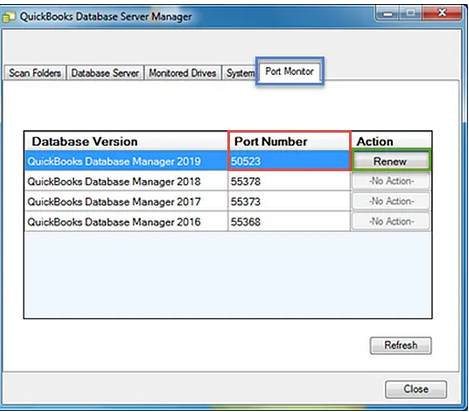
QuickBooks Desktop 2019, 2020, and later versions use dynamic ports. Here’s how to get a dynamic port number:


Step 2: Create Windows firewall exceptions for QuickBooks programs
QuickBooks uses executable files (.exe) to perform various accounting tasks. Follow these steps to create exceptions for each executable on the table:
Here’s a list of some executable files, along with their locations:
| Executable files | Location |
| IntuitSyncManager.exe | C:\Program Files\Common Files\Intuit\Sync |
| QBCFMonitorService.exe | C:\Program Files\Common Files\Intuit\QuickBooks |
| AutoBackupExe.exe | C:\Program Files\Intuit\QUICKBOOKS YEAR |
| QBW32.exe | C:\Program Files\Intuit\QUICKBOOKS YEAR |
| QBLaunch.exe | C:\Program Files\Common Files\Intuit\QuickBooks |
| OnlineBackup.exe | C:\Program Files\QuickBooks Online Backup |
| FileManagement.exe | C:\Program Files\Intuit\QUICKBOOKS YEAR |
QuickBooks Database server manager gives you permission to share and manage your company files with other PCs over your network. This tool also helps you to check your multi-user network in QuickBooks. When you set up your network, you need to have QBDSM running on your server so that users can access your company files.
After downloading, installing, or configuring QuickBooks Database Server Manager, it is important to scan the company files so that you can access them from multiple systems on the network. Below are the steps you need to perform:
Step 1: Scan your Folders
Prior to sharing your files, you have to scan the folders once holding them.
Let’s see how:
Note: If you’re using QuickBooks

Once the scan finishes, the folders display under the QuickBooks Company Files found section. You can now open the company files in such folders from other computers on your network.
Step 2: Add folders

Step 3: Remove folder

Step 4: Start Scanning

Step 5: Monitor Your Drives
The drives holding the folders display in the Monitored Drivers tab after scanning them. Then, choose the Drive to monitor these folders. This way, you don’t have to rescan the folders if you ever change or move the company files into them.
The steps for this process are as follows:
Note: You are recommended to only add drives having your company files.

Note: You can’t scan your mapped drives.
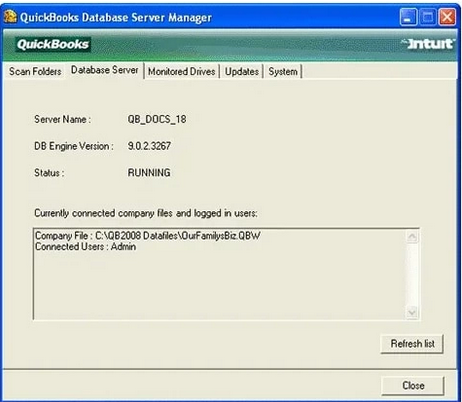
Step 6: Manage Database Server Manager
There are other different tabs in QB Database Server Manager that keep everything functioning smoothly, which include:


Note: You’ll have to change the Firewall Settings if QuickBooks Database Server Manager isn’t running on your server.
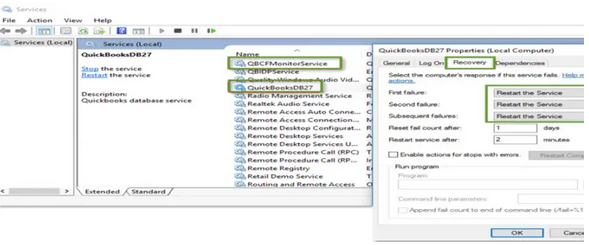
Step 7: Restart Database Server Manager
It is recommended to restart the QB Database server manager on your server computer if you can’t open it or get an error.
To install QuickBooks Desktop and Database Server Manager, follow the steps below:

To only installed QuickBooks Database Server Manager on your server computer, adhere to the steps given below:
Note: XX indicates your Database Server Manager year. For instance, the 2021 version is QuickBooksDB31.
Final Words!
QuickBooks Database Server Manager is an outstanding feature for all QB users who want to access their company files in a multi-user environment. But at times, this process becomes so annoying if you don’t have much knowledge about this tool or you’re new to it.
For a better understanding of how to download, install, or use QBDSM, immediately connect with our experts at +1-802-778-9005 and let us assist you with the best possible resolution.
QuickBooks Database Server Manager (QBDSM) is an essential tool that enables multi-user access to QuickBooks company files. It ensures that multiple users can work on the same company file simultaneously without errors or conflicts.
QBDSM is responsible for:
✔ Managing Multi-User Mode – Allows multiple users to access and work on the same QuickBooks file at the same time.
✔ Scanning Company Files – Helps detect and store company files in a network folder for seamless access.
✔ Monitoring Server Status – Ensures the database service is running correctly and alerts users to any connectivity issues.
✔ Managing User Access – Provides secure file hosting, preventing unauthorized access or corruption.
✔ Improves Performance – Allows multiple users to work efficiently without slowdowns.
✔ Enhances Security – Ensures only authorized users can access company files.
✔ Reduces Errors – Helps prevent file corruption and multi-user conflicts.
✔ Easy Troubleshooting – Built-in diagnostics help resolve network and database issues quickly.
QuickBooks Database Server Manager (QBDSM) is a crucial tool for businesses that need multi-user access to QuickBooks Desktop. It allows multiple users to work on the same company file simultaneously by hosting the file on a central server. Without it, users may experience issues like file access errors, slow performance, or connectivity problems in multi-user mode.
Setting up a reliable QuickBooks Database Server Manager (QBDSM) ensures smooth multi-user access, data security, and optimal performance. Below is a step-by-step guide to selecting and configuring the best server setup for QuickBooks Desktop.
To run QBDSM efficiently, your server should meet the following specifications:
Recommended System Requirements:
Dedicated Server: Best for businesses with multiple users accessing QuickBooks simultaneously.
NAS (Network-Attached Storage): Suitable for small businesses needing shared storage.
Cloud Hosting: Ideal for remote access, security, and automated backups.
Step 1: Install QuickBooks Database Server Manager on the host computer.
Step 2: Configure folder permissions for shared access.
Step 3: Enable multi-user mode in QuickBooks.
Step 4: Adjust firewall settings to allow communication.
Step 5: Test network connectivity and file access.
Restart the QuickBooks Database Server Manager service if files are not accessible.
Regularly update QuickBooks and Windows Server for security patches. Check network connectivity and permissions if users experience lag.
QuickBooks Database Server Manager (QBDSM) is essential for multi-user access, allowing multiple users to work on the same company file from different devices. Follow these steps to set up and use QuickBooks Database Server Manager efficiently.
By properly setting up QuickBooks Database Server Manager, your team can work together seamlessly in multi-user mode, improving efficiency and collaboration.
.ND files can cause issues with the connection to the server hosting the company file.Step 1: Restart QuickBooks Database Server Manager
Setting the correct folder permissions for QuickBooks Database Server Manager (QBDSM) is essential to ensure smooth multi-user access. Proper permissions allow QuickBooks to store, share, and access company files without errors. Here’s how to configure them:
Still have questions? Explore our detailed FAQs.

