+1-802-778-9005
Home>>QuickBooks Errors & Their Support Most Common QuickBooks Company File Errors & Issues – Process of Fixing Them Fix “QuickBooks Unable to Communicate with the Company File”?

Submit Your Details to Continue Reading

The inability to communicate with a company file in QuickBooks Desktop often signals a network or system configuration disruption, primarily in multi-user environments. This comprehensive guide provides expert-validated, step-by-step solutions designed to restore stable connectivity by addressing the core technical causes. The troubleshooting process prioritizes ease and efficiency, starting with the automated QuickBooks File Doctor tool, contained within the QuickBooks Tool Hub. Subsequent, more intricate steps focus on correcting critical network components, including: manually configuring Windows Firewall rules to ensure the correct TCP ports are open; verifying that QBDataServiceUserXX has Full Control permissions over the company file folder; confirming that multi-user hosting is enabled exclusively on the server; and ensuring the QBDBMgrN.exe service is actively running. Maintaining up-to-date QuickBooks software is also emphasized as essential for resolving compatibility issues and maintaining a secure, functional connection, ensuring users can quickly and reliably access their financial data.

Highlights (Key Facts & Solutions)

  • Primary Fix (Start Here): Use the QuickBooks File Doctor tool, accessed via the QuickBooks Tool Hub, to automatically diagnose and repair network or company file damage.
  • Essential System Check: Verify the QBDBMgrN.exe process is actively running in the background on the server computer, as it is crucial for managing multi-user access.
  • Firewall Configuration: Manually adjust Windows Firewall settings to create Inbound TCP rules for the specific QuickBooks version ports (e.g., 8019 and dynamic ports) to prevent connection blocking.
  • Security Permissions: Set Full Control permissions for the designated Windows user, QBDataServiceUserXX, on the folder that contains the QuickBooks company file to allow proper file sharing and modification.
  • Hosting Management: Ensure that multi-user hosting is enabled only on the server computer (the machine storing the company file) and is explicitly turned off on all connected workstations.
  • Software Updates: Upgrade QuickBooks Desktop to the latest release version to fix known connectivity bugs, security issues, and ensure compatibility with current operating system and network standards.
  • Network Sharing: If necessary, temporarily turn off password-protected sharing in advanced Windows network settings to facilitate easier company file sharing over the local network.

What Causes QuickBooks Unable to Communicate with the Company File Issue? 

Apart from the network firewall limitations on QuickBooks Desktop Services, connection errors in QuickBooks often stem from these reasons:

  • QuickBooks requires a Data Server Manager to establish a link to the company file. If this process isn’t functioning on the workstation, it results in a connectivity problem. 
  • Incorrect folder permission may hinder the company file folder from being shared, contributing to connection errors. 
  • QBDBMgrN not functioning in the background of your system. 
  • Server configuration issues or connectivity problems with other workstations in the particular network can trigger the communication problem in QuickBooks. 
  • The outdated QuickBooks Desktop application not only causes company file connection errors but is also accountable for various other errors like payroll errors, printing errors, update errors, and banking errors
  • Incorrect hosting settings on both the server and workstation computers can contribute to the error.

Solutions to fix “QuickBooks Unable to Communicate with the Company File”

This section outlines the primary technical methods used to restore communication between QuickBooks Desktop and the company file. These solutions address network permissions, service activity, hosting configuration, firewall routing, and directory access. Each method targets a specific cause of the interruption to ensure stable multi-user connectivity.

Solution 1: Use the QuickBooks File Doctor Tool

This tool was developed by Intuit to deal with general network connectivity issues between the server and workstation and is also useful in repairing damage in the company file. 

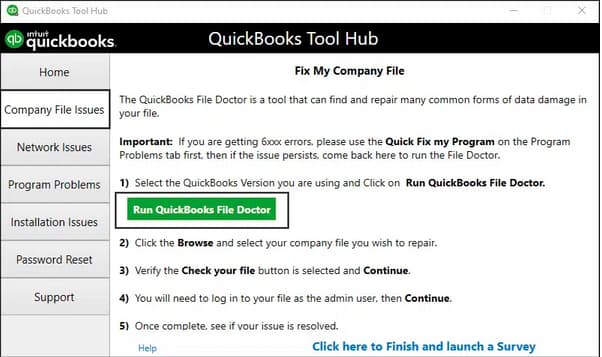
Follow the below steps to download and run QuickBooks File Doctor using QuickBooks Tool Hub:

Steps to download QuickBooks Tool Hub and run the QuickBooks File Doctor tool:

Step 1: Download QuickBooks Tool Hub

You need to start by closing the QuickBooks and downloading the QuickBooks Tool Hub, which contains the File Doctor tool.

  • Close QuickBooks before downloading QuickBooks Tool Hub. 
  • Then, visit the official Intuit website to download the QuickBooks Tool Hub.
  • Save the downloaded file so you can find it easily.

Step 2: Access Your Downloads

Once the download is complete, you need to locate the downloaded file.

  • Press Ctrl + J simultaneously to open your downloads folder directly from your browser or navigate to the Downloads folder on your computer.

Step 3: Install QuickBooks Tool Hub

Next, you will install the QuickBooks Tool Hub.

  • Right-click on the QuickBooksToolHub.exe file and select Open.
  • Agree to the Terms and Conditions and follow the prompts to complete the installation process.

Step 4: Open QuickBooks Tool Hub

After installation, you need to launch the Tool Hub.

  • After installing it, look for the QuickBooks Tool Hub icon on your desktop. 

Note: If you’re unable to find the QuickBooks Tool Hub icon on your desktop, then search for it using the search/ start option.  

Step 5: Navigate to Program Problems

Once the Tool Hub is open, you can proceed with troubleshooting.

  • Click on the Program Problems tab within the Tool Hub interface.

Step 6: Run Quick Fix My Program

This step initiates a quick repair of any issues with your QuickBooks program.

  • Click on Quick Fix My Program. This will resolve common problems that may be preventing access to your company file.

Step 7: Access Your Company File

After completing the repair process, check if you can access your company file again.

  • Click OK after the repair is finished, and try opening your company file in QuickBooks Desktop.

Note: If the problem persists, then open the Company File Issues tab and press Run QuickBooks File Doctor.

Step 8: Run QuickBooks File Doctor

QuickBooks File Doctor tool is developed to diagnose and fix various issues with your company file.

  • After accessing the Company File Issues tab, choose the option to Run QuickBooks File Doctor.
  • Be aware that it may take up to one minute for the File Doctor tool to open. If it does not launch automatically, you can manually search for “QuickBooks File Doctor” and open it from there.
Run QuickBooks File Doctor

Step 9: Select Your Company File

In the QuickBooks File Doctor interface, you will need to select your company file. 

  • Once QuickBooks File Doctor is open, you will see a drop-down menu where you need to select your company file.
  • If your file is not listed in the drop-down, click on Browse to search for and locate your company file manually.

Step 10: Check Your File

After selecting your company file, choose the option that says Check your file. 

  • Once you have selected the company file, proceed by choosing the option labeled Check your file. This will initiate a diagnostic process to identify and fix any issues with your company file.

Step 11: Continue and Enter Password

Once you have initiated the check, click on the Continue button and insert your password.

  • Now, you need to enter your QuickBooks admin password. This step is important for security reasons and ensures that only authorized users can perform repairs on the company file.
  • Click on Next after entering your admin password to begin the scanning process.

Note: Choose these options to repair both the damaged network and company file and let this tool automatically fix the identified problem. 

Solution 2: Upgrade QuickBooks Desktop to Latest Release Version

Intuit regularly introduces new and robust features that help streamline your business process. 

Therefore, you need to download and install all the latest updates of the QuickBooks Desktop application to take advantage of recent features of the accounting software:

Step 1: Open QuickBooks Desktop

  • First open QuickBooks Desktop; Now press the F2 key and then the Product Information screen will be visible. 

Step 2: Check Product Information

Press the F2 key on your keyboard. This action will bring up the Product Information screen, where you can view details about your current version of QuickBooks.

  • Confirm if the latest version of QuickBooks Desktop is installed or not. Check if your system has:
    1. QuickBooks Desktop 2020 
    2. QuickBooks Desktop 2019 
    3. QuickBooks Desktop 2018

Step 3: Update QuickBooks if Necessary

If you find that your version is not the latest, proceed with updating QuickBooks:

Update QuickBooks Desktop

Step 4: Initiate Update Process

In the update window:

  • Click on the Update Now tab.
  • Press Get Updates to start downloading the latest updates available for your version of QuickBooks.

Step 5: Restart QuickBooks 

  • Once the update process is complete, you need to restart QuickBooks Desktop, which allows the application to implement any changes made during the update.

Step 6: Install Current Application Updates

  • After restarting QuickBooks, ensure that you install any additional updates that may be available for your current version. This will help address any lingering issues and improve overall functionality.

Solution 3: Check the Firewall Settings

In case you have installed multiple versions of the QuickBooks Desktop application on the same computer. In that case,you are required to ensure that QuickBooks has permission to go through firewall settings.  

  1. First, open Windows Firewall by using the Windows search option. 
  2. Now, select the Advanced Settings option. 
  3. Then, right-click on the Inbound Rules and select the New Rule. 
  4. Navigate the port option and press the Next button.
Check the Firewall Settings
  1. Once done, ensure TCP is selected from the Does this rule apply to TCP or UDP? option. 
  2. Now enter the specific ports that are required for the QuickBooks Year Version in the field of local ports.
    1. QuickBooks Desktop 2022: 8019, XXXXX
    2. QuickBooks Desktop 2019: 8019, XXXXX
    3. QuickBooks Desktop 2018: 8019, 56728, 55378- 55382
    4. QuickBooks Desktop 2017: 8019, 56727, 55373- 55377
  3. Now, press the Next button once the Port Number is entered. 
  4. Then, choose the Allow the Connection option. 
  5. Press Next and make sure that no profiles are unchecked. 
  6. Click Next again and for the new rule created enter a name. 
  7. Once the new rule is created, click Finish.  

Solution 4: Set Up Folder Permissions

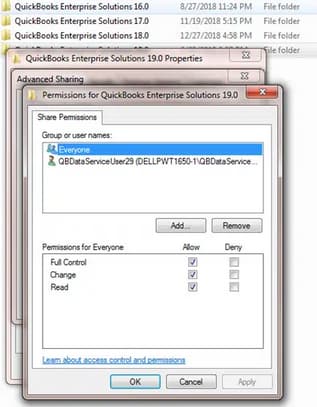
You need to make sure that the folder holding the company file is set up to share the files over the network.

That can be done by carrying out the steps below:

Step 1: Confirm that Permissions are Set Correctly

  1. Click on the Windows start menu and open File Explorer. 
  2. Now, right-click the folder containing the company file. 
  3. Then, select Properties. 
  4. Click on the Security tab and select the advanced option. 
  5. Proceed by selecting QBDataServiceUserXX and choosing Edit Option. 
  6. After completing the aforementioned steps, set the below setting to allow:
    • Traverse Folder/Execute File
    • List Folder/Read Data
    • Read Attributes
    • Read Extended Attributes
    • Create Files/Write Data
    • Create Folders/Append Data
    • Write Attributes
    • Write Extended Attributes
    • Read Permissions

In folder permissions aren’t configured correctly

  1. Right-click the folder containing the company file and select Properties. 
  2. Choose the security option and click on Edit. 
  3. Select QBDataServiceUserXX and navigate to the Full Control tab. 
  4. Enable Allow for full control access. 
  5. Lastly, click on apply and hit the OK button.
Click on apply and hit the OK button

Solution 5: Use QuickBooks Database Server Manager

The server computer which stores all QuickBooks company files is distinct from the workstation connected to your network. To address the QuickBooks cannot communicate with the company file error, run the QuickBooks Database Server Manager QBDBSM. 

Step 1: First, open QuickBooks Tool Hub. 

Step 2: Now, select the Network Issues option.

Now, select the Network Issues option

Step 3: Then, click on the QuickBooks Database Server Manager.

Note: If QuickBooks isn’t installed on the server, then you will be asked to do that. 

Step 4: After that, inside the database server manager, click the start scan option.

Click the start scan option

Note: If the option is not available, then you need to first Browse the company file to make the Start Scan option available. 

Step 5: Once the QuickBooks Database Server Manager repairs the issue with the Windows Firewall, try to make a connection with the company file once again.

Note: Once done with the process, open the folder you scanned and make sure that there is an .ND file in the folder. 

Solution 6: Check the Hosting Settings on the Workstation and Server

You have to confirm that the host multi-user access option is off on the workstations. Only the server system should be the one hosting.

Follow the steps below to do so:

Host multi-user access
  1. Open QuickBooks Accounting Software and click on the File tab. 
  2. Hover over the Utility option and check Hosting Setup. 
  3. If Stop Hosting Multi-user Access appears, the server is configured correctly, and proceeds with advanced solutions on other workstations.
  4. If the settings indicate Host Multi-user Access, choose the option and edit it to Stop Hosting Multi-user Access. 
  5. Check each workstation to ensure none display Stop Multi-User Access.
    Note: After adjusting the hosting setup, attempting to access the company file again on the specific workstation facing the QuickBooks cannot communicate with the company file issues. 

Solution 7: Verify QBDBMgrn.exe Process is Running

This solution addresses the issue of QuickBooks’s inability to communicate with the company file by ensuring that the QBDBMgrn.exe process is active. If this process is not running it can lead to connectivity issues with the company file. 

Steps to verify QBDBMgrn.exe Process is Running:

Step 1: Open Task Manager

To check if the QBDBMgrn.exe process is running, you first need to access the Task Manager.

  • Press Ctrl + Alt + Del on your keyboard to open a menu and select Task Manager.
  • Once the Task Manager window appears, navigate to the Processes tab.

Step 2: Locate QBDBMgrn.exe

In the Processes tab, look for QBDBMgrn.exe.

  • If you find QBDBMgrn.exe, it indicates that the process is running correctly. 
  • If QBDBMgrn.exe is not visible, the process may not be active, which could cause a communication issue.

Step 3: Grant Admin Rights to QBDataServiceUser

If QBDBMgrn.exe is not found, you need to ensure that the QBDataServiceUser has administrative rights.

Here’s how to do that:

  1. Make sure QuickBooks is not running before proceeding.
  2. Go to your computer’s Control Panel by searching for “Control Panel” in the Start menu.
  3. Click on User Accounts in the Control Panel.
  4. Choose the option to manage another account.
  5. Find and double-click on QBDataServiceUser.
  6. Click on Change Account Type, then select Administrator from the options available.
  7. Click on Done to save your changes and then close the Control Panel. 

Solution 8: Change Network-Related Settings for Windows 10

Changing the network settings will enable Windows to share the QuickBooks Company File over the network:

  1. First, click on the Windows Start menu. 
  2. In the search bar, type sharing, and then select Manage advanced sharing settings. 
  3. Now, click on the Turnoff password-protected sharing option. 
  4. Click on Apply and Save, to save the changes.
    Note: Open QuickBooks again and try to open the company file again. 

Solution 9: Perform System Restore and Change your System to Previous Version

If the QuickBooks cannot communicate with the company file error occurred after a recent system update, resolving it may involve restoring previous settings.

Follow the steps below:

  1. Sign in with your Admin account and navigate to All Programs from the Window Start menu. 
  2. Choose the System Restore settings option to revert your PC to an earlier point. 
  3. Select the desired restore point from the list and proceed by clicking Next. 
  4. After completing the process, restart your system and check the status of the error. 

Bottom Line

The QuickBooks Unable to Communicate with the Company File error disrupts the connection required for stable multi-user access. This article outlined the technical conditions that lead to the communication failure and the methods that restore consistent access to the company file. The next stage involves maintaining updated QuickBooks services, monitoring network configurations, and reinforcing system-level permissions to prevent future interruptions.

FAQs

When is running the QuickBooks File Doctor not enough, and what should I check next?

The QuickBooks File Doctor is the initial, most straightforward fix, addressing common network and data damage. If the error persists after running the tool, it indicates the issue lies with system-level configurations that the automated tool could not resolve.

The next critical steps are:

1. Firewall Ports: Verify that the Windows Firewall (or any third-party antivirus firewall) has open TCP Inbound and Outbound Rules for the specific ports used by your QuickBooks version.
2. Folder Permissions: Manually confirm that the QBDataServiceUserXX Windows service user has Full Control permissions over the folder holding the company file.

QuickBooks Version – 2018
Primary Port Numbers (TCP) – 8019, 56728, 55378-55382

QuickBooks Version – 2019 and later
Primary Port Numbers (TCP) – 8019, XXXXX (XXXXX is a dynamic port found in the Database Server Manager)

What is the QBDataServiceUserXX and why must it have Full Control permissions?

The QBDataServiceUserXX is a Windows user account automatically created by QuickBooks Desktop when you install the QuickBooks Database Server Manager (QBDBSM). The ‘XX’ corresponds to your QuickBooks version (e.g., 29 for 2019).

This user is crucial because it runs the QBDBMgrN.exe service in the background, which is responsible for managing all multi-user access requests to the company file. If this user does not have Full Control permissions on the company file folder, the service cannot properly read, write, or share the file, leading directly to the communication error.

How do I find the dynamic port number for QuickBooks 2019 or newer versions?

QuickBooks versions 2019 and later use a dynamic port to ensure the program has exclusive use of a communication channel, reducing port conflicts. Since this port changes, you must find its current number on the server hosting the company file.

1. Go to the Windows Start menu on the server computer.
2. Search for and open the QuickBooks Database Server Manager.
3. Click on the Port Monitor tab.
4. Find your QuickBooks version and note the Port Number. This is the XXXXX number you must use alongside 8019 when creating your firewall exception rules.

Should I allow multi-user hosting on the server, the workstations, or both?

Multi-user hosting should only be enabled on the computer that stores the company file (the server).

1. Server: Hosting must be ON. This allows the server’s QuickBooks Database Server Manager to manage access for all other users.
2. Workstations: Hosting must be OFF. If a workstation hosts, it can inadvertently enter “Alternate Hosting mode” and take exclusive control of the file, preventing other users (including the server) from accessing it.

You can verify this setting in QuickBooks by navigating to File >> Utilities. If the option reads “Stop Hosting Multi-user Access,” it is currently hosting (correct for the server). If it reads “Host Multi-user Access,” it is not hosting (correct for a workstation).

What if the QBDBMgrn.exe process is not listed in my Task Manager?

The QBDBMgrN.exe (QuickBooks Database Manager) service is essential for network connectivity. If it is not running, it is the root cause of the communication failure.

You should perform the following checks on the server:

1. Check Services: Press Win + R, type services.msc, and press Enter. Look for the QuickBooksDBXX service (where XX is the version number, e.g., QuickBooksDB31). The service status must be Running, and the Startup type should be Automatic. If it is stopped, right-click and select Start.
2. Verify Installation: Ensure the QuickBooks Database Server Manager was correctly installed on the server. If only the workstation component was installed, the hosting mechanism is absent.

Why do I need to update QuickBooks, even if I was able to access the file before?

Intuit regularly releases updates that contain patches for newly discovered bugs, security vulnerabilities, and, most importantly, fixes for multi-user networking and compatibility issues.

If your operating system (like Windows 10 or 11) or your network security software (antivirus/firewall) receives an update, an older version of QuickBooks may suddenly lose its ability to communicate because the network rules have changed. Updating QuickBooks ensures the program’s components are compatible with the latest environment.

When setting folder permissions, why is setting “Everyone” to Full Control considered risky?

While setting the “Everyone” group to Full Control often fixes the immediate communication error, it is a significant security risk.

Security Risk: It grants every user and process on your network, regardless of their credentials, the power to read, modify, or delete the company file and its supporting files. This is poor security practice, especially for sensitive financial data.

The correct and secure method is to grant Full Control only to the specific Windows service user, QBDataServiceUserXX, which needs the access to run the database manager. This provides the necessary access for QuickBooks functions while limiting network vulnerability.