Excerpt:
If you're facing issues backing up your QuickBooks company file, it could be due to various factors like incorrect file path, large file size, corrupted data, or storage problems. This article provides clear, actionable solutions to resolve common errors such as “QuickBooks unable to back up your company file,” including reconfiguring backup settings, checking for network data file corruption, and ensuring adequate storage. Following these steps will help safeguard your important business data with successful backups.
QuickBooks backup company file error is a system-level issue that blocks the creation of a QuickBooks Backup File (QBB). The error results from disruptions in file integrity, storage allocation, directory permissions, or software version compatibility. QuickBooks backup generation requires a stable file structure, a valid backup path, correct directory permissions, and a functioning Network Data (ND) descriptor.
Backup interruptions commonly occur due to incorrect directory paths, damaged ND files, insufficient storage, corrupted QuickBooks Company Files (QBW), or outdated QuickBooks Desktop versions. The article identifies these factors, categorizes the attributes affecting backup performance, and outlines the actions that restore backup integrity. The following sections provide central definitions, attribute-specific explanations, step-by-step diagnostics, and structured corrective procedures.
The QuickBooks backup company file error originates from structural attributes that control file integrity, storage allocation, directory configuration, authorization configuration, and version compatibility. Each attribute interrupts the generation of the QuickBooks Backup File (QBB) when its operational criteria are not met. The error frequency increases when the QuickBooks Desktop user processes multiple company files simultaneously or when the QuickBooks Company File (QBW) exceeds the software’s functional size threshold. The primary causes include:
When encountering this problem, you may see one of the following messages:

Note: QuickBooks creates a backup file with a .QBB extension when you try to back up your company file.
The QuickBooks backup company file error arises when system configuration, file structure, or storage attributes interrupt the creation of the QuickBooks Backup File (QBB). The error appears when QuickBooks Desktop processes corrupted company files, damaged Network Data (ND) descriptors, restricted directories, inaccessible storage devices, or outdated software versions.
Common causes include:
The QuickBooks backup company file error is resolved by stabilizing the file-integrity attributes, correcting backup-path configurations, restoring descriptor files, allocating sufficient storage, and aligning version parameters. Each corrective action reestablishes the conditions required for QuickBooks Desktop to generate the QuickBooks Backup File (QBB) without interruption.
Note: It is advisable to have a good, stable internet connection to troubleshoot the problem. If the user system doesn’t have a stable internet connection, the problem can worsen.
Step 1: Verify the Backup Directory in QuickBooks
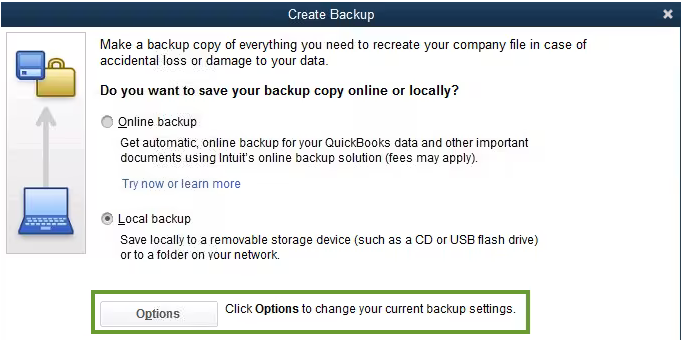
Create a Local Backup
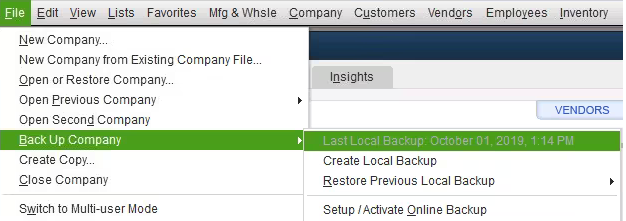
Want to know when you last backed up your Company File? Head to the File menu and click on Backup Company. You’ll be able to see the time and date at the top of the menu.
Follow the below-given steps to change your backup preferences:
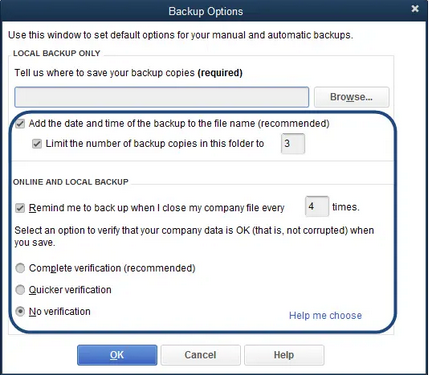
Step 2: Set up your QuickBooks Backup Reminders
Note: Make sure to select the right place and save the File successfully.
Note: You can limit the number of backup copies according to your needs. (It is optional)
.ND (network data file) file allows QuickBooks Desktop to open a company file in a network or multi-user environment. If it is damaged or missing, you won’t be able to back up your company file data.
Below are the instructions to rename this File:
C:\ Users\ Public\ Public Documents\ Intuit\ QuickBooks.

QuickBooks Backup failed error also occurs when you don’t have enough space available on the hard disk to store the backup file, so run the disk cleanup tool to delete all the temporary files.
Adhere to the steps explained below:
Need to free up more space, you can also delete system files to remove additional files:
Sometimes, Incorrect username and password are the causes. if you have wrong admin credentials or forgotten your password, In that case Automated password reset tool comes into the play. With the help of this tool, you can reset the password of various accounts automatically.
Note: The Automated Password tool is not compatible with QuickBooks Desktop 2020 or newer versions. It means if you are using the latest QB version, i.e., 2021, 2022, or 2023, you won’t be able to reset your password.
To reset login credentials; follow the steps-below;
Note: In case you see a message saying the details you’ve provided don’t match, login to your Intuit account and check whether the credential details are the same as you have on your notes.

Note: The information you entered must match the details available in our system. This includes the email address, main business phone number, and zip/ZIP code of the primary contact on the account. ONLY the primary contact can access the token as it will be sent to their email address.
Important: Select Save and save it to your Desktop if you are prompted to Run or Save the File.

Important: Type the correct Company File Admin User Name (if it’s mistakenly different from the Admin name.
Note: Create a temporary password only if QuickBooks will prompt you to change the password again when you try to open the company file.
Step 1: Make use of QuickBooks File Doctor

Note: If the QuickBooks File Doctor doesn’t open, search and locate QuickBooks Desktop File Doc and open it manually.
Note: Click Browse and search to find your File if you’re unable to see it.
Note: The scan time depends on your file size and can take up to 10 to 15 minutes. The scan may probably say it was unsuccessful, even if it fixes your issue.
Step 2: Change the name of your QuickBooks Desktop Company File
Step 3: Run Verify and Rebuild Company File Data utility in QuickBooks Desktop
Verify your company file data

Note: You need to contact Assisted Payroll before rebuilding your data if you use Assisted Payroll.
Rebuild your company file data

Note: Don’t replace your existing company file. You’ll need to enter the info into your company file again since the backup was created.
Make sure the backup you have created should not be stored in the following location:
You only need to save your backup from where you can easily access it. Try changing the backup file location if you have saved your data as default:


Note: The default location for QuickBooks Desktop company file is C:\Users\Public\PublicDocuments\Intuit\QuickBooks\Company Files.
When you overwrite an existing file with the same name, the original file is replaced with the new one, which means any data or content that is stored in the original file will be either permanently deleted or replaced with new data. So, it’s important to be careful when overwriting files, especially if they contain important business data. Here’s what you need to do for this.
Note: Always make sure to double-check the file name and location before overwriting a file to ensure that you are replacing the correct File.

You can back up your data to the external storage drive if the flash drive or hard drive is inaccessible or unauthorized. An external hard drive provides you with more storage space to keep your data safe and secure.
Note: You can only access the stored data on an external hard drive if it is plugged into your computer. You can save your company files on an external hard drive, which is not accessed very frequently.
The steps are here you need to check out:

An outdated or older application may be incompatible with your system and prevent you from accessing all the latest features and functionalities if you haven’t updated it for a long time. Follow this guide; How to Update QuickBooks to the latest version.
Antivirus software is a security program specially designed to detect, search, and remove viruses and other types of malware from computers, networks, and other devices. Running the Antivirus scan on your computer helps with malware prevention and data damage.
Below are some actions you need to take for this:


QuickBooks backup company file error occurs when file integrity, folder permissions, storage space, or software version prevent QuickBooks Desktop from creating a QuickBooks Backup File (QBB). Correcting issues with file integrity, folder permissions, storage space, and software version restores QuickBooks Desktop backup functionality and ensures reliable data protection. The diagnostic steps, file evaluations, and corrective actions provide a complete method for resolving the error and ensuring backup reliability.
Hopefully, the information given above will be useful to you. But if you are still facing any kind of issues with your software and need professional assistance regarding accounting, bookkeeping & accounting software-related issues, then feel free to get technical support with us at +1-802-778-9005, or you can email us at support@ebetterbooks.com
You can access multiple companies using the same QuickBooks Online account. Each company file is its own paid subscription, which can be easily accessed using the same sign-in info. This allows you to quickly switch between companies so you can manage everything more efficiently or smoothly.
The QuickBooks backup company file error is a system-level interruption that prevents QuickBooks Desktop from generating a QuickBooks Backup File (QBB) due to file-integrity issues, directory-authorization restrictions, storage limitations, or version-compatibility conflicts.
Here’s a list of some common errors that you may notice when the QuickBooks “Cannot backup company file” error occurs.
Certainly, Yes, To avoid the “QuickBooks backup failed” error, the user must follow the listed below things;
A damaged Network Data (ND) file disrupts the descriptor that QuickBooks Desktop uses to identify and access the QuickBooks Company File (QBW), which prevents the software from validating the file for backup creation.
QuickBooks fails to create a backup when the QuickBooks Company File (QBW) contains structural inconsistencies that do not affect day-to-day operations but block the verification routines required for backup generation.

