The QuickBooks Multi-Currency Problem content addresses and resolves common issues encountered by users in both Desktop and Online versions, enabling businesses to manage foreign transactions accurately without manually calculating exchange rates. It emphasizes that activating the Multi-Currency feature is permanent and irreversible, requiring users to understand key limitations, such as the disabling of the Income Tracker in Desktop versions. The core of the issues often lies in inactive features, incorrectly set up customer or vendor profiles, unassigned currencies in the Chart of Accounts, or outdated exchange rates. Troubleshooting methods are presented case-by-case, detailing step-by-step instructions for activation, setting the home currency, adding new customer/vendor profiles for foreign currency, manually entering rates, and using the Verify and Rebuild Data utility to address company file damage. The guide also clarifies the specific QuickBooks Online plans that support the feature, ensuring users have the necessary subscription level for international financial management.
This content provides a direct reference guide for fixing QuickBooks Multi-Currency issues, highlighting critical facts and solutions:
Contents
QuickBooks Multicurrency enhances accounting and banking features by allowing users to use multiple currencies for foreign transactions that don’t use their home currency.
QuickBooks multicurrency exchange rates help you record foreign currency transactions without worrying about the exchange rate conversion. Multi-currency enables you to pay and receive payments in foreign currencies from customers, vendors, or bank accounts that don’t use your home currency. Once you have turned it on, you can add transactions in another currency, and QuickBooks will take care of all currency conversions.

With the help of QuickBooks, you can keep track of transactions in foreign currency.
This multi-currency feature lets you assign a specific currency type to the profiles and accounts, including:
However, QuickBooks Payments and QuickBooks Bills Pay are not compatible with or supported by multicurrency. If you turn on the multicurrency option in QuickBooks, you can enter transactions of different countries. And QuickBooks will change these transactions in your home currency for you.
But sometimes, the users encounter QuickBooks Multi-Currency Problem in Desktop and Online, ultimately hindering all their ongoing tasks. So, are you one of them? If yes, don’t panic; just stay tuned with this blog until you find the right solution.
Multicurrency in QuickBooks Online is a feature that enables businesses to handle transactions, record expenses, and generate reports in multiple currencies. It automatically converts amounts based on current exchange rates, simplifying the management of international transactions with customers, suppliers, and operations across different currencies.
| Error Causes | Error Solutions |
|---|---|
| Inactive Multi-currency Feature | You are recommended to turn your Multi-currency feature on in both QuickBooks Desktop and Online. |
| Unavailability of Vendors and Customers | You have to include Vendors and Customers in foreign currency. |
| Not able to update Exchange Rates or set Home Currency for your Company | To avoid Multi-currency issues in QuickBooks, you have to download exchange rates or enter exchange rates manually. |
| Currencies are required to be added or deleted | If you notice any currency that needs to be added or deleted, it is important to do it as soon as possible. |
| Inability to add foreign currency accounts in the Charts of Accounts | You’ll have to add foreign currency accounts in the Charts of Accounts to tackle multi-currency issues in QuickBooks. |
| The Bank Account is not linked to the foreign currency transactions | Linking a Bank Account for foreign currency transactions is also one of the best solutions to encounter QuickBooks multi-currency Problem in Desktop and Online. |
| Damaged Company File | Verify and Rebuild company file data tool helps to determine and repair corruption in the existing company file. |
There are a couple of reasons for QB multi-currency problem in QuickBooks, a few of them are as follows:
Finding issues while managing foreign currencies or exchange rates? No need to worry about it; our QB experts are here to make things easier. So, just give a call at 1-802-778-9005 to start the smooth functioning of your business.
Once you turn on the multiple currency feature, you can’t turn it off. So, it is important to be familiar with all the terms and conditions before enabling this functionality.
Also, ensure that you have created the company file backup when you go through the pointers listed below:
Unable to deal with exchange rates or foreign currencies due to QuickBooks Multi-Currency Problem In Desktop and Online? Alright, we are here to come up with solutions that will help you add transactions in another currency and handle all currency conversions.
Let’s see how:
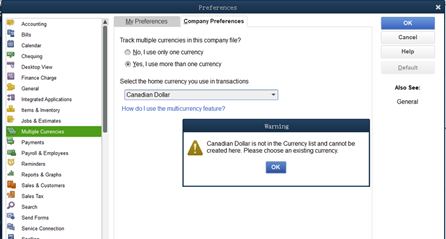
In this case, you must turn on your Multi-currency feature in QuickBooks Desktop and Online.
Below are the steps you need to carry out:
Turn on Multi-Currency in QuickBooks Online
The Manage Currencies window will take you to the Currencies page, where you can manage all the currencies you use.
Turn on Multi-Currency in QuickBooks Desktop
You can only allot one currency per customer or vendor profile. Hence, you have to create new profiles to assign a new currency.
Here’s how to add Foreign-currency Customers and Vendors:
QuickBooks Desktop downloads rates for active currencies. Also, you can only download rates if your home currency is the US dollar. Below are instructions on updating exchange rates or setting Home Currency for your company.
To Download Exchange Rates
To Enter Exchange Rates Manually
Below are the steps you need to perform for adding or deleting the foreign currencies:
Add currencies
Note: This option is only available once you enable the Multi-Currency feature.
Delete Currencies
You can only delete a currency when no transactions are attached to it.
By default, existing accounts are available in your home currency in the Currency column under the Chart of Accounts.
To create the account using a foreign currency, adhere to the steps described below:
Linking a Bank Account that uses foreign currencies is the best way to add transactions in those currencies to QuickBooks Online.
Here’s how:
The total amount is calculated by QuickBooks Online, and the transaction is shown under the Bank Description or Detail fields as your bank displayed it on your statement using the amount and currency.
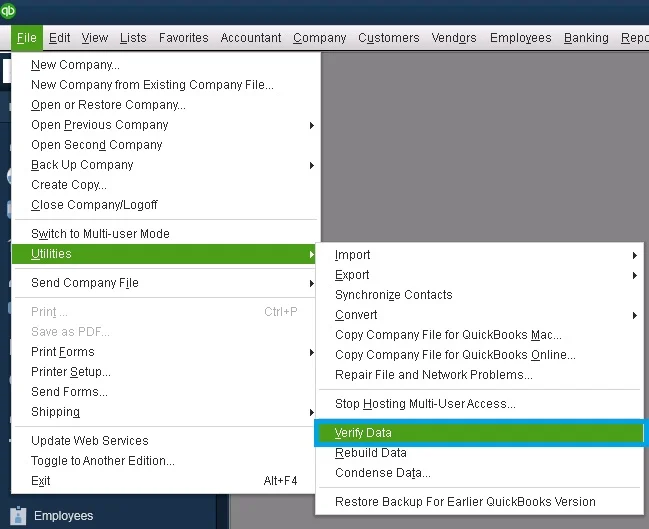
Using the Verify and Rebuild Data Tool, you can determine and troubleshoot the issue in one go.
Below are the steps to do so:
Verify your Company File Data

Rebuild Your Company File Data

Always remember that you don’t replace your existing company file. You must enter the info into your company file again since the backup was created.
To pay your employees with a different currency, you need to create a new supplier using your employee’s information.
Here’s how:
Ending-up!
Thus, you can now understand how to deal with the QuickBooks Multi-Currency Problem in Desktop and Online after performing the steps explained here.
However, if you still face any trouble in the meantime and fail to proceed, then share your concern at our customer helpdesk to make payments in your own currency.
Experiencing multi-currency synchronization issues in QuickBooks Online can disrupt your financial management. Here’s a concise guide to help you identify and resolve these problems:
1. Verify Multi-Currency Settings:
2. Address Common Sync Errors:
3. Manage Foreign Currency Transactions:
4. Seek Professional Assistance:
By following these steps, you can effectively troubleshoot and resolve multi-currency sync issues in QuickBooks Online, ensuring accurate and efficient financial management.
If you’re experiencing issues with QuickBooks’ multi-currency feature after a recent update, follow these steps to troubleshoot and resolve the problem:
1. Verify Multi-Currency Activation
Ensure that the multi-currency feature is enabled in your QuickBooks Online or Desktop version:
2. Clear Browser Cache and Cookies
For QuickBooks Online users, outdated cache and cookies can cause functionality issues:
3. Verify Subscription Plan
Multi-currency is available only in specific QuickBooks Online plans:
4. Update Exchange Rates
If exchange rates aren’t updating correctly:
5. Check for Software Updates
Ensure your QuickBooks software is up-to-date:
6. Verify Company File Integrity
Corrupted company files can lead to multi-currency issues:
7. Review Customer and Vendor Profiles
Ensure that customers and vendors are assigned the correct currencies:
Generating reports in multiple currencies within QuickBooks is essential for businesses engaged in international transactions. Here’s a concise guide to help you navigate this process:
1. Enabling Multicurrency in QuickBooks Online:
Note: Once activated, the multicurrency feature cannot be turned off.
2. Adding Foreign Currencies:
This addition allows you to manage transactions in the selected foreign currency.
3. Generating Multicurrency Reports:
Enabling the multi-currency feature in QuickBooks allows you to manage transactions in various currencies, which is essential for businesses dealing internationally. Here’s how to activate this feature in both QuickBooks Desktop and QuickBooks Online:
QuickBooks Online:
After enabling multicurrency, you can add and manage different currencies by going to Settings > Currencies. This allows you to assign specific currencies to customers, vendors, or accounts as needed.
QuickBooks Desktop:
Once activated, you can assign specific currencies to your customers, vendors, and accounts, facilitating accurate tracking of foreign transactions.
No. Once the Multi-Currency feature is activated in both QuickBooks Online (QBO) and QuickBooks Desktop (QBD), it cannot be reversed or turned off. Intuit provides a clear warning during activation that this setting is permanent for the integrity of your accounting records. The only way to move a company file to a non-multi-currency state is to:
➜Export your data and lists (like customers, vendors, and chart of accounts).
➜Create a completely new QuickBooks company file (without activating multi-currency).
➜Import the lists and manually input starting balances.
This method results in the loss of all foreign currency transactions and exchange rate details from the new file.
After activating multi-currency, you can assign a foreign currency only to certain balance sheet accounts. Income, Expense, and Equity accounts will always use your home currency. The accounts that can, and often must, be created in a foreign currency are:
➜Bank Accounts: To record deposits and withdrawals in a foreign currency.
➜Credit Card Accounts: To track foreign credit card charges and payments.
➜Accounts Receivable (A/R) and Accounts Payable (A/P): QuickBooks will automatically create separate A/R and A/P accounts for each new foreign currency the moment you create a transaction with a customer or vendor using that currency.
No, you cannot change the currency of an existing customer or vendor profile in QuickBooks once transactions have been recorded. A profile is permanently locked to its original currency, which is usually your home currency.
To start transacting with them in a new foreign currency, you must:
➜Make the old customer or vendor profile inactive.
➜Create a new customer or vendor profile.
➜Assign the new foreign currency (e.g., Euros or CAD) to this new profile.
➜It is a recommended practice to add the currency to the new profile’s display name, such as “Customer A – EUR,” for easy identification
QuickBooks Desktop requires a manual download of exchange rates, which can be done through the Currency List under the Lists menu.
A primary limitation is that QuickBooks Desktop can only automatically download rates for active currencies and often restricts this feature to companies whose home currency is one of the major global currencies, such as:
➜US Dollar (USD)
➜Canadian Dollar (CAD)
➜British Pound Sterling (GBP)
➜Euro (EUR)
If your home currency is not one of these and not supported, you must manually enter and manage all exchange rates. QuickBooks Online, by contrast, automatically downloads and updates rates every few hours.
Enabling Multi-Currency in QuickBooks Desktop causes several features to become permanently unavailable. Before activating the feature, you should confirm you do not rely heavily on:
➜Income Tracker and Bill Tracker: These visual tracking tools are disabled.
➜Batch Functions: The ability to batch enter or batch delete/void transactions (common in the Accountant editions) is removed.
➜QuickBooks Desktop for Mac: Information cannot be exchanged with or copied to a Mac version of the company file.
➜Online Payments: Online payment features will not work for invoices that use multiple currencies.
If multi-currency issues are tied to data corruption, you must run the built-in integrity checks: the Verify Data and Rebuild Data utilities.
➜Verify Data: This is the diagnostic step. It scans the company file for structural and integrity issues. If it reports that your “data has lost integrity,” you must proceed to the next step.
➜Rebuild Data: This is the repair step. It fixes minor data corruption issues. A mandatory backup is required before the rebuild starts. After the rebuild is finished, you should run the Verify Data tool again to confirm that the integrity loss message is gone.
This process is critical for fixing underlying database damage that can affect complex multi-currency calculations.
Multi-Currency is a feature limited to the mid-to-high-tier QuickBooks Online plans.
The feature is fully supported in:
➜QuickBooks Online Essentials
➜QuickBooks Online Plus
➜QuickBooks Online Advanced
The feature is not available in the base-level QuickBooks Online Simple Start plan. Users on the Simple Start plan who require multi-currency functionality must upgrade to at least the Essentials plan.