A closing entry is a journal entry made at the end of an accounting period to transfer balances from temporary accounts to permanent ones. QuickBooks Desktop makes it easy to close the books at the end of the year, as it is a necessary procedure for any business. This simple-to-use software sits on your desktop and is ideal for keeping your financial records accurate and productive to facilitate tax season.
If you’re stressed about closing your entries in QuickBooks at the end of every fiscal year and unsure how to keep your business’s finances balanced, don’t worry! Stay tuned to this blog to learn how to perform QuickBooks Closing Entries with ease.
Contents
To manage your QuickBooks account properly, it’s important to close your entries at the end of each fiscal year. This should be done after you’ve made all the necessary adjustments. Once your books are closed, no further entries should be made for that year. While QuickBooks doesn’t require a specific month or date to close, it’s essential to ensure that you complete the closing process at the end of every financial year.
QuickBooks Closing Entry is the entry made at the end of the fiscal year when it comes to transferring the balance from income and expense accounts to Retained Earnings. This process zeros out your Income and Expense accounts and adds the fiscal year’s net income to Retained Earnings. It’s a necessary part of the accounting cycle as they allow businesses to create financial statements and efficiently file tax returns every month and year.
QuickBooks contains all your data for a long time and doesn’t delete until you condense it. Also, if your closing entries are not done accurately, or you missed out, then the software sends you notifications about updating or editing them. In this blog, we will clarify the entire procedure to zero out your income and close entries in QuickBooks.
Before closing the books, always consider the below mentioned points:
Restricted Access: You can create a closing date password to restrict access to data from the previous accounting period, which includes details of every transaction. A user must know the closing date password and possess the appropriate permissions to modify or delete transactions from a closed period.
Reporting: Any changes made after the closing date to transactions dated before or on the closing date will be reflected in the Closing Date Exception Report. To run the report, navigate to the Reports menu, select Accountant & Taxes, and then click on the Closing Date Exception Report.
In general terms, QuickBooks Closing Entries stands for reconciling the account of your company. When the right time comes, closing entries in accounting allow businesses to start a new accounting period. At the start and end of every period, companies must open and close their temporary accounts in order to record and track their financial information for reporting purposes accurately. This process shifts the balance of funds and leads the closing balance to zero.

The main reason for recording the transaction is to know whether the company’s retained earnings account reflect any increment in revenues from the previous year and show lessened dividend payment and expenses. On the other hand, Retained earnings are those earnings that are not distributed among shareholders in the form of dividends and are retained for further investment.
QuickBooks conducts certain year-end adjustments based on your fiscal year start month.
Here’s how:
In QuickBooks Desktop, you don’t need to manually close your books each year— QuickBooks handles automatic adjustments for the next fiscal year, but creating a manual year-end closing entries ensures accuracy, especially if your finances are complex or involve multiple accounts. Here’s how to do it:
Important Checks:
To close out the year in QuickBooks, follow these simple steps:
Once you’ve completed these steps, your QuickBooks is successfully closed out for the year!
To Restrict access to the data from the accounting period, including the details of every transaction, you can create a closing date password. In case you want to edit or delete the transaction in a closed period, it is important to know the closing date password and have the appropriate permissions.
Reporting: If you made any changes to your transactions before or after the closing date, this could be seen in the Closing Date Exception Report.
Detail: You get easy access to the last year’s data which includes every transaction info.
Reporting: You can create comparative reports between the current year and the previous year.
During the reporting cycles, many temporary accounts are created for accounting purposes. Temporary accounts are the type of accounts that must be opened and closed. These accounts can be found in the accounting ledger, specifically the general ledger of accounts. This ledger is basically used to record all transactions over the specific accounting period in question. The list of general ledger accounts with their balances is known as the Trial Balance.
Temporary accounts are totally different from permanent accounts, which do not.
Temporary accounts
Permanent Accounts
Thus, all accounts associated with the revenue and expenses of the business must be part of the opening and closing process. If your company is incorporated, then any dividend accounts (how your business distributes the share of the profits to shareholders) must be closed and opened each period your company is integrated.
Accuracy in QuickBooks accounting books thoroughly relies on how correctly the dates of the multiple transactions have been put in. If there are any discrepancies entering the date, it can lead to inaccurate accounting books. To settle this issue, you need to follow the below-listed instructions for QuickBooks year-end closing.
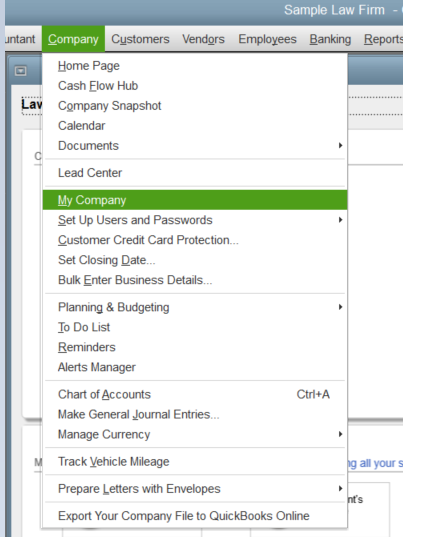
Firstly, you have to set the closing date and password under the company preferences section. When you enter your password, you can look at the previous year’s info.
After logging-in then, do the following:

To close entries in QuickBooks Online, review and verify your accounts, then close your books to prevent changes before filing taxes. Set a closing date and enable password protection for edits, ensuring your financial data remains secure and accurate for the year-end. Checkout the Step by Step guide below…
Note: If you’re going to close out the year, you need to close your books to prevent unwanted changes before filing your taxes. This will seal your books so no one can edit your accounting data prior to the closing date.

When you review the financial data of the previous year, closing your entries ensures everything stays the way you want it to. It also restricts any accidental changes that could affect your financial reports.
To remove QuickBooks online closing entries, transfer the credit balance to the Income Summary Account, zero out the Expense Accounts, address any discrepancies between credit and debit amounts, and finally, close the Dividend Account, adjusting retained earnings accordingly. This ensures accurate financial data management. Follow step by step guide below:

Now if you are in a situation wherein Income Summary Account will show a credit balance even after completing the entries, or you view a Credit Entries Amount exceeding the debit amount, this term is known as Net Income. However, if you find the debit balance exceeding the credits, then it is called a Net loss.
Removing closing entries in QuickBooks is to close the Dividend Account with respect to retained earnings. You will observe that the Dividend Account has the usual debit balance, and the retained earnings will pop up the Net Income amount which was initially given to it.

Hopefully, the information given above will be useful to you. But if you are still facing any kind of issues with your software and need professional assistance regarding accounting, bookkeeping & accounting software-related issues, then feel free to get in touch with us at +1-802-778-9005, or you can mail us at support@ebetterbooks.com
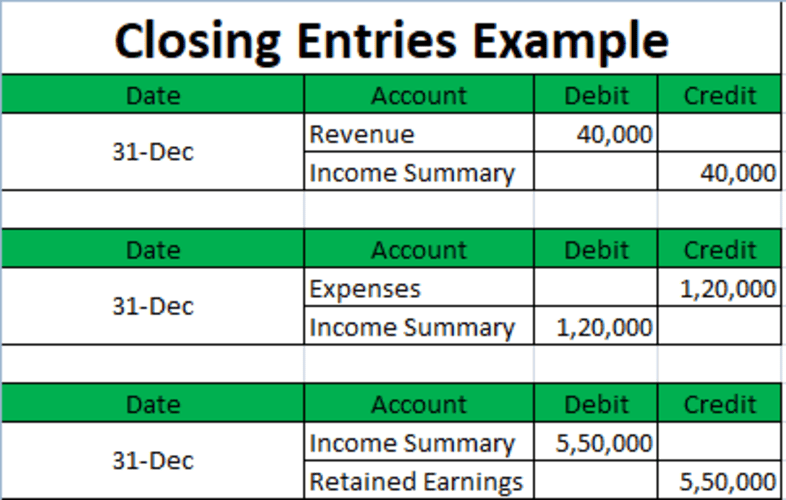
A closing entry is a journal entry made at the end of an accounting period. It transfers the balances from temporary accounts, like revenue and expenses, to permanent accounts on the balance sheet. This resets the temporary accounts’ balances to zero, preparing them for the next period’s transactions.
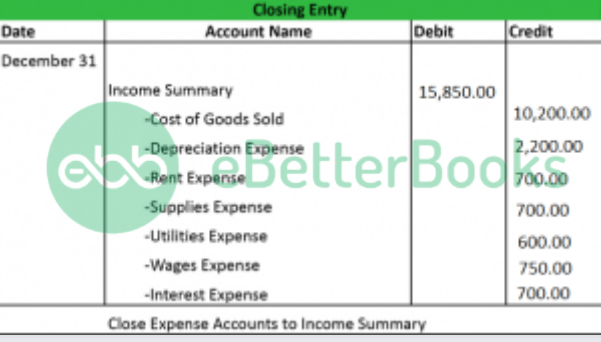
There are basically four closing entries such as; Closing Revenue to Income Summary, Closing Expenses to Income Summary, Closing Income Summary to Retained Earnings, and Closing dividends to retained earnings.
To view closing entries in QuickBooks, any changes made after the closing date can be tracked using the Closing Date Exception Report. This report highlights all adjustments to transactions dated on or before the closing date.
Here’s how to generate the report:
Additionally, the Closing Date History report shows the current and previous closing dates, along with the user who set them.
A trial balance is a bookkeeping worksheet wherein all the ledger balances are compiled into equal debit and credit account column totals. Every company prepares a trial balance usually at the end of the reporting period. The general purpose of generating a trial balance is to ensure that the company’s bookkeeping system entries are mathematically accurate. Also, it contains all the major accounting items, such as assets, liabilities, equity, revenues, expenses, gains, and losses.
Yes, of course, Net income is what the business has left over after expenses, including salary and wages, cost of goods or raw materials, and taxes. While for an individual, this is the take-home money after deductions of taxes, health insurance, and retirement contributions.
To change the closing date in QuickBooks Desktop, follow these steps:

This will update your fiscal year without affecting report dates. To adjust specific report periods, you’ll need to modify them manually when running the reports.
In QuickBooks Desktop, you can set a closing date and password to prevent changes that might affect your reports. It’s recommended to close your books at the start of a new year.
Here’s how to enter a closing date and password in QuickBooks desktop:
Note: If you void a check dated before the closing date, you will receive a message warning about the change.
Here’s how to set a closing date and password in QuickBooks Desktop for Mac: