Have you ever encountered QuickBooks Unable to Connect to Remote Server Issue and need help dealing with it? Well, then, you are on the right page. Let’s understand why this issue occurs.
QuickBooks users can access the Multi-user mode, allowing many users to open the same company file. It is necessary to configure a computer as a host or use a dedicated server to access this multi-user option.
The major part of QuickBooks Database Server Manager is what makes it possible to host data and creates a link between workstations so that company files can be communicated with. Sometimes, QuickBooks cannot communicate with the company file due to a connection issue with the remote server, preventing access to your data. Learn how this issue can be fixed with our article.
Essential Tips for Resolving QuickBooks Unable to Connect to Remote Server Issue
| Resetting your Internet Explorer browser’s settings can fix server problems. |
| Check the Preferences in the Webmail settings if QuickBooks cannot connect to the email server. |
| Ensure that your firewall and antivirus settings are not blocking QuickBooks from accessing the internet. |
| You can fix issues with the server by making the Network Data (.ND) file. |
| You should see whether your program has any new updates to resolve the server issue. |
| To prevent server problems, you should set up the QuickBooks Database Server Manager if QuickBooks POS cannot connect to the server. |
| Turn off hosting on all your servers as it could conflict between the parallel running softwares. |
| If your IP address is dynamic, then it is advisable to switch to a stable IP address. VPN connection could be an issue, it is better to turn off your VPN connection. |
Causes of QuickBooks fail to connect to remote servers
QuickBooks may fail to connect to a remote server due to network configuration issues, firewall restrictions, or incorrect hosting settings. A weak internet connection, disabled LAN, outdated QuickBooks version, or blocked ports can all prevent QuickBooks from accessing the company file. In multi-user mode, problems like incorrect hosting setup, missing file permissions, or a stopped QuickBooks Database Server Manager may also affect the connection. In some cases, VPN interference, dynamic IP addresses, or misconfigured email settings can disrupt communication with the server.
Before troubleshooting, review the following key causes that commonly trigger this issue:
- If your local area network(LAN) is not activated, you must reset the Internet Explorer Settings to Default. (See Method 1)
- If there may be problems with hosting and file permissions for QuickBooks, you can create a Data File (.ND File) on the Network, configure and restart the QuickBooks Database Server Manager or verify the QuickBooks Desktop File Hosting. (See Method 2,3 and 4)
- If the previous version is active on QuickBooks Desktop, you should Update QuickBooks with the Latest Version. (See Method 5)
- If the server’s QuickBooks Database Server Manager has stopped functioning properly, or the QuickBooks server isn’t configured correctly, You can create a Data File (.ND File) on the Network or configure and restart the QuickBooks Database Server Manager. (See Method 2 or 3)
- Also, if you are facing poor connection to the QuickBooks server, reset the router. (See Method 6)
- The server connection is being interrupted by third-party or Windows firewalls. (See Method 7)
- If you face Email-related issues in QuickBooks, such as problems with sending or receiving emails, you need to check and adjust the Webmail Preferences settings. (See Method 8)
Signs and Symptoms are Seen When the QuickBooks Cannot Connect to Remote Server
Here are a few typical signs that the system can’t connect to the remote server:
- Error messages such as “Can’t communicate with QuickBooks server,” “QuickBooks desktop fails to connect to the remote server,” and “QuickBooks server and workstation communication problems” pop up on the screen.
- The files cannot be shared through your system.
- Also, the system hangs or crashes repeatedly.
- If QuickBooks server not responding after update.
- Your computer system does not respond to commands while its peripherals are malfunctioning.
The following error message will popup when you QuickBooks Unable to connect Remote Server:
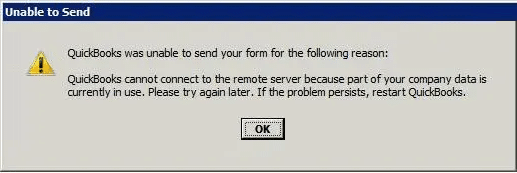
QuickBooks was unable to send your form for the following reason: QuickBooks was able to connect to the remote server but could not understand the server’s response. Please try again to see if the problem has been corrected on the server.”
How to Fix QuickBooks Cannot connect to remote server Error?
We have mentioned some methods that can fix the issue of QuickBooks not connecting to server:
Method 1: Reset Internet Explorer Settings to Default
If you reset the Internet Explorer browser’s settings, server problems can be resolved. You may connect to the server by changing the internet to default.
Step 1: Go to Internet Explorer
- Open Internet Explorer and press Alt + T while in the Tools menu.
Step 2: Choose Internet Options
- After that, select Internet Options.
Step 3: Restore Advanced Settings
- Select Restore Advanced Settings under the Advanced tab.
Step 4: Press OK & close the Browser
- Hit the OK tab and close the browser and check if the error is gone or not.
Method 2: Create Data File (.ND File) on the Network
Step 1: Go to QuickBooks Database Server Manager
- Press the Windows key and then type QuickBooks database server manager.
Step 2: Choose Database Server Manager
- Select the database server manager.
Step 3: Uninstall & Reinstall QuickBooks
- Uninstall and reinstall QuickBooks if you can’t find the QuickBooks database server manager in the program list.
Step 4: Confirm the installation
- Now, confirm the installation process.
Step 5: Browse to the company file folder
- Navigate to the QuickBooks database server manager window and hover over the folder location where the company files are stored. Then, click on the Add folder.
Step 6: Press Scan Now
- Once every folder has been added successfully, click Scan Now.
Step 7: Start scanning the company files
- Then, Scan all the QB company files.
Step 8: Make sure the file generation
- Ensure that. nd files are generated for each data file at the end of the process.
Method 3: Configure and Restart the QuickBooks Database Server Manager
You should set up the QuickBooks Database Server Manager if QuickBooks POS not connecting to the server to prevent server problems.
Step 1: Go to Windows Start Menu
- Open the Windows Start Menu.
Step 2: Enter Services
- Type Services into the search bar and open it.
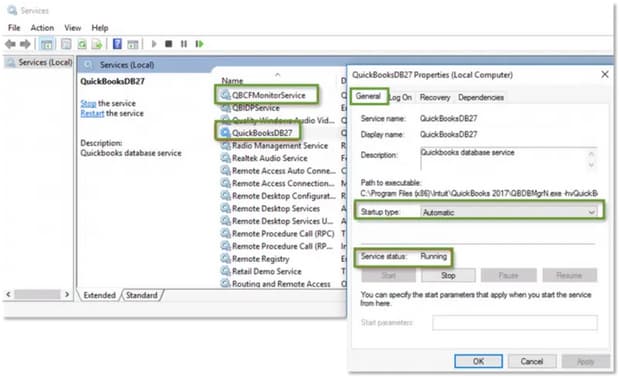
Step 3: Browse to the QuickBooks Database Server Manager
- Open QuickBooksDBXX (XX is the version number).
Step 4: Find the Service Status
- Navigate to General and locate the Service Status. Then, press Stop If it’s Started or Running.
Step 5: Click Automatic
- Choose Automatic under the startup type drop-down.
Step 6: Select Local System Account
- Then, choose the local system account under the logon tab.
Step 7: Choose to Restart the Service
- Move to Recovery and select Restart the service from the each drop-down menu: First failure, Second failure, and Subsequent failure.
Step 8: Restart the QB Database Server Manager
- Go back to General and then click Start to restart Database Server Manager.
Method 4: Verify the QuickBooks Desktop File Hosting
The QuickBooks desktop file hosting services can be verified because they might clash with the server and workstations. The involved actions are:
1. The Hosting of all the Workstation is Turned off
Step 1: Go to File menu
- Select utilities from the QuickBooks file menu.
Step 2: Stop Hosting Multi-user access
- After that, Select the option to stop hosting multi-user access after that.
Step 3: Press Yes
- If you notice host multi-user access instead of stop hosting multi-user access, click Yes to confirm.
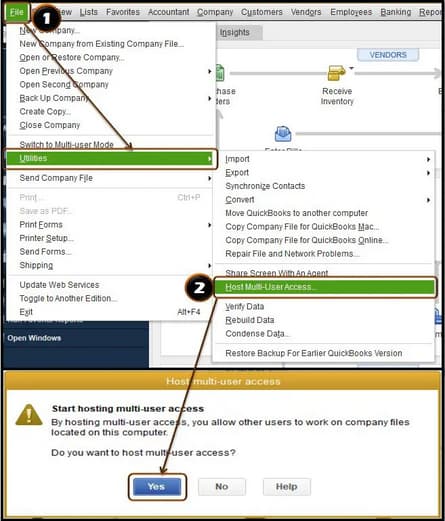
2. The server computer’s hosting is enabled
Step 1: Go for Windows Task Manager
- Press the Windows key first, then type Windows Task Manager, and finally click the enter key.
Step 2: Press More Details
- After that, select the task manager window’s more details button.
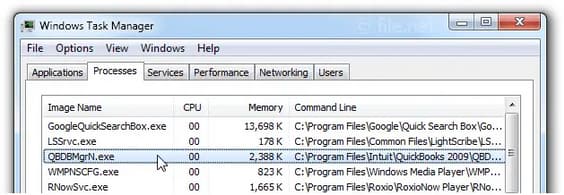
Step 3: Choose QBBDBMgrN.exe
- Next, select the services tab, then select QBBDBMgrN.exe from the list.
Step 4: Review the File Integrity
- Now press Windows + R to check the files integrity.
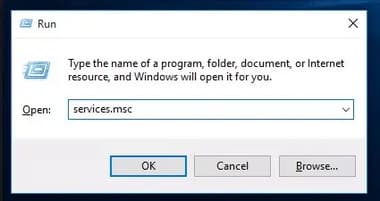
Step 5: Enter services.msc
- The next step is to open the run box, type services.msc, and press the OK button.
Step 6: Find QBDBMgrN.exe
- Press Q button to locate QBDBMgrN.exe.
Step 7: Select Automatic Start
- Finally, start the service and choose the Automatic Start option.
Method 5: Update QuickBooks with the Latest Version
The QuickBooks Unable to Connect to Remote Server error might occur if you have an outdated release of QuickBooks installed in your system. To resolve this issue, you need to update the latest version of QuickBooks.
Follow these steps to update:
Step 1: Update QuickBooks Desktop
- It is advised to upgrade QuickBooks to the latest version by selecting Upgrade QuickBooks Desktop from the help menu.
Step 2: Choose Mark All
- Next, select the mark all options by clicking the options tab.
Step 3: Select Update Now
- The next step is to select “Update Now” and wait for updates.
Step 4: Close and Restart QuicBooks
- Finally, shut down QuickBooks and restart your computer.
Method 6: Verify the QuickBooks Desktop File Hosting
Step 1: Locate the power cable
- Find the power cable or switch on the router’s rear.
Step 2: Unplug the Power cord
- Turn off the power switch or Unplug the power cord from the electrical outlet.
Step 3: Wait for a while
- Wait for roughly a minute after disconnecting or turning off the router.
Step 4: Re-plug the power cable
- Then, plug the power cable back or turn the power switch back.
Step 5: Restart your Router
- The LEDs on the router should steady first. The router’s complete restart can take a few minutes.
Step 6: Check for your Internet Connection
- Check your internet connection on your computer or other device to make sure it’s functioning correctly once the router has been rebooted.
Method 7: Adjust Antivirus or Firewall Settings to Allow QuickBooks
Step 1: Go to Firewall Settings
- Open Firewall Settings.
Step 2: Locate Firewall
- Find Firewall or Security Settings.
Step 3: Turn off the Firewall
- Then, temporarily Disable the Firewall.
Step 4: Check for the internet connection
- Check QuickBooks Connection.
Step 5: Set up Firewall Rules
- Configure Firewall Rules.
Step 6: Add QuickBooks
- Add QuickBooks to the Allowed Apps List.
Step 7: Re-enable the Firewall
- Finally, re-enable the Firewall.
If adjusting your firewall didn’t help to resolve the issue, check your antivirus settings. Make sure QuickBooks has general permissions so it’s not blocked.
Method 8: Check the Settings of the Web-Mail Preferences
Step 1: Choose Preferences
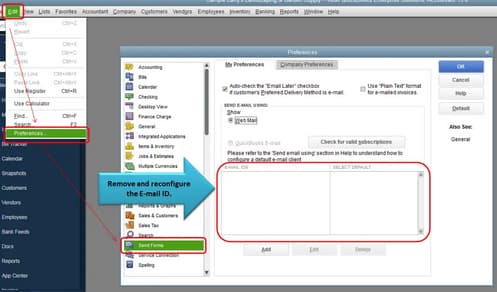
- Go to the QuickBooks edit menu and select Preferences.
Step 2: Select Send Forms
- On the next page, choose Send Forms.
Step 3: Choose the Email Account being send
- After that, please select the Email Account Being Used and click on Edit under My Preferences.
Step 4: Navigate to the SMTP server
- Next, go to the SMTP server details section, and set the port and server name to the email provider settings in the edit email info screen.
Step 5: Set up email service in QuickBooks
- Configure QuickBooks email service for a list of SMTP servers and ports.
Conclusion!
All of the above six do-it-yourself remedies lead us to the conclusion of the article, where we anticipate that after putting the measures and procedures into practice, you may be able to fix the issue quickly. Moreover, if your QuickBooks not connecting to remote, it is strongly advised that you look for technical assistance immediately.
Hopefully, the above-given information is useful for you to get rid of this problem. But if you still facing any kind of issues with your software and need professional assistance, regarding accounting, bookkeeping & accounting software-related issues then feel free to get in touch with us at +1-802-778-9005, or you can mail to us at: support@ebetterbooks.com
Frequently Asked Questions (FAQs)
How do I restore my QuickBooks server?
Following the step-by-step information given below:
- Select Open or Restore Company from the file menu.
- Choose to restore a backup copy.
- Select the next tab.
- Select a local backup, then click next.
- Look through your computer for your Company’s backup file.
- Choose a location to put the recovered corporate file.
How Can I Access the QuickBooks Remotely?
The procedures listed below can be used to configure QuickBooks Remote Access:
- Reset Internet settings to their default positions.
- Set the webmail preferences
- Making a .ND file.
- Update QuickBooks
- Set up the QuickBooks Database Server Manager.
- Verifying the hosting of QuickBooks files.
Why is my QuickBooks not connecting to the server?
If the QuickBooks server is not configured correctly, an error saying it cannot connect to the server will appear. If the firewall is preventing the connection, as well.
How do I connect QuickBooks to a server?
- Install QuickBooks Database Manager on Host PC: Begin by installing the QuickBooks Database Manager on the host computer (the PC that will store the company files and act as the server).
- Enable File Sharing on Host: Enable file sharing on the host PC.
- Allow QuickBooks through Windows Firewall: Configure the Windows Firewall on the host PC to allow QuickBooks to communicate with other PCs on the network.
- Enable Multi-user Mode in QuickBooks on Host PC: In QuickBooks, set the host PC to Multi-user Mode.
- Install QuickBooks Database Manager on Client PCs: On each client PC (computers connecting to the host), install the QuickBooks Database Manager.
- Connect Client PCs to Host in QuickBooks Database Server Manager: Using QuickBooks Database Server Manager, connect each client PC to the host PC.
- Open Company File in Multi-user Mode on Client PCs: On each client PC, open the company file in Multi-user Mode to allow multiple users to work on the same file simultaneously.
- Test Multi-user Connectivity: Finally, verify the setup by testing multi-user connectivity.
How to Set up or open a company file from a remote server?
To access your QuickBooks Desktop product and company file from a remote location, you’ll need to use a hosting service. This allows you to store your QuickBooks data files on secure remote servers, making it possible to access and use QuickBooks anytime, anywhere.
Here’s how to set it up:
- Choose a Hosting Provider: Find a reliable QuickBooks hosting service that suits your needs.
- Upload Your Files: Transfer your QuickBooks product and company files to the hosting provider’s servers.
- Access via Remote Desktop: Once your files are hosted, you can log in from any device with an internet connection and work as if QuickBooks is running on your local computer.
Disclaimer: The information outlined above for “Fix QuickBooks Unable to Connect to Remote Server Issue” is applicable to all supported versions, including QuickBooks Desktop Pro, Premier, Accountant, and Enterprise. It is designed to work with operating systems such as Windows 7, 10, and 11, as well as macOS.
