What is QuickBooks Error 6094?
QuickBooks Error 6094, 0 (sometimes accompanied by 6010, 2) occurs when QuickBooks fails to start the Database Server Manager that manages access to the company file. This issue typically arises in multi-user environments where the server is responsible for hosting the company file.
The error can also appear when QuickBooks Desktop is unable to read or access the company file due to interference from security software. In many cases, antivirus programs such as AVG, SpyHunter, or PC Tools block essential QuickBooks processes such as QBDBMgrN.exe or QBW32.exe from running properly.
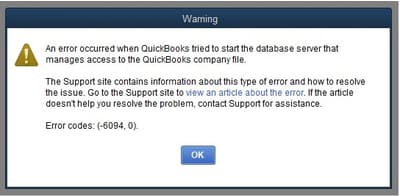
When this happens, users may see the following error message:
“An error occurred when QuickBooks tried to start the database server that manages access to the QuickBooks company file. Error (-6094,0)”
At this point, the QuickBooks Database Server Manager cannot initialize correctly, preventing the software from accessing the company file (.QBW). As a result, communication between the server and the company file is disrupted, which can halt multi-user access and interrupt normal accounting operations.
Possible Reasons For QuickBooks Error 6094, 0
This error usually occurs when QuickBooks fails to start the Database Server Manager, preventing access to the company file. The most common causes include:
- Antivirus or security software interference: Programs such as PC Tools Internet Security, AVG Anti-Virus, and SpyHunter Malware may block essential QuickBooks processes.
- Firewall restrictions: Firewalls may prevent QuickBooks services from communicating with the company file.
- Blocked or quarantined QuickBooks files: Critical files like QBDBMgrN.exe and QBW32.exe may be restricted by security programs.
- Corrupted QuickBooks company file (.QBW): Damage in the company file can prevent the Database Server Manager from reading it.
- Database Server Manager initialization failure: The service responsible for multi-user access fails to start.
How to Fix QuickBooks Error 6094, 0 in Multi-User Mode
QuickBooks Error 6094, 0 can prevent multiple users from accessing the company file simultaneously. This error often occurs due to blocked files, firewall restrictions, outdated updates, or issues with database services. The following step-by-step solutions help identify and resolve the underlying causes, restoring smooth multi-user access.
Solution 1: Update & Configure Antivirus Settings
Antivirus programs may sometimes block critical QuickBooks files, such as qbdbmgr.exe or qbdmgrN.exe, which can disrupt multi-user mode. Restoring any quarantined files and adding the QuickBooks installation folders to your antivirus exceptions ensures these essential files are not blocked. This allows QuickBooks to run its network services smoothly, enabling proper multi-user access to your company file.
- Make sure your anti-virus software is on the latest update.
- Restore qbdmgr.exe and qbdmgrN.exe from the virus vault or quarantine.
- Prevent QuickBooks Desktop Directory from being scanned by adding exceptions on your anti-virus software.
PC Tools Internet Security
To restore “infections” that have been quarantined:
- Choose Quarantine from the Settings menu.
- Select the necessary items to restore, and click Restore.
- Click Yes, and select OK.
To set up exception to prevent QuickBooks directory from being scanned:
- Go to Settings from PC Tools Internet Security menu.
- Choose Global Action List, and click Add to select the files to be excluded from scanning.
- Select OK.
AVG Anti-Virus
To prevent QuickBooks directory for being scanned:
- Close QuickBooks Desktop and open AVG Anti-Virus User Interface.
- Click twice on Resident Shield and select Manage Exceptions.
- Select Add Path, and add the path C:\Program Files\Intuit.
NOTE: If QuickBooks is installed in a different folder, add that folder path.
- Choose OK and Save Changes.
NOTE: It may be necessary to restore all QuickBooks files that AVG Anti-Virus quarantined.
To check if any of the QuickBooks files are quarantined:
- Open AVG Anti-Virus User Interface, and choose History.
- Select Virus Vault and locate any QuickBooks files that have been quarantined.
Example: qb.exe, qbw32.exe, qbdbmgr.exe, qbdbmgrn.exe
- Choose the necessary files, and select Restore and Close.
- Open QuickBooks Desktop.
To check for renamed files in the installation Directory
- Close QuickBooks Desktop.
- Check C:\Program Files\Intuit\QuickBooks folder for any files in the install directory that were renamed.
Example: QBDBMGRN_AVG_RESTORED
- Rename the file back to the original name. Example qbdbmgrn.exe
- Open QuickBooks Desktop.
SpyHunter Malware Software
Set Up Prompts for Unknown Programs:
- SpyHunter 5 might not always recognize programs trying to start on your computer.
- You can configure it to ask you whether to allow or block these unknown programs.
- Choosing “Remember my answer” will automatically create a rule in the User Added section for future attempts.
Unblock a Program if Needed:
- If you blocked a program by mistake, you can reverse it.
- Go to System Guard → User Added, find the program, and change its Status to Allowed.
See Which Programs Are Blocked:
- Open SpyHunter 5 and click System Guard.
- Blocked objects are sorted into:
- Malware
- PUPs (Potentially Unwanted Programs)
- User Added
Modify User-Added Rules:
- Click the User Added tab to see the rules you created.
- Each entry shows whether it is Blocked or Allowed.
- To change it, click the Status and select the new option.
Check for Blocked PUPs:
Programs that are not found in the User Added section but are still prevented from running may be categorized as PUPs (Potentially Unwanted Programs). You can review and manage these items directly in the PUP section of System Guard.
Solution 2: Download the latest QuickBooks Updates
QuickBooks updates frequently include fixes for bugs and issues that can impact multi-user mode, including Error 6094. Keeping QuickBooks Desktop updated resolves software conflicts, enhances file compatibility, and addresses vulnerabilities that may prevent company files from opening properly in multi-user mode.
- Open QuickBooks Desktop and navigate to the Help menu.
- Choose Update QuickBooks Desktop.
- Hit the Update Now tab. Tip: Tickmark the Reset Update checkbox to clear all previous update downloads.
- Select Get Updates to start the download.
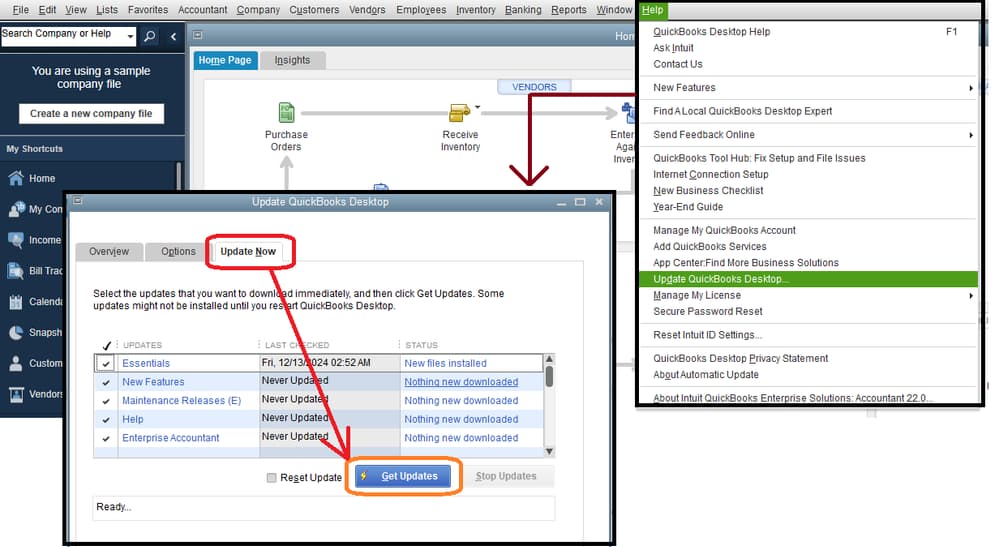
- Once done, close and reopen QuickBooks to install the update again.
Solution 3: Adjust Windows Firewall
Windows Firewall may block QuickBooks from accessing the network, which can prevent multi-user connections. Without the correct ports and program exceptions, QuickBooks cannot communicate with other computers. Setting up proper firewall exceptions allows QuickBooks and its necessary ports to function without restrictions, resolving errors caused by blocked network access.
Step 1: Add Firewall port exception for QuickBooks
Follow the steps below for each QuickBooks Desktop version if you’re using multiple versions on the same computer.
Step 1: Navigate to the Windows Start menu.
Step 2: Type “Windows Firewall” in the search bar and then hover over Windows Firewall Settings.
Step 3: Choose Firewall Advanced options from the left sidebar.Step 4: After this, you get the inbound and outbound rules under Advanced Settings.
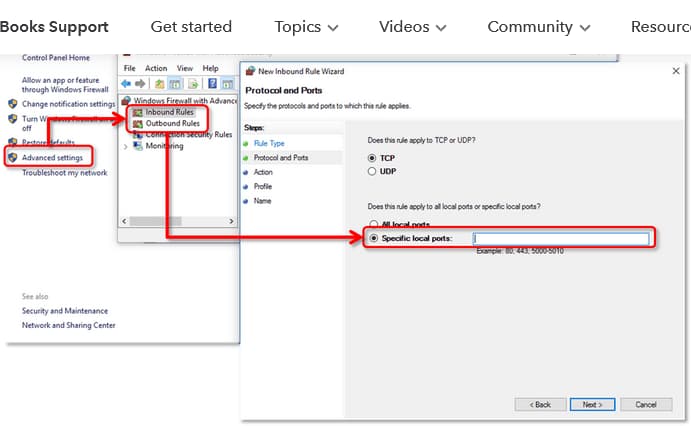
Step 5: Hit right-click on Inbound Rules and then select the New Rule option.
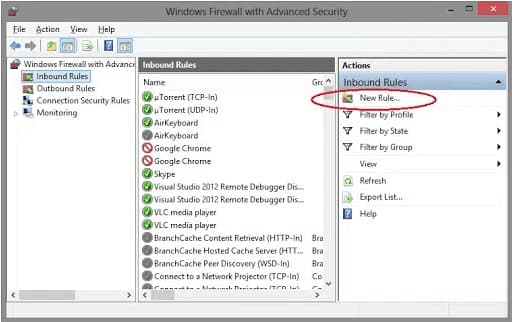
Step 6: Under the New Rule window, click on Port and later press Next.
Step 7: Next, be sure that TCP is selected.
Step 8: Under the Specific local ports field, type the Specific ports required for the QB year version you are currently using:
- QuickBooks Desktop 2020 and later: 8019, XXXXX.
- QuickBooks Desktop 2019: 8019, XXXXX.
- QuickBooks Desktop 2018: 8019, 56728, 55378-55382.
- QuickBooks Desktop 2017: 8019, 56727, 55373-55377.
QuickBooks Desktop 2021, 2022, and later versions use dynamic ports. Here’s how to get a dynamic port number:
- Open the Windows Start menu.
- Enter “QuickBooks Database Server Manager” into the search and open QuickBooks Database Server Manager.
- Navigate to the Port Monitor tab.
- Locate your QuickBooks version.
- Make a note of the Port Number. You’ll need it when creating firewall port exceptions.
Remember: You can change the assigned port number by selecting Renew. After renewing, go to the Scan Folders tab and choose Scan Now to reset firewall permissions. Port renewal is only available for QuickBooks Desktop 2019 and later; older versions do not support this option.
Step 9: Once you enter the port number, press Next.
Step 10: Choose Allow the Connection and hit the Next tab.
Step 11: If you’re prompted, make sure all profiles are marked. Click Next again.
Step 12: Create a rule and name it “QBPorts(year).”
Step 13: Select Finish.
Step 14: Re-perform the same steps to create outbound rules.
Step 2: Create Windows firewall exceptions for QuickBooks programs
QuickBooks uses executable files (.exe) to perform various tasks. To create exceptions for each executable on the table, adhere to the following steps:
Step 1: Navigate to the Windows Start menu.
Step 2: Enter Windows Firewall into the search box, and open Windows Firewall.
Step 3: Select Advanced Settings.
Step 4: Hit right-click on Inbound Rules and hit the New Rule tab.
Step 5: Click Program and press Next.
Step 6: Select This Program Path and click Browse.
Step 7: Locate and select any one executable file from the table listed below. Then, hit the Next tab.
Step 8: Select the option Allow the Connection and click Next.
Step 9: If prompted, make sure all profiles are marked. Then, click the Next button.
Step 10: Create a rule and name it “QBFirewallException(name.exe).”
Step 11: Re-implement the same steps to create Outbound Rules.
Here’s a list of some executable files, along with their locations:
| Executable files | Location |
| IntuitSyncManager.exe | C:\Program Files\Common Files\Intuit\Sync |
| QBCFMonitorService.exe | C:\Program Files\Common Files\Intuit\QuickBooks |
| AutoBackupExe.exe | C:\Program Files\Intuit\QUICKBOOKS YEAR |
| QBW32.exe | C:\Program Files\Intuit\QUICKBOOKS YEAR |
| QBLaunch.exe | C:\Program Files\Common Files\Intuit\QuickBooks |
| OnlineBackup.exe | C:\Program Files\QuickBooks Online Backup |
| FileManagement.exe | C:\Program Files\Intuit\QUICKBOOKS YEAR |
Note: If you see “Program Files (x86),” it simply means your computer is running a 64-bit operating system.
Once you’re ready, open QuickBooks Desktop and try accessing your company file in multi-user mode.
Solution 4: Restart QuickBooks Database Services
The QuickBooks Database Server Manager handles the services needed for multi-user mode. If these services are stopped or misconfigured, QuickBooks may be unable to access the company file. Restarting the QuickBooksDBXX service ensures that database services run correctly, are set to start automatically, and can recover if they fail, resolving multi-user access issues.
- Hold down and press the Windows key+R to bring up the Run window.
- Enter services.msc, and click Enter. You can also search for services.msc on the Windows search bar.
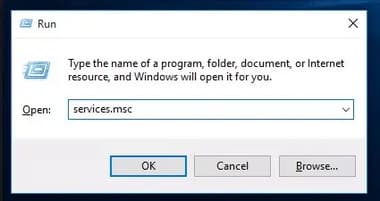
- In the services window, search for the QuickBooksDBXX service that matches your version:
- QuickBooks 2020: QuickBooksDB30
- QuickBooks 2019: QuickBooksDB29
- QuickBooks 2018: QuickBooksDB28
- Double-click the QuickBooksDBXX service.
- Select the Startup Type to Automatic and Service Status to Running or Started.
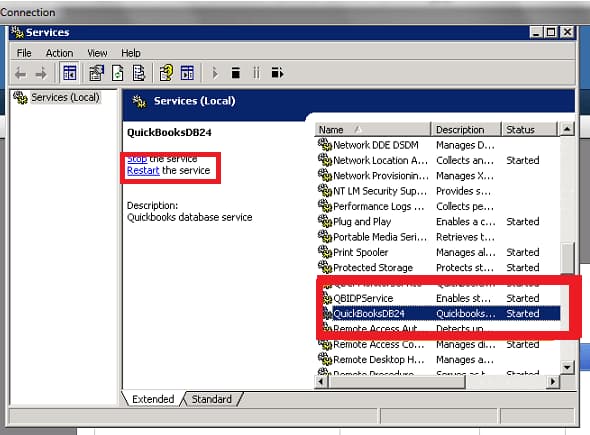
- Navigate to the Recovery tab.
- From the First failure dropdown, choose Restart the Service. This automatically restarts the QuickBooksDB service if it fails. Do the same for Second failure and Subsequent failures.
- Click OK to save the changes.
- Reboot your computer.
Solution 5: Repair QuickBooks Desktop
Corrupted program files or incomplete installations can cause Error 6094. The QuickBooks Tool Hub offers diagnostic tools to fix both program and installation issues. Using Quick Fix My Program and the Install Diagnostic Tool repairs damaged or missing files, resolves installation errors, and ensures QuickBooks operates smoothly in multi-user mode.
Step 1: Download & Install the QuickBooks Tool Hub
The QuickBooks Tool Hub helps to fix common errors. You’ll need to close QuickBooks to use the tool hub. For the best experience, we recommend you use Tool Hub on Windows 10, 64-bit.
- Close QuickBooks.
- Download and install the most recent QuickBooks Tool Hub version (1.6. 0.8).
- Save the file somewhere you can easily find it such as your Downloads folder or your Windows desktop.
Note: To find out which tool hub version you have, select the Home tab and the version will be on the bottom.
- Open the downloaded file QuickBooksToolHub.exe to start the installation.
- Follow the on-screen steps to install and agree to the terms and conditions.
- When the installation finishes, click twice on your Windows desktop icon to open the tool hub.

Note: If you are unable to find the icon, do a search in Windows for QuickBooks Tool Hub and select the program.
Step 2: Run Quick Fix My Program
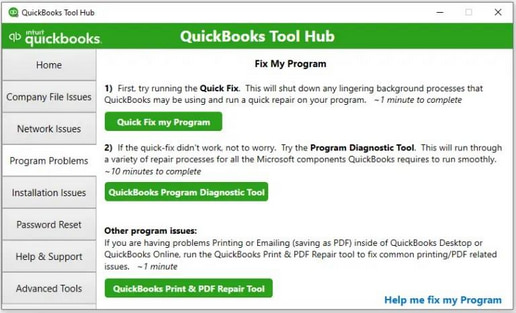
The Quick Fix will shut down any open background processes QuickBooks uses. It’ll run a quick repair on your program.
- From the QuickBooks Tool Hub, choose Program Problems.
- Select Quick Fix My Program.
- Start QuickBooks Desktop and open your data file.
Step 3: Run QuickBooks Install Diagnostic tool
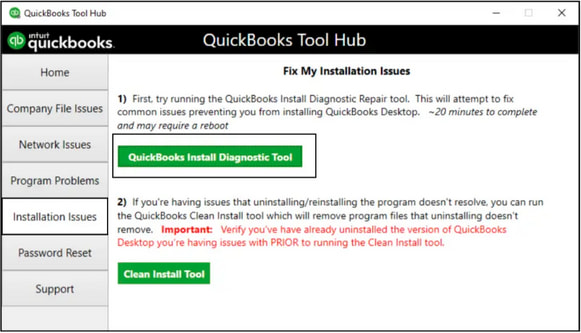
If something went wrong during the QuickBooks installation process, it may cause problems when you try to use it. Run the QuickBooks Install Diagnostic Tool to fix common installation issues.
- Open the QuickBooks Tool Hub and then choose Installation Issues.
- Select QuickBooks Install Diagnostic Tool. Let the tool run. It may take up to 20 minutes to detect the issue.
- When it’s done, restart your computer and start QuickBooks Desktop, then open your data file.
- Update your QuickBooks to the latest release. This will make sure you have the most recent fixes and security updates.
Conclusion!
QuickBooks Error 6094, 0 in multi-user mode is typically caused by issues such as antivirus interference, outdated software, firewall restrictions, database service interruptions, or corrupted program files. By updating antivirus settings, downloading QuickBooks updates, configuring firewall exceptions, restarting database services, and repairing QuickBooks Desktop, you can restore smooth multi-user access and prevent recurring errors. These steps ensure that your company files remain accessible, secure, and fully functional, allowing your team to work efficiently without disruption.
Disclaimer: The information outlined above for “How to Fix QuickBooks Error 6094 0 When Accessing The Company File Located on the Server” is applicable to all supported versions, including QuickBooks Desktop Pro, Premier, Accountant, and Enterprise. It is designed to work with operating systems such as Windows 7, 10, and 11, as well as macOS.
