To fix QuickBooks Error 1601, users must restore access to the Windows Installer Service (msiexec.exe) and repair any damaged system dependencies, such as the Microsoft .NET Framework, Visual C++ Redistributables, or Java Runtime Environment (JRE). QuickBooks 1601 error occurs when the Windows Installer—responsible for executing software setup, updates, and repairs—becomes disabled, corrupted, or unregistered. As a result, QuickBooks Desktop cannot complete its installation or update sequence, often displaying messages such as “Error 1601: Windows Installer is not accessible” or “QuickBooks update failed.”
At a functional level, this issue reflects a breakdown in communication between QuickBooks setup files and the Windows Installer infrastructure, typically due to damaged registry keys, missing installation libraries, or interference from third-party antivirus or firewall software. When left unresolved, it can cause repeated installation failures, incomplete updates, and overall application instability.
This guide provides a comprehensive technical resolution framework for QuickBooks Error 1601. It details the root causes, system-level symptoms, and verified repair procedures—including Windows Installer re-registration, framework restoration, and clean installation processes. Implementing these corrective measures ensures a stable QuickBooks deployment while maintaining long-term software integrity and system compatibility.
What is Error 1601 in QuickBooks and How does it Look when it occurs?
QuickBooks Error 1601 is a Windows Installer service malfunction that occurs when QuickBooks Desktop cannot access or execute its required installation libraries during setup, update, or repair operations. The error reflects a failure within the MSIEXEC engine—Windows’ core installation handler responsible for reading package configuration files, copying program components, and registering dependent frameworks.
When the Windows Installer Service becomes disabled, corrupted, or unregistered, QuickBooks is unable to launch installation scripts, validate registry entries, or integrate system dependencies such as Microsoft .NET Framework, MSXML, and Java Runtime Environment (JRE). As a result, the application installation halts prematurely, displaying a Windows Installer–related error prompt.
At a functional level, this error disrupts the communication between QuickBooks setup files and the underlying Windows installation infrastructure. It may occur during new installations, upgrades, or repairs—especially when the system environment has missing registry permissions or outdated installer components.
Error Message Variants:
– “Error 1601: Windows Installer is not accessible.”
– “[Error 1601] There was a problem installing Microsoft .NET Framework.”
– “QuickBooks Installation Failed: Windows Installer could not be initialized.”
What are the root causes behind the QuickBooks Error 1601?
QuickBooks Error 1601 originates from underlying system-level failures that disrupt the communication between QuickBooks installation files and the Windows Installer infrastructure. The root causes can be classified into service-related issues, component corruption, and environmental or user-level restrictions. Each of these directly impacts the MSIEXEC process responsible for executing installation commands.
1. Disabled or Corrupted Windows Installer Service (msiexec.exe)
The Windows Installer Service (msiexec.exe) is a fundamental Windows process that manages software installation and repair operations. If this service becomes disabled, unregistered, or corrupted within the system registry, QuickBooks cannot execute its installation sequence. Consequently, the installer returns the message: “Windows Installer is not accessible.”
2. Damaged Microsoft .NET Framework or Java Runtime Components
QuickBooks Desktop relies on Microsoft .NET Framework and Java Runtime Environment (JRE) for executing essential background operations during setup. Corruption, incomplete installation, or version mismatches within these components interrupt dependency registration and trigger Error 1601.
3. Interrupted or Incomplete QuickBooks Installation Process
Power loss, forced shutdowns, or prematurely terminated installations can leave partial QuickBooks files or broken registry entries. These incomplete installations prevent subsequent setup attempts from accessing valid installation libraries, causing repeated initialization failures.
4. Antivirus or Firewall Interference with Installation Directories
Overprotective antivirus or firewall settings may block QuickBooks installer components from writing data to system directories (such as ProgramData or AppData). This interference disrupts file extraction and registry registration, particularly during framework installation or patch updates.
5. Insufficient User Permissions or Non-Administrator Installation
Running QuickBooks setup without administrative privileges restricts access to protected directories and registry locations. The installer requires elevated rights to modify or register Windows components. Without these permissions, setup commands fail, resulting in installer error codes such as 1601 or 1642.
6. Outdated or Incompatible Windows Build Version
Older or unstable Windows builds may contain deprecated installer libraries or missing security updates that prevent msiexec.exe from functioning correctly. Such environments often lack recent Windows Installer patches, causing QuickBooks setup to misfire during dependency checks.
Error 1601 is not a QuickBooks-specific problem but a Windows-level installation access failure. It reflects broken communication between the QuickBooks setup package and the operating system’s installer framework. Corrective measures focus on re-enabling or repairing these base-level services rather than altering QuickBooks files themselves.
How can we identify the Symptoms of QuickBooks Error 1601?
QuickBooks Error 1601 exhibits a consistent set of behavioral and system-level indicators that reflect interruptions within the Windows Installer service or its supporting components. Identifying these symptoms helps determine whether the failure stems from installer corruption, service inaccessibility, or dependency malfunction.
1. QuickBooks Installation Fails or Stops Mid-Process
During installation or update, QuickBooks may abruptly terminate without completing file extraction or registry registration. The progress bar freezes or the installer exits without warning, indicating a failed execution of msiexec.exe commands that manage installation sequencing.
2. Error Message: “Windows Installer Service Could Not Be Accessed”
This is the most direct and diagnostic message associated with Error 1601. It signifies that Windows could not invoke the Windows Installer service required to handle installation requests. The message typically appears in a pop-up window during setup or while attempting to update QuickBooks.
3. Repeated Failure During QuickBooks or Framework Updates
Subsequent attempts to install patches, upgrade QuickBooks, or repair installations often fail with identical 1601 error prompts. This repetition suggests that the root service or framework dependency remains disabled or corrupted, preventing successful reinstallation.
4. Sluggish System Performance During Setup Operations
Users may notice a significant slowdown or brief freezes while attempting to install QuickBooks or related components like .NET Framework or Java. This performance lag occurs because Windows repeatedly attempts to access a non-responsive or unregistered Installer service, consuming excess CPU cycles in the process.
5. Failed Initialization of Dependent Frameworks (.NET, MSXML, Java)
QuickBooks may display secondary errors related to missing or unresponsive frameworks—for example, “Microsoft .NET Framework installation failed” or “Java Runtime not found.” These secondary failures indicate that QuickBooks cannot initiate the installation chain due to a dependency-level malfunction.
6. Event Viewer Logs Indicating Installer or Registry Failure
Advanced users reviewing Windows Event Viewer may find logs referencing MSIInstaller errors, Service Control Manager warnings, or “Access Denied” messages tied to msiexec.exe. These confirm that the installer service could not execute due to permission or registry conflicts.
Collectively, these symptoms confirm that the QuickBooks setup process is failing not because of QuickBooks itself, but due to broken communication between the application installer and Windows’ internal installation management services. Recognizing these early indicators helps isolate whether the problem lies with Windows Installer configuration, missing dependencies, or user-level restrictions
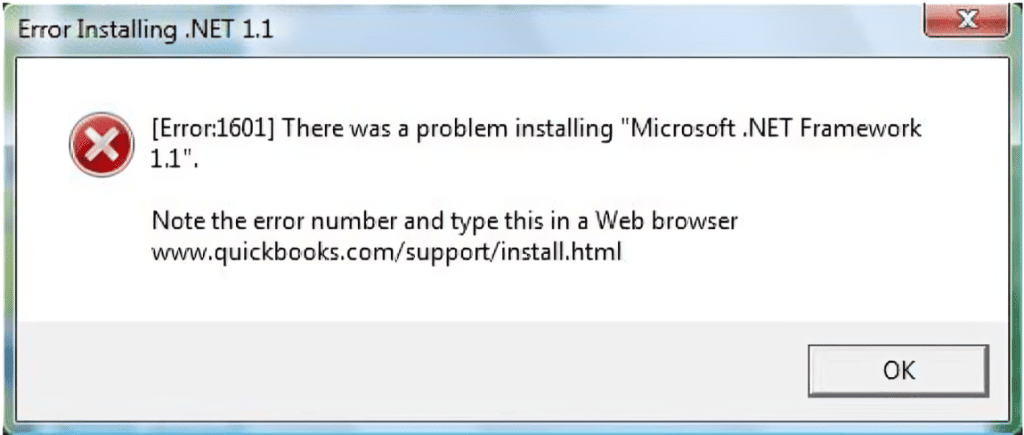
Pre-Resolution Requirements for QuickBooks Error 1601
Before initiating any corrective process for QuickBooks Error 1601, users must ensure data integrity and environmental readiness. Since Error 1601 directly affects the installation and update modules of QuickBooks Desktop, any repair or reinstallation process involves potential overwriting of configuration or company data. The following preparatory steps help preserve operational continuity and prevent secondary data loss during troubleshooting.
1. Create a Verified Backup of the QuickBooks Company File
A verified company file backup ensures that all financial data, templates, letters, logos, and application-linked resources remain intact during repair operations. Backups must be stored locally or on an external drive before executing installation or update procedures. This step prevents data corruption in case the repair sequence modifies registry entries or QuickBooks directory structures.
Procedure for Scheduled Automatic Backup
- Open QuickBooks and switch to Single-User Mode from the File menu.
- Navigate to File → Back Up Company → Create Local Backup.
- Select Local Backup and click Next.
- In the Local Backup Only section, click Browse and specify the desired save location.
- Define the number of backup copies to retain.
- Choose Complete Verification to validate the data integrity of the backup file.
- Select Save it now and schedule future backups, then click Next.
- Enable the option Save backup copy automatically when I close my company file.
- Set the backup frequency and confirm using Windows login credentials.
- Click Finish to finalize the backup schedule.
This configuration allows QuickBooks to automatically back up critical files at predefined intervals, ensuring that every session is captured before potential system-level changes.
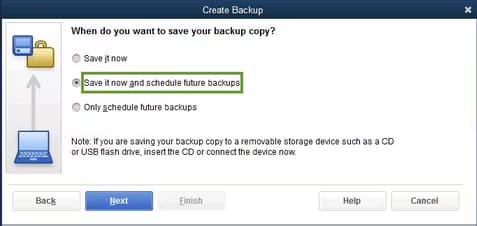
Manual Backup Procedure (Alternative)
Manual backup is recommended when performing isolated installations or immediate repairs.
- Switch to Single-User Mode within QuickBooks.
- Navigate to File → Back Up Company → Create Local Backup.
- Select Local Backup, click Next, and browse to the desired directory.
- Perform Complete Verification to confirm that the backup file is error-free.
- Click Save it now, then press Next to initiate immediate backup creation.
QuickBooks will generate a single verified backup file and confirm its successful creation. The verified backup file (.QBB) serves as a restoration point in the event of any interruption during repair or reinstallation.
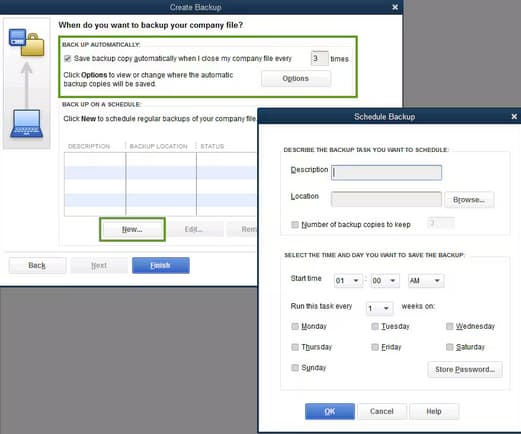
Rationale for Backup Before Troubleshooting
The QuickBooks installation and update modules interact with the Windows Installer (msiexec.exe) and modify system-level directories. During reinstallation or framework repair, residual files may be replaced or deleted. Backing up company data ensures that business records remain recoverable even if installation procedures encounter additional system faults or registry modifications.
A verified backup also protects dependencies like QuickBooks Statement Writer, Business Planner, and Loan Manager, which are indirectly affected when QuickBooks repair utilities or diagnostic tools are executed. Since Error 1601 commonly requires re-registering the Windows Installer or performing a clean installation, having an updated backup is a mandatory safety measure in all professional troubleshooting protocols.
How to Fix Error Code 1601 in QuickBooks?
Method 1: Verify and Restart the Windows Installer Service
The Windows Installer Service (msiexec.exe) is a core component that enables software installation, modification, and repair within the Windows operating system. QuickBooks Error 1601 occurs when this service becomes disabled, unregistered, or inaccessible. Verifying and restarting the service restores the installer’s operational state, allowing QuickBooks to execute setup and update commands successfully.
Step-by-Step Procedure
- Access the Services Console
Press Windows + R, type services.msc, and press Enter to open the Windows Services Management console.
This utility displays all system services and their operational statuses. - Locate the Windows Installer Service
In the alphabetical list, locate Windows Installer.
This service handles installation-related requests for QuickBooks and other software that rely on Windows’ internal installation architecture. - Check the Startup Configuration
Double-click Windows Installer to open its properties window.
Ensure the Startup type field is set to Manual.
A Manual configuration ensures that the service activates automatically when an installation request (such as QuickBooks setup) is triggered. - Start or Restart the Service
- If the Service status shows Stopped, click Start to activate it.
- If it is already running but malfunctioning, click Stop, wait a few seconds, and then click Start again to reinitialize it.
Restarting clears residual command locks or incomplete process threads that may prevent installer access.
- Close the Console and Reboot the System
After confirming the service is active, click OK and close the window.
Restart the computer to apply service-level changes and refresh system dependencies. - Reattempt QuickBooks Installation or Update
Launch the QuickBooks setup or update process again. The Windows Installer should now respond to QuickBooks installation commands without displaying Error 1601.
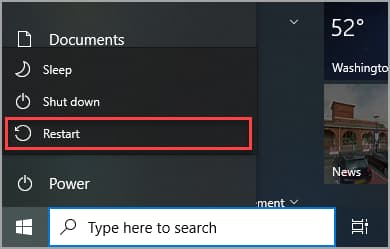

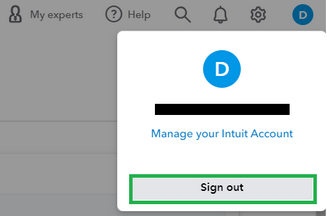
When the Windows Installer service is inactive or corrupted, QuickBooks cannot execute installation scripts stored in its MSI (Microsoft Installer) packages. Restarting this service re-establishes communication between the QuickBooks setup file and msiexec.exe, enabling proper file extraction, registry registration, and dependency installation. This process often resolves Error 1601 without further manual intervention.
Solution 2: Use the QuickBooks File Doctor Tool to Repair Installation Errors
The QuickBooks File Doctor Tool is an integrated diagnostic utility within the QuickBooks Tool Hub designed to detect and repair data corruption, network configuration errors, and installer malfunctions.
In the context of QuickBooks Error 1601, this tool functions by identifying missing or damaged installation components, repairing misconfigured dependencies, and restoring system access to the Windows Installer (msiexec.exe) framework.
QuickBooks Error 1601 occurs when the Windows Installer cannot process installation commands due to internal file corruption or misaligned registry permissions.
Executing the File Doctor Tool validates installation integrity and re-establishes the connection between QuickBooks Desktop and essential system libraries such as Microsoft .NET Framework, C++ Redistributables, and MSXML.
Procedure
Step 1: Access QuickBooks Tool Hub
- Close all active QuickBooks processes.
- Download and open the QuickBooks Tool Hub (latest version).
- Navigate to the section labeled Company File Issues or Installation Issues, depending on the version of Tool Hub installed.
Step 2: Launch the QuickBooks File Doctor Utility
- Select the QuickBooks File Doctor Tool from the available utilities.
- Browse and select the QuickBooks company file if prompted.
- Choose the diagnostic mode for installation, repair, or file verification.
- Initiate the scan by clicking Start.
Step 3: Automated Detection and Repair Process
- The File Doctor automatically analyzes installer configuration, registry linkage, and damaged dependency files.
- It repairs internal misalignments in Windows Installer and revalidates the communication between QuickBooks setup files and Windows Installer APIs.
- The process duration depends on system performance and the extent of corruption within installation libraries.
Step 4: Restart the System
- Once the repair process completes, restart the computer to apply all registry and service-level changes.
- A system reboot ensures that repaired dependencies and services are fully reinitialized before QuickBooks reinstallation or update.
Solution 3: Update Your Windows OS and Components
Outdated or partially installed Windows updates are a primary cause of QuickBooks Error 1601, as they can leave essential system services—particularly the Windows Installer (msiexec.exe), .NET Framework, and C++ Redistributables—in an unstable or unregistered state. Installing all pending Windows updates ensures that these dependencies are fully operational and compatible with the QuickBooks installation process.
Regular system updates also patch known vulnerabilities and replace outdated DLLs or registry references that may block QuickBooks setup operations.
Step-by-Step Procedure
- Access the Windows Update Console
- Click Start → Settings → Update & Security → Windows Update.
- This control panel manages all critical and optional Windows system updates required by application installers like QuickBooks.
- Check for Pending Updates
- Select Check for updates.
- Windows will scan for the latest available patches, service packs, and component upgrades related to security, frameworks, and installation services.
- Download and Install All Available Updates
- Click Download and install for each listed update.
- Ensure all pending cumulative updates and framework packages are installed.
- Do not interrupt the process—partial updates may continue to cause Windows Installer failures.
- Restart the System After Installation
- When all updates have been successfully installed, restart your computer.
- The restart process finalizes the integration of new installer components and re-registers Windows Installer (msiexec) automatically.
- Reattempt QuickBooks Installation or Update
- Once the system is back online, launch QuickBooks setup or update again.
- The installation should now proceed without Error 1601 if the Windows environment has been fully updated and synchronized.
QuickBooks installation depends on several Windows subsystems that are maintained through regular updates. A missing Windows Installer update, an outdated .NET version, or an unpatched C++ library can cause the msiexec.exe process to malfunction, leading to installation errors. Updating Windows replaces corrupted binaries, re-registers dependencies, and ensures synchronization between QuickBooks setup modules and the operating system.
Solution 4: Use QuickBooks Install Diagnostic Tool
The QuickBooks Install Diagnostic Tool is an official Intuit utility designed to automatically detect and repair installation-related issues in QuickBooks Desktop. It specifically targets component-level malfunctions within the Microsoft .NET Framework, MSXML, and C++ Redistributable packages, all of which are critical for successful QuickBooks installation and updates.
Error 1601 commonly appears when these dependencies are damaged, outdated, or improperly registered within the Windows system registry. Running the diagnostic tool standardizes the repair process and restores installer compatibility without requiring manual system edits.
Step-by-Step Procedure
- Download and Access QuickBooks Tool Hub
- Visit the official Intuit website and download the latest version of QuickBooks Tool Hub.
- Save the installation file to your desktop and follow the on-screen instructions to complete the installation.
- Open the application once the installation is finished.
- Navigate to the Installation Issues Module
- Within the Tool Hub interface, click the Installation Issues tab.
- Select the QuickBooks Install Diagnostic Tool option. This utility is specifically built to repair broken installation dependencies.
- Run the Diagnostic Scan
- Allow the tool to perform a full system analysis.
- The process may take up to 15–20 minutes. depending on system performance.
- During this period, the tool scans and repairs corrupt or missing framework components, registry entries, and configuration files essential for QuickBooks installation.
- Restart the System
- Once the scan completes, close the Tool Hub and restart the computer.
- The restart ensures that all repaired components are re-registered and loaded properly into the Windows environment.
- Reattempt QuickBooks Installation or Update
- After the system reboot, launch the QuickBooks setup or update again.
- The repaired components will now allow the Windows Installer service to execute installation commands without generating Error 1601.
QuickBooks Install Diagnostic Tool automates dependency validation by re-registering system frameworks and fixing version conflicts that prevent the msiexec.exe installer from completing operations. It eliminates manual troubleshooting of registry entries or installer permissions, ensuring that QuickBooks and Windows share consistent runtime configurations.
Solution 5: Perform a Clean Reinstallation of QuickBooks Desktop
A clean reinstallation of QuickBooks Desktop is a controlled process that removes all residual program files, registry entries, and system configurations associated with prior installations. This method ensures that any corrupted or outdated components responsible for QuickBooks Error 1601 are fully replaced with fresh installation data.
Error 1601 often persists when damaged Windows Installer caches or invalid QuickBooks registry paths prevent proper software registration. A clean reinstallation resets all installation parameters, eliminating dependency conflicts and restoring default operational stability.
Step-by-Step Procedure
- Uninstall the Existing QuickBooks Installation
- Open the Control Panel and select Programs → Programs and Features.
- Locate QuickBooks Desktop in the program list.
- Right-click the program name and choose Uninstall/Change → Remove → Next.
- Follow all on-screen instructions until the uninstall process is complete.
This step detaches QuickBooks from the Windows Installer registry and clears associated program references.
- Rename Residual Installation Folders
- After uninstallation, residual QuickBooks directories may remain in system folders.
- Open File Explorer and navigate to the following locations:
C:\Program Files\Intuit\QuickBooksC:\ProgramData\Intuit\QuickBooksC:\Users\[Username]\AppData\Local\Intuit\QuickBooks
- For each folder, right-click and select Rename.
- Append “_OLD” to the end of each folder name (e.g., QuickBooks_OLD).
Renaming prevents the new installation from referencing corrupted configuration or cache files.
- Reinstall the Latest Version of QuickBooks Desktop
- Download the latest official QuickBooks installer package from the Intuit website.
- Run the installer as an Administrator by right-clicking the setup file and selecting Run as administrator.
- Follow on-screen instructions to complete installation.
- When prompted, enter your license and product information to register the application.
- Activate and Configure QuickBooks Desktop
- After installation, open QuickBooks.
- Proceed with the on-screen activation process to validate your license credentials.
- Restore your company file from the previously created backup to resume operations.
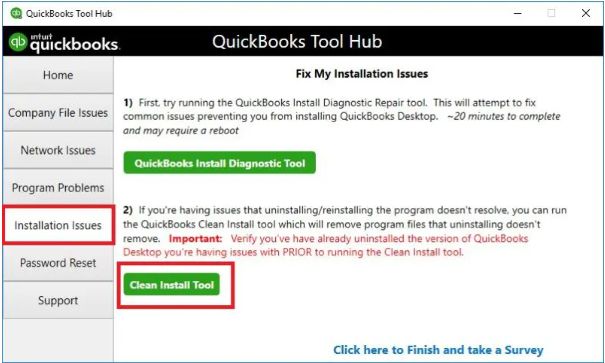
The clean reinstallation process removes invalid installation references from the Windows Installer database and registry hierarchy, which are common triggers for Error 1601.
By renaming the old directories, Windows and QuickBooks generate new folder structures with fresh configuration files and permissions. This ensures that the msiexec.exe process can execute installation commands without interference from corrupted QuickBooks libraries or incomplete system links.
This method also refreshes associated dependencies such as the QuickBooks Database Server Manager, ensuring consistent synchronization between application components and the Windows operating environment.
Solution 6: Repair and Re-register the Windows Installer to Resolve QuickBooks Error 1601
The Windows Installer (msiexec.exe) is the core service responsible for managing software installation, configuration, and repair in all Windows environments.
QuickBooks Error 1601 arises when this service becomes corrupted, deregistered, or fails to execute its installation commands. Repairing and re-registering the Windows Installer restores its operational linkage with system libraries and allows QuickBooks setup processes to execute correctly.
This procedure involves three corrective processes: (1) re-registering the installer engine, (2) restarting the Windows Installer service, and (3) repairing installer integrity using system utilities.
Process 1: Re-register the Windows Installer via Command Prompt
When the Windows Installer is deregistered or its registry keys are missing, QuickBooks installation cannot initiate. Re-registering the service re-establishes its registry paths and command execution rights.
Step-by-Step Procedure
- Open the Command Prompt as Administrator
- Press Windows + R, type cmd, and press Ctrl + Shift + Enter to launch Command Prompt with administrative privileges.
- Unregister the Windows Installer Service
- Type the following command and press Enter:
msiexec /unreg - This command detaches the existing Windows Installer registration from the system registry, clearing any corrupted linkage.
- Type the following command and press Enter:
- Re-register the Windows Installer Service
- Once the unregistration completes, type the next command:
msiexec /regserver - This command re-registers msiexec.exe as a valid Windows service and restores installer execution rights.
- Once the unregistration completes, type the next command:
- Restart the Computer
- Close the Command Prompt and restart the system to finalize service reinitialization.
- The reboot ensures that the Windows Installer re-registers all associated system libraries.
Technical Effect:
This process reinstates the installer’s registry mappings and DLL associations, allowing QuickBooks setup scripts to interact with Windows Installer APIs without encountering access violations.
Process 2: Restart the Windows Installer Service
If the service remains unresponsive after re-registration, it must be manually restarted through the Windows Services console or via system commands.
Step-by-Step Procedure
- Open the Services Console
- Press Windows + R, type services.msc, and press Enter.
- Locate Windows Installer from the list of system services.
- Check Service Status
- If the status shows Running, right-click and select Restart to reinitialize the process.
- If it shows Stopped, right-click and select Start.
- Restart the Service via Command Prompt (Alternative)
- Open Command Prompt (Admin) and enter the following commands sequentially:
net stop msiserver net start msiserver - These commands terminate the installer service and restart it, reactivating all internal threads associated with installation operations.
- Open Command Prompt (Admin) and enter the following commands sequentially:
Restarting the service clears temporary service locks, restarts pending installer transactions, and resets msiexec.exe’s access to the Windows system registry.
Process 3: Update or Repair the Windows Installer
If the Windows Installer is corrupted or outdated, running system repair utilities restores damaged files and service configurations.
Step 1: Repair Installer Registration through Command Prompt
- Open Command Prompt (Admin).
- Type and execute the following commands sequentially:
msiexec /unregister msiexec /regserver - Restart the computer to apply registry and service changes.
- Reattempt QuickBooks installation after reboot.
Step 2: Repair System Files Using the System File Checker (SFC)
- Open Command Prompt (Admin) by pressing Windows + R, typing cmd, and pressing Ctrl + Shift + Enter.
- Type the command:
sfc /scannow - Press Enter and wait until the scan completes.
- If the SFC tool detects integrity violations, follow the on-screen instructions to repair corrupted system files.
- Restart the computer once repairs are complete.
The System File Checker (SFC) and DISM utilities validate system-level files and repair broken installer components that directly affect msiexec.exe.
Updating or repairing the Windows Installer ensures that QuickBooks installation scripts can execute properly, re-registering dependencies and avoiding access conflicts.
Solution 7: Repair or Reinstall the Microsoft .NET Framework
The Microsoft .NET Framework is an essential runtime environment that enables QuickBooks Desktop to execute installation, update, and operational commands. It supports Windows communication between application installers and system-level APIs. When the .NET Framework becomes corrupted or partially unregistered, the Windows Installer (msiexec.exe) fails to execute necessary configuration scripts—resulting in QuickBooks Error 1601.
Repairing or reinstalling the .NET Framework re-establishes the connection between QuickBooks and the Windows installation infrastructure, restoring access to required libraries and registry keys.
Step-by-Step Procedure
- Access the Windows Features Panel
- Open the Control Panel.
- Navigate to Programs → Programs and Features → Turn Windows features on or off.
This section allows you to enable or disable Windows-integrated frameworks such as .NET.
- Deactivate the Affected .NET Versions
- Identify the installed versions of .NET Framework (commonly 3.5, 4.7, or 4.8).
- Uncheck the box beside each affected version and click OK.
- Windows will disable the selected frameworks and remove associated temporary files.
This step isolates potentially damaged instances from the system’s runtime environment.
- Restart the Computer
- Once deactivation completes, restart your system to ensure all changes are written to the registry and cached system files are cleared.
- Re-enable and Reinstall the Framework
- Return to the Windows Features panel.
- Recheck the boxes beside the previously disabled .NET versions.
- Click OK and allow Windows to reinstall and re-register the framework components.
- If prompted, connect to the internet so Windows can download any missing installation files.
- Restart to Finalize the Repair
- After reinstallation, perform another full system reboot.
- This ensures that the newly restored .NET components are properly integrated into the Windows Installer process.
- Reattempt QuickBooks Installation or Update
- Launch QuickBooks setup again to confirm that the error no longer appears.
Successful initialization confirms that the Installer can now access the repaired framework modules.
- Launch QuickBooks setup again to confirm that the error no longer appears.
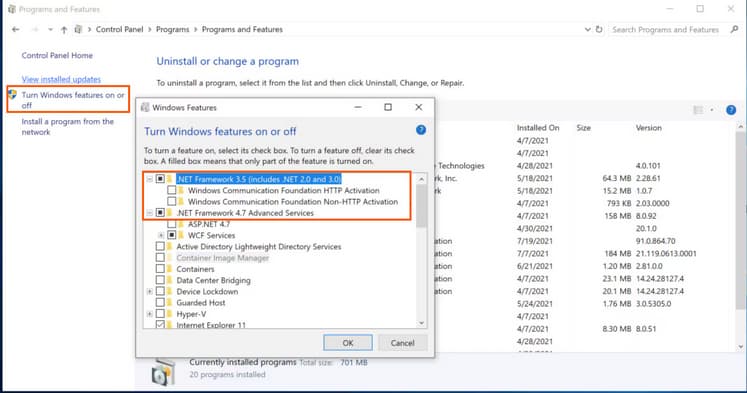
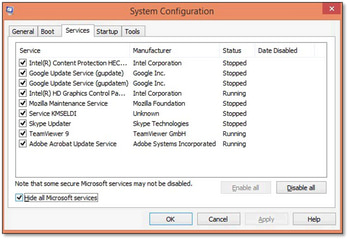
QuickBooks Desktop relies on the .NET Framework to process XML configuration, manage user permissions, and register installation libraries. When framework files or registry keys are damaged, the msiexec.exe process fails to load runtime dependencies, triggering Error 1601. Reinstalling or reactivating .NET reestablishes these linkages and restores installation stability across Windows environments.
Solution 8. Reinstall or Repair Java Runtime Environment (if applicable)
The Java Runtime Environment (JRE) is a core dependency for several QuickBooks Desktop components, including functions that execute XML-based scripts, database synchronization, and installer processes. When Java is outdated, corrupted, or improperly registered, QuickBooks installation and update commands may fail to execute, leading to QuickBooks Error 1601.
Reinstalling or repairing the Java environment restores compatibility between QuickBooks and the Windows Installer framework, ensuring proper runtime execution during installation.
Step-by-Step Procedure
- Uninstall Existing Java Versions
- Open the Control Panel → Programs → Programs and Features.
- Locate all installed entries labeled Java or Java Runtime Environment.
- Select each version and click Uninstall.
- Follow all on-screen prompts until the process is complete.
- Once uninstalled, restart your computer to clear any residual registry entries.
This process removes outdated or corrupted Java binaries that could interfere with QuickBooks installation dependencies.
- Download the Latest Java Runtime Version
- Visit the official Java download page (https://www.java.com).
- Select the 64-bit offline installer compatible with your version of Windows.
- Save the installer file to your desktop for easy access.
- Running the 64-bit version ensures full compatibility with 64-bit editions of QuickBooks Desktop and Windows Installer (msiexec.exe).
- Install the Java Package
- Right-click the downloaded installer and select Run as administrator.
- Follow the installation wizard to complete the setup.
- Once installation is complete, restart the computer to finalize the configuration.
- The installer automatically re-registers Java libraries and associated registry paths required for QuickBooks processes.
- Verify the Java Installation
- Open Command Prompt by pressing Windows + R, typing cmd, and pressing Enter.
- Type the command:
java -version - Press Enter. The system should display the currently installed Java version.
- A valid version output (e.g., “java version 1.8.0_401”) confirms successful installation and registration.
- Reattempt QuickBooks Installation or Update
- Launch QuickBooks setup again.
- If Java was the missing or corrupted component, the Windows Installer should now initialize correctly and proceed without generating Error 1601.
QuickBooks Desktop uses Java-based components for internal installation tasks and runtime communication with Windows Installer APIs. A corrupted JRE disrupts these functions, resulting in incomplete installations or failed updates.
Reinstalling Java re-establishes correct runtime calls, allowing QuickBooks to execute installer scripts, access XML configuration data, and register components with the msiexec.exe service. This process directly stabilizes the installation environment and removes one of the most frequent triggers for Error 1601.
How to fix Java error code 1601 on Windows 10?
To fix Java Error Code 1601 on Windows 10, follow these step-by-step instructions:
Step 1. Boot into Safe Mode with Networking
- Restart your computer.
- While it restarts, press F8 (or Shift + F8) to access the Advanced Boot Options.
- Select Safe Mode with Networking to allow access to essential services.
Step 2. Uninstall Existing Java Installations
- Download and run the Microsoft Uninstall Diagnostic Tool to remove any traces of previous Java installations.
- Follow the tool’s steps to uninstall Java versions one at a time.
- Once all Java versions have been uninstalled, restart your computer normally.
Step 3. Install Java 64-bit
- Download the offline 64-bit version of Java from the official site.
- Run the installer and complete the installation.
Step 4. Verify Java Installation
- Open Command Prompt and type
java -versionto check if Java is successfully installed.
If these steps don’t work, ensure that your Windows Installer service is functioning properly by checking the system services.
Customized System-Level Solution to Resolve QuickBooks Error 1601
To resolve QuickBooks Error 1601, temporarily disable your antivirus software, as it might be blocking essential access. Ensure you’re logged in as an administrator, have the complete and official setup file, and have installed all Windows updates.
For more detailed steps, follow the solutions below:
Disable Your Antivirus Software
Temporarily disabling your antivirus software can resolve QuickBooks errors 1601 or even 1642, as the antivirus might be restricting the access required to complete the task.
Before proceeding with applying any solution to fix this error, ensure the following.
- You’re logged into your system as an administrator.
- Ensure that you have downloaded the complete setup file.
- Also, make sure you have downloaded the setup file through the official Intuit portal.
- Close all apps or programs running on the operating system and try attempting to downloading them again before moving on to fix the error, as it may be solved just by doing this.
- Ensure all updates for the Windows operating system are installed.
- Update all necessary Windows drivers.
- Consider manually rectifying any issues with the .NET framework.
The following are the steps to turn off the antivirus software on your computer system:
Step 1: Move to Settings
- Press the Start button on your keyboard or desktop screen and move to Settings.
Step 2: Choose Update & Security
- Select the Update & Security option.
Step 3: Proceed to Windows Security
- Hover over Windows Security.
Step 4: Select Virus & Threat Protection
- Now, click on the Virus & Threat Protection option.
Step 5: Manage Virus & Threat Protection settings
- After this, manage Settings>Virus & Threat Protection settings.
Step 6: Find and disable Real-Time Protection
- Locate the “Real-Time Protection” option and turn it off.
Note: This action will allow scheduled scans to continue, but will stop real-time scanning of downloaded or installed files. This can potentially fix and prevent QuickBooks installation errors, as the files won’t be scanned until the next scheduled scan or until you conduct a manual scan.
Preventive Measures to Avoid QuickBooks Error 1601
Preventing QuickBooks Error 1601 requires maintaining a stable Windows installation environment and ensuring that system-level dependencies are consistently updated and properly configured. Since Error 1601 originates from Windows Installer failures, proactive maintenance minimizes corruption risks, registry conflicts, and installation interruptions.
1. Keep Windows, QuickBooks, and Related Frameworks Updated
Regularly install all available updates for Windows, QuickBooks Desktop, and supporting frameworks such as Microsoft .NET, C++ Redistributables, and Java Runtime Environment (JRE).
These updates contain dependency patches, new registry definitions, and bug fixes that maintain compatibility between QuickBooks and the Windows Installer service (msiexec.exe). Outdated or partially installed updates often leave missing DLL references or security configurations that lead to installer failures.
2. Run QuickBooks with Administrative Privileges
Always execute the QuickBooks installer or update utility as an Administrator.
Administrative privileges ensure unrestricted access to protected system directories and registry entries. Without elevated permissions, the Windows Installer cannot modify configuration files or register required components, leading to incomplete installations and recurring Error 1601 messages.
3. Temporarily Disable Real-Time Antivirus or Firewall Scanning During Installation
Security applications may block access to installation directories or executable components during file extraction. Temporarily disable real-time protection when performing major installations or updates.
This action allows QuickBooks setup files to communicate directly with the Windows Installer without interference. Once the installation is complete, re-enable the antivirus to restore normal protection.
4. Maintain Scheduled Backups of Company Data and Configuration Files
Create routine backups of QuickBooks company data and key configuration folders, including C:\ProgramData\Intuit and C:\Users[Username]\AppData\Local\Intuit.
Regular backups protect against accidental data corruption or loss caused by installation failures, system crashes, or framework repairs. This ensures quick restoration of company files after software reinstallation or recovery operations.
5. Avoid Forced or Abrupt System Shutdowns During Installation
Do not power off or restart the system while QuickBooks or Windows updates are running. Abrupt shutdowns interrupt the installation process and corrupt temporary configuration files managed by msiexec.exe.
Allow all installation and update processes to finish completely before restarting. This prevents registry inconsistencies and ensures stable installer registration for future updates.
6. Conduct Periodic System Maintenance
Use built-in utilities such as Windows Disk Cleanup, System File Checker (sfc /scannow), and DISM (Deployment Image Servicing and Management) to repair corrupted system files and maintain optimal installer performance.
Routine system integrity checks help preserve Windows Installer functionality and reduce the likelihood of recurring installation errors across QuickBooks versions.
Maintaining updated frameworks, granting administrative access, and managing system resources effectively ensures continuous communication between QuickBooks installation modules and the Windows Installer service. Consistent preventive maintenance minimizes dependency corruption, preserves registry integrity, and prevents recurrence of Error 1601 during future QuickBooks installation or update cycles.
Final Words
Hopefully, the information given above will be useful to you. But if you are still facing any kind of issues with your software and need professional assistance regarding accounting, bookkeeping & accounting software-related issues, then feel free to get technical support with us at +1-802-778-9005, or you can email us at support@ebetterbooks.com
Still have questions? Explore our detailed FAQs.
Disclaimer: The information outlined above for “How to Fix QuickBooks Error 1601 – Java Error 1601 Windows 7” is applicable to all supported versions, including QuickBooks Desktop Pro, Premier, Accountant, and Enterprise. It is designed to work with operating systems such as Windows 7, 10, and 11, as well as macOS.
