You may need to manually uninstall and reinstall QuickBooks Desktop to fix some of the most common errors encountered during the course of your work.
These errors are as follows:
- Company file issues
- Networking errors
- Installation issues or errors
- PDF and printing errors
- QuickBooks crashing and much more.
Note: The latest QuickBooks Desktop 2024 version has been released by Intuit. You can download it from here.
Why Uninstall and Reinstall QuickBooks Desktop Manually?
Below are some scenarios in which you need to uninstall & reinstall QuickBooks desktop.
- When QuickBooks has stopped working or not responding.
- When QuickBooks freezes or crashes because it can’t load its own program.
- When the third-party applications damage the QuickBooks installation on your PC,
- When your computer’s hard drive breaks down and is replaced with a new one.
- When Viruses, malware, or Windows updates corrupted the QuickBooks installation.
Points to Remember before uninstalling and reinstalling QuickBooks Desktop Manually
There are a few cautionary actions you need to take when you start un-installation and re-installation of the QB Desktop manually. Let’s check them out:
- Make sure you have the latest QuickBooks Desktop version downloaded to your system.
- Download the installer for your QuickBooks version.
- Backup your company files to keep your data safe and secure.
- Keep your Product and License number Handy.
As soon as the QuickBooks software gets uninstalled or reinstalled in your system, you are prompted to enter the Product and license number to log back into the software. So, it is important to keep it in check. It should be on the original package. But if you bought it online, it will be available on the purchase confirmation email.


For this, press the F2 key or the CTRL+1 tabs to open the Product Information window, where you will find the product registration information.
Process to Back Up Your QuickBooks Data:
Before uninstalling QuickBooks Desktop, it’s crucial to back up your important data, including company files, financial records, and other relevant information.
To back up your data follow the steps:
- Go to the File menu in QuickBooks
- Select Create Backup from the dropdown options.
- Follow the on-screen instructions to save the backup to a secure location, such as an external hard drive, cloud storage, or another networked computer.
- Confirm the backup settings preserving your data and ensuring it’s accessible when moving to a new system or QuickBooks version.
Process to Uninstall and Reinstall QuickBooks Desktop Manually (Step-by-Step Guide)
Step 1: Uninstall QuickBooks Desktop from Control Panel
Uninstalling QuickBooks Desktop requires you to navigate to Windows “Control Panel” and then from there select the “Programs and Features” section that lists all the software installed on your computer. There you will get an option to give the command to uninstall QuickBooks Desktop.
Follow the instructions below to uninstall QuickBooks Desktop from Windows Control Panel:
- Make sure you have backed up your QuickBooks data.
- Click on the Programs and Features or Uninstall a Program.
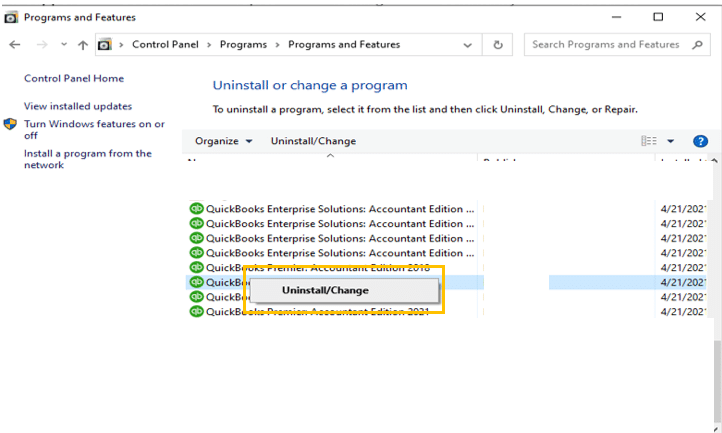
- After this, choose the QuickBooks Desktop version you want to remove from the list of programs.
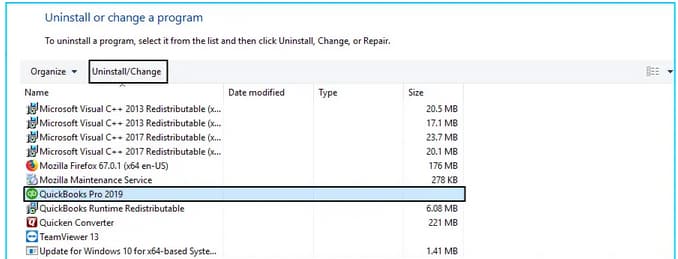
- When you’re ready, select the Uninstall/Change icon if you wish to uninstall the software.
- Otherwise, hit the Remove tab and then press the Next button.
After uninstalling QuickBooks Desktop from the control panel, you also need to stop the services running in the background and delete any local files stored on your computer.
Step 2: Manually Rename the QuickBooks Desktop Installation Folders
- Navigate to the Windows Start menu and look for “File Explorer,” then open the same.
- Locate and open the folder with your company files. This is usually your QuickBooks folder that can be accessed from one of these locations:
- C:\ProgramData\Intuit\QuickBooks (year)
- C:\Users\(current user)\AppData\Local\Intuit\QuickBooks (year)
- C:\Program Files\Intuit\QuickBooks (year)
- 64-bit version C:\Program Files (x86)\Intuit\QuickBooks (year)
- Hit right-click on the folder and then select the Rename option.
- After this, add the word .old at the end of the folder name. This prevents QuickBooks from opening the folder when you reinstall it.
- Lastly, reinstall the QuickBooks Desktop software.
If you get an access error message “The access denied while renaming the folder“ at the time of renaming the folder, adhere to the following steps:
- Initially, press the Ctrl + Shift + Esc keys to open the Windows Task Manager. You can also look for the Task Manager in the Start menu bar.
- Next, hit the Processes tab.
- Choose the Name column header to sort the list.
- Afterward, locate and select the following processes from the Processes tab, which include QBDBMgrN.exe, QBDBMgr.exe, QBCFMonitorService.exe, Qbw32.exe. Then, click on the End Process icon after selecting each of these processes.
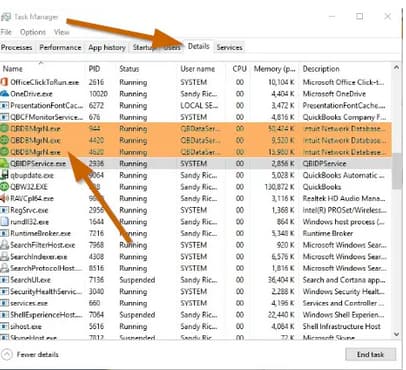
- Press Yes if you notice the warning prompt, “WARNING: Terminating a process can cause undesired results…”
Step 3: Reinstall QuickBooks on your System
- Firstly, insert the Installation CD into the computer if you have any, and then follow the on-screen instructions to complete the installation process.
- Download your QuickBooks version from the QuickBooks Product Download Page in case you have purchased QuickBooks from the official Intuit website.
- Once the product is successfully installed into your system, it will ask you to enter the Product and QuickBooks License number.
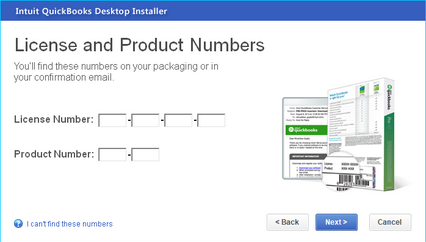
Note: Type the credentials just as they were mentioned in the system earlier.
- After entering the above information, follow the on-screen prompts to get the step completed.
- Click on the Next icon and then select the type of installation you want for your accounting process.
- Now, press Next and hit the Install tab.
- When QuickBooks installation finishes, you’re all set to run it in your system.
Note: After installation, if you’re on the server, do open the database server manager.
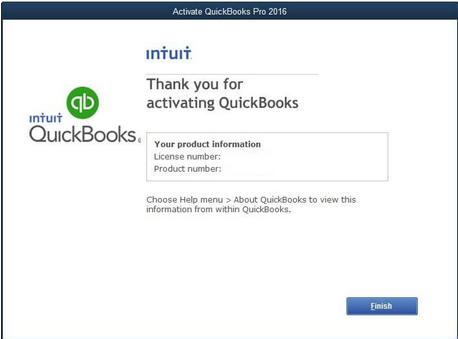
Step 4: Activate QuickBooks Desktop
Once you are done with installing QuickBooks, it’s time to activate it so you can access the exclusive QB features.
For a manual activation, adhere to the following steps:
- Open QuickBooks in the first place.
- Now, choose Activate QuickBooks Desktop from the Help menu.
- Follow the on-screen steps to verify your info.
Summing it Up!
Hopefully, the information given above will be useful to you. But if you are still facing any kind of issues with your software and need professional assistance regarding accounting, bookkeeping & accounting software-related issues, then feel free to get technical support with us at +1-802-778-9005, or you can email us at support@ebetterbooks.com
Troubleshooting Installation Errors When Reinstalling QuickBooks Desktop?
Reinstalling QuickBooks Desktop should be a straightforward process, but sometimes errors can occur that prevent a smooth installation. Here’s how to fix the most common issues:
1. Check System Requirements
Ensure your computer meets the minimum system requirements for your QuickBooks Desktop version. Insufficient RAM or outdated Windows/macOS versions can cause installation failures.
2. Use the QuickBooks Install Diagnostic Tool
Download and run the QuickBooks Install Diagnostic Tool from the QuickBooks Tool Hub to fix common installation issues automatically.
3. Disable Antivirus and Firewall Temporarily
Security software can sometimes block QuickBooks installation. Temporarily disable your antivirus and firewall, then retry installing QuickBooks.
4. Perform a Clean Install of QuickBooks
If reinstalling normally doesn’t work, try a clean install using the QuickBooks Clean Install Tool:
- Uninstall QuickBooks Desktop
- Rename installation folders manually or use the tool
- Reinstall QuickBooks Desktop with a fresh setup
5. Fix Windows Components (If Needed)
Errors during installation may be caused by damaged Windows components. Try the following:
- Update .NET Framework (Required for QuickBooks)
- Repair Microsoft MSXML and C++
- Run Windows Update to fix missing system files
6. Check for Damaged QuickBooks Installation Files
Corrupt installation files can cause errors. Download a fresh QuickBooks installer from Intuit’s official website and ensure you’re using the correct version.
7. Run QuickBooks in Compatibility Mode (Windows Only)
For older versions, right-click the QuickBooks setup file, go to Properties > Compatibility Mode, and select an earlier Windows version.
8. Contact QuickBooks Support If Needed
If errors persist, reach out to QuickBooks Support for advanced troubleshooting.
By following these steps, you can resolve most QuickBooks Desktop installation errors and get back to business quickly!
How to Deactivate QuickBooks Desktop?
If you no longer need QuickBooks Desktop on a specific device or want to transfer your license, deactivating it ensures proper account management. Here’s how to do it:
Why Deactivate QuickBooks Desktop?
- You’re switching to a new computer.
- You want to transfer your license to another user.
- You’re no longer using QuickBooks Desktop and want to disable activation.
Steps to Deactivate QuickBooks Desktop
For Windows:
- Open QuickBooks Desktop and go to Help > Manage My License.
- Click Deactivate QuickBooks on This Computer.
- Follow the prompts to confirm deactivation.
For Mac:
- Open QuickBooks and go to QuickBooks > Preferences.
- Select License & Product Information.
- Click Deactivate this License and confirm.
What Happens After Deactivation?
- QuickBooks will no longer be licensed on the deactivated device.
- You can reinstall and activate it on another computer if needed.
- Your company files remain unaffected, but you must log in again after reactivation.
If you plan to reinstall or transfer QuickBooks, make sure to save your license number before deactivation.
How to Uninstall QuickBooks Desktop on Windows & Mac?
If you need to uninstall QuickBooks Desktop from your computer—whether for troubleshooting, upgrading, or reinstalling—follow these simple steps based on your operating system.
Uninstall QuickBooks Desktop on Windows
- Close QuickBooks – Ensure the software is not running.
- Open Control Panel – Press Windows + R, type appwiz.cpl, and hit Enter.
- Find QuickBooks Desktop – Scroll through the list and select QuickBooks.
- Click Uninstall/Change – Follow the on-screen instructions to remove the software.
- Delete Leftover Files (Optional) – For a complete removal, navigate to C:\Program Files\Intuit\QuickBooks and delete the folder.
Uninstall QuickBooks Desktop on Mac
- Close QuickBooks – Make sure QuickBooks is not running.
- Go to Applications Folder – Open Finder and select Applications.
- Move QuickBooks to Trash – Drag the QuickBooks icon to the Trash.
- Delete Preferences (Optional) – Go to ~/Library/Application Support/QuickBooks and remove associated files for a full clean-up.
- Empty Trash – Right-click the Trash bin and select Empty Trash to finalize the uninstallation.
Next Steps After Uninstalling
- If you plan to reinstall QuickBooks, download the latest version from Intuit’s official website.
- If you’re facing issues, consider using the QuickBooks Clean Install Tool for a thorough removal before reinstalling.
Need further help? Check Intuit’s support page for troubleshooting assistance.
How to Install QuickBooks Desktop on Windows & Mac?
Installing QuickBooks Desktop on your computer is a straightforward process, whether you’re using Windows or Mac. Follow the steps below to ensure a smooth installation.
System Requirements
Before you begin, check that your computer meets QuickBooks Desktop’s system requirements for the version you’re installing.
Installing QuickBooks Desktop on Windows
- Download QuickBooks
- Visit the Intuit website and download the latest version of QuickBooks Desktop.
- If you have a CD, insert it into your computer.
- Run the Installer
- Open the downloaded .exe file and follow the on-screen prompts.
- Enter your license and product key when prompted.
- Choose Installation Type
- Express Install (Recommended for single users)
- Custom & Network Install (For multiple users or server setup)
- Complete the Installation
- Follow the on-screen instructions to complete the setup.
- Open QuickBooks and activate your software by signing in to your Intuit account.
Installing QuickBooks Desktop on Mac
- Download QuickBooks
- Get the Mac version from the Intuit website or use the installation disk.
- Install the Software
- Open the .dmg file and drag the QuickBooks icon to the Applications folder.
- Launch and Activate
- Open QuickBooks from your Applications folder.
- Enter your license and product key to activate.
Final Setup
- Update QuickBooks to the latest version.
- Restore your company file if you have previous data.
- Set up multi-user mode if needed.
Now you’re all set to start using QuickBooks Desktop! If you encounter any issues, check the QuickBooks Tool Hub for troubleshooting.
How to Transfer QuickBooks Desktop to Another Computer?
If you’ve purchased a new computer and need to move QuickBooks Desktop, you can easily transfer your software, company files, and license details. Follow these simple steps to ensure a smooth transition.
Step 1: Prepare for the Transfer
- Make sure your QuickBooks Desktop is updated to the latest version.
- Locate your license and product number (you can find it in QuickBooks under Help > About QuickBooks).
- Backup your company files to an external drive or cloud storage.
Step 2: Install QuickBooks on the New Computer
- Download QuickBooks from the Intuit website or use your installation CD.
- Follow the on-screen instructions to install and activate QuickBooks using your license details.
Step 3: Restore Your Company Files
- Copy the backup file to the new computer.
- Open QuickBooks and go to File > Open or Restore Company.
- Select Restore a Backup Copy and follow the prompts to restore your data.
Step 4: Verify and Reconfigure QuickBooks
- Ensure your company files open correctly.
- Reconnect bank feeds, payroll services, and third-party apps if needed.
- If using multi-user mode, update file permissions and network settings.
Alternative Method: Use QuickBooks Migration Tool
For QuickBooks 2019 and later, you can use the QuickBooks Migration Tool to simplify the process. It transfers QuickBooks and up to three company files along with necessary settings.
Final Check
- Test QuickBooks on the new computer.
- Uninstall QuickBooks from the old computer if no longer needed.
- Keep a copy of your backups for extra security.
Where to Find Your QuickBooks Desktop License Number for Reinstallation
If you need to reinstall QuickBooks Desktop, you’ll need your license number and product key. Here’s how you can find them:
1. Check Your QuickBooks Installation Details
- In QuickBooks Desktop:
- Open QuickBooks and press F2 or Ctrl + 1 to open the Product Information window.
- Your license number and product key will be displayed.
2. Look for Email Confirmation
- If you purchased QuickBooks online, check your email for the purchase confirmation from Intuit.
3. Find the License on the Original Packaging
- If you bought a physical copy, the license number is on the packaging or CD sleeve.
4. Sign in to Your Intuit Account
- Go to Intuit’s License Lookup Tool and log in with your Intuit credentials.
- Navigate to “Products & Subscriptions” to find your registered QuickBooks license.
5. Check Your QuickBooks Subscription
- If using QuickBooks Desktop Plus or Enterprise, your license info might be available under your Intuit account.
6. Contact QuickBooks Support
- If you can’t find your license number, contact QuickBooks Support and provide your purchase details for assistance.
By following these steps, you can easily locate your QuickBooks Desktop license number for a smooth reinstallation.
Still have questions? Explore our detailed FAQs.
Disclaimer: The information outlined above for “Uninstall & Reinstall QuickBooks Desktop Manually” is applicable to all supported versions, including QuickBooks Desktop Pro, Premier, Accountant, and Enterprise. It is designed to work with operating systems such as Windows 7, 10, and 11, as well as macOS.
