What is QuickBooks Error 6094 & How Does It Look When it Occurs
QuickBooks Error 6094 0 happens when the Intuit’s QuickBooks application is unable to launch the web database server that is required for the users in the network to access the company files. This error can occur due to issues with the antivirus or a third-party program as PC Tools Internet Security, AVG Anti-Virus or SpyHunter Malware. They may even disable or hinder QuickBooks or the processes required to maintain this software operative and free of issues that interfere with your work.
Also, problems like restricted firewall or having a damaged QBW file may also cause this error to occur.
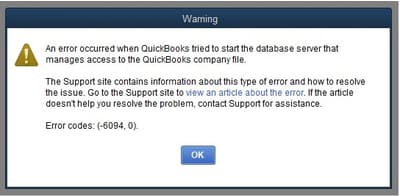
When it occurs, you’ll see a warning message stating:
“An error occurred when QuickBooks tried to start the database server that manages access to the QuickBooks company file. Error (-6094,0)”
Possible Reasons Behind the QuickBooks Error 6094
QuickBooks Error 6094 can be caused by several problems, most of which may be related to either an interference from security programs or configuration problems on the computer.
Here are the most common reasons behind this error:
- Antivirus Restrictions
- QuickBooks is not included in your list of exceptions within your antivirus software.
- The company’s antivirus program, for instance, PC Tools, AVG or SpyHunter, is preventing QuickBooks from opening the company file.
- Some important QuickBooks files namely qbdmgr.exe and qbdmgrN.exe get locked and quarantined by the antivirus software.
- Firewall and Network Configuration List
- Firewalls that are installed on QuickBooks PC are set up incorrectly to allow the software to communicate over the network.
- Many workstations act as host servers and this results in confusing to access files.
- File or Application Issues
- QuickBooks has either been impaired or corrupted in the QuickBooks Desktop version.
- There is a problem with access to the company file due to its damage.
- The QuickBooks software is installed with errors, or the installation is only half done.
- Software Update Problems
- The software is not updating when it is the current version of QuickBooks Desktop.
Customized Solution for QuickBooks Error 6094
Follow these customized solutions to resolve QuickBooks Error 6094:
Step 1: Check your Internet connection.
- Ensure that your internet connection is reliable.
- If the connection is inconsistent or weak, please contact your internet service provider.
- A stable connection is required to view your corporate files from different workstations.
Step 2: Verify your QuickBooks installation.
- Determine whether the QuickBooks version installed on your PC is corrupted.
- Restart or repair your QuickBooks program to resolve installation or update errors.
Step 3: Make a backup of your company files.
- Back up your company file before trying any repairs or a clean installation.
- This protects your data in case it is misplaced, lost, or mistakenly erased.
Step 4: Update your software.
- Update both QuickBooks and your antivirus software to the most recent versions.
- Make sure you are logged in as an administrator to make the necessary modifications.
Step 5: Setup Multi-User Mode.
- Ensure that all systems are linked to the same network.
- Enable hosting on the server computer (the one that hosts your company’s files).
- Ensure that the business file is not accessed from another computer using the same login credentials.
Step 6: Run Quick Fix. My Program.
- Open the QuickBooks Tool Hub.
- To close QuickBooks background processes, select Quick Fix My Program.
- Allow the tool to scan and rectify common program or corporate file issues.
Step 7: Proceed to Advanced Solutions.
If the difficulty remains after following these procedures, proceed to the advanced troubleshooting methods.
Advanced Troubleshooting Methods for QuickBooks Error 6094
Solution 1: Precautionary Steps
Before going through the solution part, here’s a list of certain precautionary steps that must be implemented carefully:
Step 1: Correct File Path for Bitdefender Exclusion List
- Open Bitdefender Antivirus Settings.
- Navigate to Exclusions or Exceptions.
- Add the QuickBooks Desktop installation folder (typically located at C:\Program Files (x86)\Intuit\QuickBooks or C:\Program Files\Intuit\QuickBooks).
- Ensure the entire directory is excluded from scanning.
Step 2: Update Antivirus Software
- Open Bitdefender or your antivirus software.
- Go to Settings > Update.
- Make sure your antivirus software is up to date to avoid scanning the QuickBooks Desktop directory.
Step 3: Verify File Extensions
- Check the file extensions qbdmgr.exe and qbdmgrN.exe.
- Restore these files from the virus vault or quarantine if they were removed.
- Ensure they are excluded from antivirus scans by adding them to the exception list.
Step 4: Temporarily Disable Firewall or Antivirus
- Open Bitdefender or your antivirus software.
- Disable the Firewall or Real-time Protection temporarily.
- Add QuickBooks as an exception.
- If disabling resolves the issue, check for exclusions and verify that the antivirus is allowing QuickBooks to communicate with the server.
Step 5: Antivirus Interference with QuickBooks
- Ensure QuickBooks is added as an exception to the antivirus settings.
- Verify that the QuickBooks Desktop executable (qbdmgr.exe or qbdmgrN.exe) is excluded from real-time scanning.
- Test if QuickBooks now connects to the company file.
Step 6: Verify Hosting Settings and QuickBooks Services
- On the Server Computer, ensure that QuickBooks hosting settings are set correctly.
- Open Task Manager and check that services like QuickBooksDBXX and QBCFMonitorService are running.
- Restart these services if necessary.
Method 1: Putting QuickBooks in the list of Bitdefender Exclusion
Bitdefender has amazing features in terms of malware detection, removal rates, device optimization, and data protection.
At times, just disabling Bitdefender does not work and is not sufficient to sort out the trouble.
Here’s how to add QuickBooks Desktop to your Bitdefender exclusion list:
- For 32-bit Windows Operating Systems, Add the following path: C:\Program Files\Common Files
- For 64-bit Windows Operating Systems, Add the following path: C:\Program Files (x86)\Intuit
Or C:\Program Files\Intuit
Method 2: Check Antivirus Software Settings – Ensure QuickBooks is Not Blocked
Antivirus software is meant to detect, mitigate, and eradicate dangerous programs, including spyware, trojans, ransomware, adware, viruses, and others.
It safeguards your device against cyber threats by isolating files that can be considered security threats. If you want to run antivirus software on your QuickBooks software, add QuickBooks as an exclusion to prevent it from scanning by Antivirus Software. Also, provide accurate access and permissions to your program.
To ensure the antivirus does not block QuickBooks:
- Open your antivirus software settings.
- Add QuickBooks as an exclusion to prevent it from being scanned.
- Verify access permissions for QuickBooks programs.
- If the antivirus quarantines QuickBooks files, restore them by following these steps:
- Navigate to the Virus Vault or Quarantine Folder in your antivirus software.
- Locate QuickBooks-related files (e.g., qb.exe, qbw32.exe, qbdbmgr.exe, qbdbmgrn.exe).
- Select the files and click Restore to return them to their original locations.
Method 3: Restore QuickBooks Files from Quarantine (If Any)
Your antivirus might have misplaced QuickBooks and rated it as a threat to your device, and as a result, some QuickBooks files that are executable were moved to the quarantine bin.
To recover these files:
- Open your antivirus user interface.
- Navigate to the Virus Vault or Quarantine section.
- Locate and select QuickBooks files (qb.exe, qbw32.exe, qbdbmgr.exe, qbdbmgrn.exe).
- Click Restore and close the dialog.
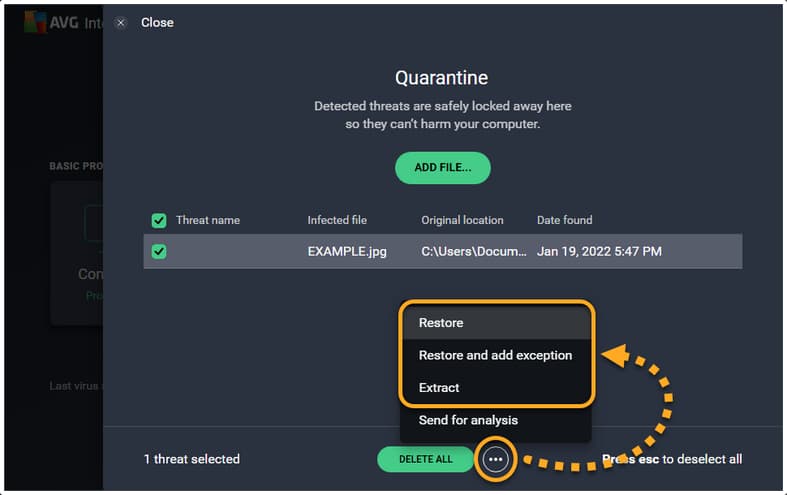
- Open QuickBooks Desktop to check if the issue is resolved.
Method 4: Ensure Firewall Settings and Configuration
Check firewall settings submitted to allow QuickBooks to gain access and approve QuickBooks as an exclusion.
Some improper settings of the Windows Firewall can interfere with QuickBooks’ ability to connect with the server or other workstations on multi-user networks.
Step 1: Add Firewall port exception for QuickBooks
- Navigate to the Windows Start menu.
- Search for Windows Firewall Settings and open it.
- Select Advanced Settings > Inbound Rules.
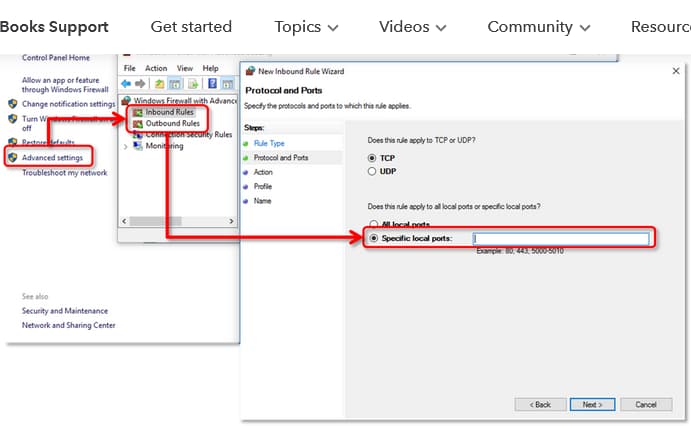
- Right-click on Inbound Rules and select New Rule.
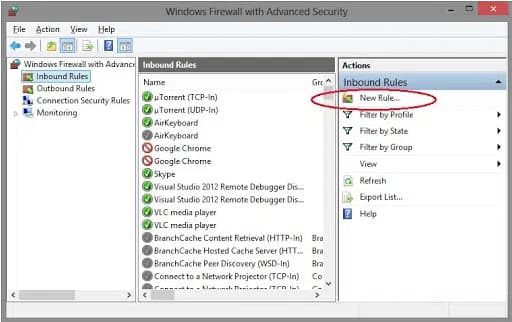
- Select Port and click Next.
- Ensure TCP is selected and enter the specific ports based on your QuickBooks Desktop version:
- QuickBooks Desktop 2020 and later: Port 8019
- QuickBooks Desktop 2019: Port 8019
- QuickBooks Desktop 2018: Ports 8019, 56728, 55378-55382
- QuickBooks Desktop 2017: Ports 8019, 56727, 55373-55377
QuickBooks Desktop 2021, 2022, and later versions use dynamic ports.
Let’s see how to get a dynamic port number:
- Once you enter the port number, click Next.
- Select Allow the Connection and click Next again.
- If prompted, ensure all profiles are checked, then click Next.
- Name the rule as QBPorts(year) and click Finish.
- Repeat these steps to create outbound rules.
Step 2: Windows Firewall Exceptions for QuickBooks Programs
In QuickBooks, executable files in the form of .exe are used in many accounting activities.
To create exceptions for these files, follow these steps:
- From the Start menu of Windows, type Windows Firewall and click on Windows Firewall.
- Click on Advanced Settings.
- Select ‘New Rule’ after right-clicking on Inbound Rules.
- Choose Next under the Select Program option.
- Select This Program Path and then select Browse.
- Choose one of the executable files from the table below, then click Next.
Below is a list of some executable files, along with their locations:
| Executable Files | Location |
| IntuitSyncManager.exe | C:\Program Files\Common Files\Intuit\Sync |
| QBCFMonitorService.exe | C:\Program Files\Common Files\Intuit\QuickBooks |
| AutoBackupExe.exe | C:\Program Files\Intuit\QUICKBOOKS YEAR |
| QBW32.exe | C:\Program Files\Intuit\QUICKBOOKS YEAR |
| QBLaunch.exe | C:\Program Files\Common Files\Intuit\QuickBooks |
| OnlineBackup.exe | C:\Program Files\QuickBooks Online Backup |
| FileManagement.exe | C:\Program Files\Intuit\QUICKBOOKS YEAR |
Once you have set your firewall permissions, open QuickBooks on your workstations, hover over the File menu, and then select the Switch to Multi-user Mode option.
Method 5: Check the Server Hosting Settings
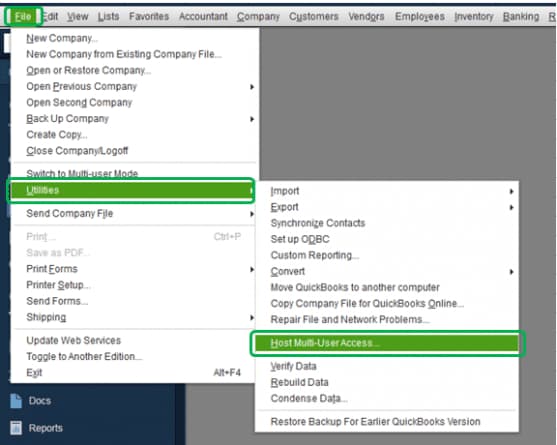
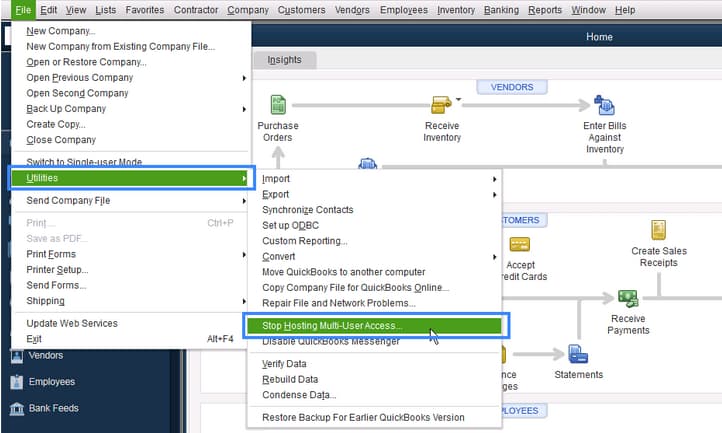
- Open QuickBooks on the server computer.
- Go to the File menu and choose Utilities.
- If the Host Multi-User Access option is selected, the corporate file is hosted on the server computer.
- If Stop Multi-User Access is available, choose Stop Hosting to return to single-user mode.
- Repeat these instructions for any workstations that are experiencing the QuickBooks Error 6094.
- Confirm by clicking Yes when asked.
- After resetting multi-user mode, ensure that you can access the corporate file from several workstations.
Note: You must have the full version of QuickBooks Desktop installed on your server; if it’s not, this means you only have Database Server Manager on your server computer.
Method 6: Repair QuickBooks Desktop
- Restart your system and create a company file backup.
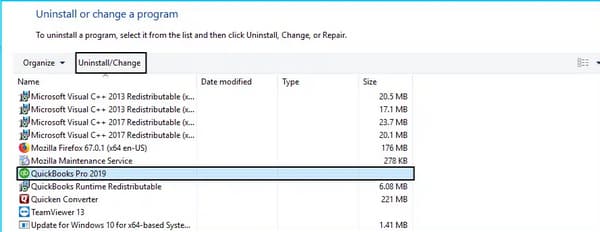
- Open Control Panel > Programs and Features > Uninstall a Program.
Note: If you’re unable to find the Programs and Features option, select the Programs option instead.
- Select QuickBooks Desktop > Uninstall/Change.
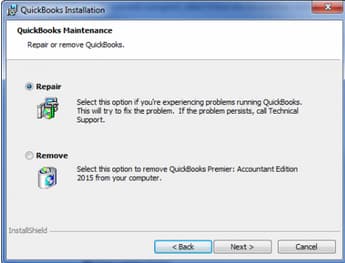
- Select Repair > Next.
- Wait for the repair process to complete and click Finish.
Method 7: Utilize QuickFix My Program from QuickBooks Tool Hub
- Download and install the QuickBooks Tool Hub if you haven’t already.
- Open QuickBooks Tool Hub and select Run Quick Fix My Program.
- This tool helps diagnose and fix errors related to QuickBooks programs or company file data without harming your files.
- Follow the on-screen instructions and allow the tool to run.
Method 8: Use the QuickBooks Clean Install Tool
- Visit QuickBooks’s official site and download the QuickBooks Clean Install Tool.
- Invoke the tool and complete the instructions to delete any corrupt installation files.
- Remove QuickBooks, rename the folders, and reinstall the software.
- The Clean Install Tool helps eliminate leftover files that may cause repeated issues.
Method 9: Update QuickBooks Desktop & Windows to the Latest Release
Regularly updating QuickBooks ensures better performance, security, and access to all Intuit services.
- Open QuickBooks and navigate to Help > Update QuickBooks Desktop.
- Follow the on-screen instructions to download and install the latest updates.
- Enable Automatic Updates for QuickBooks to keep your software current.
Also, ensure your Windows operating system is updated to the latest version.
How For We Identify the Effect of QuickBooks Error 6094?
There are many different ways to determine and spot the QuickBooks Error 6094, which are as follows:
- Inability to access your data file.
- You may notice frequent connection failures in QuickBooks Desktop.
- Windows may restart and shut down abruptly.
- Updating the QuickBooks Desktop application is quite challenging due to various reasons.
- The screen freezes, keeps loading, or stops responding to your commands.
In Conclusion
Expectantly, QuickBooks Error 6094 0 has been resolved after applying any of the above-listed solutions. If you are looking for additional solutions or information related to your software, get connected with our ebetterbooks team. For this, you need to dial our support phone number 1-802-778-9005.
Disclaimer: The information outlined above for “How to Fix QuickBooks Error 6094 0 When Accessing The Company File Located on the Server” is applicable to all supported versions, including QuickBooks Desktop Pro, Premier, Accountant, and Enterprise. It is designed to work with operating systems such as Windows 7, 10, and 11, as well as macOS.
