Experiencing QuickBooks Printer Setup Not Opening issue while printing invoices or transactions? Well, no worries, and read this blog and get your problem resolved.
If you have started using QuickBooks recently or are a pro user, you will probably be familiar with QuickBooks print issues. Despite having uncountable features such as inventory management, and online payments, QuickBooks can encounter errors like, “Printer setup QuickBooks not working”, or not opening.
This issue prevents you from completing your task on time and hampers your business growth. The availability of missing or corrupted components in QuickBooks or any issues with your printer or system may trigger printing error.
Common Error Messages & Codes Related to QuickBooks Printer Setup Issues
Encountering error messages and codes during QuickBooks printer setup is common. Below is a detailed, step-by-step guide to understanding and resolving these issues:
1. “Printer not activated, error code -20”
Cause: This error often arises due to compatibility issues between QuickBooks and the installed PDF converter.
2. “Could not print to printer”
Cause: This error may occur due to printer connectivity issues or incorrect printer settings.
3. “QuickBooks is not responding” during printing
Cause: This issue can result from corrupted QuickBooks components or printer drivers.
4. “Printer not activated, error code -30”
Cause: This error is typically due to permission issues or conflicts with the PDF converter.
5. “The device is not ready”
Cause: This message indicates that QuickBooks cannot communicate with the printer.
6. Unable to Save Forms or Reports as a PDF File
Cause: This issue often arises due to missing components or problems with the QuickBooks PDF converter.
7. QuickBooks PDF Converter Activation Errors (, -30, -41)
Cause: These errors typically result from issues with the PDF converter or system permissions.
8. 1099 Form Printing Problems
Cause: Issues with printing 1099 forms can stem from incorrect form alignment or outdated QuickBooks versions.
9. Encountering Errors 1722 or 1801 While Installing PDF Converter
Cause: These errors indicate issues with the installation process, often related to system components or permissions.
10. “Printer Driver Host for 32-bit Applications Has Stopped Working”
Cause: This error is often due to compatibility issues between the printer driver and the operating system.
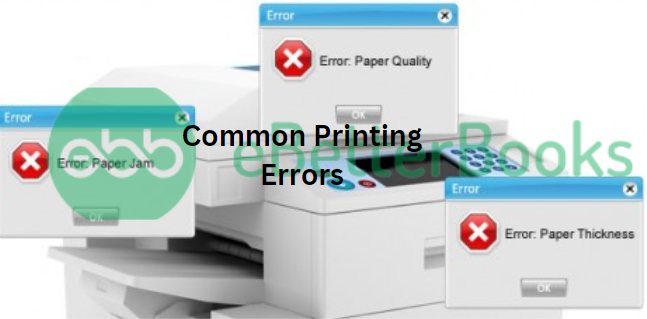
Why Do You End Up with QuickBooks Printer Setup Not Opening Issue?
There are a variety of factors that might interfere with your printer set up in QuickBooks Desktop.
Some common ones are highlighted below:
- Printer drivers or software are not installed properly.
- Either your Printer is switched off, or the paper tray doesn’t have printing paper.
- Printer is selected as a default printer.
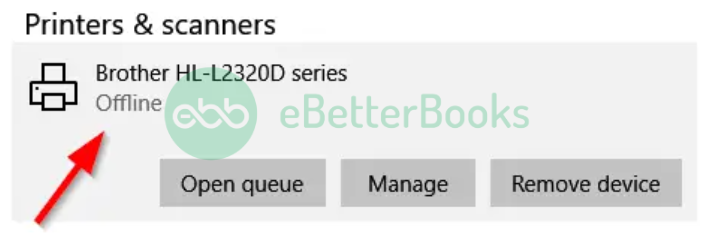
- The Printer is Offline or deactivated.
- Another reason is if you are using the wrong Printer while printing.
How to Identify Printer Setup QuickBooks Not Working Problem?
Below are some common signs and symptoms that help to detect the exact issue:
- Unable to print your invoices.
- The user can’t save files as PDFs.
- QuickBooks is not responding or crashing.
- The mouse and keyboard inputs work slowly or sluggishly.
- QuickBooks freezes whenever you attempt to reconcile accounts.

Pre-requisites Before Resolving QuickBooks Printer Setup Issue
Before starting to resolve the QuickBooks printer setup of not opening or not working issue, you need to consider some key points to start the troubleshooting process effectively.
- Make sure you have the latest version of QuickBooks installed.
- Verify that your printer is properly connected to your computer or network.
- Ensure that the latest printer drivers are installed.
- Check for Error Messages on the Printer.
- Look for any error messages or warning lights on the printer itself. These can indicate hardware issues that need to be resolved before troubleshooting QuickBooks.
If issues persist, consider renaming the QBPrint.qbp file to reset printer settings within QuickBooks.
Best Solutions to Fix Printer Setup Not Working Issue in QuickBooks:
If you are unable to print cheques or invoices due to QuickBooks Printer misconfiguration, carefully adhere to the steps listed below.
Case 1: Improper Installation of Printer Drivers & Software
Wrong installation of printer drivers or software can cause Printer setup QuickBooks not working error.
Below are the steps to overcome it:
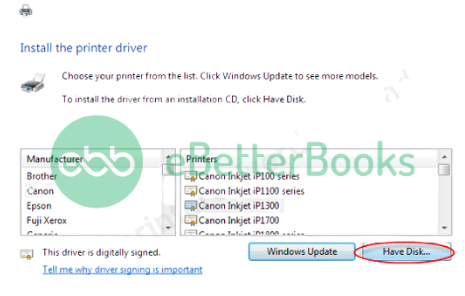
Solution 1: Install the Printer Drivers
- Navigate to the Windows Start menu and then look for Devices and Printer.
- Select Add a New Printer once the window opens up.
- Click the Add a Local Printer option from the list.
- Press the Use an Existing Port button.
- Hit the Next tab.
- When you notice the Driver window, you will have to choose the alternatives linked with the model of your printer.
- Lastly, click Next and it starts downloading or installing the drivers required for QuickBooks to function properly.
Solution 2: Set Up Your Printer Correctly
- To begin with, switch off the printer and restart your system, then turn your printer back on.
- Check that the papers are loading in the printer’s paper tray.
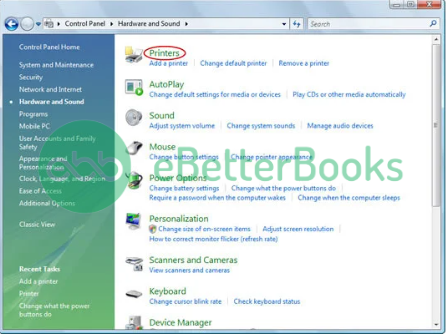
- Press the Windows or Start button and navigate to the Control Panel.
- After this, click twice on the “Printers and Faxes” icon.
- If the printer is Offline, right-click the Printer tab and choose Use Printer Online.
- You must double-click the Printer option, and if there are print jobs displayed in the queue, select Printer and then press the Cancel All Documents tab.
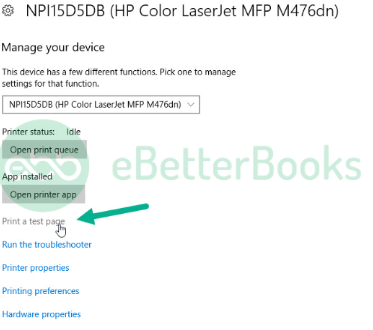
- At last, right-click on the Printer icon and choose Properties. Then hit the Print Test Page tab.
Important: If the printer is a network printer and the test page doesn’t print, this may lead to network issues.
Case 2: If Your Printer is Offline or Switch-Off Suddenly
Your Printer set up in QuickBooks Desktop can be interrupted if your printer does not respond or due to no papers in your printer’s paper tray. So make sure your printer is turned on and sufficiently loaded with papers.
Here’s how to print QuickBooks reports:
- The initial step is to open the QuickBooks software and go for the report you wish to print.
- Now, hover over the File menu once you are done.
- Choose the Print option.
- Afterward, navigate to the drop-down menu and click the Printer tab.
- Herein, you have to select the name of the printer you’d like to use for printing the report of documents.
- In the end, press the Print button.
Case 3: If Your Printer is Not Marked As a Default Printer in QuickBooks
At times, the QuickBooks printer set up is Not Opening due to corruption in the QBprint.qbp file. Now, you need to set up your printer as the default in QuickBooks.
Here’s how:
- Press the Start button and select Settings to open the Control Panel.
- Now, navigate to the Printers and Faxes tab.
- Hit right-click on a working printer under the Printers and Faxes dialog window.
- After this, choose the Set as Default Printer option.
- Close the Windows Printer and Faxes window and start QuickBooks.
- Finally, go back to the Printer Setup window to verify the changes.
It is to be noted that if you fail to reset the default printer, right-click the printer name and delete it.
Case 4: If You Choose the Wrong Printer While Printing
To avoid such printing-associated errors, you must be sure that the printer you’re using is the right one.
Here’s how:
- In QuickBooks, click on the form you’re going to print.
- Head to the File menu and choose Printer Setup.
- Ensure that the printer name is similar to the name of the printer you want to use. If not, correct the setup within your computer’s Printer Setup window.
- Hit the Help section to get more info about the settings.
Case 5: If Nothing Work, Try Printing With a Different Printer
- Go to the File menu and then select Printer Setup in QuickBooks.
- Choose the form you wish to print.
- You must select a different printer, like the Microsoft XP printer.
- Click Help in this area to get more assistance with these settings.
How to Check QuickBooks Print Spooler Service Status?
To ensure QuickBooks prints documents correctly, it’s essential to verify that the Print Spooler service on your Windows system is functioning properly. Here’s a detailed, step-by-step guide to check and manage the Print Spooler service status:
1. Accessing the Services Management Console:
- Step 1: Press Windows Key + R to open the Run dialog box.
- Step 2: Type services.msc and press Enter. This action will launch the Services management console.
2. Locating the Print Spooler Service:
- Step 3: In the Services window, scroll down to find the “Print Spooler” service. Services are listed alphabetically for easy navigation.
3. Checking the Print Spooler Service Status:
- Step 4: Observe the “Status” column next to the Print Spooler service:
- If it displays “Running,” the service is active.
- If it’s blank or shows a different status, the service isn’t running.
4. Starting or Restarting the Print Spooler Service:
- Step 5: Right-click on the “Print Spooler” service.
- Step 6: From the context menu:
- Select “Start” if the service isn’t running.
- Choose “Restart” if the service is running but you’re experiencing printing issues.
5. Setting the Print Spooler Service to Start Automatically:
- Step 7: Right-click on the “Print Spooler” service and select “Properties.”
- Step 8: In the “General” tab, locate the “Startup type” dropdown menu.
- Step 9: Choose “Automatic” from the options. This setting ensures the Print Spooler starts automatically with Windows.
- Step 10: Click “Apply,” then “OK” to confirm the changes.
6. Verifying Dependencies:
- Step 11: While still in the Print Spooler Properties window, navigate to the “Dependencies” tab.
- Step 12: Note the services listed under “This service depends on the following system components.” Ensure all these dependent services are active and running.
7. Finalizing and Testing:
- Step 13: Close the Services management console.
- Step 14: Open QuickBooks and attempt to print a document to confirm that the printing functionality is restored.
How to Verify Windows Printer Permissions for QuickBooks?
To verify and adjust printer permissions for QuickBooks on a Windows system, follow these detailed steps:
- Access the Printers Folder:
- Press Win + R to open the Run dialog.
- Type control printers and press Enter. This opens the Devices and Printers window.
- Locate Your Printer:
- In the Devices and Printers window, find the printer used by QuickBooks.
- Right-click on the printer’s icon and select Printer properties.
- Open Printer Properties:
- In the Printer Properties window, navigate to the Security tab.
- Review User Permissions:
- Within the Security tab, you’ll see a list of user groups and their permissions.
- Select the user account that runs QuickBooks (e.g., your personal user account or a specific QuickBooks user).
- Adjust Permissions:
- Ensure that the selected user has the following permissions checked:
- Manage this printer
- Manage documents
- If any of these permissions are unchecked, click Edit to modify them.
- In the Permissions window, check the boxes for the necessary permissions.
- Click Apply, then OK to save changes.
- Ensure that the selected user has the following permissions checked:
How to Ensure QuickBooks Has Sufficient User Privileges for Printing?
To ensure QuickBooks has sufficient user privileges for printing, follow these detailed steps:
Verify Printer Permissions:
- Open Control Panel:
- Press Windows + R, type control, and press Enter.
- Access Devices and Printers:
- Click on “Devices and Printers”.
- Select Your Printer:
- Right-click the printer used with QuickBooks.
- Choose “Printer properties”.
- Adjust Security Settings:
- Go to the “Security” tab.
- Ensure your user account has “Print” permission:
- If your account is not listed, click “Add” to include it.
- Select your account and check the “Print” box under “Allow”.
- Click “Apply”, then “OK”.
Best Practices for Keeping QuickBooks Printing Setup Error-Free
To maintain an error-free printing setup in QuickBooks, follow these detailed steps:
- Verify Printer Compatibility:
- Check QuickBooks Requirements: Ensure your printer model is compatible with your version of QuickBooks.
- Consult Manufacturer Specifications: Refer to your printer’s manual or the manufacturer’s website to confirm compatibility.
- Install the Latest Printer Drivers:
- Visit Manufacturer’s Website: Download the most recent drivers specific to your printer model.
- Install Drivers: Follow the on-screen instructions during installation.
- Restart Your Computer: This ensures the new drivers are properly integrated.
- Set the Correct Default Printer:
- Access Printer Settings:
- On Windows:
- Go to ‘Settings’ > ‘Devices’ > ‘Printers & scanners’.
- Right-click your preferred printer and select ‘Set as default printer’.
- On Windows:
- Confirm Default Printer in QuickBooks:
- Open QuickBooks.
- Navigate to ‘File’ > ‘Printer Setup’.
- Ensure the correct printer is selected for your forms and reports.
- Access Printer Settings:
- Update QuickBooks to the Latest Release:
- Within QuickBooks:
- Go to ‘Help’ > ‘Update QuickBooks Desktop’.
- Click ‘Update Now’ and then ‘Get Updates’.
- Restart QuickBooks: After updating, restart the application to apply changes.
- Within QuickBooks:
By diligently following these steps, you can maintain an efficient and error-free printing setup in QuickBooks.
Bottom-Line!
Hopefully, the above-given information is useful for you. But if you still facing any kind of issues with your software and need professional assistance, regarding accounting, bookkeeping & accounting software-related issues then feel free to get in touch with us at +1-802-778-9005, or you can mail to us at: support@ebetterbooks.com
FAQs:
Can I use the QuickBooks Print and Repair Tool as a quick fix for a printing error?
Yes. The QuickBooks Tool Hub includes utilities specifically designed to diagnose and fix printing issues, including the underlying components that cause the Printer Setup Not Opening error. Intuit often recommends this automated tool first, as it repairs common problems like damaged PDF files or missing system components without requiring manual file or service adjustments.
How to Clear Stuck Print Jobs from Print Queue?
A stuck print job can halt all printing activities, causing frustration and delays. Clearing the print queue effectively requires a systematic approach. Here’s a detailed, step-by-step guide to resolve this issue:
Cancel the Job: Right-click on the problematic print job and select ‘Cancel’. Confirm if prompted.
Access the Print Queue: Click on the ‘Start’ menu, go to ‘Settings’, then ‘Devices’, and select ‘Printers & scanners’. Choose your printer from the list and click ‘Open queue’.
Identify the Problematic Job: In the print queue window, look for the print job that’s causing the issue. It’s often labeled as ‘Error’ or ‘Paused’.
QuickBooks relies on an internal PDF component (historically the QuickBooks PDF Converter/Writer) for all print functions, including generating physical print jobs. When you choose to print, QuickBooks first converts the form into a PDF spool file. If this internal component is corrupted (often due to permission issues or a faulty installation), both the PDF save function and the physical print function fail, leading to related error messages.
What built‑in tools does QuickBooks offer if printing or PDF export isn’t working?
QuickBooks includes a built‑in utility — the QuickBooks Tool Hub — which houses the QuickBooks PDF & Print Repair Tool. According to official guidance, running this repair tool often resolves printing, PDF, and printer‑setup related issues without needing manual troubleshooting.
This makes Tool Hub the recommended first‑step for users who cannot print or export to PDF.
If printing works outside QuickBooks, but not within QuickBooks, what does that imply?
If your printer works when printing from other applications (e.g., Notepad, Word) but fails when printing from QuickBooks, it suggests the issue lies within QuickBooks’ PDF/print converter, settings, or the integration between QuickBooks and Windows print services rather than a hardware or printer driver issue. Many user reports and support advice confirm this scenario.
In such cases, it’s advisable to run the Print & PDF Repair Tool, reset printer settings in QuickBooks, or rename the QuickBooks print configuration file (if relevant), rather than reinstalling or replacing the printer.
Is it necessary to have the latest QuickBooks and Windows updates to avoid printing issues?
Yes having QuickBooks Desktop updated to the latest maintenance release and keeping Windows updated can reduce compatibility issues that often interfere with printing or PDF functionality. Many troubleshooting guides list updating QuickBooks and system drivers as preliminary recommendations for resolving print/PDF failures.
Outdated versions may lead to conflicts with printer drivers, PDF converters, or Windows print subsystems which may manifest as print setup not opening or print failures.
Disclaimer: The information outlined above for “Troubleshooting QuickBooks Printer Setup Not Opening Or Not Working?” is applicable to all supported versions, including QuickBooks Desktop Pro, Premier, Accountant, and Enterprise. It is designed to work with operating systems such as Windows 7, 10, and 11, as well as macOS.
