The QuickBooks “Connection Has Been Lost” error signifies a critical communication failure between the QuickBooks Desktop software and the company file (.QBW), typically stemming from five key technical issues: corrupted configuration files (.ND and .TLG), unstable network paths, incorrect multi-user hosting settings, or unexpected interference from system power management modes or firewalls. The recommended troubleshooting strategy prioritizes running the QuickBooks File Doctor utility for combined file and network diagnosis, disabling all sleep/standby settings on the host server to ensure continuous connectivity, and strictly verifying that Multi-User Hosting is active only on the single machine storing the company data. This approach, which also includes fixing firewall permissions and testing the connection using the reliable UNC path, focuses on quickly restoring the stable read-write synchronization necessary for continuous QuickBooks operations while preventing data corruption risks.
Summary (Key Facts and Solutions)
- Problem: The “Connection Has Been Lost” error interrupts the operational link between QuickBooks Desktop and the company file, forcing session termination and data loss.
- Top Causes: File corruption (.ND/.TLG files), unstable network (including external drives), incorrect hosting configurations, and server sleep/hibernation mode.
- Quick Fix: Immediately check the portable storage drive connection and disable server Sleep/Standby/Hibernation modes.
- Primary Solution 1 (Diagnostic): Run QuickBooks File Doctor (via the Tool Hub) to scan and repair file data and network issues simultaneously.
- Primary Solution 2 (Hosting): Ensure hosting is only enabled on the server/host computer; disable “Host Multi-User Access” on all workstations.
- Primary Solution 3 (Network Check): Use the UNC path (
\\Server Name\Shared Folder\) to open the company file, bypassing potential issues with local mapped drives. - Primary Solution 4 (Configuration): Temporarily disable the Firewall or configure it to allow QuickBooks-specific ports; and delete and recreate the .ND and .TLG descriptor files.
- Best Practice: Always store the company file on a stable, local network drive, avoid external storage devices (flash drives), and maintain a wired network connection.
What is the Connection has been lost error in QuickBooks?
The Connection Has Been Lost error in QuickBooks is a disruption in the data-access link that prevents QuickBooks Desktop from reaching the active company file (QBW). The error occurs when the software fails to maintain the communication sequence between the workstation and the storage location, resulting in an immediate loss of file availability and a halt in ongoing operations.
This issue develops due to file corruption, insufficient file-system permissions, or interference from third-party processes. The user sees the following error prompt when the issue occurs:
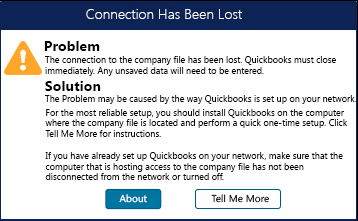
“The connection to the company file has been lost. QuickBooks must close immediately. Any unsaved data will need to be re-entered”
Reasons Behind the Problem Connection Has Been Lost in QuickBooks
QuickBooks errors related to company-file access occur when the network is unstable, the multi-user hosting settings are incorrect, or the QuickBooks Database Server Manager is not functioning properly. Additional causes include storing the file on an external drive, system sleep mode, antivirus or firewall interference, insufficient permissions, damaged company-file data, outdated QuickBooks versions, and conflicting multi-user configurations.
- The company file is hosted externally and the device connection drops.
- The system enters sleep or hibernation mode.
- The company file contains damaged or corrupted data.
- Antivirus or firewall settings interfere with QuickBooks.
- Multiple systems attempt to host the same company file.
- The internet connection is unstable.
- The user lacks sufficient file-system permissions.
- The QuickBooks version is outdated.
- Multi-user configurations conflict across connected systems.
5 Methods to resolve the error Connection Has Been Lost in QuickBooks
The Connection Has Been Lost error in QuickBooks requires targeted troubleshooting to reestablish stable access to the company file. The following methods address the primary technical causes by restoring device connectivity, correcting system settings, repairing file components, and verifying hosting configurations.
Method 1: Check the Connection with the Portable Storage Device
It is advisable to keep the company file on the same system on which the QuickBooks desktop is installed.
However, if the File is stored on a portable device or somewhere on the network, there could be a connection issue with that device or network, making the company file inaccessible.
The portable device could be a flash drive (pen drive) or external hard disk, a location on a network.
The portable storage drive in which the company file is saved should be connected to another computer.
Follow the below steps:
Step 1: Disconnect and reconnect the drive.
Step 2: Find the QuickBooks Company File (QBW) in a removable drive from My Computer.
Step 3: Save another File to ensure it’s working.
Note: Make sure that the drive has enough storage space to store the QuickBooks Company File.
Method 2: Disable Power Management Settings on the Server
If the above method does not solve your problem, try turning off the Power Management Settings on the server.
For this, follow the steps:
Step 1: Go to the Windows Control Panel and open the Power Management Settings on the system where the company file is stored.
Step 2: Press Windows Key.
Step 3: Type and select Power Options in the search results
Step 4: Turn off Sleep, Standby, or Hibernation Modes on the host computer.
Note: Please refer to the Windows Help and Support Manual for more detailed information about Power Options.
Method 3: Fix the Company File with QuickBooks File Doctor
Run QuickBooks File Doctor to resolve the Connection Has Been Lost issue in QuickBooks.
Step 1: Open Tool Hub and select the Company File Issues tab.
Step 2: Click on the File Doctor option in the Company File Issues.
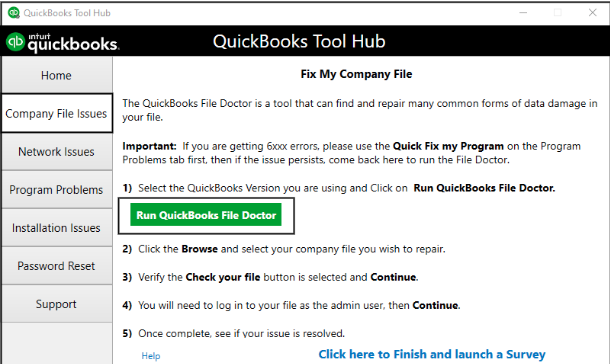
Step 3: Click on the Company File Diagnose option.
Step 4: View the results after the diagnosis process ends.
Note: QuickBooks does not support wireless networking, and it is not reliable for company files. Please follow this step at your own risk.
Method 4: Turn Off Firewall
The firewall can interfere with QuickBooks, which can lead to the problem of the connection being lost.
Follow the steps below to turn off the Firewall:
Step 1: Press the window button to open the Start Menu.
Step 2: Open Firewall settings.
Step 3: Select the Advanced Settings in Firewall settings.
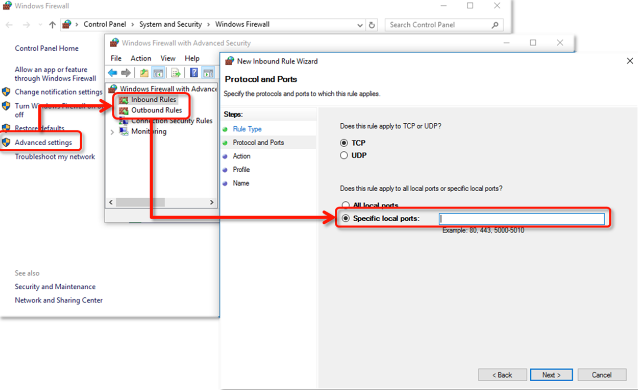
Step 4: Right-click on the Inbound Rule in Advanced Settings.
Step 5: Go to New Rule.
Step 6: Select the TCP option.
Step 7: Select the Specific local Port in Port.
Note: You need to create the Outbound Rule in a similar way you created the Inbound Rule.
Method 5: Fix Hosting on all Systems
Host system tasks
Make sure QuickBooks Database Server Manager is installed on all the hosting systems. To check this, press the Windows key and type QuickBooks. If nothing appears related to QuickBooks or QuickBooks Database Server Manager, then you need to install it.
- Check Hosting Settings
If QuickBooks is installed on the host system:
Step 1: Open QuickBooks File Menu.
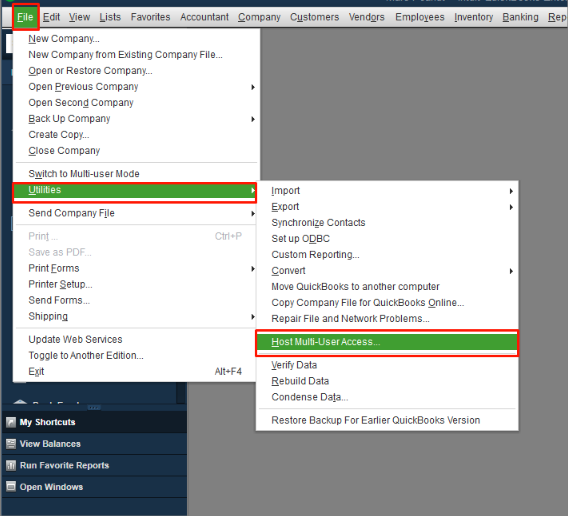
Step 2: Go to File and select Utilities.
Step 3: If “Stop Hosting Multi-User Access” appears in the menu, hosting is already enabled, and you can proceed to the next step.
Step 4: However, if “Host Multi-User Access” appears, select it to enable hosting on this computer, and then proceed with the next step.
If QuickBooks is not installed on the host system:
Step 1: Double-click the QuickBooks Database Server Manager icon in the Windows system tray (or select Start > All Programs > QuickBooks > QuickBooks Database Server Manager).
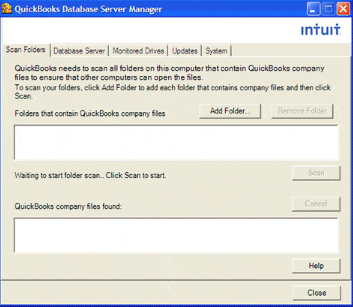
Step 2: Click on the Database Server
Step 3: Make sure your company file shows up in the list of currently connected files. If it’s missing, go to the Scan Folders section and find instructions on how to add it.
Step 4: Close QuickBooks Database Server Manager.
2. Delete and recreate .nd file:
Scan the folder where your company file is saved. This process creates a file called the Network Descriptor (nd) file. The *.nd file contains important details about the computer hosting your company file.
Step 1: Press Windows key
Step 2: Type and select QuickBooks Database Server Manager.
Step 3: Click Add Folder and look for the folders which store the company file.
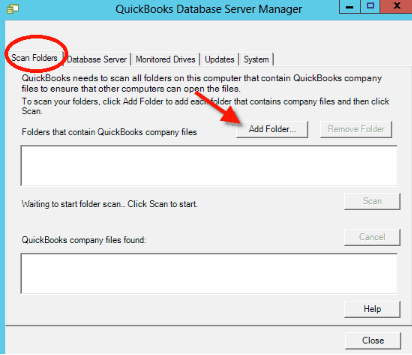
Step 4: Click Scan after adding all the folders.
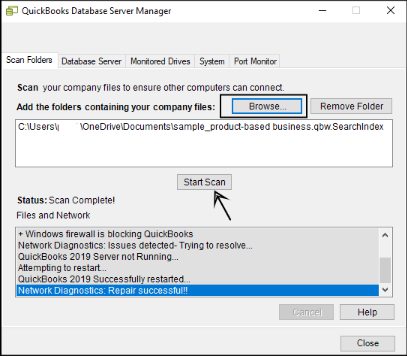
Step 5: Click on Close (the data files will appear under the QuickBooks company file).
Step 6: Browse to the folder that stores the company file and ensure that a file named .band is created for every company data file.
Note: Uninstall and reinstall QuickBooks if QuickBooks Database Server Manager does not appear in the programs list.
Workstation Tasks
Ensure hosting is turned off.
- Open QuickBooks.
- Select Utilities.
- Disable hosting by enabling QuickBooks Single User Mode if Stop Hosting Multi-User Access appears on the list.
- After ensuring that the hosting mode is off on all computers, the user should scan for the ” QuickBooks multi-user mode not working ” error.
Open company file using UNC path
UNC (Uniform Naming Convention) is a way that Windows uses to describe where things are on a network.
For instance, if you want to find a company file, you can use a UNC path like this: \\Computer Name\Shared Folder\. The “Computer Name” part is like the server’s name. To open your company file, follow these steps:
- Open QuickBooks Desktop.
- Select File and Open or Restore Company.
- Select Open a company file.
- Click on Next.
- Click on My Network Places.
- Double-click on the Entire Network.
- Browse to the location on the server.
- Choose Company File and Click on Open.
What to Do When QuickBooks Network Connection Fails?
A QuickBooks network connection failure can disrupt your workflow, preventing you from accessing company files or working in multi-user mode. Here’s how to troubleshoot and fix it:
1. Check Your Internet & Network
- Ensure your internet is stable. Restart your modem and router if needed.
- Verify that your computer is connected to the correct network.
2. Restart QuickBooks & Server
- Close and reopen QuickBooks on all devices.
- Restart your server or the computer hosting the company file.
3. Use QuickBooks File Doctor
- Download and run the QuickBooks Tool Hub.
- Use File Doctor to scan and fix network issues.
4. Check Firewall & Security Settings
- Make sure QuickBooks has the necessary permissions in your firewall.
- Add QuickBooks as an exception in your antivirus.
Common Scenarios for Connection Has Been Lost in QuickBooks
The Connection Has Been Lost error appears in specific operating conditions that interrupt access to the company file. These scenarios involve network instability, hosting conflicts, system interruptions, or file degradation. The points below outline the situations in which the error most frequently occurs.
- Network Disruptions – Unstable or weak network connections can cause QuickBooks to lose access to the company file, especially in multi-user mode.
- Server Issues – If the server hosting QuickBooks is down or experiencing problems, workstations may lose connection.
- Firewall or Security Restrictions – Overly strict firewall settings or antivirus software can block QuickBooks from communicating with the server.
- Multi-User Mode Conflicts – Incorrect hosting settings or another user switching modes can interrupt the connection.
- Corrupt or Damaged Company File – A damaged QuickBooks company file can lead to unexpected connection failures.
- Power or System Failures – Unexpected shutdowns, power outages, or system crashes can disrupt QuickBooks connectivity.
QuickBooks Software Issues – Outdated or improperly installed QuickBooks versions may cause intermittent connection problems.
How Data Corruption Leads to “Connection Has Been Lost” Error
Data corruption in QuickBooks can cause severe disruptions, including the “Connection Has Been Lost” error. When company files become damaged or unreadable, QuickBooks struggles to maintain a stable link between the server and the user’s system, resulting in unexpected disconnections.
Causes of Data Corruption Leading to Connection Loss:
- Sudden System Shutdowns – Power failures or crashes can corrupt QuickBooks files.
- Network Instability – Interrupted connections while accessing the company file can lead to damage.
- Large File Size – Overloaded company files slow down performance and increase the risk of corruption.
- Disk Errors – Bad sectors or storage issues can make data inaccessible.
How to Fix Data Corruption and Restore Connection:
- Use QuickBooks File Doctor – Scans and repairs minor file corruption.
- Run Verify & Rebuild Tool – Identifies and fixes damaged data within QuickBooks.
- Restore a Recent Backup – If corruption is severe, use a backup to recover lost data.
- Ensure Stable Network Connection – Prevent further corruption by using a reliable network.
- Keep QuickBooks Updated – New versions include bug fixes that reduce corruption risks.
By addressing data corruption promptly, you can prevent frequent connection loss errors and ensure smooth QuickBooks performance.
Why Does QuickBooks Display a “Connection Has Been Lost” Error?
QuickBooks may show a “Connection Has Been Lost” error when it loses access to the company file. This typically happens due to network issues, file corruption, or system conflicts. Here are some common reasons:
- Network Disruptions – If QuickBooks is in multi-user mode and the connection to the server is weak or unstable, it may lose access to the company file.
- Damaged Company File – Corruption in the QuickBooks company file can prevent it from being accessed properly.
- Firewall or Security Restrictions – Firewalls or antivirus software may block QuickBooks from communicating with the network.
- Incorrect Hosting Settings – If multiple systems try to host the company file, conflicts may occur.
- Power Management Settings – If your system or server goes into sleep mode, QuickBooks may lose connection.
- QuickBooks Database Server Manager Issues – If the database server isn’t running correctly, the connection to the company file may be lost.
QuickBooks File Damage Leading to Connection Loss
When QuickBooks encounters a damaged company file, it can disrupt normal operations and trigger the “Error Connection Has Been Lost” message. File corruption may occur due to unexpected system crashes, network issues, or improper shutdowns, making it difficult for QuickBooks to access the data.
Common Causes of QuickBooks File Damage:
- Sudden power failures or improper shutdowns
- Network instability in multi-user mode
- File size exceeding recommended limits
- Virus or malware affecting QuickBooks data
- Hard drive issues leading to data corruption
How to Fix QuickBooks File Damage:
- Use QuickBooks File Doctor – This built-in tool scans and repairs file damage automatically.
- Restore a Backup – If the file is severely corrupted, restoring a recent backup can help recover lost data.
- Verify and Rebuild Data – QuickBooks has a “Verify and Rebuild Data” feature to detect and fix minor file integrity issues.
- Check Network and Hosting Settings – Ensure proper network configuration to prevent future file corruption.
- Store Files on a Reliable Server – Avoid using unstable external drives or improper network setups.
Keeping regular backups and maintaining system stability can help prevent connection loss due to file damage, ensuring smooth QuickBooks performance.
Best Practices to Fix Connection Loss Errors in QuickBooks
To prevent and resolve connection loss errors in QuickBooks, follow these best practices:
- Ensure a Stable Network Connection: Use a wired Ethernet connection and check your internet speed.
- Verify Hosting Settings: Ensure the host computer is the only one hosting the company file and that multi-user access is enabled correctly.
- Configure Firewall & Security: Allow QuickBooks through the firewall and temporarily disable antivirus to check for interference.
- Use QuickBooks File Doctor: Run QuickBooks Tool Hub’s File Doctor to fix file and network errors.
- Keep QuickBooks and Windows Updated: Regularly update both to avoid compatibility issues.
- Check Server & Database Manager: Restart QuickBooks Database Server Manager and check for corrupted .ND and .TLG files.
- Restart Server & Workstations: Restart the server and workstations to resolve temporary issues.
Final Words!
The Connection Has Been Lost error in QuickBooks interrupts access to the company file and disrupts ongoing operations. The error arises when file permissions are incorrect, the network path is unstable, the hosting configuration is inconsistent, or external processes interfere with the QuickBooks environment.
Maintaining accurate permissions, stable connectivity, and a properly configured hosting setup reduces recurrence and supports consistent company-file performance. Regular updates and routine file maintenance further strengthen system stability and minimize future access issues.
Hopefully, the information given above will be useful to you. But if you are still facing any kind of issues with your software and need professional assistance regarding accounting, bookkeeping & accounting software-related issues, then feel free to get technical support with us at +1-802-778-9005, or you can email us at support@ebetterbooks.com
FAQ
-
What are the .ND and .TLG files, and why do I need to delete/recreate them to fix the connection error?
The .ND (Network Data) and .TLG (Transaction Log) files are small configuration files that sit alongside your main QuickBooks company file (.QBW). The .ND file tells QuickBooks the location and configuration (hosting status) of the company file on the network. The .TLG file tracks every transaction since the last data backup. When these files become corrupted or contain outdated network information, which often happens during network changes or sudden disconnections, QuickBooks can lose the connection. Deleting them forces the QuickBooks Database Server Manager to automatically regenerate fresh, uncorrupted files upon the next scan, which often resolves connectivity issues.
-
If the QuickBooks File Doctor reports “Data Corruption,” what’s the immediate next step after the diagnosis?
If the QuickBooks File Doctor reports data corruption, the immediate next step is to Run the Verify and Rebuild Data Utility within QuickBooks Desktop itself. While File Doctor addresses file damage and network issues, the Verify/Rebuild tool specifically focuses on correcting internal data integrity problems (like corrupted lists or transactional entries) within the .QBW file. If Rebuild fails to fix the issue, you must restore the most recent, clean backup of your company file to prevent further data loss.
-
Why is it recommended to turn off Multi-User Hosting on every computer except the server?
Hosting multi-user access should only be enabled on the Host Computer (the server or machine where the company file is physically stored). If hosting is accidentally enabled on a workstation (a client computer), it creates a hosting conflict where multiple machines are trying to manage and serve the same file. This inconsistency confuses the QuickBooks Database Server Manager and the workstations, leading directly to the “Connection Has Been Lost” error or the inability to switch into multi-user mode.
-
What is a UNC path, and how does using it help open my company file when the connection fails?
A UNC (Universal Naming Convention) path is the standard way Windows identifies a network resource. It looks like this:
\\ServerName\SharedFolder\FileName.QBW. When you open a file using a mapped drive letter (likeZ:\companyfile.qbw), you rely on that mapping being correctly established. Using the direct UNC path bypasses potential issues with the local mapped drive configuration, forcing QuickBooks to communicate directly with the server using its specific name. This is a crucial diagnostic step to determine if the problem is the network connection or the local workstation configuration. -
If my firewall needs to be turned off temporarily to troubleshoot the connection, what are the QuickBooks-specific ports I should be checking/allowing?
If you must keep your firewall active, you must ensure the required QuickBooks Ports are open for inbound and outbound traffic. These ports allow the software to communicate with the database server. While these ports can vary, the most common ports used by recent QuickBooks Desktop versions are: 8019, and a range of four dynamic ports assigned during installation, typically in the 55363 through 55367 range. You can find the exact ports assigned to your version by checking the QuickBooks Database Server Manager’s system information.
-
Can system sleep mode truly cause the “Connection Has Been Lost” error?
Yes. If the computer hosting the company file (the server) enters Sleep, Standby, or Hibernation mode, its network connection is often suspended or significantly throttled. Since the workstations rely on continuous, stable communication with the server to read and write data to the .QBW file, the server’s sleep mode instantly breaks this link. This results in the “Connection Has Been Lost” error on all connected workstations. This is why disabling power management settings on the host machine is a critical troubleshooting step.
-
Why should I only store the company file on a local drive instead of a flash drive or external hard drive?
QuickBooks company files are complex database structures that require high-speed, uninterrupted data access for continuous read-write operations, especially in multi-user mode. USB-connected devices (flash drives, external hard drives) are inherently less stable and slower than internal local or dedicated network drives. Even slight connection instability or power fluctuation in the USB connection can interrupt QuickBooks’ access, leading to the “Connection Has Been Lost” error and a high risk of data corruption during a write process.
Disclaimer: The information outlined above for “Fix “Error Connection Has Been Lost in QuickBooks”” is applicable to all supported versions, including QuickBooks Desktop Pro, Premier, Accountant, and Enterprise. It is designed to work with operating systems such as Windows 7, 10, and 11, as well as macOS.
