Hey, I really need help with this because it’s starting to impact my work. My name is Lorrie Smith, and I’ve been using QuickBooks Desktop Pro 2024 for a few months now without any issues. Everything was working fine until today when I tried to open QuickBooks like I normally do, and it suddenly said that my subscription has expired.
This caught me off guard because I already paid for the subscription earlier this year, and my Intuit account still shows that it’s active. I didn’t make any recent changes to my system, and nothing new has been installed or updated. I use this software daily to manage invoices, reconcile accounts, and run payroll, so now I’m stuck and can’t move forward with anything until this gets resolved.
I tried restarting my computer, reconnecting to the internet, and even signing in and out of my Intuit account inside the software, but it’s still throwing the same subscription expired message. I’m not sure if it’s some kind of licensing glitch or a connection issue with Intuit’s servers, but it’s incredibly frustrating—especially when you rely on QuickBooks for your business every day.
Has anyone else experienced this kind of issue recently with QuickBooks Desktop 2024? What did you do to get past it? I’d appreciate any advice or steps I can try, because I really need to get back into my books ASAP.
Thanks,
Lorrie Smith
Hi Lorrie,
Thanks for reaching out — I completely understand how stressful this must be, especially when QuickBooks is such an essential part of your daily work. It’s clear you’ve already taken all the right steps from restarting your computer, reconnecting to the internet to signing in and out of your Intuit account within QuickBooks. This shows how proactive and patient you’ve been, and it truly matters. When QuickBooks suddenly displays a subscription expired message — especially after months of smooth use — it can be both confusing and disruptive.
But the good news is: this is often a temporary licensing hiccup or a network connectivity issue with Intuit’s servers. In most cases, it can be resolved quickly without losing access to your data. We’re right here to walk you through every step and help you get back to your books without any delay.
Possible Reasons Why Your QuickBooks Desktop Pro 2024 Subscription Has Lapsed!
Even though your subscription is active, QuickBooks consider it has expired due to a temporary licensing glitch, a syncing error with Intuit’s servers, or a system setting that’s blocking QuickBooks from validating your subscription.
- QuickBooks subscription may be marked as inactive.
- The billing information is outdated or needs verification.
- A sync failure between your local license info and Intuit’s servers.
- Firewall or antivirus blocking QuickBooks from verifying your license online.
- Pending software updates or corrupted license files after a recent background update.
- Incorrect system time/date, which can confuse license validation checks.
- The qbregistration.dat or EntitlementDataStore.ecml file might be damaged or missing.
Quick Tips:
Make sure the license number and product code match.
If You Bought QuickBooks Desktop From Intuit’s Official Website
Check your purchase confirmation email for your license number and product code. When you can’t find them, you can sign in to your Customer Account Management Portal to get them.
If You Bought QuickBooks From A Retail Store
Search for the sticker on the original CD envelope.
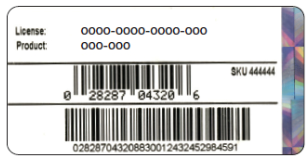
How to Fix the “QuickBooks Desktop Pro 2024 Subscription Expired” Error?
Lorrie, since you’re seeing the “QuickBooks Desktop Pro 2024 subscription expired” message even with an active subscription, it’s most likely a temporary glitch—often related to a licensing sync issue or a brief connection problem with Intuit’s servers. Here’s how you can resolve it and regain full access to your QuickBooks account:
Solution 1: Update your Billing Info
Updating your billing information or payment method helps to avoid payroll service disruptions due to failed transactions, ensure timely subscriptions renewal, maintain accurate account records, and prevent late fees or access issues.
- Log in to the Customer Account Management Portal (CAMPs) as an admin user.
- Choose QuickBooks Desktop from the products and services.
- Select Details next to your QuickBooks Product.
- Click Edit beside the Payment Method and update your payment info.
- Once done, click Save and Close.
- Open QuickBooks Desktop.
- Navigate to the Help menu and select Manage My License.
- Choose Sync License Data Online.
Solution 2: Install QuickBooks Updates
Regular updates ensure access to the latest tools, automation, performance improvements and critical security patches that protect your financial data from vulnerabilities and cyber threats.
- Open QuickBooks Desktop and navigate to the Help menu.
- Choose Update QuickBooks Desktop.
- Click the Update Now tab.
- Tip: Tickmark the Reset Update checkbox to clear all previous update downloads.
- Select Get Updates to start the download.
- Once done, close and reopen QuickBooks to install the update again.
Solution 3: Run QuickBooks as Administrator
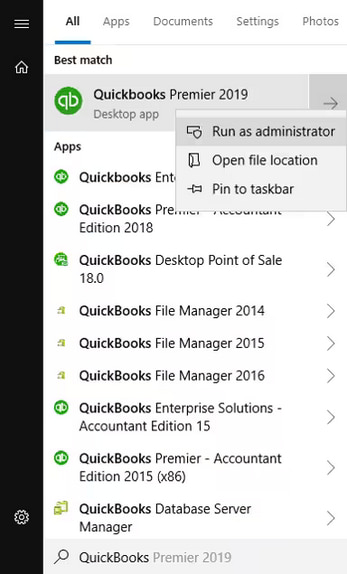
Make sure to run QuickBooks as an Administrator if your QuickBooks Desktop Subscription has expired unexpectedly.
- Open the Windows Start menu.
- Enter “QuickBooks” into the search bar.
- You will see your results listed in the Search window.
- Right-click on the QuickBooks version and year you want to open.
- Choose Run as administrator.
- Run the payroll update if needed.
- Close and reopen the QuickBooks software.
Solution 4: Sync Your License Data
Since QuickBooks Desktop Pro lets 3 users work in the same company file at the same time, syncing your license data with Intuit’s servers helps to recognize your active subscription and clears out any temporary glitches.
Sync Online
- Navigate to Help.
- Select Manage My License.
- Choose Sync License Data Online to update your new license info.
Sync Manually
You can manually update your new license info if you install QuickBooks on a computer that doesn’t have internet access.
- In QuickBooks, go to Help.
- Select Manage My License and Buy Additional User Licenses.
- Choose the phone option.
- Enter the same validation code you got when you purchased your additional license.
Solution 5: Review the System Date and Time on the Computer
An incorrect or wrong system date and time on your computer can interfere with the update process. To check the system date and time on the computer:
- Right-click the system clock on your desktop and then choose Adjust Date/Time.
- Select Change date and time, and enter the current date and time.
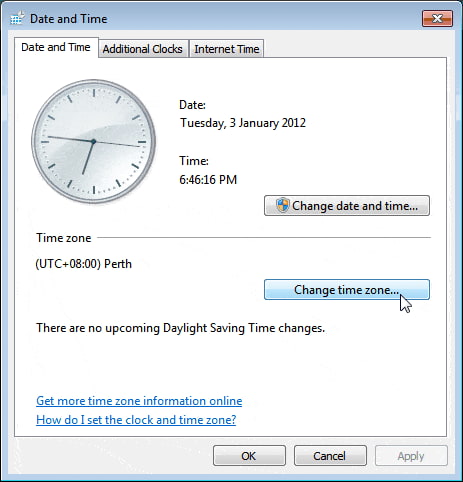
- Press OK twice.
- Close and reopen QuickBooks Desktop.
- Perform a QuickBooks Desktop update again.
Solution 6: Disable Firewall or Antivirus Temporary
Sometimes, security software like firewalls or antivirus programs can unintentionally block QuickBooks from connecting to Intuit’s servers which can ultimately lead to the subscription expired error.
Turn Windows Firewall On Or Off Manually
For Windows 10/11
- Search and open Settings in Windows.
- Under Windows Settings, do one of the following depending on your operating system.
- For Windows 11, select Privacy & Security.
- For Windows 10, choose Update & Security.
- Select Windows Security, and click Open Windows Security to view the firewall settings.
- The Security at a glance window will be displayed.
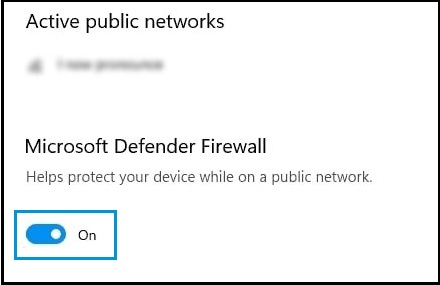
- Choose Firewall & network protection in the Security at a glance window, and choose your active network (usually “Private network” or “Domain network”).
- Click the Microsoft Defender Firewall tab to turn the firewall on or off.
Disable Windows Defender Antivirus (Built-in)
- Navigate to Windows Security.
- Select Virus & threat protection.
- Choose Manage settings under “Virus & threat protection settings”.
- Turn Real-time Protection off.
Solution 7: Reactivate or Refresh Your QuickBooks License
Managing your QuickBooks license can re-establish the connection between your software and Intuit’s servers, confirming that your subscription is valid. This process won’t affect your company data and do resolve ongoing licensing errors in just a few clicks.
Step 1: Find your license number
- Sign in to your Customer Account Maintenance Portal (CAMPS).
- Locate your license number and product number.
- Once you have your license and product number, proceed to the next step.
Step 2: Activate QuickBooks again
- Navigate to Help > Manage my license > Change my license number.
- Enter the license number as all 0s and click Next.
- Avoid entering a validation code and select Finish.
- Go to Help > Manage my license > Change my license number.
- Type your License number, select Next and click Finish.
- Your QuickBooks is now activated.
Solution 8: Repair QuickBooks Desktop Application
If you get an error when you use, install, or update QuickBooks, run Quick Fix My Program from the tool hub, and use the QuickBooks install diagnostic tool to fix common errors right away.
Step 1: Run Quick Fix My Program from the QuickBooks Tools Hub
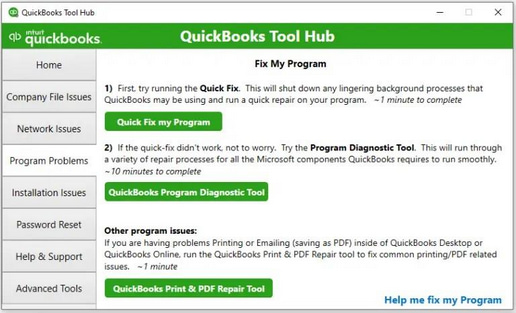
The Quick Fix will shut down any open background processes QuickBooks uses. It’ll run a quick repair on your program.
- repair on your program.
- Download and install the most recent version (1.6. 0.8) of QuickBooks Tool Hub.
- From the QuickBooks Tool Hub, choose Program Problems
- Select Quick Fix My Program.
- Start QuickBooks Desktop and open your data file.
If you still get the error, follow the next step.
Step 2: Run the QuickBooks Install Diagnostic Tool
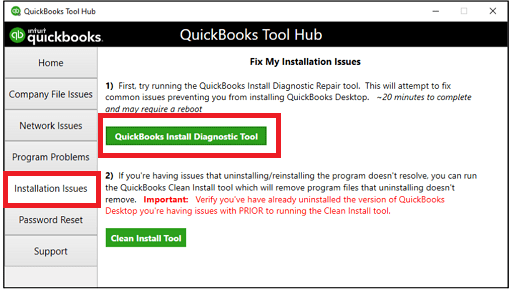
If something went wrong during the QuickBooks installation process, it may cause problems when you try to use it. Run the QuickBooks Install Diagnostic Tool to fix common installation issues.
- Open the QuickBooks Tool Hub and then choose Installation Issues.
- Select QuickBooks Install Diagnostic Tool. Let the tool run. It may take up to 20 minutes to detect the issue.
- When it’s done, restart your computer and start QuickBooks Desktop, then open your data file.
- Update your QuickBooks to the latest release. This will make sure you have the most recent fixes and security updates.
Solution 9: Restore your Product and License File
QuickBooks Desktop saves a file with your product and license info to your hard drive. If there’s a problem with it, the file is easy to restore. Let’s see how to find it.
- Close QuickBooks Desktop.
- Open the Windows Start menu.
- Type Run into the search box and click Run.
- Input C:\ProgramData\Intuit\Entitlement Client\v8 and press Enter. If this doesn’t open a folder, type C:\ProgramData\Intuit\Entitlement Client\v6 instead.
- Search for the file EntitlementDataStore.ecml.
- Hit a right-click on it and choose Delete.
- Select Yes to make sure.
- Open QuickBooks Desktop and your company file.
- Follow the on-screen instructions to re-register QuickBooks with your product and license info.
Solution 10: Check your Internet Connection Settings
Your unstable and poor internet connection could be the reason for update issues. To test your secure internet connection, open a web browser and visit Chase Banking. If you can’t open the Chase banking web page, you won’t get updates from QuickBooks. Contact your internet service provider (ISP) for further assistance.
If you’re able to find the Chase banking website, open QuickBooks Desktop, and do the following:
- Choose Internet Connection Setup from the Help menu.
- Select Use my computer’s Internet connection settings to establish a connection when this application accesses the Internet.
- Press Next.
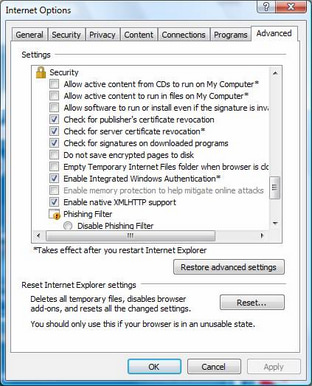
- Click Advanced Connection Settings.
- On the Advanced tab, select Restore Advanced Settings.
- Hit OK and then press Done.
- Retry for QuickBooks Desktop Update.
Major Consequences for the QuickBooks Desktop Pro 2024 Subscription Has Expired Error!
QuickBooks Desktop Pro 2024 Subscription has Expired error can be alarming especially when everything was working fine before. But don’t worry — your data isn’t lost, and the issue is usually fixable. This error can temporarily disrupt your workflow, so it’s important to fix it quickly. If left unresolved, it could:
- Restricted Access: You may be locked out of your company file, unable to open or edit important records.
- Invoicing Delays: Creating or sending invoices might not be possible, which could affect cash flow or customer communication.
- Payroll Interruptions: If you use payroll through QuickBooks, employee payments and tax filings could be delayed.
- Reporting Limitations: You might not be able to generate key financial reports needed for business decisions.
- Syncing Issues: Features that require online connectivity, like bank feeds or app integrations, can stop working until the issue is resolved.
Smart Ways to Keep Your QuickBooks Desktop Pro 2024 Subscription Active and Error-Free!
Follow some proactive tips to keep your QuickBooks Desktop running smoothly:
- Set a weekly reminder to check for QuickBooks updates.
- Make sure you’re connected to a stable internet connection before opening the software.
- Add QuickBooks and Intuit URLs as trusted programs/sites in your firewall or antivirus software.
- Log in to your Intuit account periodically and keep your payment method and contact details up-to-date.
- Enable “Set time automatically” and “Set time zone automatically” in your system settings.
- Always sign in using the main QuickBooks admin or company owner account.
- Restart your computer and QuickBooks at least once a week.
Final Note!
Lorrie, you’re doing an amazing job handling a situation that can frustrate anyone — and I want to remind you that this is only temporary. Most importantly, your data is safe, and you’re not alone in this. You’ve already taken the right steps like restarting your system and reconnecting to the Internet, and with just a little more guidance, you’ll be back to managing your books without missing a beat.
It’s completely okay to feel overwhelmed when things don’t go as planned. But please trust — there is a solution. In this case, it’s just about re-establishing that trusted connection between QuickBooks and Intuit’s servers. Whether you follow the steps above or reach out for a little extra help from QuickBooks support or your IT expert, you’re already moving in the right direction. You’re doing everything right — and we’re right here with you, every step of the way.
Disclaimer: The information outlined above for “Why Did My QuickBooks Desktop Pro 2024 Subscription Expire Unexpectedly?” is applicable to all supported versions, including QuickBooks Desktop Pro, Premier, Accountant, and Enterprise. It is designed to work with operating systems such as Windows 7, 10, and 11, as well as macOS.
