QuickBooks Online to QuickBooks Desktop Data Conversion
Migrate from QuickBooks Online to QuickBooks Desktop and get access to advanced features, industry-specific versions, better data control, offline access, and more customization options with eBetterBooks.

Switch from QuickBooks Online to QuickBooks Desktop for a Seamless Accounting Solution
QuickBooks Desktop provides greater control over data with local storage which ensures security and privacy. Its one-time purchase model as compare to QuickBooks Online’s subscription which offers cost saving over time. With QuickBooks Desktops’ feature depth and customization option, business can tailor their accounting processes to meet specific needs more efficiently.
Additionally, QuickBooks Desktop is suitable for businesses operating in areas with unreliable internet access or for users who prefer to work offline as it does not require internet dependency to function. Users can perform various tasks offline, including creating and editing transaction, generating reports and reconciling accounts.
Methods to Convert from QuickBooks Online to QuickBooks Desktop
Transfer all your data and transactions from QuickBooks Online to QuickBooks Desktop 2023, 2020, 2021 with the help of the migration tool.
Method 1: Migration Tool
The migration tool is a built-in utility provided by QuickBooks that facilitates the transfer of data from QuickBooks Online (QBO) to QuickBooks Desktop (QBD). It allows users to export their data, such as transactions and lists, and import them into the desktop version with ease.
Here’s how to download and use the Migration Tool:
Step 1: Download the Migration Tool in QuickBooks Online
Downloading the migration tool is important as it facilitates the transfer of data from QuickBooks Online (QBO) to QuickBooks Desktop (QBDT). This tool simplifies the export process which ensures that all relevant data can be successfully migrated without loss or corruption.
- Sign in to the QuickBooks Online account.
- Navigate to the Export Overview page.
- Choose Get Started.
- Then, select the Download tool.
Note: Keep this page open on your browser.
- Install the migration tool, then click Next.
- Read and accept the terms in the license agreement, then press the Next button.
- Click Install, then hit the Finish icon.
Step 2: Export Your QuickBooks Online Data
Users can ensure that only the necessary information is transferred in this step by selecting the specific data they wish to migrate, including lists and transactions. This targeted approach helps maintain organization and relevance in the new desktop environment.
- In the Step 1: Prepare to export page, and click Continue.
- Choose the QuickBooks Online data you want to export and then press Continue.
Note: You can either select All financial data or All financial data without transactions. For products and services, quantity on hand isn’t exported.
- In the Step 3: Request your data page, then hit Continue.
- Fill out the Name and Email address fields, then click Continue.
- Select Close.
Note: Email confirmation may take some time depending on the amount of data to migrate. Check your QuickBooks Online home page for updates.
- Navigate to the Export Overview page.
- In the Step 1: Prepare to export page, follow all the instructions for online migration. Then, press Continue.
- Under the Exporting from QuickBooks Online page, click Continue to Download, then select Download QBXML file.
- Save the file to your desktop, then press Continue.
Step 3: Run the QuickBooks Desktop Migration Tool
Running the migration tool in QuickBooks Desktop is important for importing the exported data. This involves selecting the appropriate file and confirming settings, which allows the desktop application to read and integrate the online data correctly. It is important to keep QuickBooks Desktop open during this process to avoid interruptions.
- Click Browse, choose your QBXML file, then select Open in the QuickBooks Desktop Migration tool.
- Open QuickBooks Desktop. Under the No Company Open screen, select Create a new company.
- Choose For myself from What does creating a company file require? screen, then click Start Setup.
- Navigate to the Sign in Later dropdown under the Sign in window, then select in 2 days. Press OK.
- In the migration tool, select Import. Choose the location and name of the file. Click Save.
- Press Yes in the application certificate, always allow access even if QuickBooks is not running. Click Yes, select Continue, then press Done.
- Fill out the fields under the Update Business Info screen then press Save, choose Sign in now, and click Start Working.
- From the Intuit Account menu, select Admin, enter your email address, then press Continue.
- In the Sign In Later dropdown, choose In 2 Days, and then click OK.
- Wait for the importing to finish and then hit the Done tab.
Step 4: Check if the Data Exported Matches
It is important to verify that all exported data matches what was originally in QuickBooks Online after completing the migration. This step ensures that no information has been lost or incorrectly formatted during the transfer which provides confidence in the integrity of the migrated data and its readiness for use in QuickBooks Desktop.
Note: You are required to run reports on an accrual basis in QuickBooks Online and QuickBooks Desktop to match and compare them.
Method 2: The Manual Method
Converting QuickBooks Online (QBO) to QuickBooks Desktop (QBD) can be accomplished through a manual method involving several steps. This process is important for users who wish to transition from the cloud-based version of QuickBooks to the locally installed version.
Step 1: Prepare Your Environment
- Ensure Compatibility: Make sure your computer meets the system requirements for QuickBooks Desktop. You should have a version of QuickBooks Desktop that is 2004 or later, and it should be either Pro, Premier, or Enterprise for Windows.
- Browser Settings: Use Internet Explorer (version 10 or above) as it is required for the export process. Ensure that ActiveX controls are enabled, as they are necessary for the conversion.
Step 2: Download QuickBooks Desktop
- Install QuickBooks Desktop: If you haven’t already, download and install the appropriate version of QuickBooks Desktop on your computer. You can find this on the official QuickBooks downloads page.
- Open QuickBooks Desktop: Launch the application and select File, then click on Close Company to ensure that no company file is open during the conversion process.
Step 3: Export Data from QuickBooks Online
- Log into QuickBooks Online: Access your QBO account and navigate to the gear icon.
- Select Export Data: Choose “Export Data” from the options available.
- Prepare for Export: Follow the prompts to prepare your data for export:
- Select the type of data you wish to export (either all data with transactions or just lists and balances).
- Click on Continue and review any limitations regarding what data can be exported.
- Enter your email address to receive a confirmation once the export is complete.
Step 4: Run the Migration Process
- Access Exported File: Once you receive confirmation via email, return to QBO and click on Get Started to continue with the export process.
- Initiate Import in QBD:
- Ensure that QuickBooks Desktop is open at the No Company Open screen.
- Launch the QuickBooks Migration Tool that you downloaded earlier.
- Browse for the path leading to your exported QBXML file and click on Import.
- Finalize Import:
- Choose a name and location for your new QBD file.
- Follow through with any prompts regarding permissions (read/modify rights).
- Click on Continue, and once the data import is complete, select Done on the confirmation screen.
Which Data Can be Transferred from QuickBooks Online To QuickBooks Desktop
Our dedicated experts work round the clock to offer you more flexible and faster QuickBooks data conversion services under your budget. Here’s what we can migrate for you:
Customer Lists & Transactions
Vendor Lists & Transactions
Inventory Details
Account Lists
Employee Lists
Account Balances
Employee profile and contact info
Payroll general ledger account balance info
Paycheck (Convert as)
Accounts Receivable and Accounts Payable
Profit & Loss
Monthly Balance Sheets
Value Addition Conversion (also get):
Attachments
Unreconciled Transactions
Allocation of Invoices or Bills against credit notes

Which Data Cannot be Transferred from QuickBooks Online To QuickBooks Desktop
At eBetterBooks, we ensure to migrate all your data smoothly without any interruption. However there is some info that can not be transferred directly to QuickBooks due to some compatibility differences.
Bank Reconciliation
Sales and Purchase Orders
Budgets
Track Inventory
Invoice Templates
Time sheets
Fixed Asset
Deleted/Void Transactions
Charts of Accounts
Journal Entries
QuickBooks Online to QuickBooks Desktop: Quick and Safe Data Migration
Sign up and move from QuickBooks Online to QuickBooks Desktop with high level of accuracy and minimum migration cost. Clean up, repair and migrate your historical transaction data for better compliance and analysis.
At eBetterBooks, we deliver precise & efficient QuickBooks data conversion for QuickBooks Online:
Assessing your needs
Preparing your data
Mapping old QuickBooks Online data to new QuickBooks fields
QuickBooks configuration, verification, and testing
Make Your Conversion Smooth
Switch From
QuickBooks Online to QuickBooks Desktop
QuickBooks Online to QuickBooks Desktop Keep Growing with Our Post-Conversion Support
We conduct comprehensive training sessions to empower your team with all the capabilities required for the new software.
Get 24*7 assistance from our support channels for any conversion-related queries or concerns.
Our dedicated experts promise to provide a speedy transition without any accidental data loss.
We offer comprehensive documentation and resources to help users in navigating the new software more effectively.
Our service providers prompt you to share post-conversion feedback and reviews to identify areas for better enhancement or frequent improvements.
Make your Move Easy with eBetterBooks QuickBooks
Data Conversion Services
Sit back and relax, our service providers convert your crucial data within no time.
E
Expertise in QuickBooks Online to QuickBooks Desktop data conversion sets us apart. With our dedicated team members, we guarantee comprehensive s and reliability in every aspect of your data conversion process.
A
Accurate QuickBooks Online to QuickBooks Desktop data conversion is our specialty. We apply a thorough evaluation process to ensure every transaction is accurately mapped and transferred.
S
Seamless QuickBooks Online to QuickBooks Desktop data conversion is our expertise. From evaluation to implementation, every step is carefully followed so that your data can never be compromised and you can get the best data conversion experience ever.
Y
Year-round QuickBooks Online to QuickBooks Desktop data conversion is our commitment. We work tirelessly to provide uninterrupted service and ensure a smooth and convenient data transition practice for our clients.
Checklist: QuickBooks Online to QuickBooks Desktop Data Conversion
Things you do for your business!
- Check QuickBooks Desktop Variant or Version You Want to Convert to.
- Choose subscription and payment mode for the subscription fees
- Sign out of QuickBooks Online
- Make a note of minimum system requirements for QuickBooks Desktop.
- Mark any historical data you want to move to QuickBooks desktop.
- Don’t forget to create a backup of your existing accounting data.
Confirm QuickBooks Desktop file will convert:
- Open the desktop file and run some utilities.
- File > Utilities > Verify Data
- File > Utilities > Rebuild Data
- Run the conversion tool and start the conversion process.
- Open QuickBooks Online
- Enter your QuickBooks desktop login credentials and agree to the terms and conditions.
- Select the QuickBooks desktop version (Pro, premier, enterprise) you want to convert to and then press continue.
- Intuit will confirm the conversion has begun and email you once it is finished.
- Once conversion is over, do compare reports.
For each of the following reports, open in QuickBooks Online and QuickBooks Desktop and check for differences:
- Run Balance Sheet, all dates, accrual basis
- Run Profit & Loss, all dates, accrual basis
- Inventory Valuation Summary, all dates (if applicable)
- Open Invoices
- Unpaid Bills
- Undeposited Funds transaction detail report
- Sales Tax Liability
- Payroll Tax Liability
- Reconciliation report
- Sales tax payments
- Payroll set up
- Check inventory conversion in QuickBooks desktop (if applicable)
- Setup users and permissions
- Company information
- Reconcile accounts based on financial reconciliation in QuickBooks Online
- Add attachments
- Customer list
- Vendor list
- Individual transactions
- Attachment center located in Gear > Lists > Attachments
- Lists
- Make unwanted list items Inactive
- Merge duplicate list items
- Customize sales templates
- Recreate memorized reports
- Link bank accounts, apps, credit cards, and payment gateways.
- Switch to Single-user or Multi-user environments.
- Go for any QuickBooks integrations.
- Payroll
- Time tracking
- Set closing date and expected timeframe for the conversion process.
14-Day Data Recovery Guarantee
At eBetterBooks, our team prioritizes the safety, security, and integrity of your data as we understand how important it is for your business growth. In case of any rare event if your data has been lost during conversion, we ensure fast data recovery within 14 days and keep our promise for better business productivity.
What you can Expect After QuickBooks Online to
QuickBooks Desktop Conversion
After the conversion, you will receive an email with the subject header “Your Conversion is Ready to Review.”
You have only 72 hours to review and approve your conversion.
Match your data with the reports you exported earlier to our team. Once the transition is over, our dedicated experts will provide:
- A QuickBooks backup file (.qbb) for easy restoration on your system.
- Check all your transactions are marked up as reconciled. If any transaction is not supported in QuickBooks, we’ll provide standard workarounds and post-conversion instructions.
- Get a detailed post-conversion checklist to make your transition faster or smoother.
- We ensure journal entries are linked to their respective invoices and bills so that your trial balance isn’t affected after the migration.

QuickBooks Online to QuickBooks Desktop
Data Conversion Process
Let our experts assist you with simplifying your conversion from one software to another.
QuickBooks Online to QuickBooks Desktop Conversion: Work Around
Switch from QuickBooks Online to QuickBooks Desktop with evaluating, implementing and optimizing the right QuickBooks solution for your business.
Sub Accounts in Sage become Independent Accounts in QuickBooks Desktop (QBD).
Inactive Accounts in Sage become Active in QBD during conversion.
Open Receivable/Payable Invoices in QuickBooks Desktop (QBD ) show only unpaid balances.
Custom Sales Tax Rates transform into standard rates with a separate “Tax Adjustment” entry in QuickBooks.
Inter Bank Transfers convert via Clearing Account in QuickBooks Desktop.
System Accounts like Retained Earnings, VAT Control Account are used in QuickBooks desktop.
Inventory Details import as “non-inventory” types in QuickBooks Desktop; manually change to “Inventory” type post-migration.
In multi-currency files, QuickBooks applies the same exchange rate for all accounts, potentially affecting trial balance.
Rounding may differ between QuickBooks desktop and Sage due to precision techniques.
Dummy numbers (e.g., Bill1, Inv1) used for Blank Bill and Invoice reference numbers.
In case of duplicate reference numbers, transaction numbers or unique characters are added.
QuickBooks limits Reference numbers to 20 characters; longer numbers are trimmed.
System Requirements For Sage 300 Construction to QuickBooks Conversion
Ensure seamless data transfer by understanding system requirements for compatibility and smooth migration.
Frequently Asked Questions
Will I Need to Re-enter any Data after Conversion?
In some cases, you may need to review and possibly re-enter certain data to ensure accuracy after conversion.
Can I Convert Payroll Data from QuickBooks Online to Desktop?
Payroll data can be converted, but you may need to re-enter certain payroll setup details in QuickBooks Desktop.
What Information Can Be Converted from QuickBooks Online to Desktop?
No, your QuickBooks Online subscription will not be automatically canceled. You’ll need to cancel it separately if you no longer need it.
Do I Need to Purchase QuickBooks Desktop before converting?
Yes, you’ll need to have QuickBooks Desktop installed before starting the conversion process.
Can you Switch from QuickBooks Online to Desktop?
Well, there’s no direct way to move your data from QuickBooks Online to Desktop. However, you can export and convert your QBO data to QuickBooks Desktop.
Below are the steps to do so:
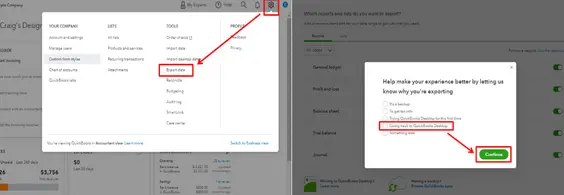
- Log in to your QuickBooks Online account and then hit the Gear Icon.
- Now, select the Export Data and enter your reason why you’re exporting your data. Then, press Continue.
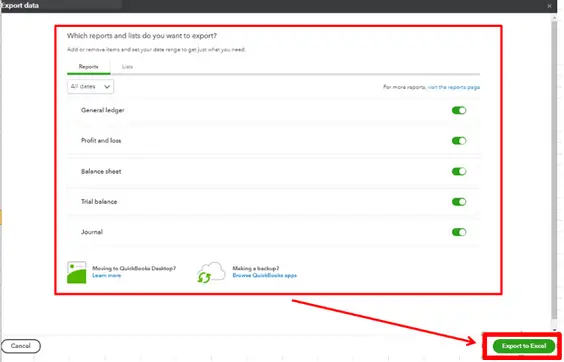
- Review your data from the export overview screen.
- Once done, click Export to Excel.
- Under the Exporting from QuickBooks Online page, choose Continue to Download.
- After this, follow the rest of the on-screen instructions to complete the exporting process.


What Errors Occur When Converting from QuickBooks Desktop to QuickBooks Online?
Moving from QB desktop to online is as seamless as you think but there are some errors you may see during or after the move.
Here’s a list of some common errors you address during migration:
- Please delete all employees already entered in QuickBooks Online
- There was a problem checking this company for import eligibility
- Error in processing data for QuickBooks Desktop for Mac
- Your file is too big to export
- We can’t export your data. It may be on a network drive
- Error:FAILED
- Error: You can’t import because the QuickBooks Online company has been canceled
- Export QBDT data to QBO: ERROR.
Will My QuickBooks Online Subscription be Canceled after Conversion?
No, your QuickBooks Online subscription will not be automatically canceled. You’ll need to cancel it separately if you no longer need it.
Which Information Can Not be Moved from QuickBooks Desktop to Online?
Here’s a list of some features, lists, items, transaction types, reports, and other labels which don’t transfer to QuickBooks Online.
Features:
- Budgets
- Inventory Items
- Attachments/Document Center docs
- Multi-Currency (transactions with 3 different currency types)
- Online Banking (Bank feed setup)
- QuickBooks Time: Timesheet data, pay item mappings, settings & preferences
- Price Levels
- Mileage Tracking
- Write Letters
Items:
- Inventory Items:
Manufacturer’s Part Number(MPN)
Currently, none of the Desktop inventory item fields move to the SKU field in Online
- Non-Inventory Items:
Manufacturer’s Part Number(MPN)
Currently, none of the Desktop inventory item fields move to the SKU field in Online
Lists:
- Chart of Accounts
- Customers and Jobs (contact, alt. contact, customer type, price level, custom fields, account, credit limit, job status, start date, projected end, end date, job description, job type, job bill to address, job ship to address, job email etc.)
- Custom Fields in Lists
- Reminders
- Scheduled Transactions
- Vendors (contact, alt. Contact, note, status, vendor type, credit limit, custom fields, 1099 ID etc.)
Reports:
Audit Trail
Memorized Transactions
Transactions:
- Invoices ( subtotals, invoices based on estimates, other and other customer custom fields, recurring payment transactions don’t move to QB Online).
- Item Receipts
- Journal Entries
- Pending Sales
- Past Reconciliation Reports
How Can I Transfer Existing Data from One QuickBooks Online Account to Another?
You can export your old data to Excel and save it to your computer. Then, import it to your new QuickBooks account to transfer all your existing files from QBO account to the new one.
Here’s how:
- In your existing QBO account, hit the Gear icon and then choose Export data.
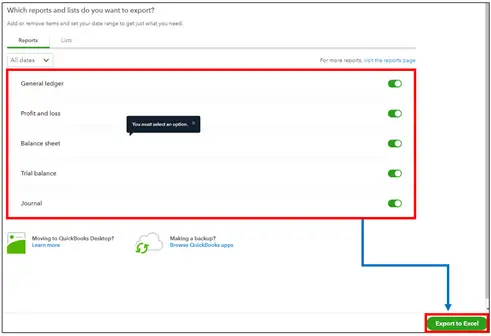
- Now, select the date range from the Reports tab and click the report you want to export.
- Choose Export to Excel.
- Navigate to the Lists tab and select Customers, Employees, and Suppliers, then click Export to Excel.

Once done, save the data to your computer and import it to your new QBO account.
- Move to the Gear icon, then click on Import data.
- Choose the data you want to import.
- Press the Browser button and then select the file you export.
- Click Next, then follow all the on-screen instructions.
Should I Move from QuickBooks Desktop to Online?
Before making the decision on moving from QuickBooks Desktop to QuickBooks Online, it’s essential to compare the features and limitations of both the software. Plus, determine which one is best fit for your business, helping you to meet your specific needs or requirements.
QuickBooks Desktop and Online both have robust capabilities with different scalability measures, industry-specific tools and customization options. More and more companies are making the switch from QuickBooks Desktop to QuickBooks Online, and here’s why:
- Accessible from anywhere: QuickBooks Online offers the flexibility to access financial data from anywhere, any time. Also, it is more accessible on mobile devices than Desktop.
- Scalability: As businesses grow, their needs change. QuickBooks Online makes it easier to scale up and down, as it offers a number of subscription plans that grow with your business.
- Integration with other apps: QuickBooks Online seamlessly integrates with a wide range of business applications to centralize your operations.
- Automatic updates: QuickBooks Online is continuously updated, unlike Desktop. It automatically implements the latest features and security patches, reducing the hassle of manual backups and updates.
- Improved collaboration: Cloud-based accessibility makes it simpler for teams to work together efficiently on the same file, regardless of their location.
Will I Have to Re-enter any Data After Conversion?
In some cases, you may need to review and possibly re-enter certain data to ensure accuracy after conversion.
How Will you Confirm the Accurate Import of your QuickBooks Desktop Data to QB Online?
To verify the accuracy of your imported QuickBooks company file data, follow the steps below:
- Choose Window and then select Close All to close all open QuickBooks windows (reports, transactions, and so on).
- Navigate to File and select Utilities, then click Verify Data.
- If QuickBooks reports a problem, rebuild your company data to repair problems.
- Hover over Window, then Close All to close all open QuickBooks windows (reports, transactions, and so on).
- Click File and choose Utilities, then select Rebuild data.
