callnow

Live Support

+1-802-778-9005
Home>>Become An Expert With QuickBooks Training & Certification How to Record Things in QuickBooks Desktop and Online? How to Record a Non-Taxable Income in QuickBooks Desktop and Online?

Submit Your Details to Continue Reading

Navigation

Recording Non-Taxable Income in QuickBooks is important for businesses. QuickBooks provides a specific field for non-taxable income, making it easy to track different sources of income without affecting their taxable income.

Items marked as “non-taxable” by IRS are:

  • Child support payments
  • Inheritances, gifts, and bequests
  • Alimony payments (for divorce decrees finalized after 2018)
  • Cash rebates on items you purchase from a retailer, manufacturer, or dealer
  • Most healthcare benefits
  • Welfare payments
  • Money that is reimbursed from qualifying adoptions

When non-taxable revenue is recorded correctly, it ensures that accounting rules and tax laws are followed and the financial statements truthfully represent the company’s financial status.

What is Non-Taxable Income in QuickBooks?

In QuickBooks, non-taxable income is revenue that the IRS does not consider taxable. It could include gifts, inheritances, and other forms of insurance proceeds, as well as some types of government benefits based on IRS rules.

Types of Non-Taxable Income in QuickBooks?

In QuickBooks, non-taxable income refers to earnings that are not subject to taxation. Properly categorizing these transactions ensures accurate financial reporting.

Common Types of Non-Taxable Income:

  • Loans Received: Funds borrowed from financial institutions or other sources.
  • Owner’s Equity Contributions: Personal funds invested into the business by the owner.
  • Gifts and Inheritances: Assets received without any exchange of goods or services.
  • Insurance Proceeds: Payments from insurance claims, such as life insurance payouts.
  • Tax Refunds: Refunds received from overpaid taxes in previous years.
  • Interest on Municipal Bonds: Earnings from bonds issued by local or state governments.
  • Certain Scholarships and Grants: Funds received for educational purposes that are not taxable.

How do you record non-taxable income in QuickBooks Desktop?

record non-taxable income in QuickBooks Desktop

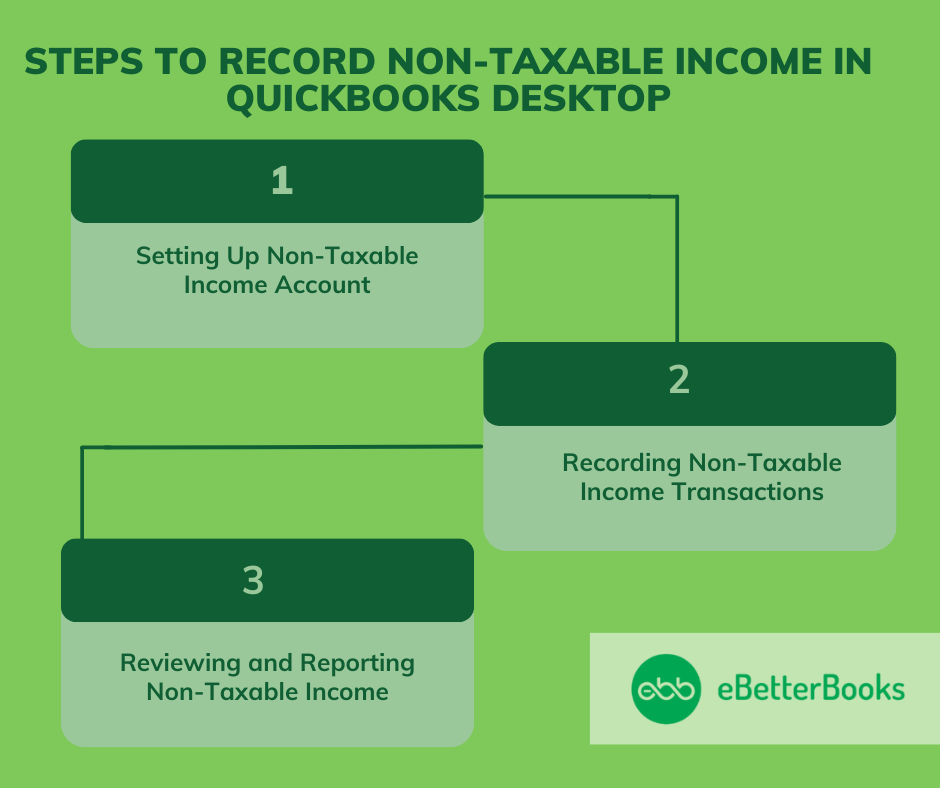
Record non-taxable income in QuickBooks Desktop, create a new income account, categorize the income as non-taxable, and then enter the payment details under this account.

Following the step-by-step information below:

Part 1: Setting Up Non-Taxable Income Account

To set up a non-taxable income account in QuickBooks Desktop, go to Lists > Chart of Accounts, create a new Income account, name it “Non-Taxable Income,” and save.

Step 1: Navigate to the Chart of Accounts

  1. Go to the Lists menu at the top.
  2. Choose Chart of Accounts from the drop-down menu.

Step 2: Create a New Account

  1. In the Chart of Accounts window, go on to the Account button at the bottom left.
  2. Choose New to create a new account.

Step 3: Set Account Type

  1. In the Add New Account window, choose Income as the account type.
  2. Click Continue to proceed.

Step 4: Enter Account Details

  1. Name the account something like “Non-Taxable Income” for easy identification.
  2. Add a description if needed.
  3. Click on Save & Close to create the account.

Part 2: Recording Non-Taxable Income Transactions

To record non-taxable income, go to Customers > Create Sales Receipts. Choose or create a customer, select “Non-Taxable Income” from the account list, enter the amount, and click Save & Close.

Step 1: Open the Create Sales Receipts Window

  1. Click on the Customers menu at the top.
  2. Choose Create Sales Receipts from the drop-down menu.

Step 2: Enter Customer Information

  1. Choose the customer from whom the non-taxable Income is received or create a new customer.
  2. Enter the customer details.

Step 3: Select the Non-Taxable Income Account

  1. In the Item column, click on Add New.
  2. Select Service as the item type and click Continue.
  3. Name the item.
  4. In the Account drop-down, choose the “Non-Taxable Income” account you created.
  5. Click on OK to save the item.

Step 4: Enter Transaction Details

  1. Put the amount received as non-taxable Income in the Amount column.
  2. Add any additional details.

Step 5: Save the Transaction

  1. Verify all the information entered is correct.
  2. Click on Save & Close to record the transaction.

Part 3: Reviewing and Reporting Non-Taxable Income

To review non-taxable income, generate a Profit & Loss report from Reports > Company & Financial. Customize the date range, ensure “Non-Taxable Income” is included, then review, save, or print the report.

Step 1: Generate a Profit & Loss Report

  1. Click on the Reports menu at the top.
  2. Choose Company & Financial and then Profit & Loss Standard.

Step 2: Customize the Report

  1. Select the date range for the period you want to review.
  2. Click Customize Report to adjust the settings if needed.
  3. Ensure that the “Non-Taxable Income” account is included in the Report.

Step 3: Review the Report

  1. Click OK to generate the Report.
  2. Review the Report to ensure that the non-taxable Income is correctly recorded and displayed.

Step 4: Save or Print the Report

  1. To save, click the Excel button to export the Report to Excel.
  2. To print, click the Print button.

How do you record non-taxable income in QuickBooks Online?

Processing invoices as non-taxable income

When you send an invoice to a customer, it is considered income because you know that it is earned revenue. This principle dictates that income is recognized when earned, not necessarily when received. To ensure the invoice is not taxable, you can exempt the item/product or service, and the tenant should also be exempted.

After recording the non-taxable income, the next step is to create a bank deposit that affects Accounts Receivable. This deposit allows you to apply the invoice. Then, you can match the bank feeds in the deposit you created, giving you full control over your financial transactions.

Part 1: Setup the Undeposited Fund Account

You must enter all the transactions that you want to deposit in the undeposited funds account. This account has everything you need before you record a deposit.

Step 1: Go to chart of accounts and set asset account

  1. Click on Chart of Accounts.
  2. Click on New.
  3. Click on Assets.
  4. Choose the Other Current Assets option on the screen.

Step 2: Name the account

  1. Drag down the Tax Form section and choose the Undeposited Funds option.
  2. Enter the account name.
  3. Click on Save.

Part 2: Access your Transactions from Banks and Credit Cards

Download and categorize transactions by date or service. Click +New, select Receive Payment, choose the customer, check the invoice, and deposit to Undeposited Funds. Review details and click Save and Close or Save and New.

Step 1: Categorize the downloaded transaction

  1. Make sure to have all the downloaded transactions from banks and credit cards.
  2. Categorize the transactions based on dates or items/services.

Step 2: Add transactions to the Undeposited Funds account

  1. Click on +New on the screen.
  2. Choose to receive payment.
  3. Choose the Customer from the Customer’s drop-down menu.
  4. Select the checkbox for the invoice for which you’re receiving payments.
  5. Choose Undeposited Funds from the Deposit drop down.

Step 3: Review the transaction

  1. Enter the required information on the screen.
  2. Select Save and send/ save and close or save and new.

Part 3: Combine the Transactions

To combine transactions, click + New, select Bank Deposit, choose the deposit account, check each transaction, ensure the total matches your deposit slip, then click Save and Close or Save and New.

Step 1: Enter the transaction

  1. Click on + New and select Bank Deposit.
  2. Select the account you want to deposit the money into from the Account drop-down menu, 
  3. Click on the checkbox for each transaction you want to combine.

Note: Make sure the total of the selected transactions matches your deposit slip. Use your deposit slip as a reference.

Step 2: Save the transaction

  1. Once you are satisfied, Click on Save and close or Save and new.

Best Practices for Recording Non-Taxable Income in QuickBooks

Tips for Maintaining Accurate Records of Non-Taxable Income

Maintaining accurate records of non-taxable income is essential for clear financial management and compliance with tax regulations. Follow these steps to ensure proper documentation:

  • Identify Non-Taxable Income Sources:
    • Common examples include gifts, inheritances, certain insurance proceeds, and some government benefits.
  • Create a Dedicated Non-Taxable Income Account:
    • In your accounting software (e.g., QuickBooks), set up a specific income account labeled “Non-Taxable Income” to segregate these funds from taxable income.
  • Record Transactions Promptly:
    • Enter each non-taxable income transaction into your accounting system as it occurs, ensuring accurate and up-to-date records.
  • Maintain Supporting Documentation:
    • Keep all relevant documents, such as gift letters, inheritance records, or insurance claim statements, to substantiate the non-taxable nature of the income.
  • Review Financial Statements Regularly:
    • Periodically examine your financial statements to ensure non-taxable income is correctly categorized and does not affect taxable income calculations.
  • Consult Tax Professionals When Necessary:
    • Seek advice from tax experts to confirm the non-taxable status of specific income types and to stay informed about any changes in tax laws.

Common Mistakes to Avoid When Recording Non-Taxable Income in QuickBooks

When recording non-taxable income in QuickBooks, avoid these common mistakes:

  1. Classifying Non-Taxable Income as Taxable:
    • Mistake: Recording non-taxable income under taxable income accounts.
    • Consequence: Incorrect tax calculations and potential tax filing errors.
    • Solution: Create a separate income account specifically for non-taxable income.
  2. Using Incorrect Income Accounts:
    • Mistake: Using general income accounts for non-taxable income.
    • Consequence: Misleading financial reports and tax implications.
    • Solution: Set up a dedicated non-taxable income account in your chart of accounts.
  3. Not Marking Transactions as Non-Taxable:
    • Mistake: Failing to indicate that a transaction is non-taxable.
    • Consequence: Taxable income may be overstated.
    • Solution: When recording the transaction, select the non-taxable income account and ensure the tax status is marked as non-taxable.
  4. Overlooking Tax Settings:
    • Mistake: Not configuring tax settings for non-taxable income.
    • Consequence: Incorrect tax calculations and potential compliance issues.
    • Solution: Review and adjust tax settings to ensure non-taxable income is excluded from tax calculations.
  5. Not Consulting a Tax Professional:
    • Mistake: Assuming all non-taxable income is treated the same.
    • Consequence: Potential tax compliance issues.
    • Solution: Consult with a tax professional to understand specific tax implications of different non-taxable income sources.

By avoiding these mistakes, you can ensure accurate financial records and tax compliance when handling non-taxable income in QuickBooks.

What are the Examples of Non-Taxable Income in QuickBooks?

Here’s a table with examples of non-taxable income in QuickBooks:

Non-Taxable Income TypeDescriptionExample
Loans ReceivedMoney borrowed from a bank or lender, requiring repayment.Business loan or line of credit
Owner’s Equity ContributionsPersonal funds invested by the owner into the business.Owner depositing personal savings into the business account
Gifts and InheritancesMoney or assets received without providing goods/services.Gift from a family member
Insurance ProceedsPayouts from insurance claims for business-related events.Property damage compensation from insurance
Tax RefundsRefunds from overpaid taxes in previous years.State or federal tax refund
Interest on Municipal BondsEarnings from tax-exempt state or local government bonds.Interest from investing in municipal bonds
Certain Scholarships and GrantsFinancial aid for educational purposes, not taxable.Scholarship for tuition or research grants
Gifts from Customers or ClientsNon-reciprocal gifts received that aren’t part of business income.A client gives a gift (not for services)

This table helps you quickly understand different types of non-taxable income and their examples in QuickBooks.

How to Set Up and Configure Non-Taxable Income for Different Businesses?

Setting up non-taxable income for a business involves ensuring the correct categorization of income that is not subject to tax. This includes understanding which sources of income qualify and how to set them up in financial and tax systems. Here’s a step-by-step guide:

1. Identify Non-Taxable Income Sources

Non-taxable income includes:

  • Gifts, inheritances, or bequests: Income received as a gift or inheritance is typically not taxable.
  • Employee benefits: Certain benefits like health insurance, retirement plan contributions, and bonuses may be non-taxable depending on the specifics.
  • Interest on municipal bonds: Interest from bonds issued by local or state governments is usually tax-exempt.
  • Certain insurance proceeds: Payouts from life insurance or disability policies may not be taxable.
  • Scholarships and fellowships: These may be non-taxable if used for qualifying educational expenses.
  • Workers’ compensation: This benefit is usually not taxable.

2. Categorize Non-Taxable Income in the Chart of Accounts

  • Set up specific accounts in your accounting system to track non-taxable income separately.
  • For example, create categories such as:
    • “Non-taxable Gifts”
    • “Non-taxable Employee Benefits”
    • “Municipal Bond Income”
  • Ensure that these accounts are clearly marked as non-taxable within your system.

3. Configure Your Accounting or Tax Software

  • For QuickBooks:
    • Go to the Chart of Accounts.
    • Click New and select Income.
    • Name it according to the type of non-taxable income.
    • Ensure that the account is set as “Non-Taxable”.
    • Use this account when recording such income.

How to Create a Non-Taxable Sales Report?

Part 1: Customize Data as Per Taxable Sales Detail

To customize taxable sales data, click on Reports, select Taxable Sales Detail, then choose Customize. Adjust the date range in the General drop down to refine the report.

Step 1: Access Taxable Sales Option

  1. Click on Reports. 
  2. In the search field, key in and select Taxable Sales Detail.

Step 2: Customize the data

  1. Choose the Customize option on the screen
  2. Choose the date range in the General drop down.

Part 2: Create Sales Report 

Create a sales report, use the Filter option to select non-taxable sales and set Distribution Account to “All Income/Expense Accounts.” Review the report and click “Run Report” to finalize.

Step 1: Access the Filter option

  1. Select the check boxes from the filter drop down option.
  2. List all customers with non-taxable sales.
  3. In the Distribution Account, select “All Income/Expense Accounts” from the drop down to hide the A/R Source line on the report.
  4. In the Product/Service Taxable, select “Non-Taxable” from the drop down to show the report as Taxable Sales Detail when you run the Non-Taxable Sales Report.

Step 2: Review the report

  1. Thoroughly check the report.
  2. Once you are satisfied, click on Run Report.

How to make an Item Non-Taxable in QuickBooks?

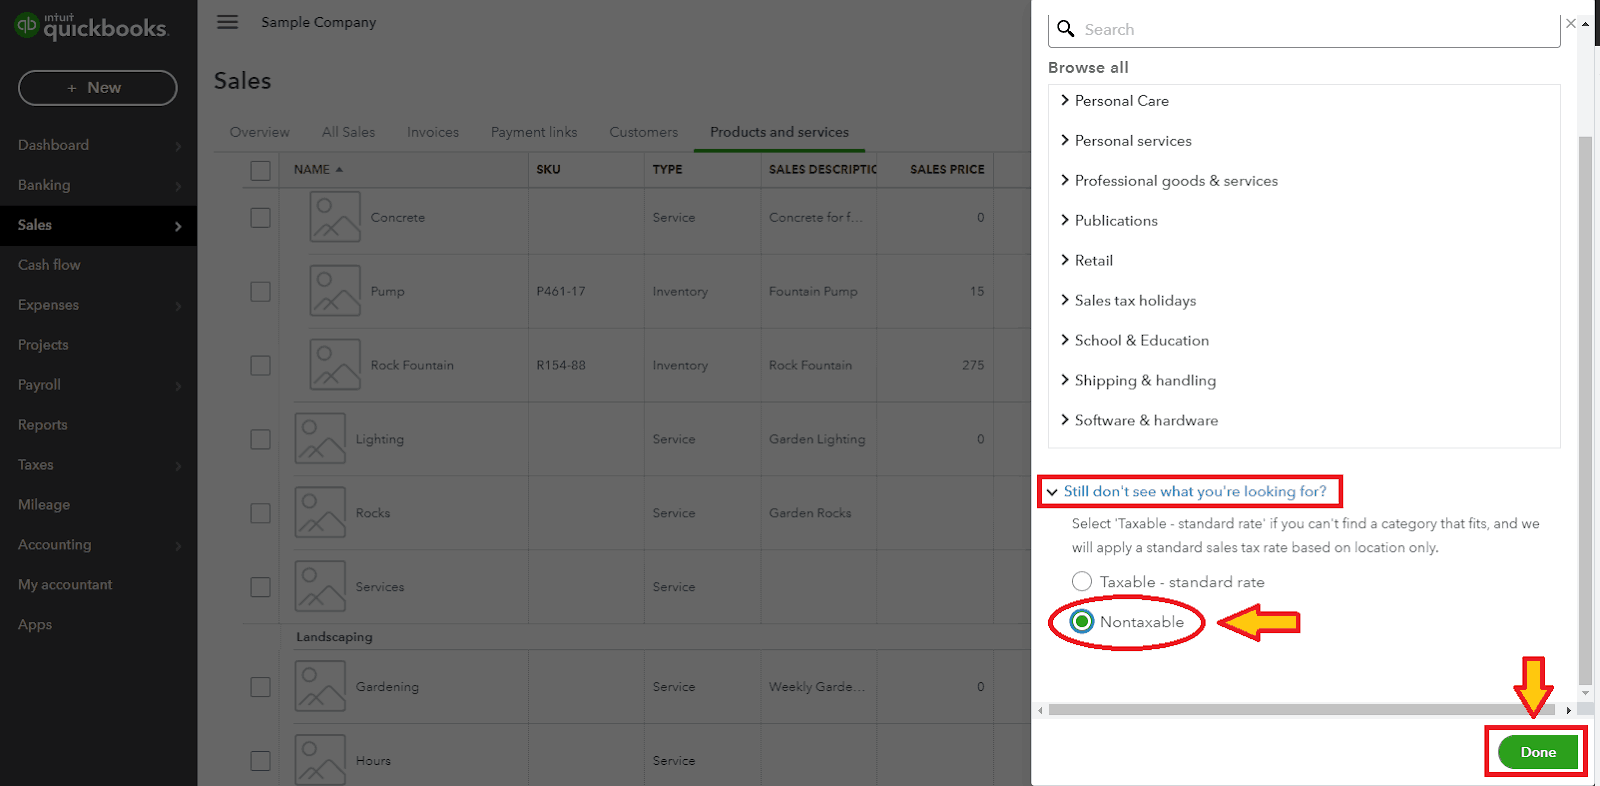
To make an item non-taxable in QuickBooks, follow these steps:

1. Go to the Products and Services List

  • Open QuickBooks and navigate to the Sales menu.
  • Select Products and Services.

2. Find the Item

  • Locate the item you want to make non-taxable from the list. You can search for it using the search bar or scroll through the list.

3. Edit the Item

  • Click on the item name to open the Edit window.

4. Set the Taxability

  • In the Sales Tax section, you’ll see an option called Taxable. Uncheck the box next to Is Taxable to make the item non-taxable.

5. Save the Changes

  • After unchecking the box, click Save and Close to save your changes.

6. Verify the Change

  • Go back to the Products and Services list and verify that the item is now marked as non-taxable.
change the taxable items into non-taxable items

How to record non-taxable income in QuickBooks for contractors?

Contractors often receive non-taxable income, which is money that is not subject to federal income tax, such as gifts, certain insurance payouts, or some reimbursements. Managing non-taxable income properly in QuickBooks is crucial for accurate financial reporting. Here’s how you can record non-taxable income in QuickBooks for contractors:

Step-by-Step Process:

  1. Set Up a Non-Taxable Income Account:
    1. Open QuickBooks and go to the Chart of Accounts.
    2. Select New and choose Income as the account type.
    3. For the detail type, select Other Income or a more specific one depending on the nature of the non-taxable income.
    4. Name the account (e.g., “Non-Taxable Income”).
    5. Ensure this account is set up as non-taxable so it doesn’t affect your tax calculations.
  2. Record Non-Taxable Income Transactions:
    1. Go to Create (+) and select Bank Deposit.
    2. Choose the bank account where you received the non-taxable income.
    3. In the Add funds to this deposit section, add the source of the non-taxable income.
    4. Under Account, select the “Non-Taxable Income” account you created.
    5. Enter the amount of income received and any other relevant details.
    6. Ensure that Tax is marked as None to indicate it is not taxable.
  3. Classify Payments Correctly:
    1. For contractors receiving non-taxable reimbursements or insurance payouts, it’s important to classify these correctly under “Non-Taxable Income” to avoid them being mistakenly counted as taxable earnings.
    2. Always double-check that “Tax” is set to None to ensure no tax obligations are triggered.
  4. Review Reports:
    1. Once recorded, you can track your non-taxable income by running Profit and Loss reports.
    2. Under the Non-Taxable Income account, you will be able to see the total income categorized as non-taxable, which ensures it’s not included in your taxable earnings.
  5. Handle Non-Taxable Income on Tax Forms:
    • Non-taxable income may not need to be reported on tax forms like the 1099, but it’s still important to track for accurate record-keeping. If required, ensure your reports align with tax filing needs.

Non-Taxable Income and QuickBooks Reports

How to Create and Customize Non-Taxable Income Reports in QuickBooks

To create and customize non-taxable income reports in QuickBooks, follow these steps:

Step 1: Set Up Non-Taxable Income Accounts

To ensure non-taxable income is properly tracked, you need to create specific income accounts in your Chart of Accounts.

  1. Log in to QuickBooks Online:
    • Open your browser and log in to your QuickBooks Online account.
  2. Access the Chart of Accounts:
    • Click the Gear icon (⚙️) in the upper-right corner of your QuickBooks dashboard.
    • Under the Your Company section, click Chart of Accounts.
  3. Create a New Income Account:
    • In the Chart of Accounts page, click the New button in the upper-right corner.
    • For Account Type, select Income.
    • For Detail Type, select an appropriate option. If you don’t see a relevant one, you can use Other Income.
    • In the Name field, type a name for your non-taxable income account (e.g., “Non-Taxable Income”).
    • If you’d like, you can also add a description to clarify the purpose of this income account.
    • Click Save and Close to create the account.

Step 2: Record Non-Taxable Income Transactions

After creating your income account, you can now record non-taxable income transactions.

  1. Create a New Transaction (Invoice or Sales Receipt):
    1. From your QuickBooks dashboard, click on the + New button on the left-hand side.
    2. Choose either Invoice or Sales Receipt, depending on whether you’re billing a customer or receiving payment immediately.
  2. Add a Non-Taxable Income Item:
    1. In the transaction screen, you’ll see fields to add items, products, or services.
    2. In the Item column, select an existing item that corresponds to non-taxable income, or create a new item.
  3. Create a New Item Linked to Non-Taxable Income:
    1. To create a new item, click Add New under the Item dropdown.
    2. In the Item Name field, give it a name (e.g., “Non-Taxable Income”).
    3. In the Income Account dropdown, choose the non-taxable income account you created earlier.
    4. Set the Tax Code to Non-Taxable (this ensures the income isn’t taxed).
    5. Click Save and Close to create the item.
  4. Complete the Transaction:
    1. Fill out the transaction as usual (e.g., customer, date, payment terms, etc.).
    2. Ensure you select the non-taxable income item in the item column.
    3. Once everything looks correct, click Save and Close (for an invoice) or Save and Send (for a sales receipt).

Step 3: Customize Your Report to Show Non-Taxable Income

To view the non-taxable income on your reports, you will need to customize the Profit and Loss (P&L) report.

  1. Access Reports:
    • From your QuickBooks dashboard, click on the Reports tab on the left-hand side.
  2. Choose the Profit and Loss Report:
    1. In the search bar, type Profit and Loss.
    2. Click on Profit and Loss to open the default report.
  3. Customize the Report to Include Only Non-Taxable Income:
    1. Click on the Customize button at the top-right of the report page.
    2. In the Customize Report window, go to the Filter section.
    3. Under the Filter dropdown, select Account.
    4. A list of your accounts will appear. Check the box next to the non-taxable income account(s) you want to include in the report.
    5. You can also set a date range to specify the period you want to view (e.g., last month, year-to-date, etc.).
    6. Click Run Report to apply the filter and generate your custom report.

Step 4: Save the Customized Report for Future Use

Once your report is customized, you can save it so you don’t have to redo these steps every time.

  1. Save the Customized Report:
    • After customizing the report, click on the Save customization button at the top of the report.
    • In the Save Custom Report window, give the report a name (e.g., “Non-Taxable Income Report”).
    • Select any additional options, such as whether to share the report with others or add it to your Dashboard.
    • Click Save to save your report.

Step 5: Access and Use Your Customized Report

Now that you’ve saved your customized non-taxable income report, it’s easy to access whenever you need it.

  1. Go to Custom Reports:
    1. From the QuickBooks dashboard, click on the Reports tab.
    2. In the search bar, type Custom Reports and click on it.
  2. Open the Saved Report:
    1. You will see a list of saved custom reports. Click on your saved Non-Taxable Income Report to open it and view the filtered results.

How to Record Non-Taxable Income in QuickBooks Payroll for Employees?

To record non-taxable income in QuickBooks Payroll for employees, follow these steps:

  1. Access Payroll Settings:
    • Log in to QuickBooks.
    • Navigate to the Gear icon > Payroll Settings.
  2. Add a New Earnings Item:
    • In Payroll Settings, select Earnings.
    • Click on Add a New.
    • Choose Earnings and name it (e.g., “Non-Taxable Bonus”).
  3. Set Taxability:
    • In the earnings item setup, find the Tax Tracking Type.
    • Select None to indicate non-taxable income.
  4. Assign to Employees:
    • Go to the employee’s profile.
    • Under Earnings, add the new non-taxable item.
  5. Record Payroll:
    • Process payroll as usual.
    • The non-taxable income will be excluded from tax calculations.

By following these steps, you ensure that non-taxable income is accurately recorded and excluded from tax calculations in QuickBooks Payroll.

Understanding IRS Rules on Non-Taxable Income in QuickBooks

In QuickBooks, before recording, determine which income sources are non-taxable according to IRS guidelines. Common examples include:

  • Gifts and Inheritances: Amounts received as gifts or inheritances are generally not taxable.
  • Life Insurance Proceeds: Payouts from life insurance policies upon the insured’s death are typically non-taxable.
  • Municipal Bond Interest: Interest earned on municipal bonds is usually exempt from federal taxes.
  • Worker’s Compensation: Benefits received for job-related injuries are non-taxable.

For a comprehensive list, refer to IRS Publication 525.

Conclusion

Non-taxable income must be entered into QuickBooks to maintain accurate financial records and guarantee compliance with accounting standards. By classifying these transactions accurately, businesses can make better judgements and better grasp their financial health.

Effectively handling non-taxable income in QuickBooks facilitates financial management and strategic planning in addition to streamlining accounting procedures, all of which support the general expansion and success of the company.

Frequently Asked Questions

What is Non-Taxable Income in QuickBooks?

Non-taxable income in QuickBooks refers to earnings that are not subject to income tax, such as child support, gifts, or certain benefits. It’s crucial to categorize these correctly to ensure accurate financial records and compliance with tax regulations.

Why is it important to accurately record non-taxable income in QuickBooks?

Accurate recording of non-taxable income ensures compliance with accounting standards and tax laws. It helps maintain precise financial records, supports informed decision-making, and reflects the true financial status of the company.

How to Add a Non-Taxable Reimbursement Payroll Item to QuickBooks Online?

Below are the steps to add a Non-Taxable Reimbursement Payroll item in QuickBooks Online:

  1. Navigate to the Payroll option and click on the Employees tab and then click on an employee.
  2. Click Edit employee or Add payroll item or any other similar options where your need arises.
  3. Finally, in the Compensation or Other Pay Types section, it is possible to upload a new reimbursement.
  4. Better yet, come up with a name for it ( for instance, Non-Taxable Reimbursement) and make sure that it is tax exempt.
  5. Save the changes.

This reimbursement can now be included in the payroll process. Check it in detail with payroll reports so that it is shown under the right head of non-taxable income.

What are the Differences Between Non-Taxable vs. Taxable Income?

Non-Taxable Income:

  • Definition: Non-taxable income refers to income that is not subject to taxation. This can include specific exclusions or exemptions outlined by tax laws.

Taxable Income:

  • Definition: Taxable income refers to the income on which an individual or business is required to pay taxes. It includes wages, salaries, bonuses, interest, dividends, and any other earnings that are not exempt by law.

How to record employee gifts in QuickBooks Online and Desktop?

To record employee gifts in QuickBooks, follow these steps:

In QuickBooks Online

  1. Go to “Expenses” → Click “New Transaction” → Select “Expense” or “Check”
  2. Payee: Enter the employee’s name (if applicable)
  3. Category: Use “Employee Gifts” or create a new account under Expenses
  4. Amount: Enter the gift value
  5. Memo: Add a note for tracking (e.g., “Holiday Gift for John Doe”)
  6. Save and Close

In QuickBooks Desktop

  1. Go to “Banking” → Click “Write Checks”
  2. Pay to the Order of: Enter the employee’s name
  3. Account: Use “Employee Gifts” under Expenses
  4. Amount: Enter the gift cost
  5. Memo: Add a note for tracking
  6. Save & Close

💡 Tax Note:

  • Cash or gift cards are taxable and should be reported as wages.
  • Non-cash gifts under $75 are generally not taxable but confirm with a tax professional.