Highlights (Key Facts & Solutions)
- Dual Platform Recording: The core difference in workflow is that QuickBooks Desktop uses distinct forms (e.g., “Write Checks,” “Enter Credit Card Charges”), while QuickBooks Online uses a single entry point: + New → Expense.
- Personal Funds: Expenses paid using personal money must be recorded by posting the transaction to an equity account, such as Owner’s Equity or Owner’s Investment, to ensure clean financial separation [Source: Intuit].
- Reconciliation and Accuracy: Regular account reconciliation is a fundamental accounting principle and a best practice that ensures the accuracy of the financial position, minimizing the risk of errors and supporting timely tax filing.
- Automation Limits: The Auto-Pay feature for recurring invoices is subject to limitations, including that the maximum invoice amount must be $5,000 or less and the interval cannot be Daily [Source: Intuit].
- EEAT Topics (Multi-Currency): For international transactions, the Multi-Currency feature, which converts foreign amounts to the home currency using updated exchange rates, must be permanently enabled in the settings and cannot be turned off [Source: Intuit].
- Third-Party Integration: Tools like Expensify and Hubdoc reduce manual data entry and errors, accelerating approval cycles, and enhancing audit readiness by automatically storing digital receipts [Source: Ramp].
- Tax Compliance: Proper expense categorization is required for tax purposes. For 2025, the standard business mileage rate is 70 cents per mile, and the exclusion for qualified parking and commuter benefits is $325 per month [Source: IRS Publication 15-B (2025)].
Overview
While recording the loan under QuickBooks, a small business can monitor all the long-term or short-term loans while keeping a track of all the loan deposit amount and loan repayment.
Do you have trouble entering loans into QuickBooks? Accurate financial management requires knowing how to set up and record loans in QuickBooks, whether you work as an accountant or as a small business owner.
While handling a business, you will encounter many scenarios where you have to borrow money to fund your business or lend money.
There are two such scenarios as per accounting rules:
- Loan Payables (Where you have borrowed money and are under the obligation to pay)
- Loan Receivables or Receivables (Where you have lend money and have the right to receive principle and interest payments)
When the company borrows money, it is mandatory to record the loan as “payables” under the liability account to maintain financial records. And when you lend money to someone else, then the loan is recorded as “receivables” in the asset side of the balance sheet.
How to Create / Set-Up a Loan in QuickBooks?
To efficiently manage financial transactions, setting up a loan in QuickBooks entails opening a loan account, entering loan details, and establishing loan installments. To initiate the process of creating a loan account in QuickBooks, go to the Chart of Accounts and choose the ‘New’ option to establish a new account. Next, you can designate an appropriate account name and select “Long Term Liabilities” as the account type.
Once the loan account has been created, you can add specific loan details like the loan amount, interest rate, and period once the loan account has been created. In order to guarantee precise loan payment tracking and administration, QuickBooks gives you the option to customize loan payment settings by establishing recurring payment schedules.
Step 1. Establishing a Credit Account
To effectively record financial obligations and manage loan transactions within the accounting system, you must first create a loan account in QuickBooks. The process entails multiple crucial phases, commencing with accessing the Chart of Accounts and choosing the Add New Account option.
You’ll need to provide important information while creating the loan account, including the loan amount, interest rate, conditions of repayment, and lender details. For these data entries, QuickBooks offers dedicated fields, so you can precisely record the loan terms in the system.
To ensure accurate financial reporting, you can tailor the account to fall under the long-term liabilities category. You can make sure that your loan transactions are correctly documented and efficiently handled by adhering to these guidelines.
Step 2. Documenting Credit Data
To ensure thorough financial record-keeping and analysis, loan details such as principal amount, interest rate, and repayment terms must be precisely entered into QuickBooks. This procedure provides the basis for monitoring how the loan affects the company’s financial situation. QuickBooks makes it easier to calculate interest payments to ensure accurate financial reporting.
To ensure compliance and transparency, loan details including loan agreements, payment plans, and any collateral involved must be properly documented. Businesses can obtain a comprehensive understanding of their financial obligations by integrating these components with QuickBooks, which facilitates improved strategic planning and decision-making.
Step 3. Organizing Loan Disbursements
In order to facilitate smooth loan administration within QuickBooks, setting up loan payments requires establishing payment schedules, connecting bank accounts, and guaranteeing precise transaction categorization. The first step in this process is to use QuickBooks’ “Loan Manager” feature to enter the loan information, such as the principal amount, interest rate, and loan period. Users can specify a payment plan that is either monthly, bi-weekly, or based on a custom time frame after entering the loan details.
It is important to link the relevant bank account to expedite the payment process and guarantee that transactions are appropriately displayed in the software. By correctly classifying these transactions in QuickBooks, users may efficiently monitor how the loan is affecting their financial statements.
How to record a loan in QuickBooks Desktop?
How to record a loan in QuickBooks Desktop, first create a liability account under Chart of Accounts. Set up the vendor and an expense account for interest. Use the Make Deposits feature to record the loan amount and Write Checks to record loan payments, including principal and interest.
Tracking Loans In QuickBooks Desktop for Windows
To record a loan in QuickBooks Desktop, create a liability account under Chart of Accounts, set up the vendor, and an expense account. Record the loan via Make Deposits and loan payments via Write Checks.
In order to track your loan in QuickBooks Desktop for Windows, kindly follow the steps below:
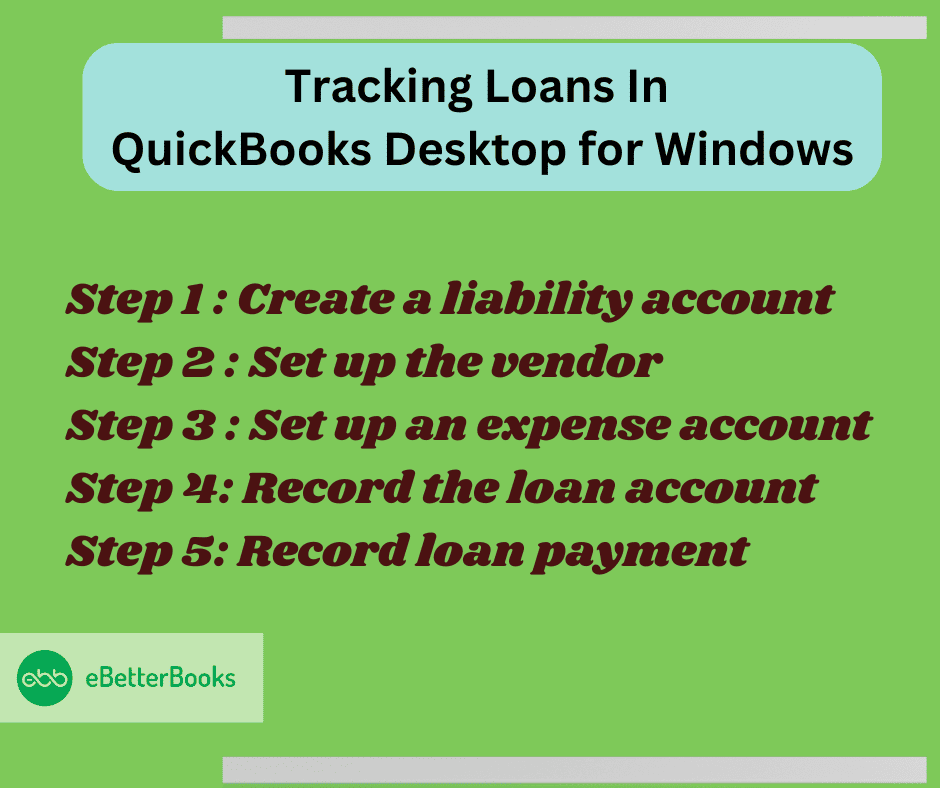
Step 1: Create a liability account.
You must choose a liability account when you record a loan in QuickBooks.
- Navigate to the Lists menu and choose the Chart of Accounts.
- Choose New.
- Choose the appropriate account type for your loan by first selecting Other Account Types:
- Other Current Liability: This should be used for short-term loans that are due in more than a year.
- Long-Term Liability: This should be used for debts that are due over an extended length of time.
- Click “Continue.”
- Input the account number and name.
- Click Save & Close.
Step 2: Set up the vendor
- Select the Vendor Center under the Vendor menu.
- Choose a New Vendor.
- Enter the bank name or the company name you need to pay for the loan.
- Enter the vendor’s details such as email address, phone number.
- Click on “OK”.
Step 3: Set up an expense account.
- Go to the Lists menu, then choose the Chart of Accounts.
- Click on the New.
- Select the Expense and then continue.
- Enter the name of the account for the interest payments or fees and charges.
- Click on Save and then close the transaction.
Step 4: Record the loan account
In this step, you will get to know how to record entries for Cash Loans in QuickBooks Desktop:
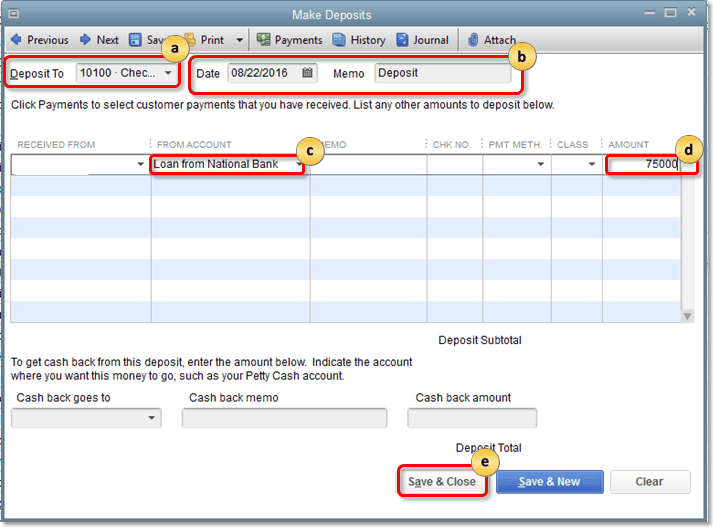
- Click the Banking menu and choose “Make Deposits.”
- Choose Cancel if the Payments to Deposit window appears.
- Choose the account to which you want to deposit the loan in the Deposit To section of the Make Deposits window.
- Verify the date and add a memo if desired.
- Choose the Liability account that you created in Step 1 under the From Account column.
- Enter the loan amount in the Amount column.
- Click Save & Close.
Step 5: Record loan payment
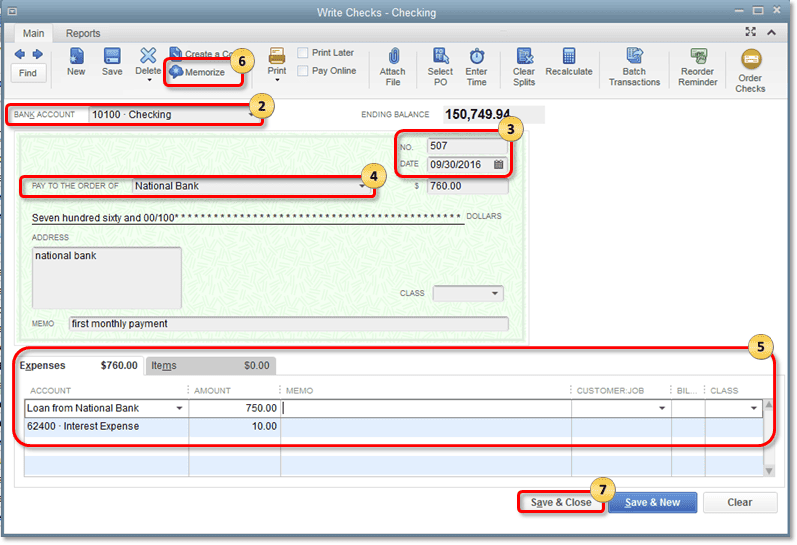
- Click on the Banking menu, then click on “Write Checks:.
- Choose the Bank account you want for loan payment.
- Check and verify the “Check number” and “Date”.
- Select the bank name in the “Pay to the order of” field.
- Now in the Expense tab:
- Select the liability account you have created in the Step -1 (in the first line).
- Then enter the payment for the principal amount.
- Select the interest expense account (in the second line),
- Enter the payment for the loan interest.
- Click on Save and close the transaction.
Tracking Loans In QuickBooks Desktop for Mac
First , create the liability account and set up the vendor, to know the steps (read under the heading above “ Step 1: Create a liability account and Step 2: Step up the Vendor“), then follow the below mentioned steps:
Step 3: Record the loan amount
In this step, you will get to know how to record entries for Cash Loans in QuickBooks Mac:
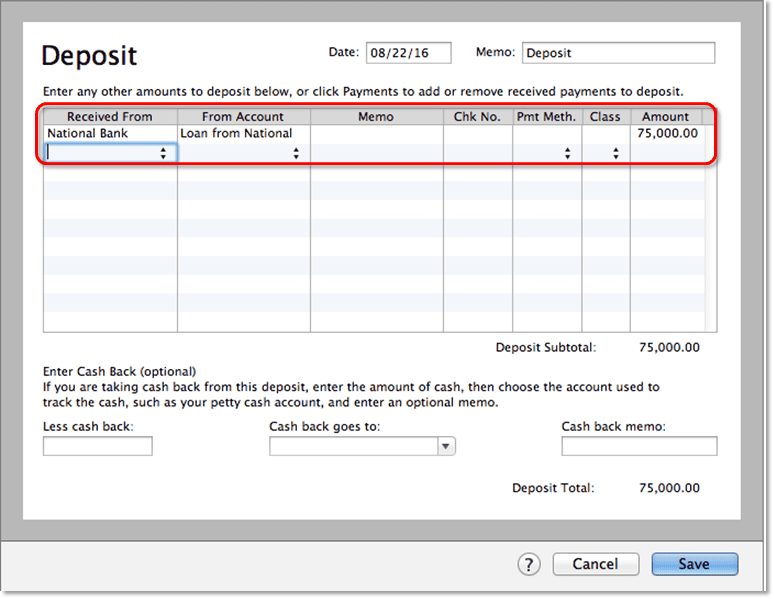
- Click the Banking menu and choose “Make Deposits.”
- Choose Cancel if the Payments to Deposit window appears.
- Choose the account to which you want to deposit the loan in the Deposit To section of the Make Deposits window.
- Choose the liability account that you created in Step 1 under the From Account column.
- Enter the loan amount in the Amount column.
- Click Save.
Step 4: Record the loan payment
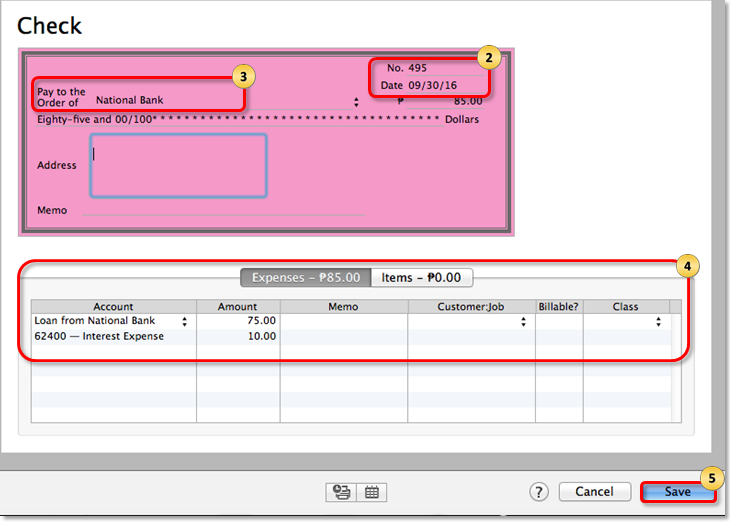
- Navigate to the Banking menu and choose “Write Checks.”
- Choose the bank account to use to make loan payments.
- Check Date and Check No.
- Choose the bank’s name in the Pay to the Order of field.
- On the tab for expenses:
- Choose the liability account you formed in Step 1 on the first line. Next, enter the principal payment amount.
- Choose the interest expense account on the second line. Next, insert the loan interest payment.
- Click Save & Close.
Recording entries for loans in QuickBooks Desktop (QBDT)
In QuickBooks Desktop, record loan entries by creating a liability account, setting up the vendor, and an expense account for interest. Use Make Deposits to log the loan and Write Checks for payments, including both principal and interest.
Recording entries for Only Loan Interest Payments in QuickBooks Desktop
First, you can write a check to the relevant expenditure account that is utilized to track loan interest for the interest-only payments. You must first create an expense account, though.
How to do it is as follows:
- Select Chart of Accounts from the List menu.
- If you do a right-click anywhere, choose New.
- Choose Expense and press Next.
- To make interest payments or pay fees and penalties, enter the account name. Then, click Save and Close.
Recording Entries for Non-Cash Loans in QuickBooks Desktop
There are different processes for recording non-cash loans in Windows and Mac for QuickBooks Desktop.
Below are the mentioned processes:
In Windows
- Create an asset account.
- Navigate to the Lists menu and choose the Chart of Accounts.
- If you do a right-click anywhere, choose New.
- Choose the non-cash loan account type:
- Vehicles, structures, and other goods with a useful life of more than a year should be classified as fixed assets.
- Other Current Asset: Put valuables here that can be exchanged for cash (such as pre-paid bills).
- For objects that are neither fixed assets nor other current assets, use the term “other asset.”
- Click “Continue.”
- Input the account number and name.
- Once finished, choose Save & Close.
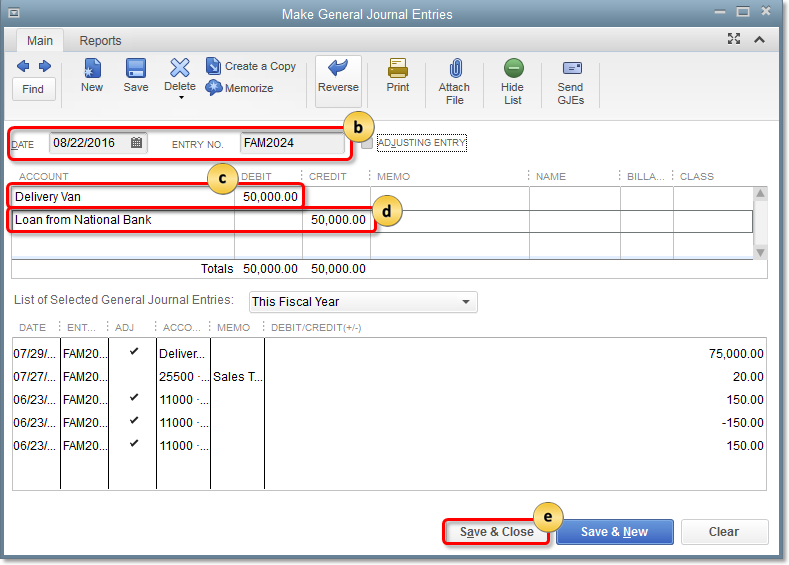
- Click on the Company menu and choose the option to Enter General Journal Entries.
- Put the Journal Entry No. and Date in here.
- Debit the loan asset account by selecting the first line.
- Click on the second line, then give the liability account credit.
- Click Save & Close.
In Mac
Follow the steps below to record the entries for non-cash loans:
- Create an asset account.
- First, navigate to the Lists menu and choose the Chart of Accounts.
- To add a new account, click the + symbol.
- Choose the loan’s asset account:
- Vehicles, structures, and other goods with a useful life of more than a year should be classified as fixed assets.
- Other Current Asset: Put valuables here that can be exchanged for cash (such as pre-paid bills).
- For objects that are neither fixed assets nor other current assets, use the term “other asset.”
- Click OK.
- Click on the Company menu and choose the option to Enter General Journal Entries.
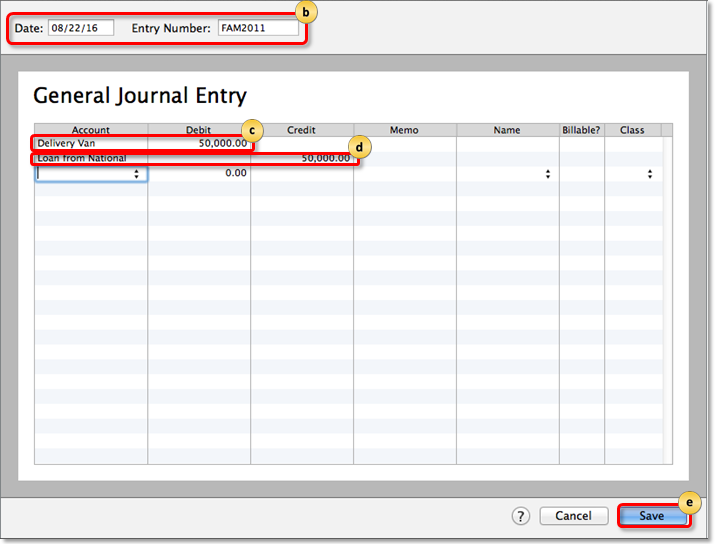
- Date and journal entry number should be included.
- Debit the loan asset account by selecting the first line.
- Click on the second line, then give the liability account credit.
- Click Save.
How to record a loan in QuickBooks Online?
Record a loan in QuickBooks Online, create a liability account, specify the loan balance, and record repayments by selecting the liability account, entering payment amounts, and categorizing interest and fees. Save the details to complete the entry.
By this method, you can record:
- Loan for asset in QuickBooks Online
- Loan for other purposes
- Loan to Buy Inventory
Now, it’s time to learn to set up and record loans in QuickBooks Online and then enter the record as per the scenarios.
Setting or Configure up a Loan in QuickBooks Online
Step 1: Create a liability account
The first step includes creating a liability account in your QuickBooks account.
Follow the below-mentioned steps:

- Click on Settings and then choose the Chart of Accounts.
- After that, click on “New” to create a new account.
- Select Long-Term Liabilities from the Account Type dropdown.
- Now, provide the loan account name (including – Company or Individual Name, Description. Tax-line)
Step 2: Specify the loan balance
In this step. We will determine the type of loan – whether it is a new loan or prior loan, you need to record both of them.
- If it is a new loan, it shows the full balance to be paid back. So, if the amount gets deposited to your bank from loan:
- In the Opening balance, leave US $0 and then click on Save.
- You have to determine the bank deposit in your liability account to begin with the beginning amount.

- If it is a prior loan, then the partial amount will be set off with the current payoff balance.
- In the Opening balance section, select the start date ( date from which you will start tracking your finances).
- Mention the amount balance for that date.
- Click on Save.
Step 3: Record the loan repayment
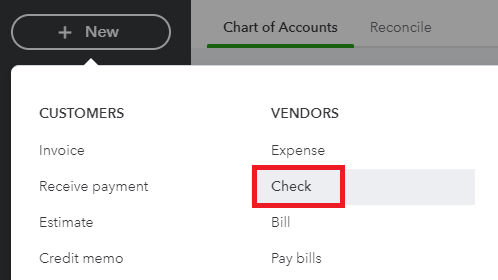
- Click on + New.
- Then, select Check.
- Now, add the check number ( if you want to send a check) or enter the Debit or EFT details in the Check number field ( if you want to use direct withdrawal or an EFT).
Now, it’s time to enter the Category details in the check section. Make sure to document all the following information:
- Click on the liability account for the loan from the dropdown menu of the Category section.
- Now, enter the payment amount.
- Click on the expense account for the interest from the dropdown menu of the Category section.
- Now, enter the Interest payment.
- If you have any additional fees, you can choose from the dropdown menu of the Category section.
- Once, all the details are entered and checked properly. Click on Save and then close it.
Recording a loan in QuickBooks Online
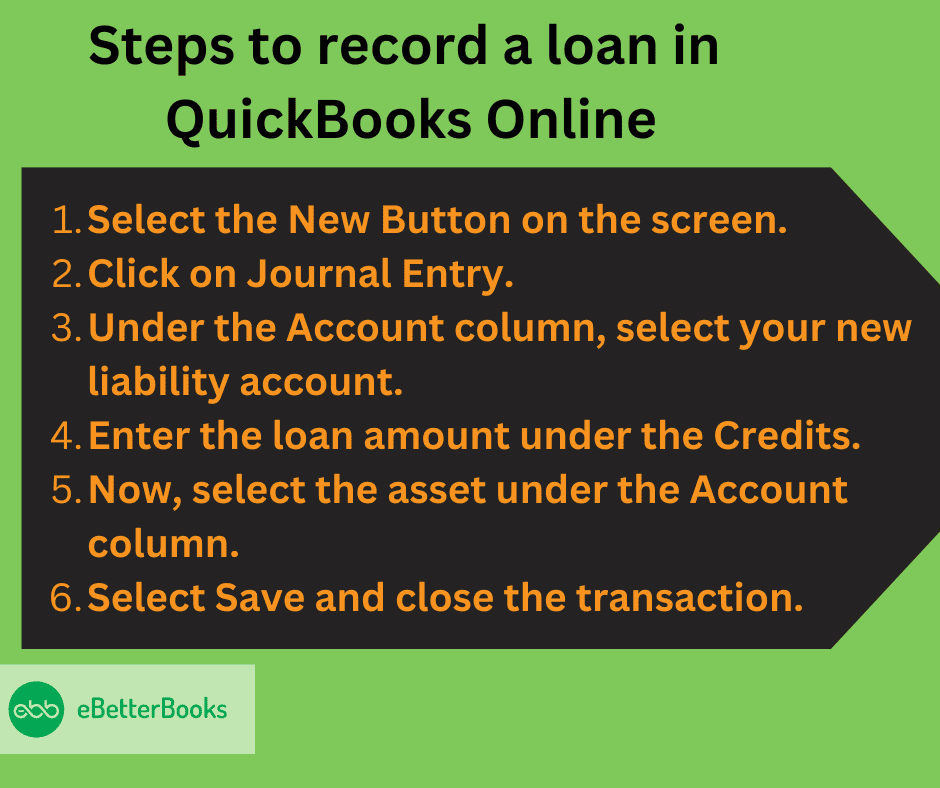
To record a loan in QuickBooks Online, click the New button, select Journal Entry, choose your liability account, enter the loan amount under Credits, select the asset account, then save and close the transaction.
Following the step-by-step information below:
Step 1: Click on the New Button
- Select the New Button on the screen.
Step 2: Start a Journal Entry
- Click on Journal Entry.
Step 3: Choose the Liability Account
Under the Account column, select your new liability account.
Step 4: Enter the Details
- Enter the loan amount under the Credits.
Sep 5: Select the Asset
- Now, select the asset under the Account column.
Step 6: Finishing Up!
- Select Save and close the transaction.
Recording Customer’s Invoice Based Loan Entries in QuickBooks Online
To record a customer’s invoice-based loan in QuickBooks Online, create a liability account, enter the loan amount using a journal entry, and record payments via the “Make Deposits” feature. Set up a recurring invoice for loan repayments and track interest income in the appropriate accounts.
Following the step-by-step information below:
Granting a Loan to Close Open Invoices
In order to record a loan to close open invoices, you must have a liability account (if you don’t have one, first create that, read under the heading above “ Step 1: Create a liability account “ ), then follow the below mentioned steps:
- Select “Loans to Others” from the Detail type drop-down.
- Enter the Name for the loan in the Name field.
- Click Save and Close.
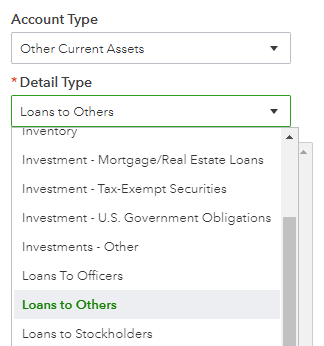
Note: While creating the liability account:
- If the loan will be repaid within the current fiscal year, use “Other Current Assets” under “Account Type”.
- If the loan will be repaid after the current fiscal year, use “Current Assets” under “Account Type”.
Entering the Loan Amount with a Journal Entry

In order to enter the loan amount with a Journal Entry, follow the below mentioned steps:
- Click on + New.
- Pick the Journal entry option.
- Under the Account section, select a new liability account.
- Enter the amount of the loan under the Credits section.
- Now, select the asset account under the Account column.
- Select Save and then close.
Creating a General Loan for a Customer
In order to record a general loan for a customer, you must have a liability account (if you don’t have one, first create that, read under the heading above “ Step 1: Create a liability account “ ), then follow the below mentioned steps:
- Click on the New button in the left-side Navigation Pane.
- Now, choose Checks under the Vendor heading.
- A Check panel pop up will appear on the screen and then you have to choose the account that funds the loan in the Bank Account drop-down.
- Then, enter the account that you created to track the loan as the offsetting account in the below area.
- Enter the total amount.
- Click on the Save and Close button.

Recording Customer Loan Payments
In order to record the customer loan payments you must have a liability account (if you don’t have one, first create that, read under the heading above “ Step 1: Create a liability account “) , then follow the below mentioned steps:

- Click on the “Banking” menu and then “Make Deposits”.
- Choose the Payment, linked with the account ( if the payments to deposit window is accessible).
- If the “Make Deposit Window” is accessible, then enter the name of the customer who is paying off the loan in the “Received From” column.
- Now, enter the Asset Account that has been created for the loan in the “ From Account Field”.
- Enter the customer’s payment in the Account column.
- Now, enter the customer’s name in the “Received From” column.
- If there is any interest amount, then enter the interest amount in the “Account” column.
- Click on “Save & Close” to save and close the transaction window.
Creating an Item for the Loan

- Click on Setting and then navigate to the Products and Services list under the Lists heading.
- Select the Products and Services and click on the New button and then select the Service.
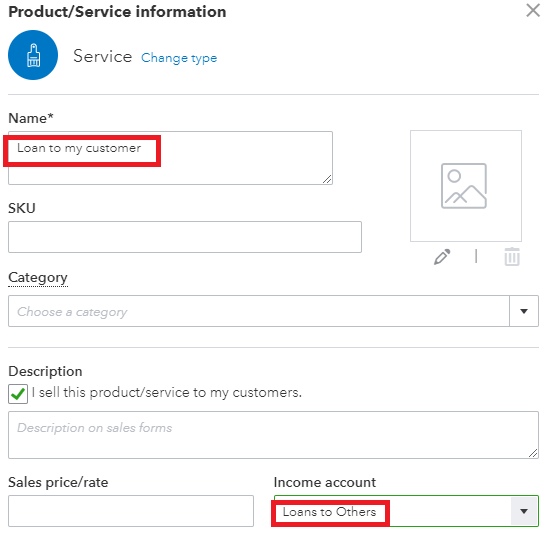
- A panel will slide in, now enter the descriptive name for the loan and under the Income account drop down, select the customer’s loan receivable amount.
- Click on the Save and close the transaction.
Making a Recurring Invoice for Loan Repayments
- Click on the Settings button and select the Recurring transaction under the Lists heading.
- Click on the New button and then select the Invoice from the drop-down.
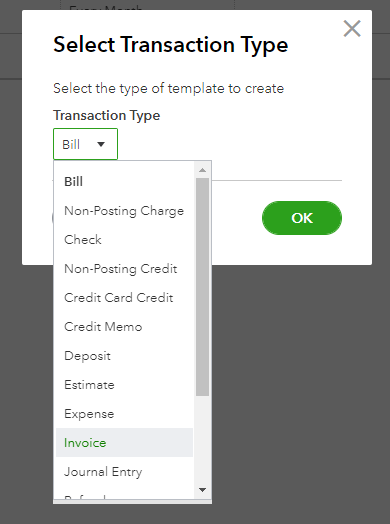
- Select the customer’s name from the Customer dropdown, under the Invoice form.
- Now, choose the loan that you have made from the Product/ Service dropdown.
- Now, under the Edit Schedule area, enter the schedule that you want the loan to be paid by.
- Once done, click on the Save Template button.
Recording Entries for Loan Receivables
In order to record the entries for loan receivables, you must have a loan account (if you don’t have one, first create that, read under the heading above “ Step 1: Create a liability account “) , then follow the below mentioned steps:
- Open the Banking menu and make deposits.
- Now, choose the payment you want to link with the account ( if the payment to deposit window is open).
- Enter the name of the customer paying off the loan inside the “Received From” column ( if the “Make Deposits Window” is opened).
- In the “From Account” field, enter the asset account ( that you have created for the loan).
- Enter the customer’s payment in the Amount column.
- Enter the account you will use to track the interest income into the “From Account” field.
- Enter the payment part that goes in the Amount column. ( Use the “Interest Income” account under the Other Income Type, until you have an amount to track the interest of the loan.)
- Click on Save and close the transaction.
Creating Loan Repayment Schedule in QuickBooks
Create a loan repayment schedule in QuickBooks, enter the loan as a journal entry, set up expense accounts for interest and fees, input loan details, and use “What If Scenarios” to calculate and print the repayment schedule.
Following the step-by-step information below:
- Enter the initial loan amount as a journal entry.
- Set up Expense account for the interest and fee
- Enter the loan information such as account name, loan amount, original amount.
- Enter the payment information.
- Enter the interest information.
- Make payments by selecting “Regular Payment” in the Set Up Payment window.
- Use the What If Scenarios tool by clicking the “What If Scenarios” button and select the loan from “Choose a loan list”.
- Click on ‘Calculate” to see the final result and “Print” to print the transaction.
- Click on “Ok”.
Zeroing Out a Loan in QuickBooks
One more important process is to get a loan account in QuickBooks to zero out at the end of the cycle. When payments are final and when you are required to book a loan account fully, you are expected to clear the loan account to represent the correct amount of liability.
Here’s how you can do this:
In QuickBooks Online
Follow the below steps to zero out a loan in QuickBooks Online:
- From the list go to Reports, select Balance Sheet and see if there is any balance in the loan account.
- Go to the BookkeepingàCreate Check or Expense, choose the loan account, insert the remaining balance and click on save.
- Go to Chart of Accounts, modify the loan account, and check the option Inactive.
In QuickBooks Desktop
Follow the steps to zero out a loan in QuickBooks Desktop:
- It is recommended to open Chart of Account, right click at the loan account and click on Quick Report so that the balance can be viewed.
- Click on Banking then on Write Checks, choose proper loan account, type the rest balance and click on save.
- The Loan account needs to be made inactive. Here you will get the list of accounts, right click on the Loan Account which we would like to make inactive and click on Make Account Inactive.
Tip: Make sure the accounts are cleared before the loans are written off to avoid discrepancies.
What to do in order to adjust a loan balance in QuickBooks?

- Click on the New button on the left side of the Navigation Pane to create a new bank deposit.
- Select the Bank Deposit under the Other heading.
- Select the payment you received and in the Add Funds to the deposit section.
- Choose the loan account that you have created for the customer from the dropdown.
Efficient Loan Tracking and Management in QuickBooks
QuickBooks offers powerful tools to manage diverse loan types with precision. From distinguishing short- and long-term loans to handling non-cash assets, it ensures accurate financial records. Custom payment schedules and dedicated expense accounts streamline tracking, while journal entries maintain clarity and reduce errors for smoother loan oversight.
Understanding Different Types of Loans in QuickBooks
QuickBooks supports two main loan types: short-term and long-term loans. Short-term loans are typically due within 12 months, while long-term loans extend beyond one year. Correct classification impacts your financial reports and tax calculations. You must record loans as liabilities — “Loan Payables” if you borrowed money, and “Loan Receivables” if you lent money. Accurate tracking of principal and interest for each type is crucial to avoid errors. QuickBooks allows you to set separate accounts for each loan type, enabling clearer cash flow analysis and helping you manage over 5 different loan agreements efficiently.
Setting Up Expense Accounts for Loan Interest and Fees QuickBooks
In QuickBooks, creating dedicated expense accounts for loan interest and fees is essential. Proper categorization helps you track how much you spend on interest annually, which can be over 10% of your loan amount. It also simplifies tax deductions and financial analysis. To set up, go to Chart of Accounts, create a new expense account named “Loan Interest Expense,” and another for fees if applicable. This separation lets you monitor multiple loans’ costs clearly, avoid mixing with other expenses, and provides a precise overview of your financial obligations each quarter or fiscal year.
How to Handle Non-Cash Loans in QuickBooks Desktop and Online
Non-cash loans, like equipment or vehicle loans, require special handling in QuickBooks. Instead of cash deposits, you record these as assets and liabilities simultaneously. Create an asset account (e.g., “Vehicle Asset”) and a liability account for the loan. Use journal entries to debit the asset and credit the loan liability for the exact value. This ensures your balance sheet reflects both the asset and the debt accurately. Handling non-cash loans this way helps you manage at least 3 types of non-cash transactions, keeps reports precise, and avoids misrepresenting your company’s financial position.
Customizing Loan Payment Schedules in QuickBooks
QuickBooks lets you customize loan payment schedules to match your repayment plans. You can set monthly, bi-weekly, or custom intervals, ensuring timely tracking of principal and interest payments. This feature helps manage over 12 months of payments efficiently, reducing manual errors and missed deadlines. By linking payment schedules to bank accounts, QuickBooks automates transaction recording and improves cash flow visibility. Custom schedules also support forecasting, allowing you to plan future expenses and manage budgets better. Using this tool can save you up to 30% of the time spent on loan management tasks annually.
Using Journal Entries in QuickBooks for Accurate Loan Recording
Journal entries in QuickBooks help you record loans precisely by capturing both sides of the transaction. Debit the asset or cash account for the loan amount and credit the liability account to show your obligation. This dual-entry method ensures your balance sheet stays balanced and financial reports remain accurate. For interest and fees, separate entries track expenses without affecting the principal. Using journal entries reduces errors by 20%, simplifies audits, and improves transparency. This approach works well for complex loans or partial payments, helping you manage multiple loans smoothly and keep your books compliant.
Mastering Loan Management in QuickBooks: Essential Tips for Accuracy and Efficiency
Effective loan management in QuickBooks hinges on consistent updates, clear categorization, and regular reconciliation. By leveraging QuickBooks Loan Manager and avoiding common mistakes, you can streamline tracking, reduce errors, and maintain accurate financial records. These best practices not only simplify audits but also enhance your overall financial clarity and control.
Tips for Maintaining Accurate Loan Records in QuickBooks
Maintaining accurate loan records in QuickBooks starts with consistent data entry and regular reconciliation. Update loan payments at least monthly to track principal and interest separately. Use reminders or calendar alerts to avoid missed payments, which can save you from 15% in late fees annually. Always verify loan balances against lender statements every quarter to catch discrepancies early. Categorize all loan-related transactions clearly using dedicated accounts. Backing up your QuickBooks data weekly ensures no loss of critical financial info. These practices enhance financial clarity, reduce errors by up to 25%, and support smoother audits or tax filings.
How to Use QuickBooks Loan Manager for Effective Loan Tracking
QuickBooks Loan Manager simplifies tracking by consolidating all loan details in one place. It helps you monitor principal balances, interest rates, and payment schedules for multiple loans—up to 10 loans simultaneously. The tool automatically calculates interest and suggests payment amounts, saving you up to 40% time on manual calculations. You can generate reports showing loan status and upcoming payments, improving your financial planning. Using Loan Manager reduces errors, enhances accuracy, and ensures timely repayments, helping you maintain strong lender relationships and avoid penalties.
Common Mistakes to Avoid When Recording Loans in QuickBooks
Avoid common loan recording errors like mixing principal and interest payments in one account, which can misstate your financials by up to 20%. Failing to update loan balances regularly leads to inaccurate reports and poor cash flow management. Another mistake is neglecting to set up separate liability and expense accounts, making tax deductions harder. Not linking payments to the correct bank account causes reconciliation issues. Lastly, skipping documentation like loan agreements or payment schedules can create compliance risks. Staying vigilant on these points keeps your books accurate, saves time during audits, and supports smarter financial decisions.
How to Adjust and Reconcile Loan Balances in QuickBooks
Adjusting and reconciling loan balances in QuickBooks ensures your records match lender statements accurately. Start by comparing your loan account balance with your latest loan statement each month. Use journal entries to correct any discrepancies in principal or interest amounts. Reconcile payments against bank transactions to confirm accuracy, preventing errors that can skew your financial reports by up to 15%. Regular reconciliation helps avoid overdue payments and supports audit readiness. Setting a monthly schedule for review can save you hours annually and keeps your bookkeeping transparent and reliable.
Best Practices for Zeroing Out and Closing Loan Accounts
Zeroing out loan accounts in QuickBooks ensures your liabilities reflect actual balances and prevents confusion in financial reports. Once a loan is fully paid, record a final payment to bring the loan balance to zero. Then, mark the loan account as inactive to keep your Chart of Accounts clean. This process avoids errors in future reconciliations and improves report accuracy by up to 10%. Always verify zero balances through reports before closing accounts. Following this practice helps maintain organized records, simplifies audits, and keeps your bookkeeping streamlined.
Conclusion!
While dealing with the financial record, calculating a loan is a big matter for businesses. You don’t want a small calculation error to ruin your entire balance sheet. Consequently, QuickBooks offers a QB loan manager to monitor every transaction meticulously and ultimately determine the outstanding balance.
Frequently Asked Questions
1. What is the fundamental difference between “Loan Payables” and “Loan Receivables” in accounting, and how does QuickBooks classify them?
The distinction between payables and receivables is essential for accurate Balance Sheet reporting:
- Loan Payables: This is money the company has borrowed and is obligated to repay. It represents a financial obligation.
- QuickBooks Classification: Recorded as a Liability account. This is usually split into Current Liability (due within 12 months) and Long-Term Liability (due beyond 12 months).
- Loan Receivables: This is money the company has lent to another party and has the right to receive back. It represents a future economic benefit.
- QuickBooks Classification: Recorded as an Asset account, often categorized as Other Current Asset or Other Asset.
Correct classification ensures the Balance Sheet accurately shows the company’s debts versus its future income streams.
2. How do I correctly handle the split payment between principal and interest when recording a loan repayment in QuickBooks Desktop?
Loan repayments must be recorded as a single check or expense but split between two different accounts using the Write Checks feature in QuickBooks Desktop:
- Principal Payment: The portion of the payment that reduces the outstanding debt is entered on one line and debited to the Loan Liability Account.
- Interest Payment: The portion of the payment that is the borrowing cost is entered on a separate line and debited to the Interest Expense Account.
This method ensures the Loan Liability account balance decreases accurately, and the Interest Expense is correctly reflected on the Profit and Loss statement for tax purposes.
3. Why is it necessary to use a General Journal Entry to record a non-cash loan, like financing a piece of equipment, instead of a simple bank deposit?
A General Journal Entry is required for non-cash loans because the transaction is an exchange of non-cash items and does not involve the bank account in the initial transaction:
- Debit: The Journal Entry must debit the appropriate Asset Account (e.g., Fixed Asset for a vehicle or equipment) to place the asset on the Balance Sheet.
- Credit: It must simultaneously credit the Loan Liability Account (Notes Payable) to record the debt obligation.
Using a journal entry ensures the fundamental double-entry accounting principle is followed, recording both the new asset and the new liability simultaneously and keeping the Balance Sheet balanced.
4. What is the QuickBooks Loan Manager tool, and why should Desktop users utilize it?
The QuickBooks Loan Manager is a dedicated feature primarily available in QuickBooks Desktop (note: it was discontinued in QBDT 2022 but remains functional in supported older versions) that helps manage and automate complex loan tracking:
- Amortization Calculation: It automatically calculates the loan’s amortization schedule, showing how much of each payment goes toward principal and how much goes toward interest over the loan’s life.
- Payment Setup: It facilitates the setup of the loan payment entry, ensuring the correct split between the principal and interest accounts.
- Analysis: It includes a “What If Scenarios” tool to evaluate different repayment possibilities.
5. What are the key steps to “zero out” or close a loan account in QuickBooks after the debt is fully paid off?
When a loan is fully repaid, the account must be closed to prevent it from skewing the Balance Sheet and future reports:
- Final Payment Verification: Ensure the final payment transaction (check or expense) is recorded, bringing the balance of the loan account in the Balance Sheet Report to precisely zero.
- Account Status: Once the balance is zero, navigate to the Chart of Accounts.
- Closure: Right-click the Loan Liability account (Desktop) or edit the account details (Online) and select the option to Make Account Inactive.
Making the account inactive prevents it from appearing on routine financial statements while preserving its historical data for auditing purposes.
6. When setting up a loan repayment schedule, what is the crucial distinction between “Short-Term Liability” and “Long-Term Liability”?
The distinction is critical for financial analysis and is based on timing:
- Short-Term Liability (Current Liability): This category is used for the portion of the debt that is due to be paid within the current operating cycle, typically within 12 months.
- Long-Term Liability (Non-Current Liability): This category is used for the remaining principal amount of the debt that is due to be paid over a period exceeding one year.
Accurate separation is required by accounting standards to show a business’s liquidity—its ability to cover upcoming expenses with current assets.
7. If I am lending money to a customer (a “Loan Receivable”), how should I record the interest income I receive on their repayments?
Interest received from a customer loan must be recorded separately from the principal payment when creating the bank deposit:
- Principal Payment: This portion is credited to the Loan Receivable Asset Account (the original account created for the loan) to reduce the customer’s outstanding balance.
- Interest Income: This portion is credited to an Interest Income account, which should be set up as an Other Income account type and is reflected on the Profit and Loss statement.
Separating these amounts ensures the asset account (what the customer owes) is accurate, and the business’s revenue correctly reflects the income earned from lending.
Disclaimer: The information outlined above for “How To Record A Loan in QuickBooks Online and Desktop – Learn the Process” is applicable to all supported versions, including QuickBooks Desktop Pro, Premier, Accountant, and Enterprise. It is designed to work with operating systems such as Windows 7, 10, and 11, as well as macOS.
