QuickBooks Error 12007 occurs when the software fails to connect to the Internet during updates, often due to incorrect settings or network issues. This error is generally easy to fix by adjusting QuickBooks or Internet configurations. Follow our guide to troubleshoot and resolve Error 12007, ensuring your updates run smoothly.
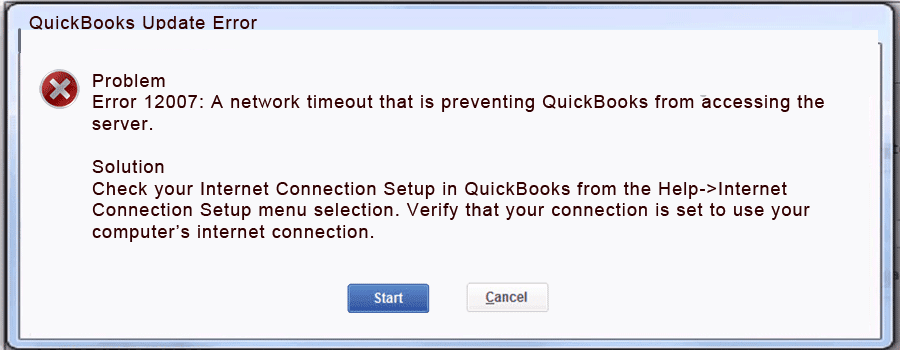
What is QuickBooks Error 12007 & How does it Looks when it occur
Sometimes, QuickBooks Desktop can’t successfully connect to the internet, which causes issues when updating. This may be because there are incorrect browser and security settings in place, or an application such as an antivirus or firewall program is interfering with the update.
Reasons that Causes QuickBooks Error 12007
Here are some possible causes of this error:
- Internet security and firewall are blocking QuickBooks.
- Internet Explorer browser not the default browser may also lead to this error.
- Third-party programs tampering with QuickBooks functionalities
- The previous QuickBooks Update was incomplete
- Erroneous Connection Settings
- Incorrect SSL settings
How to identify the effect of QuickBooks Error 12007?
Some of the common signs that users can relate to such error are:
- The user is unable to Update QuickBooks and instead encounters an error message related to Error 12007.
- The system experiences frequent crashes, especially when updating QuickBooks.
- Unexpected system lags while running QuickBooks.
Customized Solution for QuickBooks Error 12007
To resolve this payroll update error 12007
Troubleshooting Methods for QuickBooks Error 12007
To resolve QuickBooks Error 12007 setting Internet Explorer as your default browser, resetting web browser settings, clearing SSL state, using TLS 1.2 tool, or adjusting firewall settings.
Further detailed steps are provided below:
Solutions Part 1
Before going through the solution part, here’s a list of certain precautionary steps that must be implemented carefully.
Solution Part 2
To communicate with the server or access the company file, below we have discussed some possible solutions for the antivirus application that may help you to prevent QuickBooks from being scanned and fix QuickBooks Error 6094.
For this, adhere to the steps listed below:
Methods to Fix QuickBooks Error 12007
Methods 1: Make Internet Explorer as Default Browser
- Open your Internet Explorer in the first place.
- Now, click on the Tools menu and then select Internet Options.
- Hit the Programs tab and choose the Make Default option.
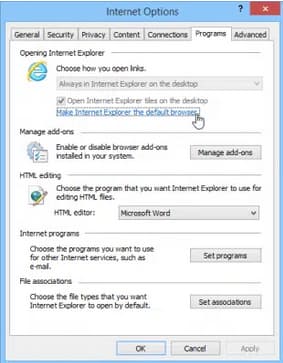
- Once done, press OK and then make an exit from Internet Explorer.
Methods 2: Reset Internet Web Browser Settings
- To begin with, close all open Windows and Programs and then open Internet Explorer.
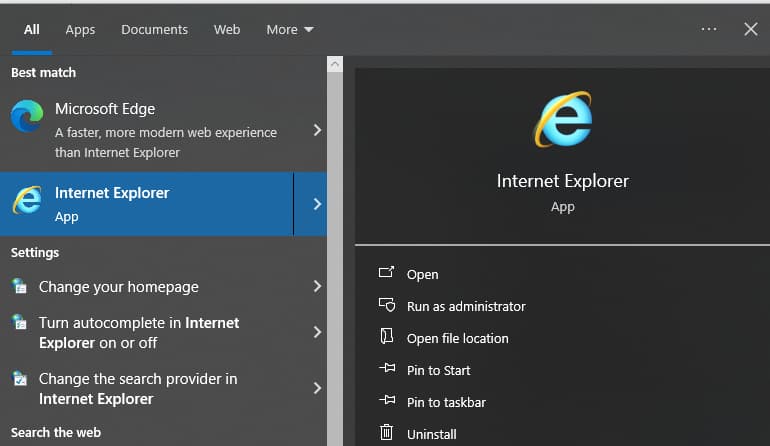
- Navigate to the Tools menu and choose Internet options.
- Hit the Advanced tab.
- After this, select Reset from the Reset Internet Explorer Settings dialog box.
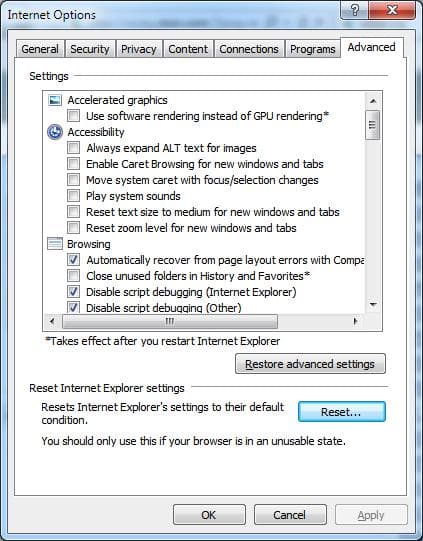
- This will direct you to the pop-up. Are you completely sure you want to reset all Internet Explorer settings? Press the Reset button again for the confirmation.
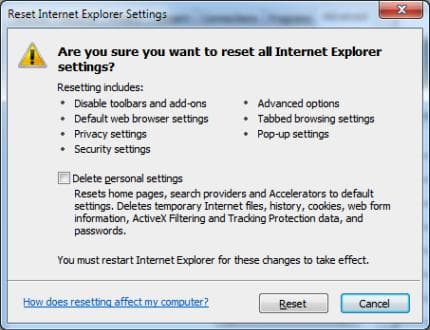
- When Internet Explorer finishes applying default settings, click Close and hit OK. Then, restart your system to apply the changes you’ve made.
Methods 3: Clear SSL State
- Hold and press Win + S tabs on your keyboard and then type Internet Options in the search bar.
- Now, open Internet Options and then go to the Content window.

- Select the Clear SSL state tab from the Certificates option.
- After this, click OK and then restart your system.
Methods 4: Run TLS 1.2 Utility from QuickBooks Tool Hub
Note: When you run this tool, you’ll update your operating system to be TLS 1.2 compliant.
Step 1: Run the TLS 1.2 Readiness tool using QuickBooks Tool Hub
- Firstly, close QuickBooks and download the latest QuickBooks Tool Hub version from the official Inuit website.
Note: The most recent tool hub version is 1.6. 0.3.
- Next, save the File where you can easily access it like your Downloads folder or Windows desktop.
Remember: If you have already installed Tool Hub, you need to find out which version you’re using.
For this, do the following:
- Click the Home icon, and the version will pop up at the bottom right corner of your screen.
- Also, select the option About to view the version.
- Open the File you downloaded named QuickBooksToolHub.exe.

- Click Yes to follow all the on-screen instructions and agree to the terms and conditions.
- After this, hit the Next icon and select the Install option.
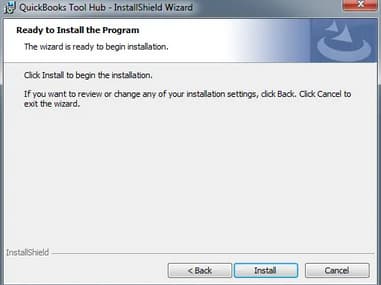
- When the installation comes to an end, select the Finish tab.
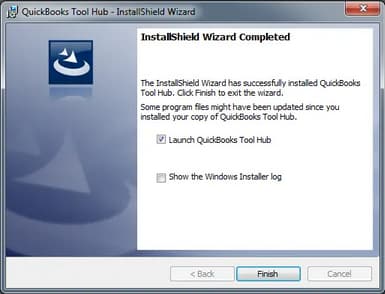
- Then, double-click on the Windows desktop icon to open the tool hub program.

Important Note: Hold and Press the Windows or Start key if you are unable to locate the icon, and then search for QuickBooks Tool Hub. Once found, choose the program to open it.

Step 2: Make use of the TLS 1.2 tool from the Tool Hub
- Under QuickBooks Tool Hub, click Installation Issues tab.
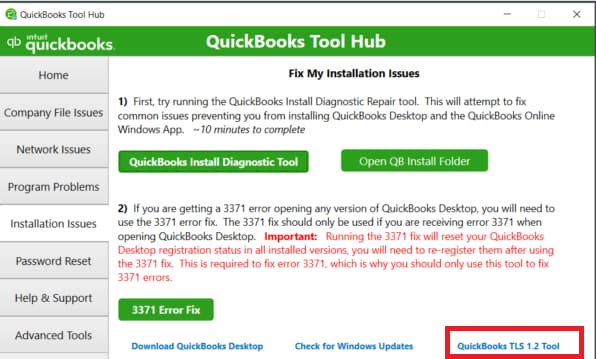
- Now, select QuickBooks TLS 1.2 Tool from the bottom right corner of your screen.
- Press OK to open the TLS Tool and then hit the Yes icon to the EULA Agreement.
- Choose the Run option.
- When the tool finishes, click Exit.
Methods 5: Reset QuickBooks Update Settings
- Initially, open the Windows Start menu.
- Now, look for QuickBooks Desktop and hit right-click on the icon then choose Run as administrator.
- Go to the Help menu and then select the Update QuickBooks Desktop option.
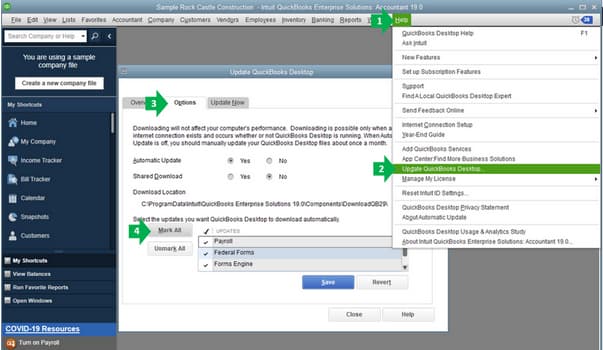
- After this, hit the Options tab and choose Mark All then press Save.
- Click the Update Now tab and tick-mark the Reset Update checkbox.
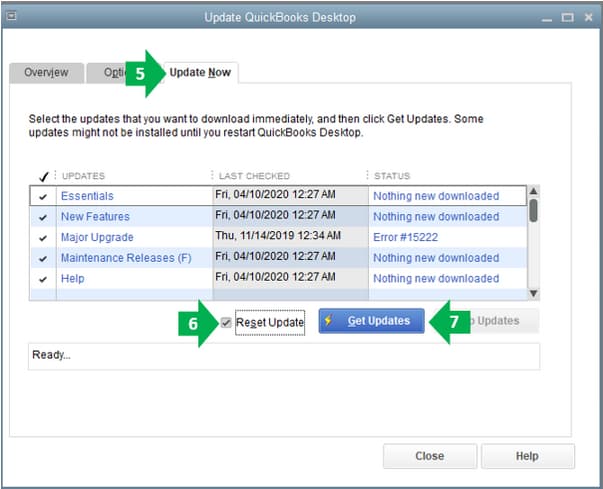
- Once done, press the Get Updates icon.
- After a successful update, close and reopen QuickBooks Desktop.
- At last, hit the Yes tab to install the updates and then restart your system.
Methods 6: Reconfigure Advanced Connection Settings
- First of all, check if your Internet connection is properly set up in QuickBooks.
- After this, press the Next button and then select the Advanced Connection settings.
- Navigate to the Display the Internet Properties window and hit the Advanced tab.
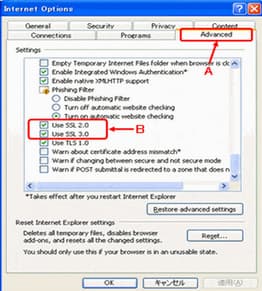
- Now, make sure the SSL 2.0 and SSL 3.0 check boxes are marked if not then select them.
- Press Apply and then click the OK icon.
- Close QuickBooks and restart your system
- Finally, try updating the QuickBooks Payroll services.
Methods 7: Open Windows in Safe Mode with Networking
- Firstly, remove all the floppy disks, CDs and DVDs from your computer and then restart your system.
- If your computer has a single operating system installed, press the F8 key until the Window logo appears. Once the Window logo displays, try again and wait for the Window Log on prompt then shut down and restart your computer.
- However, if your computer has more than one operating system, click the arrow keys to highlight the operating system you want to start in safe mode, and then hold down and click the F8 key.

- From the Advanced Boot Options screen, move the arrow keys to highlight the safe mode option and choose Safe mode with networking then hit the Enter tab.
- After this, login to your software with the correct administrator rights and then proceed ahead with the updating process.
Methods 8: Adding QuickBooks as Exception in Windows Security or Firewall
Note: Make sure QuickBooks is added as an exception in the Firewall.
If Windows Firewall Settings are misconfigured, it may hamper every single operation running in your system and restrict QuickBooks from connecting to the multi-user network.
Let’s set up Windows Firewall exceptions by following the below-listed steps:
Step 1: Add Firewall Port Exception for QuickBooks
Adhere to the following instructions for each QuickBooks Desktop version if you’re using multiple versions on the same computer.
- Navigate to the Windows Start menu.
- Write down Windows Firewall in the search bar and then hover over Windows Firewall Settings.
- Choose Firewall Advanced options from the left sidebar.
- After this, you get the inbound and outbound rules under Advanced Settings.
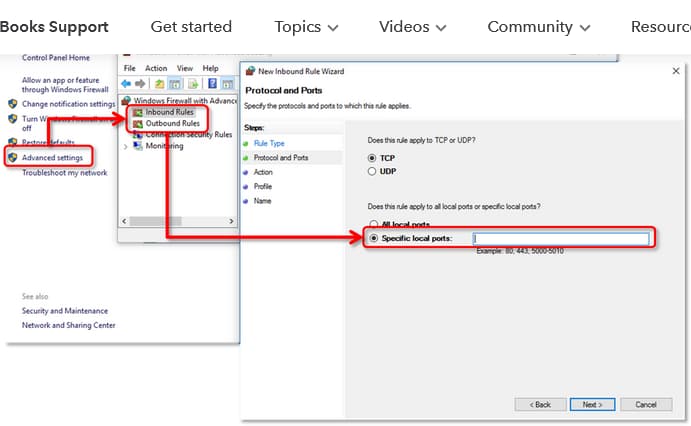
- Hit right-click on Inbound Rules and then select the New Rule option.
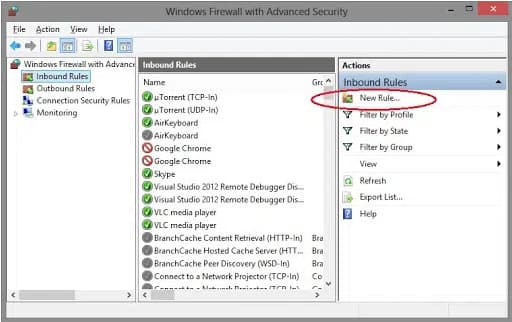
- In the New Rule window, click on Port and later press Next.
- Next, be sure that TCP is selected.
- Under the Specific local ports field, type the Specific ports required for the QB year version you are currently using:
- QuickBooks Desktop 2020 and later: 8019, XXXXX.
- QuickBooks Desktop 2019: 8019, XXXXX.
- QuickBooks Desktop 2018: 8019, 56728, 55378-55382.
- QuickBooks Desktop 2017: 8019, 56727, 55373-55377.
QuickBooks Desktop 2021, 2022, and later versions use dynamic ports.
Let’s see how to get a dynamic port number:
- Once you enter the port number, press Next.
- Choose Allow the Connection and hit the Next tab.
- If you’re prompted, make sure all profiles are marked. Later, click the Next icon again.
- Create a rule and name it “QBPorts(year).”
- After this, select Finish.
- Re-implement similar actions to create outbound rules.
Step 2: Create Windows firewall exceptions for QuickBooks Programs
QuickBooks makes use of executable files (.exe) to perform many accounting operations.
To create exceptions for each executable on the table, adhere to the following steps:
- Go to the Windows Start menu.
- Now, enter Windows Firewall into the search bar, and then open Windows Firewall.
- Select the Advanced Settings option.
- Hit right-click on Inbound Rules and hit the New Rule tab.
- Choose Program and then press Next.
- Afterward, choose This Program Path and click on Browse.
- Search and select any one executable file from the table listed below. Then, hit the Next tab.
- Moving ahead, select the option Allow the Connection and then click Next.
- If prompted, you need to verify that all profiles are tickmarked and then click the Next button.
- Create a rule and give it a name: “QBFirewallException(name.exe).”
- And finally, re-implement the same steps to create outbound rules.
Below is a list of some executable files, along with their locations:
| Executable files | Location |
| IntuitSyncManager.exe | C:\Program Files\Common Files\Intuit\Sync |
| QBCFMonitorService.exe | C:\Program Files\Common Files\Intuit\QuickBooks |
| AutoBackupExe.exe | C:\Program Files\Intuit\QUICKBOOKS YEAR |
| QBW32.exe | C:\Program Files\Intuit\QUICKBOOKS YEAR |
| QBLaunch.exe | C:\Program Files\Common Files\Intuit\QuickBooks |
| OnlineBackup.exe | C:\Program Files\QuickBooks Online Backup |
| FileManagement.exe | C:\Program Files\Intuit\QUICKBOOKS YEAR |
Once you have set your firewall permissions, open QuickBooks on your workstations and try downloading the payroll or updating the QuickBooks Desktop software.
In Conclusion
All the aforementioned solutions can be easily performed to fix QuickBooks Update Error 12007. In case, you are facing trouble while applying any of the solutions, feel free to talk to our QuickBooks Experts. We have a team of highly skilled professionals who have years of experience in resolving QuickBooks errors.
Frequently Asked Questions
Can My Firewall or Antivirus Software Cause QuickBooks Update Error 12007?
Yes, firewalls and antivirus software can block QuickBooks from accessing the Internet, leading to Error 12007. If QuickBooks is not added as an exception or allowed program in your firewall or antivirus settings, the software may restrict Internet connectivity, preventing updates from downloading.
What Role Does Internet Explorer play in QuickBooks Error 12007?
QuickBooks uses Internet Explorer as its default web browser for Internet-based tasks, including updates. If Internet Explorer settings are misconfigured or if the browser is outdated, it may block QuickBooks from accessing the Internet. Ensuring that Internet Explorer settings, such as security and SSL settings, are correctly configured can often resolve Error 12007.
Does Error 12007 Affect Both QuickBooks Desktop and Online Versions?
Error 12007 specifically affects QuickBooks Desktop versions, as it relates to connectivity issues for downloading desktop updates. QuickBooks Online doesn’t require updates in the same way, so it is unaffected.
Can I Manually Download QuickBooks Updates to Bypass Error 12007?
Yes, if Error 12007 persists, you can manually download the latest QuickBooks updates from the Intuit website. This bypasses the automatic update and can be a temporary fix while troubleshooting.
Disclaimer: The information outlined above for “How to Fix QuickBooks Update Error 12007” is applicable to all supported versions, including QuickBooks Desktop Pro, Premier, Accountant, and Enterprise. It is designed to work with operating systems such as Windows 7, 10, and 11, as well as macOS.
