QuickBooks Error 6000 301 is a critical access error preventing users from opening their company file, often stemming from damaged support files, incorrect network permissions, or outdated software versions. The expert guide provides a systematic, eight-step troubleshooting process designed to restore data access safely. Key fixes include first renaming the proprietary QuickBooks support files, specifically the .ND (Network Data) and .TLG (Transaction Log) files, to force the application to recreate uncorrupted versions. Further solutions involve running the official QuickBooks File Doctor tool to repair network and data damage, ensuring the application is run with administrator rights, and disabling any interfering third-party encryption software. Users are also instructed to repair the QuickBooks Desktop installation and verify stable access by temporarily copying the company file to the desktop, concluding with necessary software updates and upgrades to prevent recurrence.
Highlights (Key Facts & Solutions)
- Error 6000 301 is a 6000-series access error preventing QuickBooks Desktop from opening the company file, usually due to data corruption or network issues.
- Primary Causes include damaged support files (.ND, .TLG, .DSN), insufficient system disk space, lack of administrator rights, third-party encryption conflicts, or using an outdated QuickBooks version.
- Safety First: Users must create and restore a backup of the company file before running major fixes like the QuickBooks File Doctor tool.
- Initial Fixes:
- Restart the computer and run QuickBooks as an Administrator.
- Disable any third-party encryption software that may lock the company file.
- Core Solution (File Integrity): Rename the QuickBooks supported files (.ND, .TLG, and/or .DSN) by adding .OLD to the end of the filename, forcing QuickBooks to create new, healthy versions.
- Tool-Based Fix: Use the official QuickBooks File Doctor tool, available in the QuickBooks Tool Hub, to automatically diagnose and repair both company file damage and network connectivity problems.
- Program Repair: Repair the QuickBooks Desktop installation via the Windows Control Panel to fix damaged or missing program components.
- Location Test: Copy the company file to the Desktop and attempt to open it; if successful, the problem lies with the original storage location (e.g., long file path, network permission issues).
- Prevention: Maintain stability by consistently updating and upgrading QuickBooks Desktop to the latest versions.
What is QuickBooks Error 6000 301, and how does it look when it occurs?
QuickBooks Error 6000 301 arises when you attempt to open your company file on different QB versions, but for some reason, you fail to do so. This often happens when you access damaged or corrupted company files without having enough disk space.
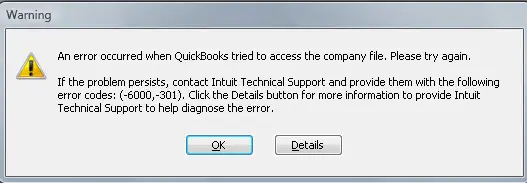
You will notice the following warning prompt on your display when this 6000 series error pops up:
Warning: “An error occurred when QuickBooks Desktop tried to access the company file. Please try again. If the problem persists, contact Intuit Technical Support and provide them with the following error codes: (-6000, 301).”
Primary Causes behind the QuickBooks Error 6000 301
Below are some of the most common factors that may lead to QuickBooks company file error 6000 301, which are as follows:
- If you don’t have free disk space in your system, which ultimately affects the performance of the software, you end up with QuickBooks error 6000 301.
- You cannot open your company file in different QuickBooks versions without having administrator rights.
- Due to the installation of any encrypted software, your company’s file data may be damaged.
- There’s no corruption or damage in QuickBooks desktop-supported files such as the Transaction log (TLG) file, Network descriptor (ND) file, or Data source name (DSN) file.
- QuickBooks is not installed properly on your device.
- Having internal glitches or corruption issues with the .QBW company file.
- Another reason is that QuickBooks cannot access the company file that is stored on the hard drive of a server.
- You may find trouble while accessing the company file if you work on an outdated or older version of QuickBooks Desktop software.
- Also, if you’re using incompatible QuickBooks versions, you will encounter errors when opening a company file on your workstation.
How to Determine the Effect of QuickBooks Error 6000 301?
There can be multiple indicators that help you to recognize the error 6000 301 in QuickBooks. Let’s take a look:
- Inability to access the damaged or corrupted company file.
- QuickBooks is responding more slowly than usual to any commands.
- You are prompted to recreate the company file for easy access.
- Getting issues related to excess data usage and time management.
- You are not able to use QuickBooks support files (like .nd, .tlg, .dsn), which are required for accessing your accounting data in multi-user mode, keeping track of the company file modifications, and connecting the QB program to the company file, respectively.
Customized Solution for QuickBooks Error 6000 301
Before moving toward the troubleshooting methods, here’s a list of some precautionary actions that must be taken carefully:
- To resolve QuickBooks Error 6000 301, first check that you have a stable Internet connection to open the company file on your server, and you log in to QuickBooks using the correct admin credentials. This will allow you to open your company file from the location of your choice.
- If you still find any glitches with your workstation or slow QuickBooks, like a late response to your inputs, system crashes or freezes unexpectedly, performance-related issues, etc., try restarting your system and then opening QuickBooks again.
- After this, you can download and install the QuickBooks File Doctor tool from the tool hub.
- Make sure you create and restore a backup of your company before running this tool on your system.
- Once done, let this tool run, and it will take a few minutes to diagnose and fix your problem. When the process is completed successfully, check for the error status.
- Sometimes, the issue lies with your software, so you are recommended to uninstall/ repair the program if nothing works.
- However, if the error still persists, then immediately perform the steps listed below in the given order.
Best Ways to Troubleshoot QuickBooks Error 6000 301
Before applying any repair steps, ensure that you understand the source of the issue and work in a secure environment. Always create a backup of your company file to prevent data loss during troubleshooting. Verify that your QuickBooks Desktop version is updated and that you are logged in as an administrator. Follow the solutions below in the given order to systematically identify and fix the cause of QuickBooks Error 6000 301.
Solution 1: Make a Restart of Your Computer System & Log in to the QuickBooks As an Administrator
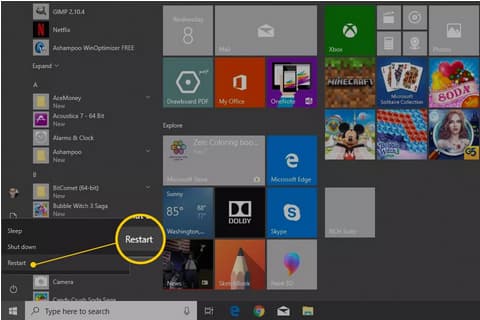
- To restart, head to the Start menu and then select the Power button.
- After this, click on Restart.
- This will help you to eliminate the errors up to a certain extent, including RAM problems, software conflicts, performance-related issues, etc.
Once done with restarting your system, follow the steps below to log in as an Administrator in QuickBooks:
- For this, go to your Desktop or the folder where you have downloaded your QuickBooks software.
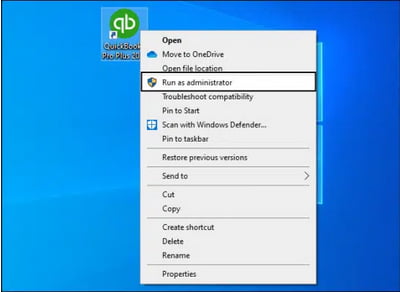
- Now, right-click on the QuickBooks icon and then select the Run as administrator option.
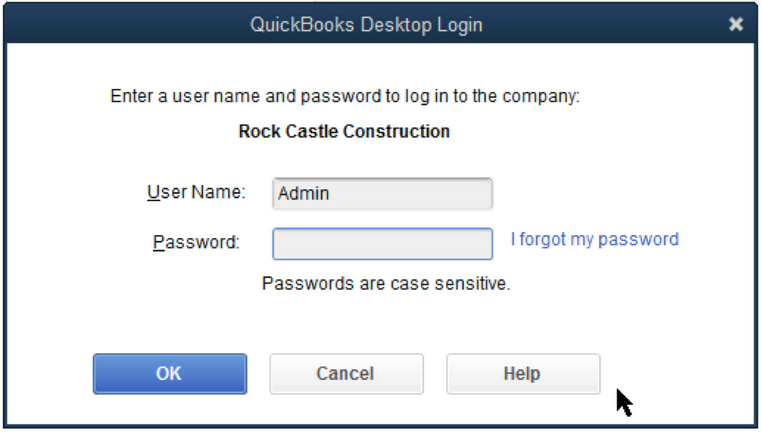
- You can also log in as an administrator using your admin credentials (username and password).
Note: Make sure the username and password you entered are correct; otherwise, you won’t be able to access your company file.
- However, if you do not have admin rights or want to give admin access to other users or manage their roles, then you must read Admin Rights in QuickBooks.
Solution 2: Disable the Encryption Software (If Any)
The error 6000 301 can take place if you have any third-party antivirus or encryption software installed in your system. Hence, it is advisable for you to disable it as soon as possible.
Note: Intuit doesn’t recommend users encrypting their files using third-party encryption software. Instead, they can contact their encryption software vendors to get guidance on disabling it.
To check if device encryption is available on your system, adhere to the following steps:
- Navigate to the Start button.
- Choose Settings and then hit the Update & Security tab.
- Now, select Device Encryption.
- If it does not appear, that means it is not available.
- However, if it is enabled, then click on the Turn Off button.
Solution 3: Rename The QuickBooks Supported Files (.ND Files, .tlg, .dsn)
QuickBooks uses several support files to establish network connections and track company file activity. When these files become damaged or corrupted, they can trigger Error 6000 301 and prevent QuickBooks from accessing the company file.
Renaming these files forces QuickBooks to recreate new, undamaged versions automatically, which often resolves the issue. Follow the steps below carefully to perform this process safely.
- Firstly, open the folder where your company file is stored.
- Now, search for the files with the same name as your QuickBooks file but with different extensions: .tlg, .nd, and/or .dsn.
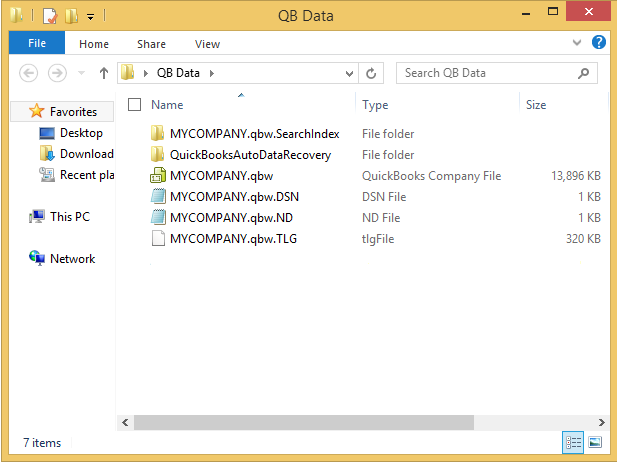
- Right-click on each file and then choose the Rename option. Don’t forget to add the word .OLD at the end of every filename.
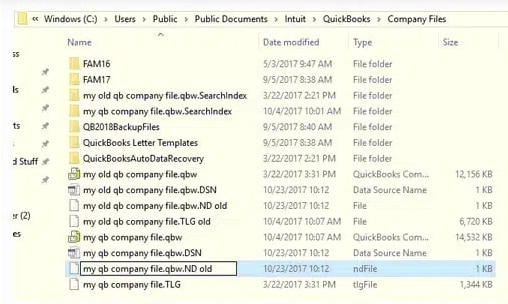
- After this, repeat the same steps for the remaining files (.nd and .dsn).
Note: These files are automatically recreated by the QuickBooks software.
Solution 4: Repair Your QuickBooks Desktop
Sometimes, QuickBooks Error 6000 301 occurs due to damaged or missing program components within the QuickBooks installation. Repairing the software helps restore these essential files without affecting your company data.
This process fixes internal glitches, missing DLL files, and update-related conflicts that may prevent the application from accessing company files properly. Make sure to close all running programs before starting the repair to ensure a smooth process.
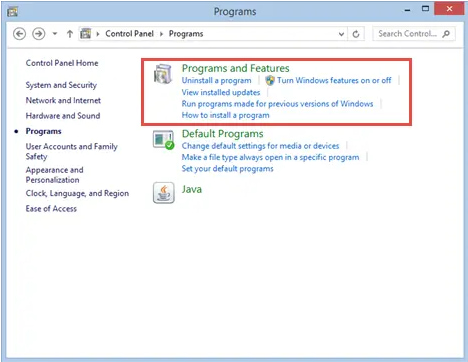
- Head to the Start menu and then open the Control Panel.
- Now, select the Programs tab and then click on the Programs and Features icon.
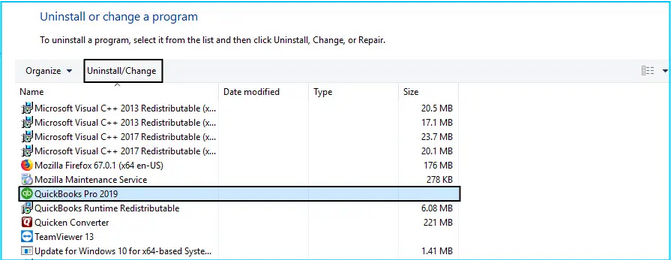
- Choose the QuickBooks software from the list of programs and then click on the Uninstall/Change option.
- After this, press the Next tab once the QuickBooks Installation window opens up.
- Click the Radio icon and then select the Repair tab.
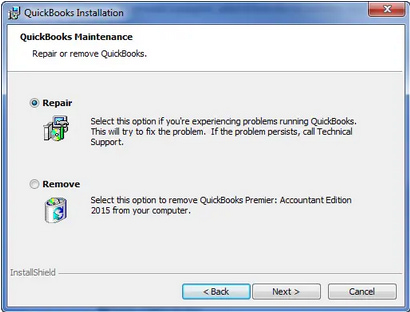
- At last, hit the Finish button.
Solution 5: Make Use of the QuickBooks File Doctor Tool
QuickBooks File Doctor Tool is a multifaceted tool used to resolve common QuickBooks company File errors such as data damage, connection errors, Windows problems, update errors, and network-related issues.
By running this tool, you can fix all of them. For this, you need to download and install it from the tool hub. Once it is downloaded successfully, this will scan your company file and start diagnosing the errors you’re currently getting. Later, it will categorize the identified issues and take appropriate actions to fix them.
Note: Wait for a while, as it may take a few minutes to detect and resolve the issue.
QuickBooks File Doctor will start fixing the issues automatically and determine what may hinder the smooth functioning of your software. When the repair process is done, the QuickBooks File Doctor will provide you with a detailed report that outlines the problems available in your software. This generated report will help you understand the issues and all the actions taken by the tool.
Solution 6: Copy the Company File to Your Desktop
At times, QuickBooks Error 6000 301 occurs because the company file is stored in a restricted or damaged folder path, or the network location is unstable. Copying the company file to your desktop helps verify whether the problem lies with the original file or its storage location.
This process isolates the file from network-related interruptions and allows you to open it locally in a clean environment. It also helps confirm whether permissions or path length issues are contributing to the error.
- The initial step is to right-click on the Desktop and hover over New, then select Folder Options.
- Go to the original location of your company files.
- After this, click right on the Company file and press Ctrl + C keys to copy the file.
- Once done, move to the newly created folder on the Desktop and hit the Ctrl + V keys to paste the file.
- Now, hold and press the Ctrl key until the No Company Open Window flashes out on the screen.
- Here, select the Open or Restore an Existing Company option.
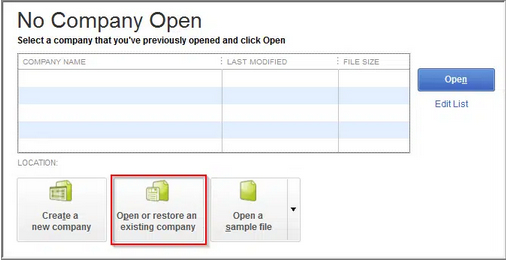
- Then, choose the company file that you copied to the desktop folder and click Open.
- And finally, you’re good to go.
Solution 7: Update Your QuickBooks Software
Outdated or older QB versions can no longer access all the exclusive features of the application so it is recommended to update your QuickBooks software at regular intervals. Also, you won’t be able to receive any new or critical security updates that may help you protect your software from vulnerable data breaches.
Whenever any update is available, QuickBooks will notify you in advance through email, in-product notifications, and the product page itself. Now, it’s all up to you whether you want to update your software automatically or manually.
If you turn on automatic updates, QuickBooks will automatically download updates when they’re available. As soon as the Update is downloaded, you’ll see the Update available on the status bar in the top right corner. After this, the Update will install automatically when you close the product and keep the system/PC switched on. Or if you don’t want to do it automatically, you have the option to update your software by yourself, following the manual instructions.
Solution 8: Upgrade Your QuickBooks Software to the Latest Edition
To upgrade QuickBooks Pro, Premier, or Enterprise with or without a subscription, follow the steps below:
Upgrade your QuickBooks Desktop with a Subscription
When a new version of QuickBooks software is available, you’ll get a notification related to this. Here’s how to upgrade with a subscription plan.
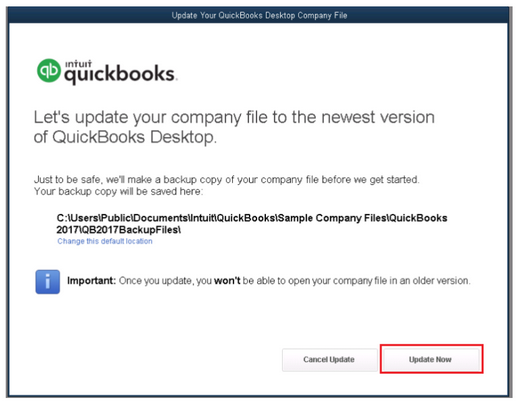
- In QuickBooks, click on Upgrade Now when you’re ready.
- Choose the option Keep old version on my computer if you wish to keep your current QuickBooks.
- Then, hit the Let’s Go icon. QuickBooks will download, install, and activate the latest version for you. It updates your company files.
- Once the Upgrade is done, select Open QuickBooks.
Note: The Upgrade may take a few minutes, depending on the internet speed and the size of your company file.
Upgrade QuickBooks Desktop without a Subscription
If you cannot see a prompt to upgrade your QuickBooks Subscription, don’t get worried. It indicates that you made a one-time purchase of QuickBooks software. You can upgrade it with the easy upgrade tool. Here’s how.
- Click on the Help menu, and then select Upgrade QuickBooks.
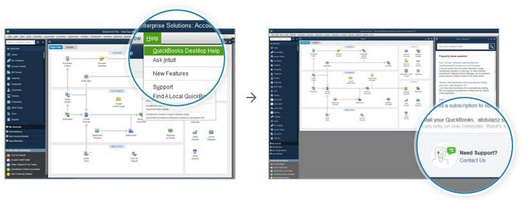
- Now, choose the version you want to upgrade and then click on Upgrade Now.
- You can keep a copy of your recent QuickBooks version.
- After this, select the Keep old version on my computer option, then click on Let’s go.
- QuickBooks will download, install, and activate the latest version for you. It also updates your company file(s).
Conclusion
QuickBooks Error 6000 301 occurs when damaged support files, outdated installations, or incorrect configurations prevent QuickBooks Desktop from accessing the company file. You can fix this issue by restarting your system, renaming the support files, repairing the QuickBooks installation, and running the QuickBooks File Doctor to repair file and network problems.
Copying the company file to a local folder and updating QuickBooks to the latest version further ensures smooth and uninterrupted access to your data. To prevent this error from reappearing, create regular backups of your company file, update both QuickBooks Desktop and Windows frequently, and store your files without encryption or compression.
Maintain your system environment, monitor file integrity, and verify access permissions regularly to keep QuickBooks stable, secure, and fully functional.
FAQ
-
What exactly are the .ND and .TLG files, and why is renaming them a safe fix?
The Network Data (.ND) file and the Transaction Log (.TLG) file are essential support files QuickBooks uses to access your Company File (.QBW), particularly in a multi-user or network environment.
1. The .ND file stores configuration data, allowing QuickBooks Desktop to connect to the Company File over a network.
2. The .TLG file records all recent transactions and modifications since the last successful backup or data integrity check.Renaming them to
.ND.OLDand.TLG.OLDis safe because it forces QuickBooks to automatically create fresh, uncorrupted versions the next time you open the company file. This process often resolves errors caused by damaged network paths or corrupt transaction logs without affecting the core accounting data in the .QBW file. -
Is it safe to use the QuickBooks File Doctor tool, and what specific issues does it resolve for Error 6000 301?
Yes, the QuickBooks File Doctor tool is highly recommended and safe, as it is an official utility provided by Intuit. It is specifically designed to diagnose and repair two main categories of issues that cause 6000-series errors:
1. Data Damage: It scans and attempts to fix internal corruption within the QuickBooks Company File (.QBW) itself.
2. Network and Connectivity Issues: It checks your network settings, Windows firewall configuration, and the connection between the QuickBooks application and the server hosting the company file.For Error 6000 301, the File Doctor can be the definitive tool to fix file structure problems that prevent access, especially when simple steps like renaming .ND and .TLG files fail.
-
I get this error when opening my file from a network drive. What permissions do I need to check?
When accessing a company file over a network, Error 6000 301 is often triggered by insufficient permissions on the server or host computer. You must ensure that the user accessing the file has full access rights.
Specifically, check the following:
1. Folder Permissions: The Windows user account running the QuickBooks Database Server Manager (on the server) must have Full Control permissions for the folder that contains the company file.
2. Firewall Exclusion: The QuickBooks Database Server Manager program and specific QuickBooks ports must be added as exceptions in the firewall settings on both the server and the workstation to allow uninterrupted network communication.
3. QuickBooks Admin Login: You must be logged into the QuickBooks software using a user ID with Admin credentials, as instructed in the article’s Solution 1. -
Why does the article recommend restarting the computer and running QuickBooks as an administrator?
These are initial, foundational troubleshooting steps that address common system-level conflicts and restrictions:
1. Restarting the Computer: Clears temporary system caches, resolves conflicts caused by background processes, and refreshes system resources (like RAM) that might be causing internal glitches or slow performance.
2. Running as Administrator: QuickBooks often requires elevated permissions to fully access and modify the necessary system files, including database server components and network files. Running the application as an administrator ensures it is not being blocked by Windows User Account Control (UAC) settings from accessing the company file. -
Can using third-party encryption software really cause Error 6000 301?
Yes, third-party encryption software is a frequent cause of the Error 6000 301.
1. QuickBooks Desktop is designed to handle company files in a standard, unencrypted format.
2. When a third-party application encrypts the folder or the company file itself, it blocks QuickBooks from reading or writing data.
3. The application cannot decrypt the file fast enough or fails to access the file altogether, resulting in the 6000-series access error.Intuit advises against using external encryption software on company files and instead recommends using built-in Windows security features or contact the software vendor for guidance on disabling encryption.
-
If copying the file to the Desktop fixes the error, what does that tell me about the original problem?
If you can successfully open the company file after copying it to your local desktop, the file itself is likely not damaged. This diagnosis points directly to the original storage location as the source of the error, indicating one of the following issues:
1. Long File Path: The original folder structure was too deep, exceeding Windows’ character limit for file paths.
2. Network Interruption: The network connection was unstable or slow when accessing the server.
3. Folder Permissions: The original server folder lacked the necessary read/write permissions for your user account.
4. Synchronization Service Conflict: Cloud or sync services (like Dropbox, OneDrive) were actively locking the file.The solution is to resolve the underlying issue at the original network location (e.g., shorten the path, fix permissions, or move the file to a standard QuickBooks hosting location).
-
Which specific QuickBooks Desktop components should I repair when using the installation repair option?
When you choose the Repair option via the Windows Control Panel (Solution 4), the process automatically checks and restores all the necessary core components of your QuickBooks Desktop installation.
This includes:
1. QuickBooks Executable Files (.EXE): The main program files.
2. DLL Files: Critical system and dynamic-link libraries that enable various QuickBooks features.
3. Database Server Manager Files: Components required for multi-user access.
4. Windows Registry Entries: Corrects any damaged or missing configuration entries in the system registry.You do not need to manually select individual components; the repair function is comprehensive and designed to fix internal installation errors without affecting your company file data.
Disclaimer: The information outlined above for “How to Fix QuickBooks Error Code 6000 301 While Accessing the Company File?” is applicable to all supported versions, including QuickBooks Desktop Pro, Premier, Accountant, and Enterprise. It is designed to work with operating systems such as Windows 7, 10, and 11, as well as macOS.
