QuickBooks Error 1920 is a service-related malfunction that arises when the QuickBooks Database Server Manager (QBCFMonitorService) fails to start properly during installation or while accessing company files. This error interrupts communication between the QuickBooks Desktop application and the network-stored company files, limiting multi-user access and preventing database synchronization.
The following sections explain the core reasons behind this error, outline the visible system indicators, and provide verified troubleshooting methods to restore normal operations. The article also includes preventive configurations and installation best practices that ensure stable database management performance and help avoid recurrence of the issue in future QuickBooks sessions.
What is quickBooks error 1920, & How does it Look when occurs
QuickBooks error 1920 is a QuickBooks Database Server Manager, which occurs when the QBCFMonitorService failed to initiate the service. QuickBooks Database Server Manager is a tool that permits multiple users to access the same company file stored on a network server. It creates a network data file (.nd) for any company file stored on the host computer.
This error message is usually displayed when the QuickBooks Database Server Manager is not able to access a hard drive on the desktop to create a connection with company files. The service fails to start properly when the QBDBMS attempts to access a drive on the desktop and is unsuccessful.
The error message appears on the screen stating that-
“Error 1920: Service QuickBooks Database Manager (QBCFMonitorService) failed to start”.
Primary Reasons Behind QuickBooks Error 1920
QuickBooks Error 1920 originates when the QuickBooks Database Server Manager (QBCFMonitorService) fails to start due to system or configuration conflicts. The primary causes include:
- Incomplete or damaged installation of QuickBooks Desktop.
- Corrupted Windows registry files associated with QuickBooks services.
- Malware or virus infection affecting the data files or service executables.
- Abrupt power outage or improper system shutdown during operation.
- Accidental deletion of QuickBooks service files or shared components.
How to identify the Impact of quickBooks error 1920?
QuickBooks Error 1920 directly affects the stability and performance of the QuickBooks Desktop application as well as the connected network environment. The following indicators help to recognize its impact on the system:
- Repeated error notification during startup or company file access.
- Inability to open or share company files stored on the network server.
- Unexpected crashes or forced shutdowns of QuickBooks or the operating system.
- Unresponsive or frozen program windows during data processing or synchronization.
- Noticeably slower system performance while accessing or saving company data.
Customized Solution for quickBooks error 1920
To resolve the problem with basic steps:
- It would be best if you closed all the programs that are running in the background from your workstation.
- You also need to make sure that you have a stable internet connection so that you can access the files that are stored on the server. If it is not working, you must contact your ISP (Internet Service provider).
- Make sure that before uninstalling Quickbooks Desktop, you create a backup to prevent any important data loss.
- Also, make sure you install the software properly. Due to improper installation, a few components will be missed, and an error will be encountered.
If you still need help, follow the steps below.
Solutions of QuickBooks Error 1920
To address Error 1920, close all background programs on your system and ensure a stable internet connection. Create a backup before uninstalling QuickBooks and verify proper installation. For detailed solutions, follow the steps below:
Solutions Part 1
Before heading to the actual solutions, make sure to follow these prerequisite actions, which might save your efforts by not investing your time in time-consuming methods:
- Make sure you check your connection with the server so that the same File that is stored on the network can be accessed by all the users.
- You need to disable antivirus temporarily in case any one of them is preventing your software from connecting to the server.
- To prevent data loss, it is suugested that you create a backup of your company file before moving or accessing it from a different server.
- Make sure you are using an updated version of QuickBooks software and that it is properly installed on your computer.
- Make sure that the QuickBooks Database Manager service is running. If the service is not running, you may encounter Error 1920.
- Make sure that your system meets the minimum system requirements for QuickBooks Desktop. You can check the system requirements for your version of QuickBooks Desktop on the official QuickBooks website.
Solution Part 2
Even though following the steps mentioned above does not stopping this error from occurring, now you have to perform the following steps mentioned in the series to stop the persistence of the QB error code 1920:
Solution 1: Check Your Connection with the Server
Check the connection with the server to resolve the error 1920. Follow the below steps:
- Open QuickBooks.
- Click on File in the top menu bar.
- Choose Utilities.
- Click on Host Multi-User Access.
- Click on Yes to confirm that you want to enable multi-user access.
- Click on OK to close the Multi-User Setup Information window.
- Click on File again.
- Select Utilities.
- Click on Stop Hosting Multi-User Access.
Solution 2: Temporary Disable Antivirus & Check for Firewall Settings
To resolve QuickBooks Error 1920, temporarily turning off your antivirus and checking your firewall settings. Here are the steps to temporarily turn off your antivirus:
- Open your antivirus software.
- Locate the option to turn off the antivirus temporarily.
- Follow the onscreen instructions to turn off the antivirus.
Here are the steps to check your firewall settings:
- Press the Windows + R to open the Run dialog box.
- Type firewall.cpl.
- Click OK.
- Click on Allow an app or feature through Windows Firewall.
- Click on Change settings.
- Click on Yes if asked by User Account Control (UAC).
- Find QuickBooks in the list of allowed apps and features.
- Make sure that both the private and public checkboxes are selected.
- If QuickBooks is not on the list, click on Allow another app.
- Select QuickBooks from the list of installed programs.
- Click on Add.
- Click on OK.
Solution 3: Uninstall QuickBooks Database Server Manager & Reinstall It Again
If you’re sharing a file over the network using the database server manager but don’t have QuickBooks installed on the server, you can follow the steps below:
Uninstall QuickBooks Database Server
- Press the Windows + R keys and open the Run Dialogue Box.
- Type appwiz.cpl.
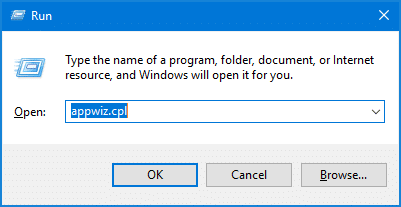
- Select OK.
- Choose QuickBooks Database Server Manager.
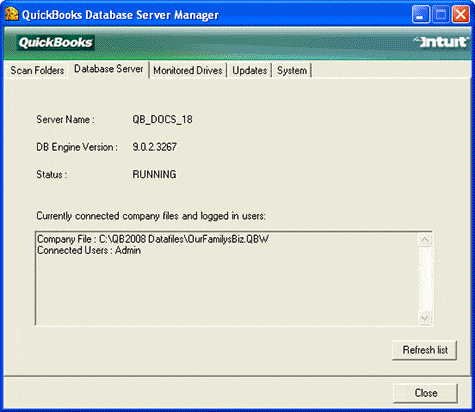
- Click on Uninstall/Change.
- Follow the onscreen instructions to complete the process.
Rename Installation Folder
If you have other Intuit apps installed on your computer system, you only need to rename or uninstall the QuickBooks versions folder located in the Intuit folder at C:\ProgramData\Intuit.
- Go to the Installation folder.
- See the chart below:
| Windows 10/8/7 | Windows Vista |
| C:\Program Data\Intuit | C:\Program Data\Intuit |
| C:\Program Data\Common Files\Intuit | C:\Program Data\Common Files\Intuit |
| C:\Users\[Username]\AppData\Local\Intuit | C:\Users\AppData\Local\Intuit |
| C:\Program Files\Intuit | C:\Program Files\Common Files\Intuit |
| C:\Program Files\Common Files\Intuit | C:\Program Files\Common Files\Intuit |
- Press the Windows + R keys and open the Run Dialogue Box.
- Right-click the folder and choose Rename.
- Rename the folder .OLD.
Reinstall QuickBooks Database Manager
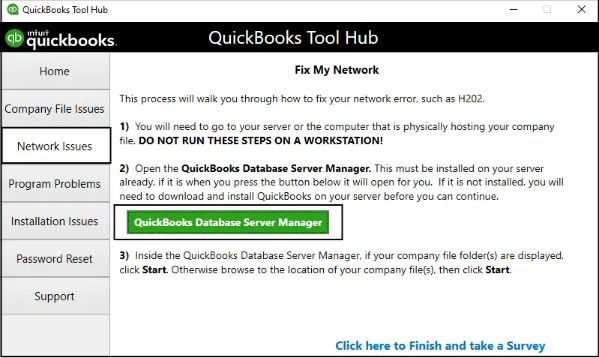
- Download and install Database Server Manager.
- Open the downloaded File Setup_QuickBooks.exe file.
- Follow the onscreen instructions.
- When QuickBooks asks you to choose an install option, either choose Custom or Network options.
- Click on Next.
- It would help if you chose the option which is suitable for your setup.
- Click on Next.
Note: Both options will download Database Server Manager.
- If you want to install both QuickBooks Desktop and Database Server Manager on the server system, select the option ‘I’ll be using and storing QuickBooks Desktop on this device.’
- If you only want to install the Database Server Manager on your server system, select the option ‘I will not be using QuickBooks Desktop’ and proceed with the onscreen instructions.
- After that, click on Install.
- Allow permissions when Windows asks for permission.
Solution 4: Uninstall and reinstall QuickBooks Desktop Software
Follow these steps if you are trying to install or update a new version of QuickBooks:
Uninstall QuickBooks Desktop
- Press Windows + R.
- Open Control Panel.
- Choose Programs and Features.
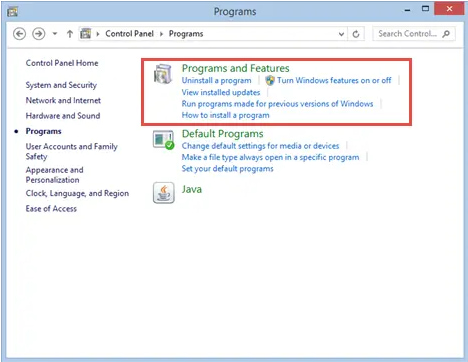
- Click on Uninstall a Program.
- Select the QuickBooks Desktop version from the list of installed programs.
- Select Uninstall or Change program.
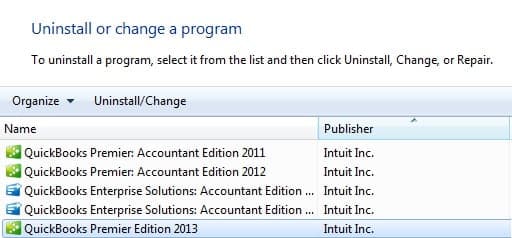
- Follow the onscreen instructions.
Rename the Installation Folder
You need to search for every folder location listed for the version of Windows which is using Windows Explorer, and then rename them accordingly:
- Go to the installation folders.
| Windows 10/8/7 | Windows Vista |
| C:\Program Data\Intuit | C:\Program Data\Intuit |
| C:\Program Data\Common Files\Intuit | C:\Program Data\Common Files\Intuit |
| C:\Users\[Username]\AppData\Local\Intuit | C:\Users\AppData\Local\Intuit |
| C:\Program Files\Intuit | C:\Program Files\Common Files\Intuit |
| C:\Program Files\Common Files\Intuit | C:\Program Files\Common Files\Intuit |
- Press Windows + R and open the Run Dialogue Box.
- Type the location of the folder.
- Press Enter.
- Right-click on the folder and choose Rename.
- Rename the folder to .OLD.
- Reinstall The QuickBooks Again
After completing the above a and b steps, now it’s time to reinstall QuickBooks software:
- Go to Intuit’s official website.
- Download and open the .exe file.
- Follow the onscreen instructions to complete the installation process.
- Accept the license agreement.
- Choose Next.
- Complete the installation process by entering the product and license number.
Preventive Measures to Avoid QuickBooks Error 1920
Proper installation, regular updates, and system maintenance help prevent QuickBooks Error 1920 and ensure stable database service performance.
- Install QuickBooks with administrative rights: Always run the installer as an administrator to ensure the Database Server Manager service receives proper startup permissions.
- Keep QuickBooks and Windows updated: Regular updates fix bugs, improve compatibility, and prevent service-related errors.
- Maintain clean and valid registry entries: Use trusted registry cleaners or perform manual checks to avoid configuration conflicts.
- Use reliable antivirus software: Protect the system from malware or unauthorized modifications that can damage QuickBooks files or services.
- Shut down the system properly: Avoid forced shutdowns or power interruptions during QuickBooks operations to prevent data corruption.
- Verify Database Server Manager status: Ensure the QBCFMonitorService is running correctly and configured to start automatically with Windows.
- Create frequent data backups: Store backups on secure, external or cloud locations to prevent data loss if an error reoccurs.
- Avoid unnecessary file deletion: Do not modify or remove QuickBooks installation directories or service files unless instructed during a verified troubleshooting process.
Conclusion!
QuickBooks Error 1920 occurs when the QuickBooks Database Server Manager fails to start, which disrupts access to company files and multi-user functionality. The error occurs due to factors such as incomplete installation, registry corruption, or missing service files, and structured troubleshooting procedures help restore normal operations.
Regular software updates, proper installation, and frequent malware scans prevent the issue from recurring. Continuous monitoring of the Database Server Manager service ensures stable system performance and uninterrupted access to QuickBooks data across the network.
FAQs (Frequently Asked Questions)
What does QuickBooks Error 1920 indicate?
QuickBooks Error 1920 indicates that the QuickBooks Database Server Manager (QBCFMonitorService) failed to start, preventing QuickBooks from accessing or sharing company files stored on a network.
When does QuickBooks Error 1920 usually occur?
The error typically occurs during QuickBooks installation, update, or when attempting to open a company file hosted on a server.
Can outdated QuickBooks versions cause Error 1920?
Yes, using an outdated or incompatible version of QuickBooks can lead to service startup failures, resulting in Error 1920.
Does Error 1920 affect multi-user mode in QuickBooks?
Yes, the error directly impacts multi-user mode by restricting the Database Server Manager service, which is required for multiple users to access the same company file simultaneously.
How can I prevent QuickBooks Error 1920 from recurring?
Regularly update QuickBooks Desktop, perform clean installations, maintain valid Windows registry entries, and ensure that the Database Server Manager service has administrative permissions.
Is it necessary to reinstall QuickBooks to fix Error 1920?
Reinstallation may be required if the Database Server Manager or related files are corrupted. However, checking service permissions and repairing the installation often resolves the issue without full reinstallation.
Can antivirus or firewall settings trigger QuickBooks Error 1920?
Yes, overly restrictive antivirus or firewall settings can block the QuickBooks Database Server Manager from starting. Temporarily disabling them or allowing QuickBooks through the firewall often resolves the problem.
Disclaimer: The information outlined above for “How to Fix QuickBooks Error 1920 Database Manager Failed to Start Issue?” is applicable to all supported versions, including QuickBooks Desktop Pro, Premier, Accountant, and Enterprise. It is designed to work with operating systems such as Windows 7, 10, and 11, as well as macOS.
