QuickBooks Error 1904 (IcWrapper.dll failed to register) is a software installation error that occurs when the QuickBooks Desktop setup cannot properly register one or more critical system components. This issue arises primarily during installation or update processes when specific Windows elements, such as Microsoft Visual C++ Redistributable, Microsoft .NET Framework, or MSXML components, are missing, damaged, or improperly configured. The error message typically appears as “Error 1904: [file path/name/extension] failed to register,” indicating that QuickBooks is unable to link necessary files with its internal library system.
The root technical context of this problem lies in Windows’ component registration mechanism. When system libraries required for QuickBooks fail to register correctly, the installer cannot proceed, leading to incomplete installation and subsequent software instability. Common triggers include interrupted installations, restricted user permissions, outdated Windows builds, and security software interference during setup.
This malfunction directly impacts both QuickBooks functionality and system performance. Users may experience unstable program launches, inability to open company files, missing accounting features, or degraded system responsiveness. Prolonged neglect of this error can cause configuration corruption, preventing future updates and integrations within the QuickBooks environment.
The objective of this guide is to provide a structured, verified, and repeatable procedure to identify and resolve QuickBooks Error 1904 at its root cause. Each method discussed is designed according to official installation principles and follows a stepwise diagnostic approach to ensure full system recovery and stable QuickBooks operation.
In the following sections, this article explains:
- The technical causes and system-level triggers of QuickBooks Error 1904.
- The key symptoms and diagnostic indicators that confirm the error’s presence.
- Expert-verified methods to fix the error through system repair, QuickBooks diagnostic utilities, and administrative configuration adjustments.
- Preventive best practices to eliminate the recurrence of the error in future installations.
Through these structured explanations, the article provides a complete resolution framework that restores QuickBooks installation integrity and prevents system-level disruptions.
What is QuickBooks Error 1904 & How Does it Look When Occurs?
QuickBooks Error 1904 is a software installation failure that occurs when the QuickBooks Desktop installer cannot register one or more dynamic link library (DLL) components required for program initialization. In the QuickBooks environment, this error specifically indicates that the installation registry process has failed, preventing critical system files from integrating correctly with the application’s operational framework.
The error commonly manifests during QuickBooks setup or update execution, especially when system dependencies—such as Microsoft Visual C++ Redistributable, Microsoft .NET Framework, or MSXML—are either missing, outdated, or damaged. These components act as the underlying runtime libraries that enable QuickBooks to execute its installer scripts, establish user permissions, and access the Windows registry during configuration. When these elements fail to respond, the installer halts, producing the 1904 error code.
The message “IcWrapper.dll failed to register” represents a specific instance of QuickBooks Error 1904, where the DLL file named IcWrapper.dll cannot be successfully linked to the system registry. The term “failed to register” denotes that Windows could not verify or attach the DLL to its directory of executable libraries. This failure interrupts the installation process, causing QuickBooks setup to stop and display the 1904 error message.
In most cases, the error occurs during the final stage of QuickBooks installation, immediately after the file extraction process. At this point, the installer attempts to register each dependency file. If the Windows account executing the installation lacks administrative privileges, or if another program, such as antivirus software, interferes with the registration process, QuickBooks Error 1904 is triggered.
The following are common error messages associated with QuickBooks Error 1904:
- Error 1904: [file path/name/extension] failed to register.
- Error 1904: IcWrapper.dll failed to register.
- Error 1904 module [filename.dll] failed to register. HRESULT -2147024894.
![How to Fix QuickBooks Error 1904 IcWrapper.dll Failed to Register? 1 Error 1904: [file path / name / extension] failed to register](https://ebetterbooks.com/wp-content/uploads/2024/08/QuickBooks-Error-Message-Code-1904.png)
Each of these messages indicates that the installer encountered a registry-level obstruction preventing one or more DLL files from being authenticated within the Windows environment.
Note: The QuickBooks Error 1904 is a warning sign of more important issues, and we suggest that the users fix it ASAP when they notice the symptoms.
Overview Table of Fixes: QuickBooks Error 1904
The table below summarizes common causes and their corresponding solutions:
Cause Type Recommended Fix Tool/Method Damaged Visual C++ or .NET Run Install Diagnostic Tool QuickBooks Tool Hub Missing Permissions Enable Administrator Account Windows CMD Antivirus Blocking Add QuickBooks to Exclusions Antivirus Settings Outdated Windows Build Update Windows OS Windows Update Corrupted Registry or Files Repair System Components System Tools
What are the Root Causes of QuickBooks Error 1904?
QuickBooks Error 1904 occurs when one or more system-level dependencies required by the QuickBooks Desktop installation fail to initialize or register properly within the Windows operating environment. The following are the verified root causes of this error, each explained directly in the context of QuickBooks installation processes.
1. Damaged or Outdated Microsoft Components
QuickBooks relies on Microsoft Visual C++ Redistributable, .NET Framework, and MSXML components to execute installation commands and register system libraries. If any of these components are missing, corrupted, or outdated, the QuickBooks setup fails to invoke necessary system instructions.
This interruption breaks communication between the QuickBooks installer and Windows runtime services, directly triggering “IcWrapper.dll failed to register” or similar registration errors during installation.
2. Incomplete or Interrupted QuickBooks Installation Process
QuickBooks installation depends on the uninterrupted execution of all setup scripts that register files, allocate permissions, and copy program data to system folders. When this process is disrupted by an unexpected shutdown, network disconnection, or user termination, essential QuickBooks components remain unregistered or partially installed.
These incomplete installations leave residual or duplicate files in system directories, causing QuickBooks to encounter invalid references and throw Error 1904 during subsequent installation attempts.
3. Corrupted Windows Registry or File Permission Errors
The Windows Registry maintains configuration data and file associations for QuickBooks. If these registry entries are corrupted, misconfigured, or inaccessible, the installer cannot validate or register DLL files.
Similarly, incorrect file permissions within system folders—such as Program Files, Common Files, or Intuit directories—restrict QuickBooks from writing necessary data into protected locations. This leads to failed component registration and incomplete installation.
4. Administrative or System Configuration Conflicts
QuickBooks installation requires administrative privileges and a compatible Windows configuration to perform system-level actions like DLL registration and component linking.
If the user performing installation lacks administrator rights, or if Windows is outdated and missing critical updates, QuickBooks cannot execute high-level commands needed to register components such as IcWrapper.dll or QBVersionTool.dll.
This combined lack of privilege and system compatibility produces the 1904 error because Windows blocks or fails to recognize QuickBooks’ registry requests.
5. Security Software Interference from Antivirus or Firewall
Active antivirus or firewall programs may misidentify QuickBooks installation files as potential threats. When this happens, security software blocks installer access to protected directories, preventing QuickBooks from registering its DLL and OCX components.
As a result, the installation terminates prematurely, and Windows displays Error 1904, indicating a file—often IcWrapper.dll—failed to register because access was denied.
Note: These are the most common causes of QuickBooks error 1904. In some cases, multiple factors might contribute to the issue. For precise diagnosis and resolution, it’s recommended to gather detailed information about the error message, system configuration, and recent changes made to the computer.
Major Symptoms of QuickBooks Error 1904
QuickBooks Error 1904 is a component registration malfunction that disrupts the installation and operational integrity of QuickBooks Desktop. The symptoms produced by this error are system-level indicators that reflect incomplete integration between QuickBooks installation files and their dependent Windows libraries. Understanding these symptoms in the context of the QuickBooks environment allows accurate diagnosis and targeted corrective action.
1. Repeated “Error 1904” Message During Installation
QuickBooks displays the message “Error 1904: [file path/name/extension] failed to register” when the installer cannot authenticate one or more system components.
This repeated message confirms that the QuickBooks setup process has failed to register specific dynamic link library (DLL) files, particularly IcWrapper.dll.
The persistence of this error across multiple installation attempts indicates that the Windows registry is blocking QuickBooks from recording essential component data, preventing the setup from reaching completion.
2. Delayed or Unresponsive Setup Process
During installation, QuickBooks executes sequential system commands to install dependencies and link internal components.
When a required runtime element, such as Microsoft Visual C++ Redistributable or MSXML, fails to respond, the installer becomes slow, unresponsive, or stops responding entirely.
This symptom occurs because QuickBooks continuously retries communication with missing or damaged libraries, consuming system resources and extending the installation time abnormally.
3. Missing or Inaccessible QuickBooks Modules After Installation
If QuickBooks installation completes while Error 1904 remains unresolved, the program may start with missing modules, disabled menus, or unavailable features.
This happens when specific DLL or OCX files linked to QuickBooks’ internal functions fail to register, preventing modules such as payroll processing, company data access, or reporting from initializing correctly.
As a result, QuickBooks operates in a partial or degraded state, where the user interface loads but critical accounting functionalities remain nonfunctional.
4. System Freeze or Delay When Opening Company Files
After installation, if Error 1904 corrupted or blocked QuickBooks dependencies, the application may freeze or delay while loading company files.
This symptom occurs because QuickBooks attempts to access unregistered DLL files, which causes Windows to search for missing runtime references in memory.
The repeated delays or unresponsive states directly indicate that certain QuickBooks libraries remain disconnected from the Windows registry, affecting file retrieval and internal data synchronization.
5. Failure to Register DLL or Library Files (Especially IcWrapper.dll)
The most definitive indicator of QuickBooks Error 1904 is the explicit failure to register a DLL or shared library file.
When the installer logs “IcWrapper.dll failed to register”, it means QuickBooks cannot establish communication between its executable modules and Windows runtime frameworks.
This failure prevents the creation of necessary registry entries that allow QuickBooks Desktop to execute installation routines, verify version information, and connect to Intuit services.
In some cases, Windows Event Viewer records the error under Application Logs as a registration failure tied to HRESULT -2147024894, confirming the precise nature of the installation block.
Each symptom of QuickBooks Error 1904 represents a functional response from the system to a missing or inaccessible dependence. Unlike generic software failures, these symptoms appear only within the QuickBooks installation or initialization environment. They provide measurable evidence that QuickBooks has lost access to its required Visual C++ libraries, XML components, or administrative privileges. Detecting these signs promptly allows accurate repair of the affected components before the software’s internal registry structure becomes unstable.
Pro Tips Before Fixing QuickBooks Error Code 1904
Encountering QuickBooks Error 1904 can be frustrating, but taking proactive steps can significantly improve your chances of resolving the issue quickly.
Here are some important tips to remember before troubleshooting error 1904 in QuickBooks:
- Create a full backup of your QuickBooks company file to prevent potential data loss.
- Run the installation or repair as an administrator to avoid permission-related issues.
- Make sure Windows and QuickBooks are updated to their latest versions for compatibility.
- Once installation begins, avoid multitasking or shutting down the computer until completion.
Step-by-Step Solutions to Fix QuickBooks Error 1904
Solution 1: Run QuickBooks Install Diagnostic Tool
QuickBooks Install Diagnostic Tool is an automated repair utility developed by Intuit to diagnose and fix component registration errors that occur during QuickBooks Desktop installation. In the context of QuickBooks Error 1904 (IcWrapper.dll failed to register), this tool identifies damaged or missing system dependencies such as Microsoft Visual C++ Redistributable, .NET Framework, and MSXML components. It then repairs those elements to restore the installation’s structural integrity.
The tool functions as the first diagnostic measure because it performs a comprehensive scan of all installation-related system files, automatically corrects broken configurations, and minimizes the need for manual registry modifications.
Where to Download the QuickBooks Install Diagnostic Tool
The QuickBooks Install Diagnostic Tool must be downloaded exclusively from the official Intuit source to maintain data authenticity and security.
The verified file is distributed through the QuickBooks Tool Hub, which consolidates Intuit’s official troubleshooting applications.
Steps to Access the Official Source:
- Open a web browser and visit Intuit’s official QuickBooks Tool Hub page (https://quickbooks.intuit.com/learn-support/en-us/help-article/).
- Locate and download the QuickBooksToolHub.exe file.
- Save the file in a local directory such as Downloads or Desktop for easy access.
- Double-click the executable file and follow on-screen instructions to complete installation of the Tool Hub.
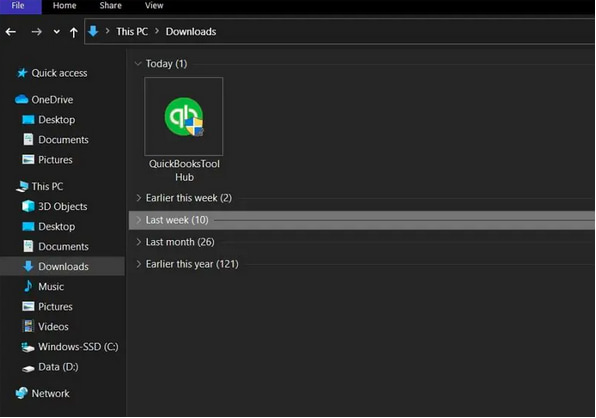
Once the Tool Hub is installed, it contains the QuickBooks Install Diagnostic Tool under the “Installation Issues” section.
Step-by-Step Execution Process
The execution of this diagnostic utility should be carried out under administrative privileges to ensure unrestricted access to system-level components. Each step must be completed sequentially to allow accurate detection and correction of the underlying registration failures.
Step 1: Launch QuickBooks Tool Hub
- Double-click the QuickBooks Tool Hub icon on your desktop.
- If the icon is missing, search “QuickBooks Tool Hub” in the Windows search box and select the program from the list.
Step 2: Open the Installation Issues Tab
- In the left-hand panel, select Installation Issues.
- Under this tab, click on QuickBooks Install Diagnostic Tool.
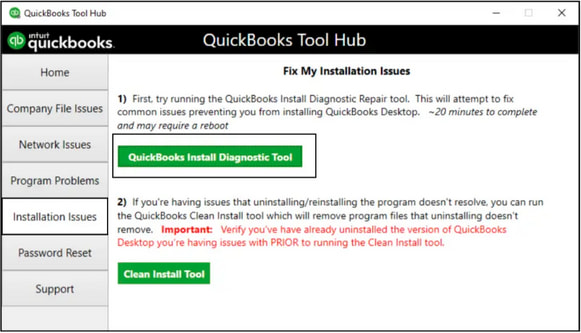
Step 3: Run the Diagnostic Scan
- The diagnostic scan will automatically begin.
- Allow the process to run uninterrupted.
- The average scan time ranges between 15 and 25 minutes, depending on system speed and the level of component corruption.
Step 4: Tool Operation and Detection
- The tool scans and repairs Microsoft Visual C++ Redistributables, .NET Frameworks, and MSXML files.
- During scanning, if a corrupted component is found, the tool replaces or re-registers the affected files automatically.
- The tool logs these operations in an internal diagnostic report for later review.
Step 5: System Restart
- After the scan is complete, close the tool and restart the computer to ensure that all system-level modifications are applied successfully.
- Rebooting forces Windows to reload repaired registry entries and reinitialize updated DLL libraries.
Run the QuickBooks Install Diagnostic tool from the QuickBooks Tool Hub to fix QuickBooks Error 1904. If this doesn’t resolve the issue, explore additional methods to fix Error 1904.
Solution 2: Repair Windows Components
QuickBooks Error 1904 frequently arises from damaged or unregistered Windows components that serve as foundational dependencies for QuickBooks Desktop installation. The three core frameworks responsible for supporting QuickBooks’ installer operations are Microsoft Visual C++ Redistributable, Microsoft .NET Framework, and Microsoft MSXML.
If any of these frameworks becomes corrupted or improperly configured, QuickBooks fails to execute its setup scripts, leading to registration failure of dynamic link library (DLL) files such as IcWrapper.dll.
This solution outlines a systematic procedure to repair or reinstall these components to restore the Windows environment required for a successful QuickBooks installation.
1. Repair or Reinstall Microsoft Visual C++ Redistributable
Purpose:
The Microsoft Visual C++ Redistributable library provides the runtime components necessary for executing QuickBooks installer files and registering system-level DLLs.
When this library is damaged or incomplete, QuickBooks cannot communicate with Windows runtime processes, resulting in Error 1904 during installation.
Procedure:
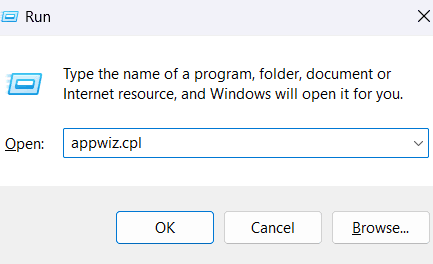
- Press Windows + R to open the Run dialog box.
- Type appwiz.cpl and press Enter to open Programs and Features.
- Scroll through the list of installed programs and locate all entries labeled Microsoft Visual C++ Redistributable.
- For each entry, select it and click Repair. Follow the on-screen instructions to allow Windows to automatically fix the package.
- If the Repair option is unavailable, select Uninstall, then download the latest Visual C++ Redistributable versions directly from the official Microsoft website.
- Install both the x86 (32-bit) and x64 (64-bit) redistributable packages to ensure complete coverage for QuickBooks’ runtime architecture.
After completing installation or repair, restart the computer and verify that all redistributable entries appear correctly in the installed program list. This ensures that the runtime library registration is successful and that QuickBooks can now initiate setup operations without encountering missing dependency errors.
2. Use the Microsoft .NET Framework Repair Tool
Purpose:
QuickBooks relies heavily on the .NET Framework for executing installation scripts, handling background services, and registering communication components.
If the .NET Framework becomes damaged or its registry keys are misconfigured, QuickBooks fails to load installation modules, leading to Error 1904.
Procedure:
- Visit the official Microsoft .NET Framework Repair Tool page from Microsoft’s documentation site.
- Download the executable file named NetFxRepairTool.exe.
- Once downloaded, right-click the file and select Run as administrator to ensure elevated privileges.
- Accept the license terms and click Next to initiate the diagnostic process.
- The tool automatically identifies and repairs inconsistencies in the .NET Framework installation and updates missing components.
- When prompted, click Apply Changes, then restart the computer to finalize repairs.
After restarting, open the Programs and Features window to confirm that .NET Framework versions are listed correctly and are not marked as damaged or incomplete. A stable .NET environment ensures QuickBooks can perform background communications during setup without triggering registry or permission-based interruptions.
3. Re-register Microsoft MSXML6.dll
Purpose:
The MSXML6.dll file is a core XML parser library used by QuickBooks to read configuration data during installation.
When MSXML is missing or unregistered, QuickBooks cannot interpret setup scripts or configuration files, leading to the 1904 registration error.
Procedure for 64-bit Operating Systems:
- Click the Start icon and type CMD in the search box.
- Right-click Command Prompt and select Run as administrator.
- In the command window, type the following commands sequentially and press Enter after each:
cd \windows\syswow64regsvr32 MSXML6.dll
- Wait for the confirmation message that states “DllRegisterServer in MSXML6.dll succeeded.”
Procedure for 32-bit Operating Systems:
- Press Windows + R to open the Run dialog box.
- Type cmd and press Enter to open Command Prompt.
- Enter the following command and press Enter:
regsvr32 MSXML6.dll
- A confirmation message will appear if the re-registration is successful.
After completing registration, restart the system. Then, open the Command Prompt again and verify registration by typing reg query HKCR\CLSID /f MSXML6.dll.
If the system returns a valid CLSID entry, it confirms that the MSXML6.dll component is successfully linked to the Windows registry, ensuring QuickBooks can access XML-based configuration data during setup.
Repairing these three core Windows components—Visual C++ Redistributable, .NET Framework, and MSXML6.dll—restores the dependency chain required for QuickBooks installation integrity.
Once these frameworks are functioning correctly, QuickBooks can properly register its DLL and OCX libraries, eliminating the primary triggers of Error 1904 (IcWrapper.dll failed to register).
Solution 3: Solution 4: Add QuickBooks to Antivirus Exclusion List (Bitdefender and Other Security Programs)
QuickBooks Error 1904 can persist even after component repair if third-party antivirus or firewall software interferes with the installation process. Security applications such as Bitdefender, Norton, or McAfee monitor real-time file activity and may incorrectly classify QuickBooks installation executables as potential threats. This misclassification prevents the installer from registering DLL components, particularly IcWrapper.dll, which leads to the recurring 1904 error message.
Adding QuickBooks installation folders to the antivirus exclusion list isolates its setup process from live protection scans, allowing uninterrupted registration of internal libraries and dependencies. This method is essential when the installation is repeatedly blocked despite successful system component repairs.
Antivirus software functions by monitoring all read, write, and execute operations across system directories.
During QuickBooks installation, the setup program writes multiple DLL, OCX, and configuration files into Program Files and Common Files directories.
If the antivirus intercepts this activity, it denies registry access to QuickBooks’ setup scripts, causing an incomplete installation and triggering Error 1904: [file name] failed to register.
By configuring an exclusion rule, the antivirus is instructed to ignore any operation within specified QuickBooks directories, ensuring successful library registration and stable installation.
2. Procedure to Add QuickBooks to Antivirus Exclusion List
Step 1: Identify the QuickBooks Installation Directories
Locate the folders where QuickBooks stores executable and shared files.
These directories vary based on whether the operating system is 32-bit or 64-bit.
For 32-bit Windows Systems:
C:\Program Files\Common Files\Intuit
For 64-bit Windows Systems:
C:\Program Files (x86)\Common Files\IntuitC:\Program Files\Intuit
These directories contain shared Intuit components such as IcWrapper.dll, QBVersionTool.dll, and runtime files that must remain accessible during installation and operation.
Step 2: Access Antivirus Settings
- Open your antivirus dashboard (for example, Bitdefender, Norton, McAfee, or Avast).
- Navigate to the Protection or Settings panel.
- Locate the Exclusions, Exceptions, or Allow List section depending on the antivirus interface.
Step 3: Add QuickBooks Directories to the Exclusion List
- Click Add Folder or Browse to locate QuickBooks installation directories.
- Add the paths specified above (based on your system architecture).
- Save the changes and close the antivirus configuration panel.
Step 4: Temporarily Disable Real-Time Protection (if required)
Some antivirus programs continue monitoring newly added paths until the next restart.
Temporarily disable real-time protection for the duration of QuickBooks installation and re-enable it once installation completes.
Step 5: Reinstall or Re-Run QuickBooks Installation
After exclusions are configured, reinitiate the QuickBooks setup process.
The installation should proceed without interruption, allowing successful DLL registration and complete system integration.
3. Why Antivirus Exclusion Prevents Recurrence of QuickBooks Error 1904
The antivirus exclusion mechanism prevents QuickBooks installation files from being scanned, quarantined, or blocked during setup.
When antivirus scanning is active, the system often restricts QuickBooks access to registry keys and shared component directories, interrupting the DLL registration process.
By adding these directories to the exclusion list, the installer gains uninterrupted access to the Windows registry and runtime libraries, ensuring that components such as IcWrapper.dll register correctly.
In technical terms, exclusion removes execution-time file interception, thereby restoring a stable installation environment.
Once exclusions are established, subsequent QuickBooks updates and repairs execute seamlessly without being falsely flagged or terminated by antivirus control modules.
Solution 4: Change Your Windows User/Account Permission Settings
You are required to switch to the Windows Administrator account to change a few settings.
- Press the Windows button on the keyboard or click the bottom left corner of the screen.
- Now, enter CMD (command prompt) in the search bar, and select Run as administrator.
- Then, once the command prompt window appears, type net user administrator/active: yes, and click the Enter tab. Afterward, quit the command window.
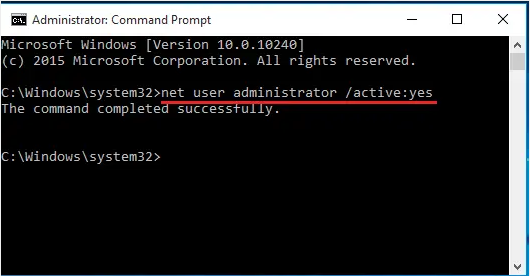
- After this, click on the Windows start icon, and then select your account name, and click on Sign out.
- Lastly, navigate to the Account, which is labeled as the administrator, and try to log in there. Fill in the login details if you have any; otherwise, you can leave it blank.
Solution 5: Refer to the QBversionTool.dll
This method specifically applies to the error message that refers to the QBversionTool.dll file. You are suggested to install Diagnostic Tool and change the admin settings to proceed with the steps:
Test your Permissions
- First, click the Windows start menu, type Notepad in the search box, and open it.
- Now, type QBTEST on the notepad.
- Then, click on the File option and select Save as. You are suggested to save it to either C:\Program Files\Common Files” or “C:\Program Files(x86)\Common Files.
Note: If you’re unable to save the note to the folder, then you’re required to sign in and install QuickBooks as an admin.
Installing QuickBooks as Admin
- Now, you are supposed to install QuickBooks as an administrator.
- First, click on the Windows start menu and select the Sign-Out option.
- Now, select an Account that says Admin and sign in. It should be noted the password shouldn’t be there.
- Then, install QuickBooks as admin.
Follow the below-given steps to a built-in administrator:
Step 1: Activate the Built-in Administrator
- Click on the Windows button on the keyboard.
- Now, type CMD in the search box.
- Then, click on Run as administrator.
- Enter the net user administrator /active: yes, in the command prompt window and hit the Enter tab.
Note: If any error occurs, type net user administrator /active instead.
Step 2: Switch to the built-in Administrator Account
- First, press Ctrl+Alt+Delete on the keyboard simultaneously, and choose the Switch User Windows 8 users option.
- Now, hit the Windows button and click on the user icon option on the upper right of the display.
- Then, again press Ctrl+Alt+Delete at a time, and select the default Administrator account icon.
Step 3: Hide the built-in Administrator Account
- First, press the Windows button on the keyboard.
- Now, type CMD (Command Prompt) in the search box, and choose the Run as administrator option.
- Then, type net user administrator /active: no in the command prompt, and press the Enter button.
Step 4: Modify User Permission form installation directory security settings
- First, open the File Explorer by clicking on the icon on the Start menu or by pressing Win + E simultaneously on the keyboard.
- Now, navigate to This PC and click on Local Disk (C:).
- Then, select the Program Files.
- Navigate to the Common Files, right-click on the folder, and choose the properties option.
- Click on the Security tab and select the Edit icon, and then under the Group or User names icon, select the Users option.
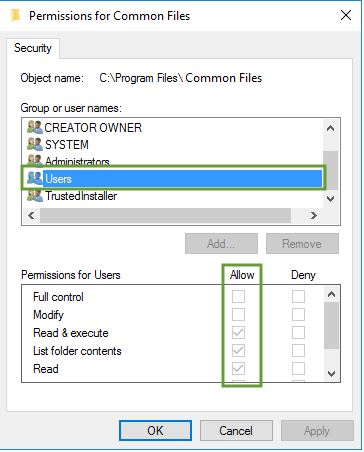
Below the Permissions for Users tab, select the allow for the following permissions:
- Full Control
- Modify
- Read and Execute
- List Folder Contents
- Read
- Write
Click on the Apply and then OK BUTTON.
Step 5: Do a QuickBooks Installation
- Once again, install QuickBooks Desktop.
- Now, switch to the original user login after installing QuickBooks accounting software.
Solution 7: Update Windows Operating System
Windows updates are designed to maintain synchronization between software applications and system-level libraries.
Each cumulative update package includes patches for the Windows Installer Service, registry integrity, file permissions, and runtime environments used by QuickBooks.
When Windows remains unpatched for extended periods, the system develops compatibility gaps that prevent QuickBooks from registering DLL and OCX components, resulting in Error 1904.
Updating the operating system reestablishes this compatibility by installing the latest driver versions, revalidating registry paths, and reconfiguring framework dependencies.
2. How to Update Windows 8.1
Purpose:
Windows 8.1 systems require specific updates to synchronize with modern QuickBooks installation frameworks, particularly for .NET and C++ redistributable packages.
Procedure:
- Click the Start icon and select Settings.
- Choose Change PC Settings from the control panel.
- Navigate to Update and Recovery, then select Windows Update.
- Click Check Now to search for available updates.
- If updates are found, click View Details and select all critical and recommended updates.
- Click Install to begin the update process.
- Once installation completes, restart the system to apply changes.
After rebooting, reopen Windows Update and confirm that the message “Your PC is up to date” is displayed. This confirmation indicates that all essential components required by QuickBooks have been updated successfully.
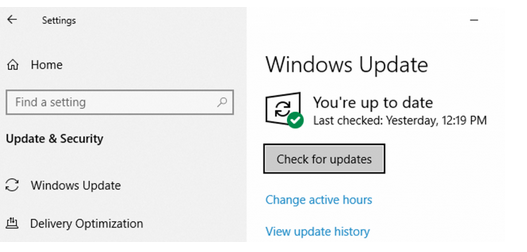
3. How to Update Windows 10
Purpose:
Windows 10 frequently releases stability updates that include patches for system frameworks used by QuickBooks installation utilities. Applying these updates eliminates outdated runtime dependencies that trigger component registration errors.
Procedure:
- Click the Start menu and select Settings.
- Navigate to Update & Security.
- Select Windows Update from the sidebar.
- Click Check for Updates to initiate the scan.
- Windows will display available updates; click Download and Install.
- Wait for the process to complete and restart the computer when prompted.
Once restarted, return to Windows Update and confirm that there are no pending critical updates. QuickBooks should now install successfully without encountering Error 1904 due to outdated system files.
4. How to Update Windows 11
Purpose:
Windows 11 integrates its security and framework updates differently, ensuring that QuickBooks installation scripts interact properly with the latest versions of Windows runtime libraries.
Procedure:
- Click the Start button and open Settings.
- Select Windows Update from the left-hand menu.
- Click Check for Updates to identify available packages.
- If updates are detected, select Download and Install to begin the update.
- Allow the system to install all updates fully and restart when prompted.
After rebooting, navigate again to Settings → Windows Update and confirm that the system states “You’re up to date.”
For manual updates, advanced users can visit the Microsoft Update Catalog (https://www.catalog.update.microsoft.com) to download and install specific update packages required for runtime stability.
5. Link Between Outdated Windows Components and QuickBooks Installation Issues
QuickBooks relies on synchronized communication between its internal installer and Windows system libraries.
When the operating system is outdated, several conflicts arise:
- The Windows Installer Service fails to recognize new QuickBooks installation scripts.
- Registry access permissions are restricted by obsolete security policies.
- Outdated Visual C++ and .NET versions prevent successful registration of IcWrapper.dll and related libraries.
- Missing MSXML components disrupt configuration parsing during QuickBooks setup.
These conditions collectively cause QuickBooks Error 1904, halting the installation process. Performing a full Windows update resolves these inconsistencies by restoring the dependencies required for QuickBooks to install and function correctly.
6. Technical Outcome
Updating the Windows operating system ensures that all system dependencies, registry policies, and runtime frameworks align with QuickBooks’ installation requirements.
After updates are applied, the installer can correctly register IcWrapper.dll and other shared libraries without interference.
A fully updated system prevents recurrence of Error 1904 and maintains long-term stability across QuickBooks updates, integrations, and future installations.
Remember: While updating Windows 11 might be a potential solution, it’s often not the root cause of QuickBooks Error 1904. Focus on troubleshooting QuickBooks-specific issues first before considering a system update.
Solution 8: Uninstall and Reinstall Adobe Flash Player to Resolve QuickBooks Error 1904
QuickBooks Error 1904 (IcWrapper.dll failed to register) can occur due to corrupted or outdated system components that interact with QuickBooks installation files. One of the frequently affected components is Adobe Flash Player, which QuickBooks Desktop previously used for certain interface elements and embedded content rendering. A corrupted Flash Player installation can disrupt QuickBooks setup files, resulting in registration failures of DLL components such as IcWrapper.dll.
Purpose of This Solution:
Reinstalling Adobe Flash Player ensures that all associated system libraries are refreshed, removing corrupted entries and restoring compatibility between Windows system files and QuickBooks installation modules. This action stabilizes the environment and allows QuickBooks to register its dynamic link libraries correctly.
Step-by-Step Procedure
Step 1: Open the Control Panel
Access the Control Panel by typing “Control Panel” into the Windows search box and selecting it from the results. Ensure you are logged in with administrative privileges to modify system software components.
Step 2: Navigate to Program Management
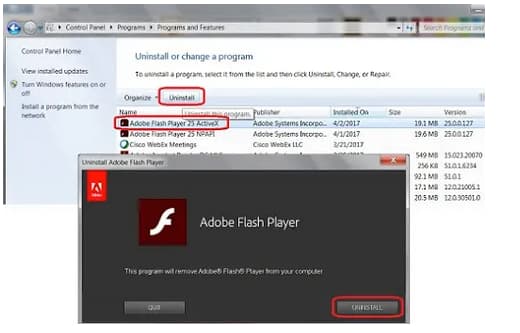
Within the Control Panel, select “Programs” and then click on “Uninstall a Program.” This section displays a list of all installed applications and system extensions.
Step 3: Locate Adobe Flash Player
In the list, search for “Adobe Flash Player ActiveX” or any Flash-related entries that may exist in the system. These entries are typically located under the publisher name “Adobe Systems Incorporated.”
Step 4: Uninstall Adobe Flash Player
Select the identified Flash Player entry and click “Uninstall.” Follow the on-screen instructions carefully until the uninstallation process is complete. Once the process finishes, restart your computer to remove all cached Flash components and residual registry values.
Step 5: Reinstall Adobe Flash Player (If Required by QuickBooks Version)
Although Adobe Flash Player has reached end-of-life, certain legacy QuickBooks Desktop versions still reference its framework. If your version requires it, download a compatible Flash installer only from Adobe’s official archive or Intuit’s recommended sources. Install the package by following the setup wizard instructions and verify completion through the Control Panel’s program list.
Step 6: Verify Installation Integrity
After reinstallation, restart the system once again. Then, relaunch QuickBooks Desktop and verify that the installation process or program startup proceeds without the Error 1904 message.
Additional Guidelines to Remember
To prevent QuickBooks Error 1904 or similar installation issues, follow these best practices:
- By only downloading QuickBooks and all updates from Intuit’s website, you help prevent getting incomplete or corrupted files.
- You should make sure that your operating system and all the system drivers are current to support QuickBooks’s functionality.
- RB: Use the QuickBooks Tool Hub version to get more information about QuickBooks tools available to address installation issues before they occur.
- Make sure you have the right user privileges on your respective systems and that you log on as a ‘Superuser/Administrator’ during the installation of QuickBooks.
- Ensure you perform a malware or virus check on your system to avoid interaction with these problems during the installation process.
- While installing the program, set the antivirus to ‘off’ mode for a while, then turn it back on after the installation process.
Legacy Dependencies (Adobe Flash Player)
Older QuickBooks Desktop versions once used Adobe Flash Player. Since Flash has reached end-of-life, it can occasionally cause registration issues if remnants exist. If your version references Flash:
- Uninstall Flash Player from the Control Panel.
- Restart the system.
- Proceed with QuickBooks installation.
Conclusion
Hopefully, the information given above will be useful to you. But if you are still facing any kind of issues with your software and need professional assistance regarding accounting, bookkeeping & accounting software-related issues, then feel free to get technical support with us at +1-802-778-9005, or you can email us at support@ebetterbooks.com
FAQs!
What does “HRESULT -2147024894” mean, and how does it relate to the registration failure?
The HRESULT (High-Level Result Code) is a 32-bit value returned by a Windows function call. The specific code -2147024894$ (which is equivalent to the hex code 0\text{x}80070002$) typically translates to ERROR_FILE_NOT_FOUND.
When you see this HRESULT alongside Error 1904, it means the Windows registry tried to locate and register the specified DLL file (like $IcWrapper.dll$ or $QBVersionTool.dll$) but failed because either:
a) The required file is physically corrupted or missing from its expected system path.
b) The security permissions on the folder or registry keys are inadequate, causing the system to be unable to “see” or access the file.
The core fix is to repair the missing system components (Solution 2) or adjust the folder permissions (Solution 6) to ensure the file is both present and accessible.
Why do I need to repair both the x86 and x64 versions of the Microsoft Visual C++ Redistributable?
QuickBooks Desktop is a complex application that often relies on libraries built with both architectures, even if you are running a 64-bit operating system:
1. x86 (32-bit) components: These are used by older core QuickBooks functions, or by specific supporting DLLs that were originally compiled as 32-bit.
2. x64 (64-bit) components: These handle modern system interactions, large memory addresses, and the primary QuickBooks executable.
If QuickBooks relies on a specific DLL registered by the x86 redistributable, but only the x64 version is working correctly, the installation will still fail with Error 1904. Repairing both ensures the entire runtime environment required by all QuickBooks components is fully functional, preventing component-specific registration blocks.
If I exclude the QuickBooks folder from my antivirus (Solution 4), does that pose a security risk?
There is a minimal and temporary security risk during the installation window, but this step is often critical for a successful setup.
Antivirus and firewall programs (like Bitdefender) sometimes use real-time monitoring that misidentifies the installer’s actions (writing files and modifying the Windows registry) as a threat, thereby blocking the critical DLL registration steps.
By adding an exclusion, you instruct the security software to ignore all file and registry operations within the specified QuickBooks folders. This is considered safe only for the duration of the installation. Once the installation is complete and verified, you should immediately re-enable any temporarily disabled real-time protection.
When should I choose the QuickBooks Install Diagnostic Tool (Solution 1) versus Manual Windows Component Repair (Solution 2)?
Always start with Solution 1 (The Tool).
Diagnostic Tool (Automated): This is the official, low-risk, and fastest method. It automatically detects and repairs the most common causes of Error 1904 (damaged C++, .NET, and MSXML components) in one step.
Manual Repair (Targeted): This is a high-control step reserved only for when the Diagnostic Tool fails. It is necessary when you need to specifically re-register a file like MSXML6.dll$ using the regsvr32 command or manually ensure the latest Visual C++ version is cleanly installed.
Why does re-registering MSXML6.dll using regsvr32 sometimes fail, and what should I check next?
The command regsvr32 MSXML6.dll fails when the Windows system cannot complete the registration. Common causes are:
Permission Error: You did not run the Command Prompt (CMD) as an administrator. This is the most common reason.
Location Error: On 64-bit systems, you must first navigate to the correct directory (cd \windows\syswow64) before running the command. If you run it from the wrong folder, the system cannot find the file.
Corruption: The $MSXML6.dll$ file itself is missing or severely corrupted.
If the failure persists after verifying permissions and the directory, you may need to run the System File Checker (SFC) scan (execute sfc /scannow in CMD as administrator) to attempt a repair of all critical Windows system files before trying the regsvr32 command again.
Can installing a new Windows Update (Solution 7) actually cause the 1904 error instead of fixing it?
Yes, this is a known, though less common, scenario. Windows Updates are typically fixes, but a major OS upgrade (e.g., from Windows 10 to 11) or a cumulative update can sometimes:
Break Compatibility: The update may temporarily remove or corrupt an older version of a component (like a specific version of .NET or C++ Redistributable) that QuickBooks was actively using.
Reset Permissions: The update can sometimes reset system or folder permissions, re-introducing the “failed to register” problem.
If Error 1904 appears immediately after a Windows Update, you should still proceed with the steps in the article, specifically:
Run the QuickBooks Install Diagnostic Tool (Solution 1).
Manually Repair/Reinstall the Microsoft Visual C++ and .NET Frameworks (Solution 2) to force the clean installation of components compatible with the new Windows environment.
Disclaimer: The information outlined above for “How to Fix QuickBooks Error 1904 IcWrapper.dll Failed to Register?” is applicable to all supported versions, including QuickBooks Desktop Pro, Premier, Accountant, and Enterprise. It is designed to work with operating systems such as Windows 7, 10, and 11, as well as macOS.
