When installing or updating QuickBooks Desktop, users may sometimes encounter a sudden installation failure accompanied by the message “Error 1603: The update installer has encountered an internal error.” This issue, known as QuickBooks Error Code 1603, prevents the software from completing installation or applying updates successfully.
This error typically occurs when the Windows system components that QuickBooks depends on—such as Microsoft .NET Framework, MSXML, or Visual C++ Redistributables—are damaged, outdated, or improperly configured. Because QuickBooks relies on these core frameworks to run its installation scripts and communicate with the Windows installer, even a small corruption can cause the setup process to halt midway.
This guide aims to help QuickBooks Desktop users resolve Error 1603 by restoring system dependencies, repairing damaged installation frameworks, and creating a stable environment for updates. It provides a structured troubleshooting process based on Microsoft and Intuit-approved methods to ensure error-free installation, reliable system performance, and lasting prevention of installation-related failures.
What is QuickBooks Error 1603, & How does it Look when encountered?
When QuickBooks Error 1603 occurs, it’s not just a random installation glitch — it’s a signal that Windows and QuickBooks have stopped communicating properly during a setup or update sequence.
This error generally appears during installation or update attempts, causing the setup process to fail before completion. To understand how to fix it, users first need to know why it happens and what system components are affected.
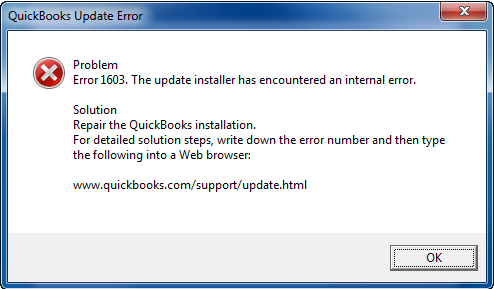
When the error occurs during the installation you see the following error message on the screen:
- Error Status 1603: The update installer has encountered an internal error. (www.quickbooks.com/support/update.html)
Or
- Error Status 1603: Unable to apply the patch.
Or - MSI returned 1603: Fatal error during installation.
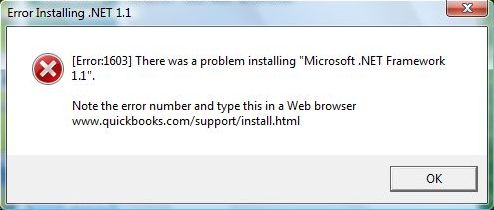
Or - “[Install Error 1603]: There was a problem installing Microsoft .NET Framework 1.1.”
Or
- “Install Error 1642: Error installing Microsoft .NET Framework while installing QuickBooks.”
What Happens During Installation or Update?
When you install or update QuickBooks Desktop, the program depends on several Microsoft components that act as the foundation of the installation process.
These include:
- Microsoft .NET Framework — Handles program logic, installer execution, and integration with online services.
- Microsoft Visual C++ Redistributables — Provide runtime libraries essential for running QuickBooks’ background processes.
- Microsoft MSXML (XML Core Services) — Manages the communication between QuickBooks and Windows for file handling and web-based operations.
Here’s how the breakdown occurs:
- QuickBooks Setup Initialization:
When installation begins, Windows verifies if all the necessary dependencies are present and functional. - Dependency Check Failure:
If one or more components (like .NET Framework or MSXML) are missing, outdated, or corrupted, the installation scripts cannot execute properly. - Installer Abort:
As soon as the Windows Installer Service encounters a blocked or inaccessible dependency, it terminates the setup and triggers the message:
“Error 1603: The update installer has encountered an internal error.” - Rollback and Incomplete Installation:
The installer then attempts to revert partial changes, leaving QuickBooks partially installed or completely rolled back.
QuickBooks Error 1603 occurs when a communication bridge between QuickBooks setup scripts and Windows core services breaks down during installation or update.
What are the root causes behind the QuickBooks Error 1603?
QuickBooks Error 1603 is often caused by system crashes, improper shutdowns, file corruption due to malware or security software, outdated software, or interrupted installations. To diagnose the problem effectively, it’s important to understand what triggers the dependency or installer failure. Below are the most common technical root causes behind QuickBooks Error 1603:
1. Outdated or Unpatched Windows Operating System
When Windows lacks the latest service updates or patches, QuickBooks may fail to detect compatible versions of .NET Framework or MSXML, halting installation.
2. Corrupted Microsoft Installer or Registry Conflicts
The Windows Installer Service (MSI) manages all software installations.
If it’s damaged, incorrectly registered, or the registry entries for QuickBooks remain from an earlier version, installation scripts may misfire or fail mid-process.
3. Interrupted or Improper System Shutdown
If your system loses power or is forcibly restarted while installing QuickBooks or Windows updates, temporary installation files can become corrupt — causing repeated 1603 errors on future attempts.
4. Third-Party Security or Antivirus Software Interference
Aggressive antivirus tools (like Avast, McAfee, or Norton) can flag QuickBooks installer processes as suspicious.
This may block or delete temporary setup files required by QuickBooks Installer (setup.exe or QBDBMgrN.exe).
5. Lack of Administrative Privileges
QuickBooks installation requires system-level access to write registry keys and modify Windows components.
Installing from a non-administrator account can cause permission conflicts, leading the installer to abort with Error 1603 or Error 1642.
How can we identify the effect of the QuickBooks Error 1603?
Before attempting any fixes, it’s crucial to identify the visible and system-level signs that confirm QuickBooks Error 1603 is the actual cause of your installation or update failure. Many users mistake this error for general system slowness or a random crash but in reality, QuickBooks Error 1603 leaves specific footprints in your system that make it easier to diagnose precisely.
The following are the signs that can be used to identify the QB Error Code 1603:
On-Screen Symptoms: What Users Commonly See
During installation or update, you may encounter one or more of the following alerts or behaviors:
- Installer Freezes or Closes Unexpectedly
- The QuickBooks setup screen may hang indefinitely during extraction or installation.
- In some cases, it closes without displaying an error message.
- Error Code Message Appears
- A pop-up window may display: “Error 1603: The update installer has encountered an internal error.” or “QuickBooks Install Error 1642: Fatal error during installation.”
- This indicates that the Windows Installer Service stopped responding mid-process.
- Progress Bar Resets or Cancels Automatically
- You might notice the installation progress returning to zero or automatically rolling back changes after reaching a certain percentage.
- QuickBooks Fails to Launch After Update
- After what seems like a successful update, QuickBooks may refuse to open or crash immediately after startup.
- This is usually because .NET or MSXML dependencies were not registered correctly during installation.
System-Level Indicators
Even if no visible alert appears, your Windows system records detailed information about the failed installation. These internal indicators confirm that Error 1603 occurred due to component or permission failure.
- Event Log Entry: “MSI Returned 1603”
- Windows logs the exact failure in the Event Viewer under Application Logs.
- The message “MSI returned 1603” means the Microsoft Installer (MSI) encountered a fatal issue during QuickBooks setup.
- Missing Microsoft Components
- When you open Control Panel → Programs and Features, one or more of the following may be missing or corrupted:
- Microsoft .NET Framework (versions 4.5 and above)
- Microsoft Visual C++ Redistributables (x86 and x64)
- Microsoft MSXML 4.0 or 6.0
- The absence or corruption of these components interrupts QuickBooks communication with Windows services.
- When you open Control Panel → Programs and Features, one or more of the following may be missing or corrupted:
- Damaged QuickBooks Installation Folder
- Partial or empty QuickBooks directories under
C:\Program Files\Intuit\QuickBooksorC:\ProgramData\Intuitindicate that installation was aborted mid-process. - You might also see leftover
.tmpor.msifiles, confirming an incomplete setup.
- Partial or empty QuickBooks directories under
- Frequent Windows Installer (msiexec.exe) Failures
- System Resource Monitor may show repeated msiexec.exe or QBDBMgrN.exe processes starting and stopping rapidly — a classic sign of an installer attempting to execute failed commands.
Application-Level Behavior After Error 1603
Once the installation attempt fails, QuickBooks may exhibit secondary issues indicating a broken dependency chain:
- QuickBooks Desktop opens but crashes when performing updates or accessing company files.
- Network-based operations (e.g., file sharing or database connection) fail, even though the network is stable.
- Certain features like payroll updates or add-ons don’t load, suggesting partial installation of service components.
These behaviors confirm that QuickBooks was not fully installed or registered on your system.
How to Resolve QuickBooks Error 1603 (Issue With the Installation or Update File)?
When QuickBooks Error 1603 appears, it signals that one or more Microsoft dependencies or QuickBooks installation components have failed during setup. To resolve QuickBooks Error 1603, download and run the QuickBooks Install Diagnostics Tool from the QuickBooks Tool Hub. Ensure your Windows OS is updated. Repair or reinstall Microsoft .NET Framework if needed, or install QuickBooks in Safe Mode or Selective Startup. Follow the below step by step methods to fix Error 1603 in QuickBooks desktop. Each method builds upon the previous one, ensuring a structured approach and preventing redundant system changes.
Method 1: Use QuickBooks Install Diagnostic Tool (via QuickBooks Tool Hub)
The QuickBooks Install Diagnostic Tool (part of the official QuickBooks Tool Hub) automatically scans and repairs system files required for QuickBooks installation — including Microsoft .NET Framework, MSXML, and Visual C++ Redistributables.
Terminate any running processes along with QuickBooks. It’s advised to fetch the latest version (1.6.0.5) of the QuickBooks Tool Hub. Store the downloaded file in an easily accessible location.
Note: If you’ve previously installed the Tool Hub, you can verify your version. Choose the Home tab in QB. The version will be visible at the bottom right, or you can click on About to see the version.
Step-by-step process:
![How to Fix QuickBooks Update Error 1603? [Install or Update HTML Error] 1 QB tool hub](https://ebetterbooks.com/wp-content/uploads/2024/10/ToolHub.avif)
- Download the latest QuickBooks Tool Hub
- Visit the official Intuit support page.
- Download the latest version (recommended: v1.6.0.5 or higher).
- Save it to an easily accessible folder like Desktop or Downloads.
- Install the Tool Hub
- Open the downloaded file (QuickBooksToolHub.exe).
- Follow on-screen prompts and agree to the terms of service.
- Once installation is complete, double-click the desktop icon to open the tool.
- Run the Install Diagnostic Tool
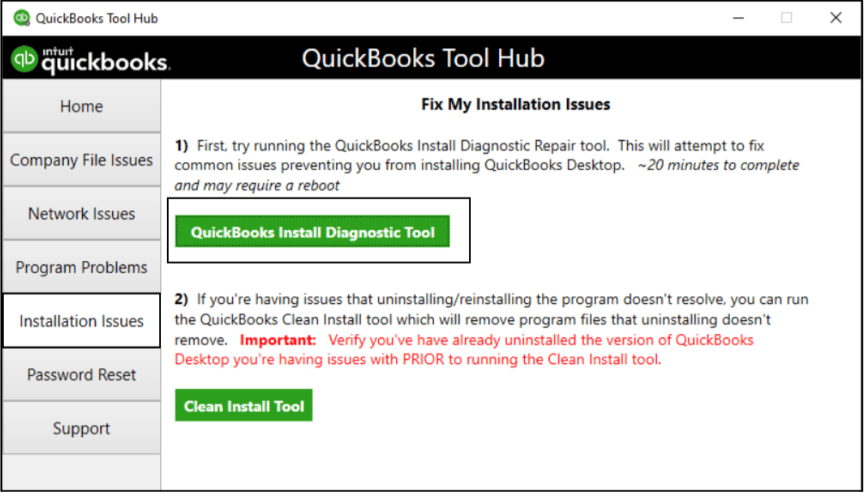
- Inside the Tool Hub, navigate to:
Installation Issues → QuickBooks Install Diagnostic Tool. - Click Run Tool.
- Allow the process to complete — this may take 15–20 minutes depending on your system speed.
- Inside the Tool Hub, navigate to:
- Restart your computer
- Once the tool finishes repairing, restart your PC to apply all changes.
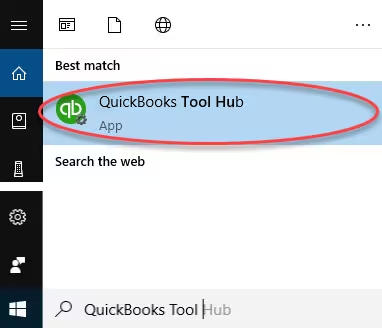
Note: If the icon is not immediately visible, perform a search in Windows for QuickBooks Tool Hub and choose the application.
Method 2: Update Windows Operating System
QuickBooks relies on Microsoft system frameworks such as .NET 4.8, MSXML, and C++ Redistributables.
If your Windows version lacks critical updates, QuickBooks may fail to install or register these components correctly.
Running Windows Update ensures that all background dependencies are synchronized with the latest build.
Before proceeding with applying any solution to fix this error, ensure the following:
- Back up your essential data. This helps protect your information in case anything unexpected happens during the troubleshooting process.
- Close any applications running in the background.
- Ensure you have a stable internet connection.
- You’re logged into your system as an administrator.
- Ensure that you have downloaded the complete setup file.
- Also, make sure you have downloaded the setup file through the official Intuit portal.
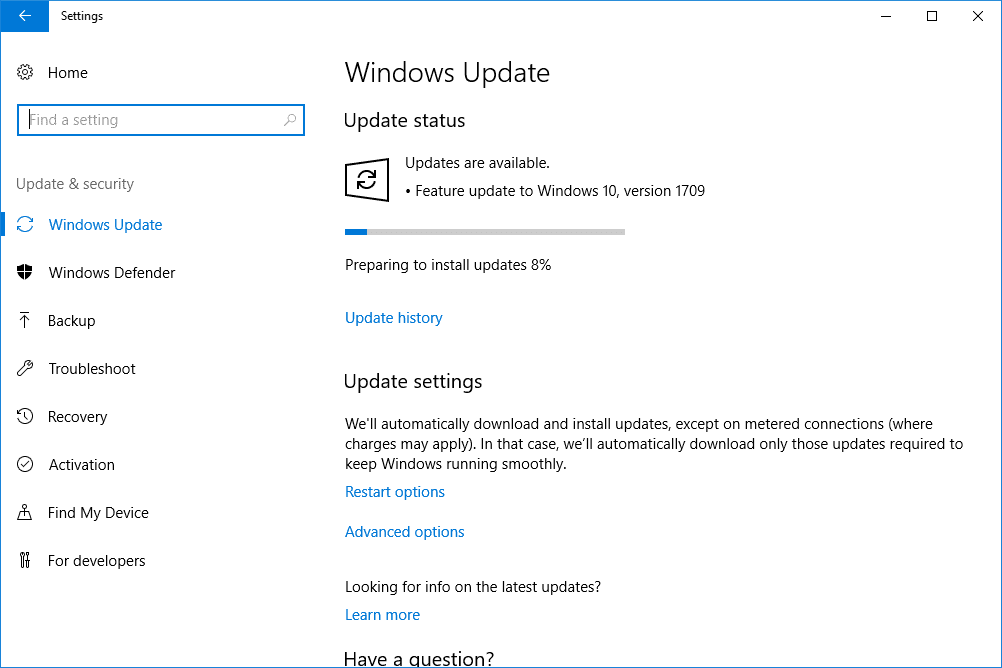
Step-by-step process For Windows 10, 8.1, or 8:
- Open Windows Update settings
- Press Windows + I → select Update & Security → click Windows Update.
- Check for Updates
- Click Check for Updates.
- Allow Windows to search for pending updates (including cumulative and security updates).
- Download and Install All Pending Updates
- If updates are available, click Download and Install.
- Wait for all installations to finish, then restart your system when prompted.
- Run QuickBooks Setup Again
- After rebooting, try reinstalling or updating QuickBooks Desktop.
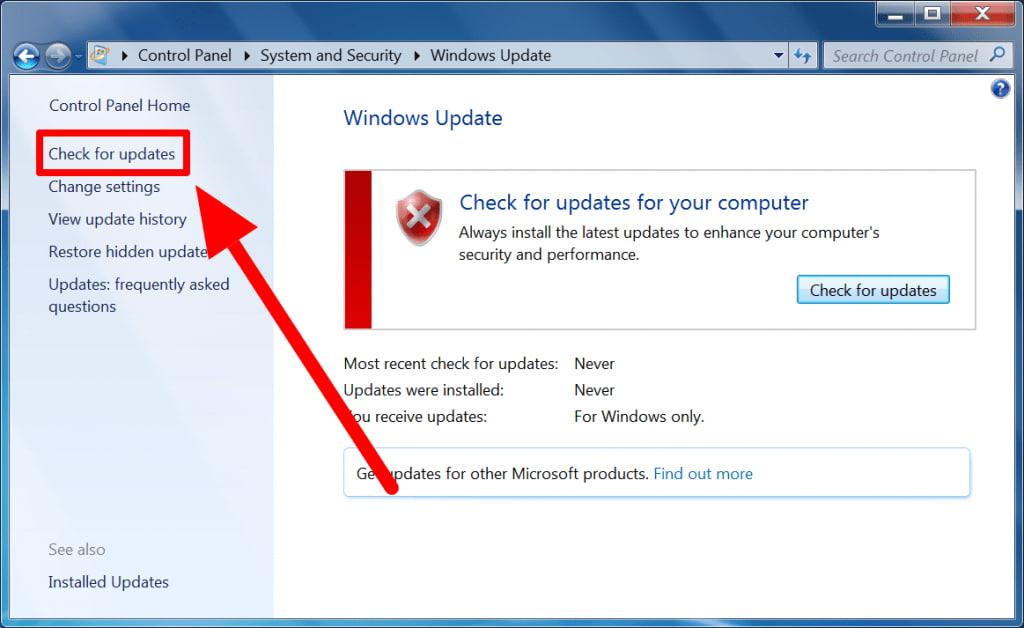
For Windows 7:
Step 1: Press Start
- Click on the Start Button.
Step 2: Go for Control Panel
- Navigate to the Control Panel.
Step 3: Choose System & Security
- Select System & Security.
Step 4: Select Windows Updates
- Click on Windows Updates.
Step 5: Check for Updates
- Press Check for Updates and download the latest updates if available.
Method 3: Repair Microsoft Components MSXML 4.0
Microsoft XML Core Services (MSXML) is an essential Windows component for applications that rely on XML (Extensible Markup Language) for processing and data communication. QuickBooks Desktop uses MSXML to execute certain tasks, such as importing, exporting, and communicating between QuickBooks and web-based services.
If MSXML is damaged or missing, it can cause QuickBooks Desktop to malfunction, preventing the software from performing certain tasks or even starting properly. Here’s how to repair MSXML:
If you’re using a CD to install QuickBooks, you need to select the type of installation you want. Insert the CD into your system and close all open programs and applications. Then follow the following instructions to start the MXSML installation for your operating system:
For Windows 7 or Vista:
Step 1: Press Windows + R, type the following command, and press Enter:
Step 2: Type “msiexec.exe /fvaum “C:\Program Files\Common Files\Intuit\QuickBooks\msxml.msi”
Step 3: (If QuickBooks is installed from CD or a custom directory, adjust the path accordingly — e.g., D:\QBOOKS\msxml.msi.)
Step 4: Wait for the repair process to finish.
Step 5: Restart your system.
For Windows XP:
Step 1: Press the Windows and R keys (Windows+R) together. A Run box will appear on the bottom left of your screen.
Step 2: Enter msiexec.exe /fvaum “D:\QBOOKS\msxml.msi” in the box and click OK.
Please note that the QuickBooks Windows installer error 1603 or download QuickBooks installer setup failed can occur on any Microsoft Windows operating system, including Windows XP, Vista, 7, 8, 8.1, 10, and 11.
Method 4: Repair or Reinstall Microsoft .NET Framework
.NET Framework supports the graphical interface and operational logic of QuickBooks.
If it’s damaged, QuickBooks may crash or fail during installation.
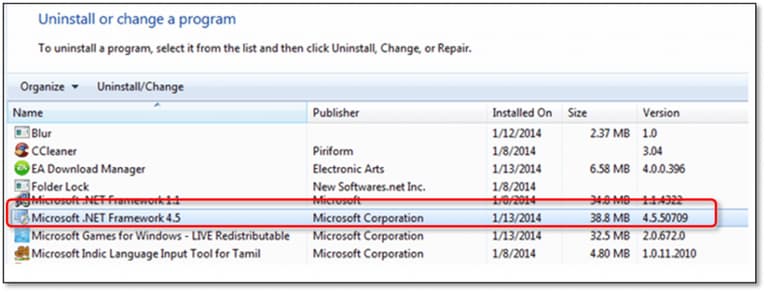
If a damaged or missing .NET framework causes errors, follow these steps to fix this:
Steps to repair:
- Press Windows + R, type appwiz.cpl, and hit Enter.
- Click Turn Windows features on or off in the left panel.
- In the list that appears:
- Ensure .NET Framework 3.5 and .NET Framework 4.8 Advanced Services are checked.
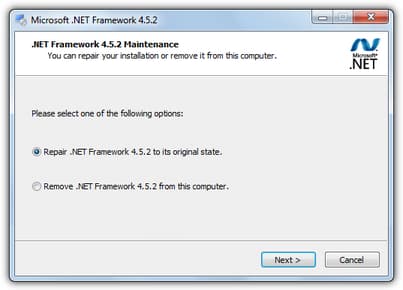
- If already checked, uncheck → Apply → recheck → Apply again to trigger a repair.
- Restart your computer.
Alternate fix:
If .NET repair fails, download and reinstall the latest .NET Framework version directly from Microsoft’s official website.
Method 5: Repair Microsoft Visual C++ Redistributables
QuickBooks uses multiple versions of Microsoft Visual C++ for runtime support. Damaged or missing redistributables can prevent setup execution.
Steps to repair:
- Open Control Panel → Programs and Features.
- Locate all entries titled Microsoft Visual C++ Redistributable (both x86 and x64).
- For each version (2012, 2013, 2015–2022):
- Select → Change → Repair → follow on-screen steps.
- If a version fails to repair, uninstall it and download the latest version from Microsoft’s site.
Method 6: Install QuickBooks Desktop in Windows Safe Mode
During a normal Windows startup, multiple third-party applications (such as antivirus, backup tools, or cloud sync services) launch automatically in the background.
These background services can lock important installation files, block Microsoft Installer (MSI), or interrupt QuickBooks setup scripts — especially those involving Microsoft components (.NET, MSXML, Visual C++).
Safe Mode starts Windows with only core system files and basic drivers, disabling all non-essential programs and allowing the QuickBooks installer to run in an isolated, conflict-free environment.
Complete the following steps to install QuickBooks Desktop in Windows Safe Mode:
Step 1: Open System Configuration Utility
- Press Windows + R to open the Run dialog box.
- Type msconfig and press Enter.
- This opens the System Configuration window.
Step 2: Enable Safe Boot Mode
- In the System Configuration window, go to the Boot tab.
- Under “Boot options,” check the box for Safe Boot.
- Select Minimal (recommended option for troubleshooting).
- Click Apply, then OK.
Step 3: Restart Your Computer
- You will be prompted to restart your computer.
- Click Restart to boot Windows into Safe Mode.
- Once restarted, your desktop will appear with a black background and the words “Safe Mode” displayed in the corners — confirming that you’re operating in a restricted mode.
Step 4: Install QuickBooks Desktop
- Locate your QuickBooks installation file — either a downloaded setup file (.exe) or your installation CD.
- Right-click the installer and choose Run as Administrator.
- Follow the on-screen installation steps normally.
- Avoid multitasking during installation — Safe Mode disables unnecessary background activity to ensure stability.
Step 5: Revert to Normal Startup
After QuickBooks installs successfully, you must revert your computer back to its normal startup mode.
- Reopen msconfig (press Windows + R, type msconfig, hit Enter).
- Go to the Boot tab again.
- Uncheck Safe Boot under “Boot options.”
- Click Apply, then OK.
- Restart your computer normally.
Step 6: Verify Installation Success
After your system restarts in normal mode:
- Launch QuickBooks Desktop.
- Confirm that the application opens without errors or rollback prompts.
- Go to Help → About QuickBooks to verify the installed version and build number.
- Check Event Viewer (Windows Logs → Application) for absence of new “MSI returned 1603” or “Installer failed” entries.
4.3 Additional Tips for Safe Mode Installation
- Disable Internet temporarily if network-based services trigger background syncs or firewalls that can interfere.
- Avoid running any third-party utilities (like cloud backup or security scans) during installation.
- If QuickBooks still fails to install even in Safe Mode, proceed to Method 5: Use Selective Startup Mode — which allows for deeper control over service-level conflicts.
Safe Mode acts as a controlled diagnostic environment — by stripping Windows down to its core services, it eliminates interference from corrupted background applications or aggressive antivirus software that prevent QuickBooks from registering necessary components like .NET Framework, MSXML, and C++ Redistributables.
Method 7: Use Selective Startup to Install QuickBooks Desktop
If you’re unable to install or uninstall QuickBooks on your computer, switch to Selective Startup and try again.
Complete the following steps to switch to Selective Startup and reinstall QB:
Before you start, make sure you:
- Create a backup of your company file.
- Create a copy of your QuickBooks Desktop product and license info.
Switch to Selective Startup
To ensure no other apps interfere, switch to Selective startup. If you’re not familiar with or comfortable doing the steps, consult your computer’s manufacturer or a Windows expert.
Step 1: On your keyboard, press Windows+R to open the Run command.
Step 2: Enter “msconfig,” then select OK.
Step 3: In the General tab, select Selective Startup and Load system services.
Step 4: Go to the Services tab, then select Hide all Microsoft Services.
Step 5: Select the Disable All option.
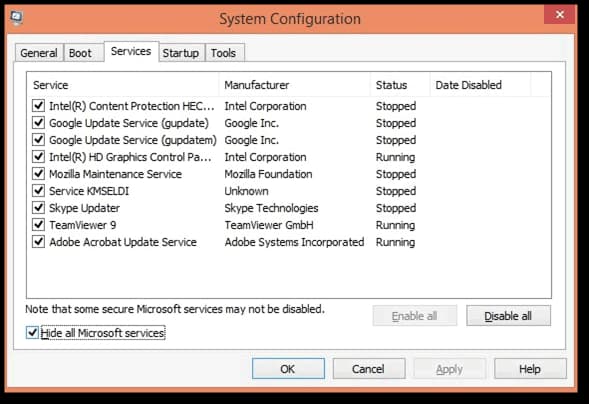
Step 6: Uncheck Hide all Microsoft services.
Step 7: Select Windows Installer from the list of services.
Step 8: Select OK.
Step 9: From the System Configuration window, select Restart.
Uninstall or Install QuickBooks Desktop
Step 1: On your keyboard, press Windows+R to open the Run command.
Step 2: Type control panel, then select OK.
Step 3: In the Program tab, select Uninstall A Program.
Step 4: Find and right-click on QuickBooks.
Step 5: Click on Uninstall.
Now, reinstall QuickBooks and, finally, restart your operating system to ensure the changes have been implemented.
Method 8: Update Your QuickBooks Desktop Manually
If you’re ready to update QuickBooks Desktop manually, follow these simple steps:
Step 1: Go for the Help menu
- Open QuickBooks and navigate to the Help menu.
Step 2: Update QuickBooks
- Select Update QuickBooks Desktop.
Step 3: Press Update Now
- Hit the Update Now icon, then choose Get Updates.
Step 4: Close and reopen QuickBooks
- Once the update completes, close QuickBooks and reopen it.
Step 5: Press Yes
- When prompted to install the update, click Yes and follow all the on-screen instructions to complete the installation.
Verification and Post-Repair Validation
After completing all repair or installation steps, it’s essential to verify that QuickBooks Desktop — and all supporting Microsoft components — are functioning properly.
Error 1603 often originates from underlying system dependencies rather than QuickBooks itself.
Even if the software installs successfully, lingering issues in Microsoft .NET Framework, MSXML, or Visual C++ Redistributables can cause instability later — such as random application crashes, update rollbacks, or failed file openings.
Post-repair validation ensures that:
- All dependencies are fully operational and registered.
- No residual corruption exists in the Windows Installer logs.
- QuickBooks can perform installation-related operations without interruption.
Follow these steps carefully to confirm a successful repair and system integrity:
Step 1: Launch QuickBooks for a Functional Test
- Open QuickBooks Desktop from your Start menu or desktop shortcut.
- If prompted, log in with your admin credentials.
- Observe the startup behavior — there should be no installer rollback, missing file prompt, or “Error 1603” warning.
- Proceed to create a dummy company file or open an existing test file.
- Perform a few standard operations, such as creating an invoice or running a report, to validate stable functionality.
Step 2: Inspect QuickBooks Installation Logs
- Navigate to the installation log directory:
C:\ProgramData\Intuit\QuickBooks\log - Open the latest log file using Notepad or a text editor.
- Search for key entries such as:
Installation completed successfullyReturn value 1No errors detected
- Ensure there are no recent entries showing “Error 1603,” “MSI returned error,” or “Failed component registration.”
Step 3: Verify Microsoft Dependency Health
QuickBooks relies on several Microsoft components that must function properly for installation and runtime stability.
Perform the following checks:
a. Check .NET Framework
- Press Windows + R, type appwiz.cpl, and hit Enter.
- Click Turn Windows features on or off in the sidebar.
- Verify that .NET Framework 3.5 (includes .NET 2.0 and 3.0) and .NET Framework 4.8 Advanced Services are both checked and enabled.
- If unchecked or partially shaded, enable them and restart your system.
b. Verify Microsoft Visual C++ Redistributables
- In Programs and Features, scroll down to view all installed Microsoft Visual C++ packages.
- Ensure that multiple versions (2012, 2013, 2015–2022) are installed and marked as functional (no missing version errors).
- If any redistributable is missing, reinstall it from Microsoft’s official website.
c. Verify MSXML Component
- Press Windows + R, type cmd, then press Ctrl + Shift + Enter to open Command Prompt as administrator.
- Run the command:
msiexec /x {MSXML ID}(to check version)
ormsiexec /fvaum "D:\QBOOKS\msxml.msi"(to re-verify registration). - You can also check via C:\Windows\System32 for files like msxml4.dll and msxml6.dll — ensuring they exist and are not corrupted.
Step 4: Run a Quick Data Operation Test
- Open any valid company file or create a temporary one.
- Perform quick operations such as:
- Adding a dummy customer and creating an invoice.
- Running a profit and loss report.
- Saving and reopening the file.
- Observe for any lags, errors, or system hangs.
Step 5: Review Event Viewer Logs for Confirmation
- Press Windows + R, type eventvwr.msc, and hit Enter.
- Go to Windows Logs → Application.
- Filter logs for entries related to QuickBooks, msiexec.exe, or Installer.
- Confirm that no new warnings or errors appear after the latest installation attempt.
5.3 Optional Final Check — System Stability Test
- Run a short System File Checker (SFC) command again: sfc /verifyonly
- This non-repair mode check validates that all system files remain intact after installation.
- You can also monitor system health by running: DISM /Online /Cleanup-Image /CheckHealth
- Both commands confirm the absence of pending repair actions that might affect QuickBooks functionality.
Conclusion
The steps mentioned above will help you solve QuickBooks Error 1603. In case you cannot fix QuickBooks Error 16043 or are unable to understand the issue, reach out to us on eBetterBooks support phone number 1-802-778-9005 for immediate help.
FAQs:
Can installing the wrong bit version (32-bit vs. 64-bit) of Microsoft Visual C++ Redistributables cause QuickBooks Error 1603?
Yes, it can. QuickBooks Desktop is built to run on both 32-bit (x86) and 64-bit (x64) architectures. To function correctly on a 64-bit operating system, QuickBooks requires both the x86 and x64 versions of the Microsoft Visual C++ Redistributables. If either version is missing or corrupted, the installation scripts may fail to register the necessary runtime libraries, causing the generic Error 1603 during the setup process.
Is it safe to temporarily disable my antivirus software (like Norton or McAfee) just to install QuickBooks and avoid Error 1603?
Temporarily disabling antivirus or firewall software is often required to resolve Error 1603 because these security programs can aggressively block or quarantine the installation’s essential temporary files (.tmp or .msi). Intuit-approved troubleshooting often includes this step. However, it should only be done temporarily, and the software must be re-enabled immediately after the installation is complete to prevent security risks. A safer alternative is to configure the antivirus to allow exceptions or exclusions for the QuickBooks installation folder and executable files.
What is the difference between installing QuickBooks in Safe Mode versus Selective Startup when dealing with Error 1603?
Both modes isolate the installation environment, but they differ in scope:
➜Safe Mode starts Windows with only the absolute minimum core drivers and services. It eliminates nearly all third-party interference.
➜Selective Startup (using msconfig) allows the user to manually disable non-Microsoft third-party services while leaving critical Windows services running.
If Safe Mode fails, Selective Startup is used to isolate conflicts caused by specific, persistent third-party services that may still run in Safe Mode or are more deeply integrated into the system, offering a more controlled isolation environment.
Why do older versions of the Microsoft .NET Framework (like 3.5) need to be enabled even if QuickBooks uses a newer version (like 4.8)?
QuickBooks Desktop often uses older versions of the .NET Framework (which includes versions 2.0 and 3.0) for specific legacy features, add-ons, or component interactions, even while the core application utilizes the newest framework (like 4.8). If the older .NET Framework 3.5 is not enabled in Windows Features, the installation process for the older components will fail, triggering the Error 1603. Therefore, both the older (3.5) and newer (4.8) frameworks must be active and undamaged.
Does running the QuickBooks Install Diagnostic Tool uninstall or repair my existing Microsoft .NET Framework components?
The QuickBooks Install Diagnostic Tool (part of the Tool Hub) is designed to automatically detect and repair damaged Microsoft components essential for QuickBooks, including .NET Framework, MSXML, and C++ Redistributables. It does not typically uninstall the entire component. Instead, it re-registers, repairs, or attempts to fix corrupted files within these frameworks, restoring the necessary integrity required for a successful QuickBooks installation and preventing Error 1603.
Does QuickBooks Error 1603 affect my company files or accounting data?
No. Error 1603 only occurs during the installation or update process of QuickBooks Desktop and does not impact company files (.QBW), backups (.QBB), or the QuickBooks Database Server Manager.
Intuit confirms that installation-related errors do not modify or delete your business data. Only QuickBooks program files are affected, not your accounting information.
