+1-802-778-9005
Home>>QuickBooks Errors & Their Support Most Common QuickBooks Crashing or Not Responding Errors/Problems How to Resolve QuickBooks Search Not Working Issue in Desktop?

Submit Your Details to Continue Reading

Navigation

QuickBooks Desktop Search Function retrieves transactional data, list records, and company-file attributes through an indexed search system. The function stops generating results or fails to load indexed data when QuickBooks Desktop is outdated, the Search Index File is corrupted, Windows Registry entries disrupt file-path references, Windows Firewall blocks QuickBooks processes, or Windows Search services do not index the company-file directory.

This article explains how to restore the QuickBooks Desktop Search Function through updates, index-file reconstruction, registry repair, program tools, firewall adjustments, Windows Indexing configuration, and user-profile testing. It also covers preventive measures and alternative search methods to maintain consistent search performance.

What is “QuickBooks Search Not Working in Desktop?”

QuickBooks Desktop Search Function is an indexed retrieval system that locates transactions, list records, and company-file attributes based on defined search criteria. The function operates through a search bar with a keyword input field and a magnifying-glass icon that initiates the query. QuickBooks Desktop also includes an Advanced Search mode that processes multi-filter queries across a defined time range, including two-year datasets such as 2021 through 2023.

The QuickBooks Search Not Working issue occurs when the system fails to load or return indexed records. This malfunction indicates that the application cannot read the Search Index File or cannot access the internal catalog that maps transactional and list-based data.

It typically results from corrupted index files, outdated QuickBooks Desktop versions, incomplete program components, Windows Registry inconsistencies, Windows Search service interruptions, or interference from system-level security software. When the QuickBooks Desktop Search Function stops responding, the application cannot process queries, which requires manual retrieval of records and increases the time needed to access operational data.

Possible Reasons Why Search Function isn’t Working in QuickBooks Desktop?

The QuickBooks Desktop Search Function fails when the application cannot read or generate its indexed data. This malfunction is associated with specific system, program, and file-level conditions. The primary causes include the following:

  1. An outdated QuickBooks Desktop version that prevents the application from loading the current search components.
  2. Missing, damaged, or corrupted QuickBooks Search Index File that interrupts the indexing process.
  3. Windows Registry inconsistencies that disrupt QuickBooks file-path references and program dependencies.
  4. Windows Firewall or third-party security software that blocks QuickBooks services required for search operations.
  5. Browser restrictions that prevent access to Online Search elements when QuickBooks Desktop connects to web-based components.
  6. An incomplete or improper QuickBooks Desktop installation that removes essential program files needed for indexing.

What are the troubleshooting methods for “QuickBooks Search not functioning”?

Resolving QuickBooks Search issues involves rebuilding the Search Index File, repairing core QuickBooks Desktop components, installing the latest program updates, and correcting system configurations that restrict search activity. These actions reestablish proper indexing and allow QuickBooks Desktop to retrieve data as expected.

Solution 1: Update QuickBooks Desktop to the latest Release

Any outdated application (generally older than QuickBooks 2020) may be incompatible with your system and prevent you from accessing all the latest features and functionalities.

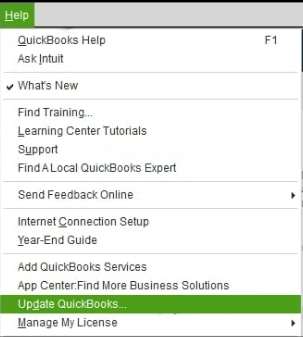
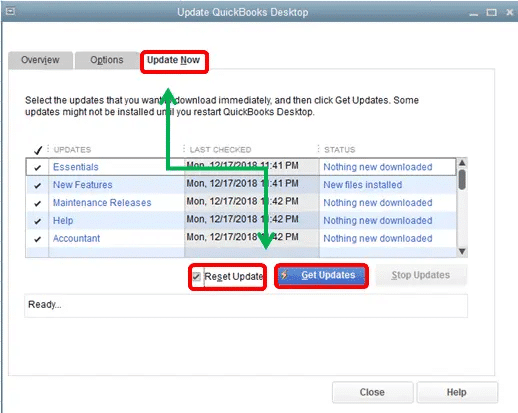
If your current QuickBooks Version is not updated for a long time or You’re using an older version (2020 or older). The occurrence of QuickBooks Search not working is the major cause for the same. To fix this, implement the steps as follows:

  1. Step 1: Navigate to the Help menu and then choose Update QuickBooks Desktop.
Update QuickBooks to the latest release for improved performance
  1. Now, select Update Now, then click on Get Updates.
Update QuickBooks to the latest release for new features and fixes
  1. Once the update is done, close and reopen the QuickBooks application.
  2. If you are prompted to install the update, hit the Yes tab.
  3. When you’re ready, follow all the instructions appearing on your screen.

Note: Hold and press F2 or Ctrl+1 to open the Product Information Window, and then check your current version and release from here.

  • QuickBooks 2024 R3_61
  • QuickBooks 2023 R7
  • QuickBooks 2022 R9_74
  • QuickBooks 2021 R13_19

Solution 2: Rename the QuickBooks Search Index File

Changing the name of the QuickBooks Search Index File is the best way to remove the corruption from your search index file, as it might be the main reason for essential data loss. Here are the steps to do so:

  1. To begin with, close QuickBooks and then press the Windows Start button.
  2. Now, type *.SearchIndex under the Search Programs and Files search box and hit the Enter key.
  3. This will direct you to the C:\ Users\ UserName\Public \Documents\Intuit\ QuickBooks\Company File\ Companyfilename.QBW folder containing the QBW file.

Note: Company file types has different extensions and different uses;

QuickBooks Company File Extensions Functions/ Uses
QBWQuickBooks Company File
QBBQuickBooks Backup file
QBMQuickBooks Portable file
QBOQuickBooks Bank Statement file
  1. After this, locate the qbw.SearchIndex folder and then click right on it.
  2. Select the Rename option and type .old at the end of the folder name.
  3. Press the Enter tab to save the new name and then close this window. 
  4. When you’re ready, open the QuickBooks company file again and then hit the Search icon/ Magnifying Glass icon from the top left corner of the Window. 
  5. Select the Update Search Information option and then hit the OK tab. When you notice the update in progress, please wait for notification.
  6. Once the update is completed successfully, try using the QuickBooks search functionality.

Solution 3: Fix the Damaged or Broken Windows Registry 

Fixing the Damaged or broken Windows Registry items is required to make your system stable or let it function normally. It also rectifies multiple performance issues and allows you to use QuickBooks desktop Search functionality. Here are the steps you need to perform for this: 

Step 1: Re-activate QuickBooks

  1. Hover over the Help menu and Manage my license, then Change my license number.
  2. Next, enter the license number as all 0s and press the Next button.
  3. You don’t need to enter a validation code and click Finish.
  4. Now, go to Help, Manage my license, and Change my license number again.
  5. At last, type your License number, choose Next, and then Finish.
Re-activate QuickBooks to continue using the software

Step 2: Create Windows Registry Backup

  1. Firstly, choose Start and type regedit.exe into the search window, and then hit the Enter key. 
  2. If you are asked for an administrator password or for confirmation, enter the password or provide confirmation.
  3. From the Registry Editor, locate and hit the registry key or subkey that you want to back up.
  4. After this, select File> Export.
Create a backup of the Windows registry to prevent data loss
  1. Opt for the location where you want to save the backup copy under the Export Registry File dialog box and then type a name for the backup file in the File name field.
  2. Finally, press the Save button.
Backing up Windows registry to ensure system stability.

Step 3: Download and Install QB Tool Hub

  1. Initially, close QuickBooks and download the latest QuickBooks Tool Hub version.
  2. Now, save the File somewhere you can easily access it, such as your Downloads folder or Windows desktop. 
  3. If you have already installed Tool Hub, you must find out which version you have. For this,
    • Hit the Home tab, and the version will start displaying in the bottom right corner of your screen.
    • Also, choose About to view the version option.
  4. After this, open the File you downloaded named QuickBooksToolHub.exe and follow all the on-screen instructions to install and agree to the terms and conditions.
  5. Once the installation finishes, click the Windows desktop icon twice to open the tool hub program.
Downloading and installing QuickBooks Tool Hub for system repair

From the Tool Hub, run Quick Fix My Program

  1. Go to your Desktop and right-click on the QuickBooks Tool Hub icon. 
  2. Select the option Run as Administrator.
  3. Now, choose Program Problems under the QuickBooks Tool Hub.
  4. You must click on Quick Fix My Program.
  5. This will scan the QuickBooks program with all its files and detect or fix the problem you are currently facing. 
  6. Then, restart the QuickBooks Desktop application and open your data file that is causing the Search Function not working issue in QuickBooks Desktop.
Running QuickFix My Program from QuickBooks Tool Hub to resolve QuickBooks issues

Solution 4: Turn off Microsoft Defender Firewall Temporarily

Check if the firewall is blocking the QuickBooks application and restricting it from functioning properly; you need to disable it for a temporary time period. Adhere to the steps described below:

  1. Step 1: Click the Start button and then open Settings.
Microsoft Firewall settings interface to configure firewall for QuickBooks
  1. Step 2: Now, select Windows Security > Firewall & network protection under the Privacy & security window.
Temporarily disabling Microsoft Defender Firewall to resolve QuickBooks connectivity issues
  1. Choose a network profile: Domain network, Private network, or Public network.
Choose between Private or Public network settings in Microsoft Defender Firewall
  1. Step 4: After this, Under Microsoft Defender Firewall, switch the setting to Off in the Microsoft Defender Firewall. This could make your device or network more vulnerable to unauthorized access. 

Note: If there’s an app you want to use that’s being blocked, you can allow it through the firewall instead of turning it off.

Activate Private Network option in Microsoft Defender Firewall settings

Solution 5: Open your QB Account in Private/ Incognito Mode

You are recommended to try logging into the QuickBooks account using a private or Incognito Window and access your software without using a cache that stores data causing browser-related issues.

Below, we have listed the shortcut keys for the different web browsers, so use the following key combinations according to the Internet Browser you are running: 

  • Google Chrome: Ctrl + Shift + N
  • Safari: Command (Cmd) + Shift + N
  • Mozilla Firefox: Shift + Ctrl + P
  • Microsoft Edge: Ctrl + Shift + N

Note: Clear the cache and cookies of the Internet browser you are using once you are able to use the Search icon. This process also helps you to restore the default setup of the browser.

Solution 6: Uninstall & Reinstall the QuickBooks Software

Uninstalling and reinstalling the QuickBooks Desktop Application from scratch fixes the issue, if there is any, with the software you are working on. Below are the instructions to be followed:

Step 1: Uninstall QuickBooks Desktop

  1. Hold and press the Windows + R keys to open the Run command.
  2. Now, enter the Control Panel into the search bar and then hit the Enter key.
  3. Select Programs and Features and click on Uninstall a Program option.
Uninstall QuickBooks Desktop through Control Panel or Settings
  1. After this, choose the QuickBooks Desktop you wish to remove from the list of programs.
  2. Click on Uninstall/Change, Remove, then press the Next button.

Note: If you don’t get this option on your display, sign out and sign back into Windows as an administrator.

  1. The final step is to follow the on-screen prompts to complete the uninstallation process.

Step 2: Reinstall QuickBooks on your System

  1. Open the File QuickBooks.exe.
  2. Now, perform all the instructions appearing on your display, accept the software license agreement, and press Next.
  3. You must enter your product and license numbers. Then, hit the Next tab at the end.

Do you know:

When you try to look for a company file, all the files can be seen under the list based on the related keyword you use in QuickBooks. You can also locate your files using a wildcard search of File Explorer. For this, do the following:

  • Go to the Windows Start menu and type File Explorer into the search, then open File Explorer.
  • Select My Computer or This PC from the navigation bar.
  • Now, ensure that you include the asterisk (*) before the extension under the search field and type (*.qbw, *.qbb) to find all corresponding files. For QuickBooks, you can also search *.qb.

Solution 7: Use QuickBooks Tool Hub to Repair Search-Related Issues

Step 1: Download and Install QuickBooks Tool Hub

  1. Download the Tool Hub:
    • Visit the official Intuit website to download the latest version of QuickBooks Tool Hub.
    • Save the downloaded file (QuickBooksToolHub.exe) to a convenient location on your computer.
  2. Install the Tool Hub:
    • Locate the downloaded file and double-click to initiate the installation.
    • Follow the on-screen instructions, agreeing to the terms and conditions.
    • Once installed, launch the QuickBooks Tool Hub by double-clicking its desktop icon.

Step 2: Utilize the Quick Fix My Program Tool

This tool addresses common program issues, including search-related problems.

  1. Access the Tool:
    • In the QuickBooks Tool Hub, select the “Program Problems” tab.
  2. Run Quick Fix My Program:
    • Click on “Quick Fix My Program.”
    • The tool will begin scanning and repairing your QuickBooks program. This process may take a few minutes.
  3. Restart QuickBooks:
    • Once the repair is complete, close the Tool Hub.
    • Open QuickBooks Desktop and check if the search function is operating correctly.

Solution 8: Check Windows Indexing Options and Adjust Settings for QuickBooks

To resolve search-related issues in QuickBooks, it’s essential to verify and adjust Windows Indexing Options. Here’s a detailed, step-by-step guide:

  1. Access Indexing Options:
    1. Press Windows Key + S to open the search bar.
    2. Type “Indexing Options” and press Enter.
  2. Modify Indexed Locations:
    1. In the Indexing Options window, click “Modify.”
    2. Ensure that the folders containing your QuickBooks company files are selected. Typically, these files are located in:
      • C:\Users\Public\Public Documents\Intuit\QuickBooks\Company Files
      • Or a custom directory you’ve specified.
    3. If your QuickBooks files are stored on a network drive, ensure that the network location is added to the indexed locations.
  3. Adjust Advanced Settings:
    1. In the Indexing Options window, click “Advanced.”
    2. Under the “File Types” tab:
      • Scroll through the list to ensure that file types associated with QuickBooks (e.g., .qbw, .qbb, .qba) are selected.
    3. Under the “Index Settings” tab:
      • Check the box for “Index encrypted files” if your QuickBooks files are encrypted.
      • Click “Rebuild” to initiate a complete reindexing. This process may take some time, depending on the size of your data.
  4. Ensure Windows Search Service is Running:
    1. Press Windows Key + R, type services.msc, and press Enter.
    2. In the Services window, locate “Windows Search.”
    3. Ensure its status is “Running.” If not:
      • Right-click “Windows Search” and select “Start.”
      • If the service is disabled, right-click, choose “Properties,” set the “Startup type” to “Automatic,” and then start the service.
  5. Configure QuickBooks Search Preferences:
    1. Open QuickBooks.
    2. Go to the “Edit” menu and select “Preferences.”
    3. Choose “Search” from the list on the left.
    4. Click the “Company Preferences” tab.
    5. Ensure that “Update Automatically” is checked. This setting allows QuickBooks to update its search index automatically.
    6. Click “Reset” to rebuild the QuickBooks-specific search index.
  6. Verify Folder Permissions:
    1. Navigate to the folder containing your QuickBooks company files.
    2. Right-click the folder and select “Properties.”
    3. Go to the “Security” tab.
    4. Ensure that your user account and the “SYSTEM” account have “Full control” permissions.
    5. If not, click “Edit,” adjust the permissions accordingly, and apply the changes.
  7. Restart Your Computer:
    • After making these adjustments, restart your computer to ensure all changes take effect.

By following these steps, you can optimize Windows Indexing Options to enhance search functionality within QuickBooks.

Solution 9: Create a New Windows User Profile to Test Search Functionality

To create a new Windows user profile for testing QuickBooks’ search functionality, follow these detailed steps:

For Windows 10 and Windows 11:

  1. Access Settings:
    • Press Win + I to open the Settings window.
  2. Navigate to Accounts:
    • Click on “Accounts” to manage user information.
  3. Add a New User:
    • Select “Family & other users” from the sidebar.
    • Under “Other users,” click “Add someone else to this PC.”
  4. Set Up the New Account:
    • In the Microsoft account prompt, choose “I don’t have this person’s sign-in information.”
    • Click “Add a user without a Microsoft account.”
    • Enter a username and, if desired, set a password. Click “Next” to create the account.
  5. Assign Administrative Rights:
    • After creating the account, return to “Family & other users.”
    • Click on the newly created user and select “Change account type.”
    • In the dropdown menu, choose “Administrator” and click “OK.”
  6. Log In to the New Profile:
    • Sign out of your current session by clicking on the Start menu, selecting your profile icon, and choosing “Sign out.”
    • On the login screen, select the new user profile and sign in. Windows will set up the new environment, which may take a few moments.

By following these steps, you can effectively create a new Windows user profile to test and potentially resolve issues with QuickBooks’ search functionality.

How to Prevent QuickBooks Search Issues in the Future?

Preventing QuickBooks Search issues requires keeping QuickBooks updated, maintaining healthy company files, and configuring system settings to support indexing. These actions help ensure the Search Function continues to operate reliably.

Regularly Update QuickBooks and Windows OS

Keeping both QuickBooks and your Windows operating system up to date ensures compatibility and access to the latest features and security patches. Regular updates can prevent potential search functionality problems.

Keep Your Company File Size Optimized

Large or bloated company files can slow down QuickBooks and cause search issues. Regularly condense your company file to remove outdated transactions and data. Utilize QuickBooks’ built-in tools to archive old data and maintain optimal file size.

Configure Windows Firewall and Antivirus to Allow QuickBooks

Firewalls and antivirus programs can sometimes block QuickBooks processes, leading to search issues. Ensure that QuickBooks is added to the exception list of your firewall and antivirus software. This allows QuickBooks to function without interference from security programs.

Avoid Using Corrupt or Outdated Company Files

Corrupt or outdated company files can lead to search problems. Regularly back up your data and verify the integrity of your company files using QuickBooks’ built-in utilities. If corruption is detected, restore from a recent backup or use the QuickBooks File Doctor tool to repair the file.

Ensure QuickBooks is Installed Properly with Admin Privileges

Proper installation of QuickBooks with administrative privileges is crucial for full functionality. Install QuickBooks using an administrator account to ensure it has the necessary permissions to operate correctly. This can prevent issues with search and other features.

By following these guidelines, you can minimize the occurrence of search issues in QuickBooks and maintain smooth operation of your accounting processes.

Alternative Methods to Search in QuickBooks

Efficiently locating transactions in QuickBooks is crucial for effective financial management. Below are detailed, step-by-step methods to enhance your search capabilities:

1. Use QuickBooks Shortcuts to Locate Transactions Faster

QuickBooks offers keyboard shortcuts to streamline navigation and transaction retrieval:

  1. Access the Find Feature:
    1. Press Ctrl + F (Windows) or Command + F (Mac) to open the Find window.
    2. In the Find window, choose between the Simple and Advanced tabs:
      • Simple Tab: Select the transaction type and enter known details (e.g., invoice number, customer name).
      • Advanced Tab: Apply multiple filters (e.g., amount, date range) to narrow down the search.
  2. Navigate to Specific Lists:
    1. Press Ctrl + J to open the Customer Center.
    2. Press Ctrl + W to open the Write Checks window.
    3. Press Ctrl + I to create a new invoice.

Utilizing these shortcuts can significantly reduce the time spent searching for transactions.

2. Utilize QuickBooks Filters and Advanced Search Options

Applying filters and using advanced search features can help pinpoint specific transactions:

  1. Using the Find Feature:
    1. Navigate to Edit > Find or press Ctrl + F.
    2. In the Advanced tab, select filters such as Transaction Type, Date, Amount, or Name.
    3. Enter the relevant criteria for each selected filter.
    4. Click Find to display matching transactions.
  2. Search by Customer or Vendor:
    • Go to Sales > Customers, select a customer to view related transactions.
    • Go to Expenses > Vendors, select a vendor to view related transactions.

These methods allow for a more targeted search, making it easier to locate specific entries.

3. Export Data to Excel and Use Excel Search Functionality

Exporting data to Excel enables advanced analysis and search capabilities:

  1. Exporting Reports:
    1. In QuickBooks, navigate to the desired report.
    2. Click on Export and choose Export to Excel.
    3. Save the file to your preferred location.
  2. Using Excel’s Search Functionality:
    1. Open the exported Excel file.
    2. Press Ctrl + F to open the Find dialog box.
    3. Enter the search term (e.g., transaction amount, date, customer name).
    4. Click Find Next to locate instances of the search term within the spreadsheet.

This approach leverages Excel’s robust data manipulation tools for in-depth analysis.

Conclusion!

QuickBooks Desktop Search Function depends on accurate indexing, stable program components, and supportive system configurations. Restoring the function requires rebuilding the Search Index File, updating the QuickBooks installation, repairing program components, and correcting system settings that block search operations. The QuickBooks Desktop Search Function remains stable when the software is up to date, company files are intact, and system permissions are correctly configured.

Hopefully, the information given above will be useful to you. But if you are still facing any kind of issues with your software and need professional assistance regarding accounting, bookkeeping & accounting software-related issues, then feel free to get technical support with us at +1-802-778-9005, or you can email us at support@ebetterbooks.com

FAQs:

Does running the QuickBooks Install Diagnostic Tool help to resolve the QuickBooks Desktop search issue?

Yes, if something goes wrong while installing the QuickBooks application in your system, it may cause problems when you try to search for your transactions, entries, and other important details. To fix all such common installation-related issues, you are recommended to make use of the QuickBooks Install Diagnostic Tool.
Let’s see how:

1. Open the QuickBooks Tool Hub program from the desktop icon.
2. Now, select Installation Issues from the list.
3. Choose the option QuickBooks Install Diagnostic Tool. Let the tool run, and it may take up to 20 minutes.
4. Once the tool finishes, restart your system and QuickBooks Desktop, then open your data file.
QuickBooks Install Diagnostic Tool used to resolve installation errors

How do I rebuild the QuickBooks Search Index File?

You can rebuild the Search Index File by renaming the existing index folder, reopening QuickBooks, and selecting the option to update search information, which forces QuickBooks to generate a new index.

Does QuickBooks Desktop require indexing services to be enabled for features other than Search?

Yes. QuickBooks Desktop relies on Windows indexing for multiple internal lookup functions, such as quickly scanning lists, item names, and some background data reference tasks. If Windows Search or indexing is disabled system-wide, certain QuickBooks lookup features may respond slower even if they do not fully stop working.

How does the QuickBooks Search Index work, and can I manually rebuild it if the search fails?

The QuickBooks Search feature relies on a Search Index—a hidden internal database that tracks the location of data within your company file. When you search, QuickBooks queries this index instead of scanning the entire file, which is why it’s so fast.
Yes, you can manually rebuild the index. If the search function stops working, the index may be corrupted or incomplete. The standard procedure is to run the File > Utilities > Rebuild Data utility. Running a Rebuild Data often forces QuickBooks to create a new, clean search index.

Why does the search function work for some users but not others in a multi-user environment?

In a multi-user setup, issues are often tied to permissions or local data paths.

➜If the search works for the Admin User but fails for a Standard User, it usually indicates that the Standard User’s Windows profile is missing proper Read/Write permissions to the location where the QuickBooks search index files are stored (typically within the user’s AppData folder).
➜Correcting the Windows folder permissions or logging in as an administrator on the affected computer usually resolves the disparity.

Can the size of my QuickBooks Company File (.QBW) affect the performance or reliability of the search feature?

Yes. While the search uses an index to maintain speed, an excessively large company file (e.g., over 1.5 GB to 2 GB) can strain the overall system resources, which in turn affects the reliability of background processes like the Search Indexer.

➜A large file increases the time it takes to rebuild the index or verify the data during maintenance, making the index more prone to corruption if the process is interrupted. Intuit recommends using the Condense Data utility to reduce file size if performance suffers significantly.

Does my version of the Microsoft .NET Framework have any impact on the QuickBooks Search function?

Yes, absolutely. QuickBooks relies heavily on the Microsoft .NET Framework for many core graphical and functional components, including the advanced features of the search window and interaction with the Windows Operating System.
An outdated, corrupted, or incompatible version of the .NET Framework can cause the search window to fail, crash, or freeze. Intuit often recommends repairing or updating the .NET Framework as part of general troubleshooting for application-level errors.