Excerpt:
This guide helps nonprofit organizations efficiently record and track donations in QuickBooks, ensuring accurate financial management and compliance. It covers cash, in-kind, and product/service donations, explaining step-by-step processes for both QuickBooks Online and Desktop. By properly categorizing donations, you ensure transparency, tax compliance, and donor trust. The article also provides insights on setting up accounts for charitable contributions and managing in-kind donations, ultimately optimizing your financial reporting and donor engagement.
Nonprofit organizations must accurately record donations in QuickBooks Desktop and QuickBooks Online to ensure tax compliance, financial transparency, and effective donor tracking. The core methodology varies based on the donation type and software version: Cash donations are typically recorded using a Sales Receipt to link the payment to a donor (customer) profile, while non-cash or in-kind donations require a more advanced sequence involving setting up special accounts, creating an initial income transaction (Invoice/Sales Receipt), and issuing an offsetting Credit Memo or General Journal Entry to balance the fair market value. For complex entries like in-kind gifts in QuickBooks Online, expert methodology involves using an In-Kind Clearing Account to guarantee accurate zero-net transaction recording. Beyond basic entry, effective donation management requires implementing Class tracking for specific funds, utilizing Recurring Transactions for pledges, and performing monthly reconciliation to maintain data integrity, all of which are essential for generating compliant reports for boards and grant applications.
Highlights (Key Facts & Solutions)
A donation is a voluntary gift made to a charity or nonprofit organization without expecting anything in return. It can take various forms, including money, goods, or services, and is typically aimed at supporting a specific cause or organization.
A contribution refers to giving something as part of a collective effort to achieve a common goal. While contributions can also be charitable, they may not always be voluntary or altruistic. Contributions can include financial support, time, or resources, and are often part of a larger initiative.
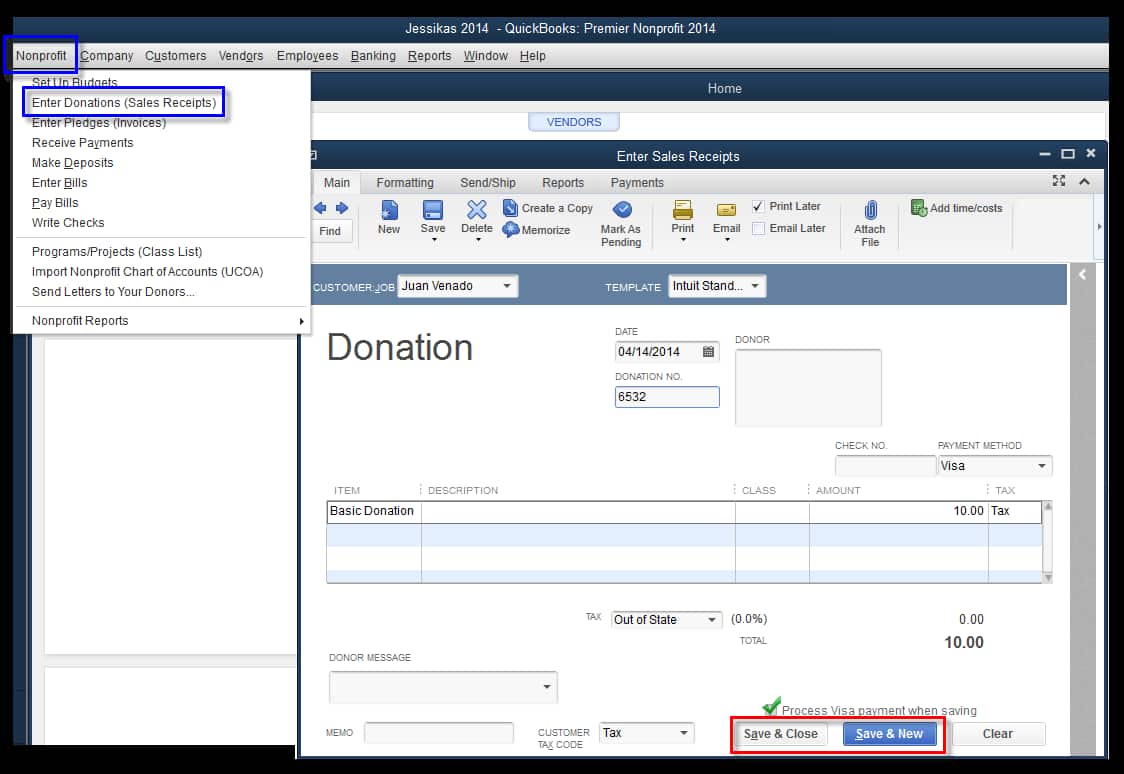
To maintain accurate and compliant records, it’s important to properly track charitable donations in QuickBooks Desktop.
For non-cash charitable contributions, you must first create an invoice in QuickBooks Desktop.
When the business makes donations or charitable contributions, it is important to record them correctly for accurate bookkeeping.
Users can record two types of entries:
When donating cash, treat the charitable organization as a vendor and record the payment like any other expenses.
To record cash donations in QuickBooks Online, follow the below-mentioned steps:
Note: However, make sure that the expense account you select from the Category drop-down list under the Category details section is a dedicated expense account for tax-deductible contributions.
If you don’t have an expense account, then click + Add new from the drop-down list under the Category column to add one when you record the donation.
To record a donation of products or services in QuickBooks, create an invoice, set up a Charitable Contributions account, add a product/service item, issue a credit memo, and verify its application to the Invoice.
Note: If the Amount you’re writing off as a contribution will significantly affect your gross sales, consult your accountant before making this entry.
To record a product and services donation, adhere to the steps listed below:
To record a donation of products or services, you need to create an invoice. This helps track the income and ensures your balance is accurate.
Follow these steps:
If you’re using the New Layout
Tip: In the Terms field, Net refers to the number of days until the Payment is due.
Note: To add another product or service, click on Image Alt Text Add product or service.
There are several options for saving or sharing the Invoice:
Remember: The text invoice feature is currently only available for payments-enabled customers.
If you’re using the old layout
Tip: Net refers to the number of days until the Payment is due. The default is 30 days, but you can change the due date if required.
There are several options for saving or sharing the Invoice:
Note: If you’re using QuickBooks Simple Start, click on Send.
If you want to make an account to use to record charitable contributions, follow these steps:
Once done with creating this account, the next step is to create a product/service item for donations.
To create a product/service item for charitable contributions, go through the following steps:
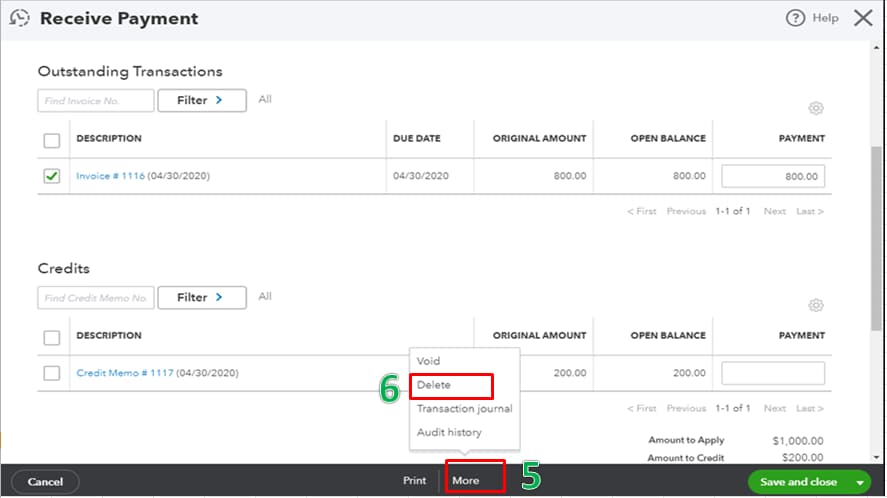
Now, if you have created an account and a product/service item, it’s time to issue a credit memo for the value of your donation.
To issue a credit memo for the value of the products or services you’re donating, do the following:
The credit memo reflects the Amount of your donation. After this, you are advised to verify that it has been applied to the invoice you created.
The final step is to authenticate that the credit memo you created has been applied to the Invoice that you’ve created for the donated items.
To confirm that the credit memo has been properly applied, adhere to the steps listed below:
To categorize a donation in QuickBooks, follow the below mentioned steps:
Categorizing charitable contributions in QuickBooks is simple and ensures proper expense tracking.
Follow these steps based on your version of QuickBooks:
QuickBooks Online
QuickBooks Desktop
This process helps keep your financial records accurate and organized.
In cases of donor-requested returns, duplicate entries, or misapplied payments, QuickBooks Online and Desktop allow you to record donation refunds using their built-in refund and credit transaction features.
Follow the below mentioned steps to record donation refunds:
In-kind donations refer to non-cash contributions such as goods, services, or assets provided to an organization. Donated office supplies, professional services, or use of facilities are some examples of In-Kind donation.
To set up in-kind donations, first check for an existing in-kind donations account in your chart of accounts. If needed, create an in-kind donations account and a clearing account. Then, add a product or service item for each donation.
Follow the step-by-step information below:
Step 1: Check if you Already Have an in-Kind Donation Account
Make sure you don’t already have an in-kind donation account in your chart of accounts to avoid duplicates.
Note: If you see an account named “In-kind donations”, your chart of accounts is already set up, which means you don’t have to do anything.
Step 2: Create an in-Kind Donation Account
If you already have an in-kind donations account, you no longer need to create one, and you can easily skip this step.
Step 3: Make a Clearing Account
To keep track of your in-kind donations, create a clearing account. This helps you to record your in-kind donations’ sales receipts or bill payments.
Follow the steps listed below:
Step 4: Create a Product or Service Item
Create a product or service item for each in-kind donation you receive and accurately track what you have. This allows you to record in-kind donation items to your books for a more detailed financial report.
Let’s see how:
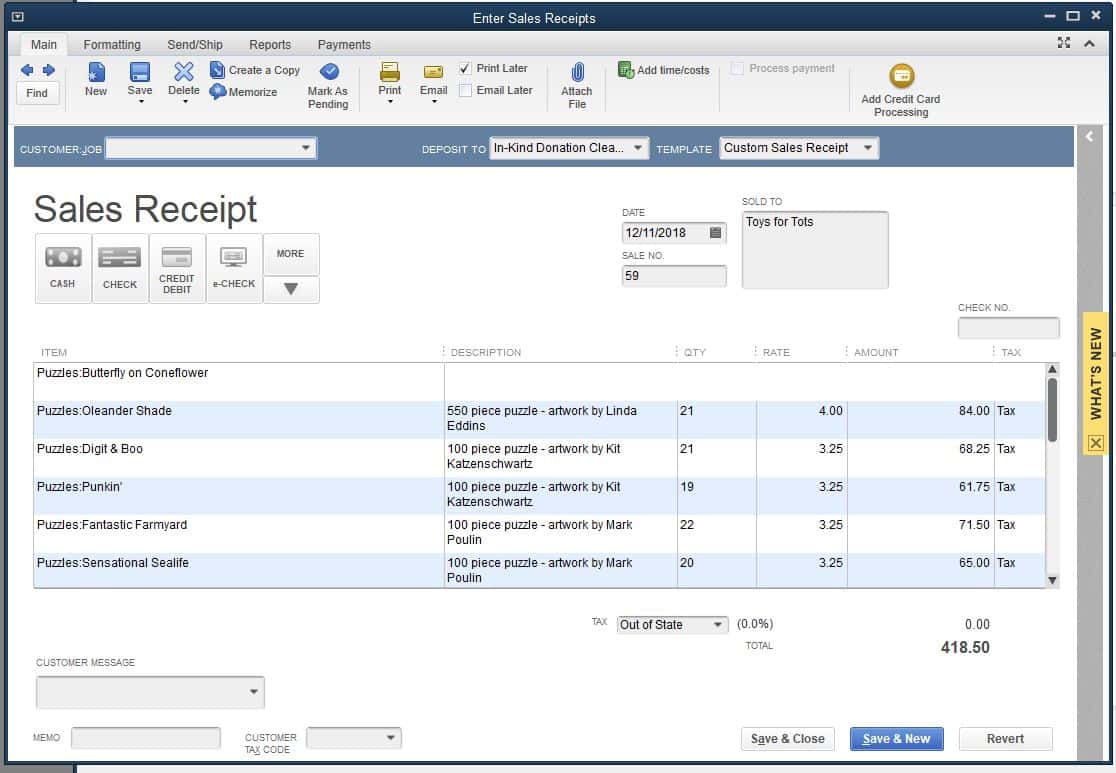
To record in-kind donations in QuickBooks, create a sales receipt for the donation’s fair market value, then create a bill for the same amount, and finally mark the bill as cleared.
Follow the step-by-step information below:
Note: If you receive fixed assets like vehicles, computers, or land, use an expense or fixed asset account on the bill. You can consult with your accountant if you’re unsure about whether an item is a fixed asset or not.
Step 1: Create a Sales Receipt
Step 2: Create a Bill
Step 3: Mark the Bill as Cleared
Note: Always consult with your accountant to confirm whether a contribution qualifies as an in-kind donation and should be recorded accordingly.
Recording in-kind donations (non-cash contributions) in QuickBooks Desktop is essential for tracking the value of donated goods or services.
Follow these simple steps to ensure proper recording:
Step 1: Create an In-Kind Donation Account
Step 2: Set Up a Donated Item or Service
Step 3: Record the Donation Transaction
Step 4: Offset the Donation with a Journal Entry
This method ensures accurate tracking of non-cash contributions for financial reporting and tax purposes.
Accurately recording donations in QuickBooks is crucial for nonprofit success. Beyond basic entry, tracking donor history, fund-specific contributions, and segmenting donations can boost transparency and reporting accuracy. This guide covers five essential techniques to optimize your donation management and improve financial insights.
To track donor history in QuickBooks, use the Customer Profile, Sales Reports, and Transaction List by Donor. First, assign each donor a unique Customer name for accurate identification. Second, generate the Sales by Customer Detail report to view donation amounts, frequency, and dates. Third, apply filters by date range or donation type to isolate trends over time. This helps identify repeat donors, monitor giving patterns, and support personalized outreach. Regularly exporting this data into spreadsheets lets you build year-over-year comparisons, assess donor retention, and plan targeted fundraising strategies effectively.
QuickBooks allows setting up Classes to track donations by specific funds or programs. First, enable Classes under Account and Settings > Advanced. Second, create Classes named after each fund or campaign. Third, assign Classes to donation transactions when recording. This lets you generate Class-based reports showing donation totals per fund. You can monitor which programs attract the most support, track fundraising effectiveness, and maintain clean audit trails. With Class tracking, organizations can simplify budget management, ensure fund-specific compliance, and improve donor transparency.
QuickBooks Online’s Projects and Locations features help segment donations efficiently. Start by enabling Projects under Settings to track income and expenses per fundraiser or event. Use Locations to differentiate donations by region or office. Assign donations to the correct Project or Location when entering transactions. This provides detailed insights into which events or areas generate the most funds, aids in budget allocation, and supports targeted reporting. It simplifies financial transparency and helps identify growth opportunities across various segments.
Reconciling donation accounts in QuickBooks ensures accuracy between your records and bank statements. First, regularly compare your donation income accounts with your bank deposits. Second, use QuickBooks’ Reconcile tool monthly to spot discrepancies early. Third, investigate and correct mismatches such as missing transactions or duplicate entries. Accurate reconciliation prevents reporting errors, maintains donor trust, and simplifies year-end audits. Doing this monthly can reduce errors by up to 90% and save hours during tax season.
Customize donation reports in QuickBooks to meet board or grant requirements quickly. Start by selecting Sales by Customer Summary or Profit and Loss by Class reports. Next, apply filters for date ranges, donation types, and fund categories. Add custom columns to show donor demographics or campaign performance. Export reports to Excel for further analysis or visual charts. Tailored reports help boards make informed decisions, support grant applications, and demonstrate financial transparency. Customization can reduce report prep time by 50% and improve stakeholder confidence.
Beyond recording donations, nonprofits benefit from strategic practices to optimize data accuracy and operational efficiency. This section covers essential supplementary tips—from naming conventions and recurring donations to software integration and tax settings. Implementing these strategies can save time, reduce errors, and strengthen donor relationships, ensuring your organization’s financial health and transparency.
Consistent naming of donors and donation items in QuickBooks improves tracking and reporting accuracy. Use clear, standardized formats like “Last Name, First Name” for donors and descriptive names for items, such as “Annual Gala Ticket” or “Office Supplies Donation.” Avoid abbreviations to reduce confusion. Consistent names help quickly retrieve donor history and donation patterns, ensuring precise financial records. Additionally, clear item names enable easy categorization and smoother audit processes. Following these best practices saves time, reduces errors by up to 30%, and enhances your nonprofit’s professionalism and donor communication.
QuickBooks allows you to manage recurring donations by setting up scheduled transactions. Start by creating a recurring sales receipt or invoice with the donor’s details, donation amount, and frequency (weekly, monthly, yearly). This automates entry, reduces manual errors, and ensures timely recording. Tracking pledges separately helps monitor outstanding commitments and improve cash flow forecasting. Using recurring transactions can increase donation processing efficiency by up to 40%. Always review and adjust schedules regularly to maintain accurate records and strengthen donor relationships through consistent acknowledgment.
Maintaining an audit trail in QuickBooks enhances transparency and accountability for donations. Use the Audit Log feature to track who created, modified, or deleted donation entries. Regularly review these logs monthly to identify errors or unauthorized changes. This process supports compliance with nonprofit regulations and builds donor trust. Keeping a clear audit trail can reduce financial discrepancies by up to 25% and prepares your organization for smooth external audits. Always back up your data before major updates to safeguard records.
Integrating QuickBooks with donor management software streamlines financial and donor data handling. Syncing systems eliminates double data entry, reduces errors, and provides a holistic view of donor activity and donations. This integration supports accurate tax receipts, improved fundraising strategies, and automated donor communications. Organizations report up to a 50% reduction in administrative time post-integration. Choose software compatible with your QuickBooks version and ensure regular syncs for up-to-date information. Integration enhances efficiency, donor engagement, and financial transparency.
Proper currency and tax settings in QuickBooks are crucial when recording donations, especially for organizations with international donors. Ensure the correct home currency is set under Company Settings to avoid exchange rate issues. For taxable donations, configure tax codes accurately to comply with local laws. Incorrect settings can lead to reporting errors and potential tax penalties. Regularly review and update these settings to maintain compliance. Proper configuration improves financial accuracy, simplifies tax filing, and reduces discrepancies by up to 20%.
Properly recording and categorizing donations in QuickBooks is crucial for maintaining accurate financial records, ensuring transparency, and staying compliant with accounting standards. By using features such as sales receipts and properly categorizing donations, organizations can streamline their financial processes.
Still have questions? Explore our detailed FAQs.

