QuickBooks Desktop Pro/Premier payroll errors occur when the company file exceeds the recommended size limit, preventing the payroll system from accessing data efficiently. Large or oversized files increase processing time, increase data load, and disrupt indexing, which leads to delayed paycheck calculations, payroll update failures, and errors in tax form retrieval. This article focuses on identifying how oversized files cause these payroll issues and provides the most effective methods to reduce file size, repair data, and restore reliable payroll performance in QuickBooks Desktop Pro and Premier.
This article explains why large or oversized files directly trigger payroll errors in QuickBooks Desktop Pro and Premier and outlines the corrective methods required to restore stable payroll performance. It details how file-size reduction, data-repair utilities, diagnostic tools, and company-file reconstruction steps address the underlying causes of payroll failures. It also includes integrity checks that identify damaged records, remove corrupted data segments, and improve system responsiveness.
Why Large QuickBooks Pro/Premier Files Trigger Payroll Errors?
Large QuickBooks Pro/Premier files trigger payroll errors because oversized data slows internal processing, increases indexing delays, and raises the risk of corrupted payroll records. When the file exceeds the recommended size limit, the system struggles to retrieve payroll data, apply tax updates, and generate paychecks accurately.
- Exceeding the File-Size Limit: QuickBooks Pro and Premier are designed to run smoothly with company files up to about 250 MB. When the file exceeds this limit, payroll functions begin to slow down or fail.
- Heavy Transaction Volume: Years of invoices, bills, payroll entries, and list items increase the density of the file. This overload affects payroll calculations, tax table updates, and paycheck generation.
- Fragmented or Corrupted Data: Large files are more prone to data-index corruption. Corrupted indexes cause miscalculations, incorrect payroll totals, and missing payroll forms.
- Slow Data Retrieval: Oversized files take longer to read and write. This delay affects payroll components such as tax form retrieval, direct deposit processing, and payroll report generation.
- Audit Trail Growth: The audit trail records every edit and transaction. As it grows, it inflates the file size and slows down payroll processing.
- List Overload (Employees, Vendors, Items): Large employee lists or long payroll item lists increase database load and often trigger payroll calculation or loading errors.
- Outdated System Resources: Older or low-memory systems struggle with large QuickBooks files. This results in freezes, payroll module timeouts, and “Not Responding” errors.
- Damaged or Unoptimized Company File: When the file structure becomes too complex or contains damaged blocks, the payroll module fails to access required data in real time.
Signs of Payroll Issues from Oversized QuickBooks Pro/Premier Files
Oversized company files in QuickBooks Desktop Pro and Premier cause slow payroll calculations, delayed tax table loading, and errors in payroll reports. Users may notice freezing, missing payroll data, or unresponsive payroll windows. These issues indicate that the file has become too large and requires corrective action to restore normal payroll performance.
- Slow payroll calculation or delayed paycheck generation.
- Payroll tax tables failing to update or taking unusually long to load.
- Payroll reports opening slowly, freezing, or producing incomplete data.
- Missing, corrupted, or inaccurate payroll records.
- QuickBooks becoming unresponsive when accessing payroll features.
- Errors when retrieving tax forms or submitting payroll-related data.
- Long loading times when switching between payroll windows or employee profiles.
- Frequent prompts to rebuild or verify data during payroll activities.
Fixes for QuickBooks Payroll Errors Caused by Large or Oversized Files
Large or oversized files cause payroll errors, including application latency and inaccurate paycheck calculations. The following methods reduce file size, repair damaged data, and correct structural issues using tools like Condense Data, Verify and Rebuild, QuickBooks Tool Hub, company file reconstruction, and File Doctor.
Solution 1: Use the Condense Data Utility Tool
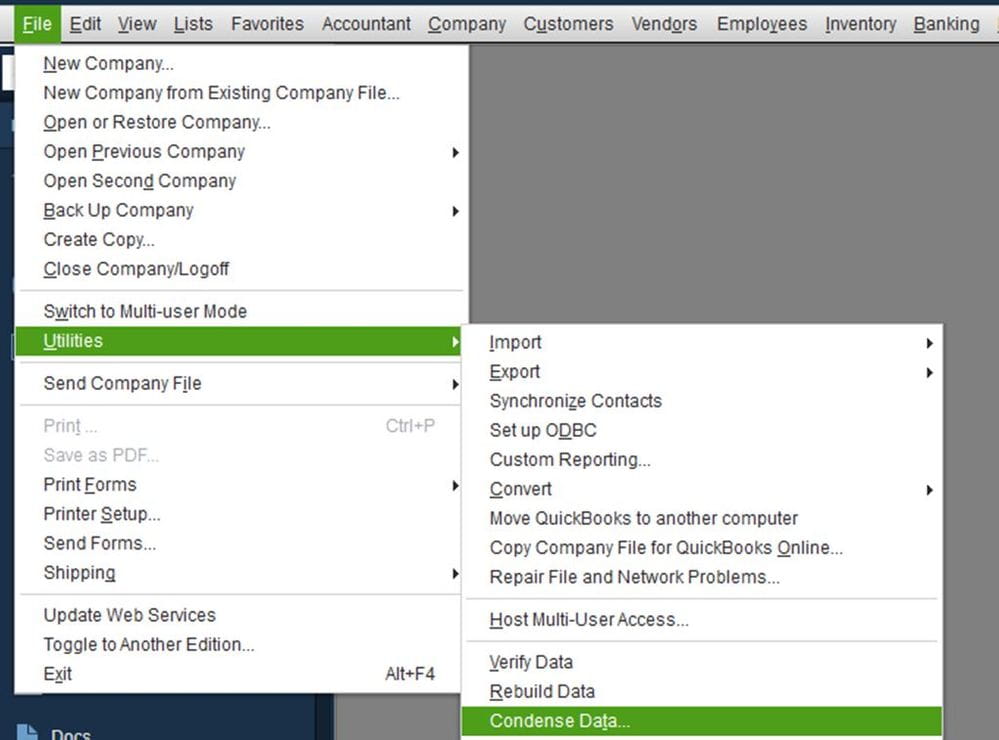
The Condense Data utility streamlines the company data file and increases its performance. Users can condense the company file using two methods:
Case 1: Keep All Transactions
This method condenses the data while retaining all transactions:
- Step 1: Select File > Utilities.
- Step 2: Click on Condense Data.
- Step 3: Click ‘Keep all transactions, but remove audit trail information up to the current date.’
- Step 4: Click Next > Close when the process is done.

CASE 2: Remove Selected Transactions
This method Condense data by removing selected transactions:
- Step 1: Select File > Utilities.
- Step 2: Click Condense Data.
- Step 3: Click Remove the transactions you select from your company file, then click Next.
- Step 4: Select the transactions to remove, then click Next.
- Step 5: Choose how to summarize transactions, then click Next.
- Step 6: Decide how to condense inventory, then click Next.
- Step 7: Select recommended transactions to remove, then click Next.
- Step 8: Choose List entries to remove, then select Next.
- Step 9: Click Begin Condense, wait for it to finish, and select Close.

Solution 2: Run Verify and Rebuild Utility Tool
The Verify and Rebuild Utility repairs report issues and list data corruption in the company file. Follow the steps to verify and rebuild data:
- Step: Click on File > Utilities
- Step: Click Verify Data > OK to close all windows.
- Step: Open File > Utilities and select Rebuild Data.
- Step: QuickBooks prompt for a backup before rebuilding the company file. Click OK to proceed.
- Step: After the rebuild, click OK again.
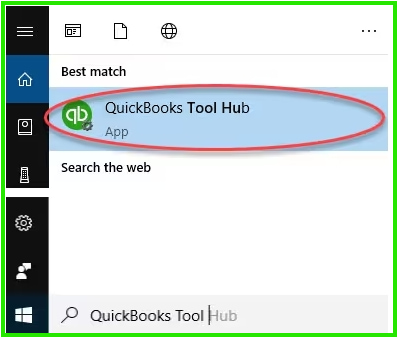
Solution 3: Use the QuickBooks Tool Hub
The QuickBooks Tool Hub provides multiple repair utilities, such as Quick Fix My File, to resolve file-related issues.
Step to Install QuickBooks Tool Hub
- Step 1: Close QuickBooks.
- Step 2: Download the latest QuickBooks Tool Hub from (1.5.0.0) and save it.
- Step 3: Run the downloaded file (QuickBooksToolHub.exe) and follow the installation steps on the screen.
- Step 4: Double-click the Tool Hub icon on your desktop after installation.
- Note: Use the Tool Hub on a 64-bit Windows 10 system.

Steps to run Quick Fix my File:
- Step 1: In the Tool Hub, select Company File Issues.
- Step 2: Click on Quick Fix my File.
- Step 3: Select OK when it finishes, then launch QuickBooks.
Solution 4: Split or Recreate the Company File
Large or corrupted company files lead to loading errors, degraded performance, and system failures in QuickBooks. Splitting or recreating the company file optimizes performance and eliminates corrupted data blocks that resist repair.
Follow the steps to split and import a clean company files:
- Step 1: Go to the File > New Company. ( Follow the wizard that appears on the screen).
- Step 2: Open the original file and export your lists ( customers, vendors, employees).
- Step 3: Open the Intuit Interchange Format (.IIF) files and delete unnecessary entries.
- Step 4: Import the cleaned files.
- Step 5: Set up opening balances.
Solution 5: Run QuickBooks File Doctor
QuickBooks File Doctor maintains data integrity and resolves network problems or damaged files.
Follow the steps to run QuickBooks File Doctor:
- Step 1: In the tool hub, select Company File Issues.
- Step 2: Choose Run QuickBooks File Doctor. ( If it doesn’t open, search for and open it manually.)
- Step 3: Select your company file from the drop-down or click Browse to locate it.
- Step 4: Click Check your file > Continue.
- Step 5: Enter your QuickBooks admin password and select Next.
Once finished, run Verify and Rebuild again to check for errors in your file.
Solution 6: Run as Administrator
Running QuickBooks with administrative privileges resolves issues that occur when the program cannot access or modify certain files due to restricted permissions.
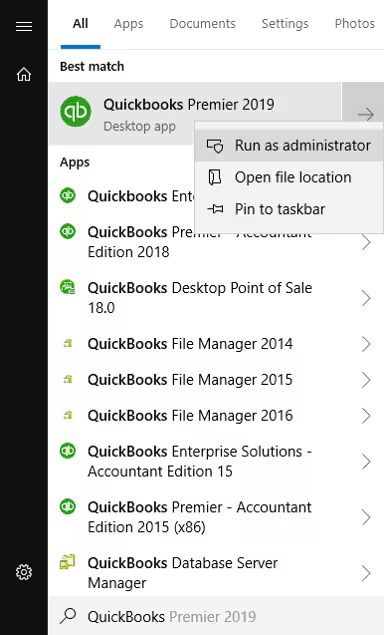
Follow the steps to run QuickBooks as administrator:
- Step 1: Open the Start menu, type QuickBooks.
- Step 2: Right-click on the QuickBooks version you want open.
- Step 3: Select Run as administrator.

Best Practices to Prevent Payroll Errors from Large QuickBooks Files
Preventing payroll errors caused by large or oversized QuickBooks Desktop Pro and Premier files depends on consistent file management and routine maintenance. An optimized company file improves data access, supports accurate tax updates, and ensures timely payroll calculations.
- Monitor the company file size to keep it within the recommended range.
- Run Verify and Rebuild routinely to correct developing data issues.
- Use the Condense Data utility to reduce audit-trail buildup and unnecessary data.
- Clean employee, vendor, and payroll item lists to remove duplicates and outdated entries.
- Store large attachments outside the QuickBooks file to limit file growth.
- Maintain sufficient system memory and updated hardware for stable payroll processing.
- Create regular data backups to protect payroll information and support recovery.
Conclusion!
Large or oversized company files in QuickBooks Desktop Pro and Premier create conditions that slow data processing, disrupt indexing, and increase the risk of payroll-related errors. These file-size issues interfere with payroll calculations, tax form retrieval, and report generation, which leads to delays and system interruptions.
The corrective methods in this article, including file size reduction, data repair, diagnostic tools, company file reconstruction, and integrity checks, help restore stable payroll performance by improving data access and system efficiency. Routine file maintenance, periodic verification, and consistent size management help prevent these errors from recurring and ensure reliable payroll operations over time.
Frequently Asked Questions
How to Avoid Payroll File Overload ?
- Regularly condense files and run data verification to maintain file health.
- Manage audit trail size by turning it off and clearing logs when possible.
- Avoid storing non-accounting files in the same folder as your company file.
- Run the Rebuild Data tool regularly to fix minor errors early.
- Limit simultaneous users, especially during payroll or file-intensive tasks.
- Avoid attaching large documents to transactions to prevent slowdowns.
How can I Avoid Payroll Errors Due to Oversized Company Files?
Keep your file size under 250MB by regularly condensing data, cleaning up lists, and managing attachments. Use built-in tools like Rebuild and Verify, and consider upgrading to Enterprise ( if needed).
What Causes Oversized Company Files in QuickBooks?
- Unarchived transactions and lists.
- Excessive payroll entries.
- Inadequate multi-user mode cleanup.
- Large audit trails, and insufficient data maintenance.
What file size is considered too large for QuickBooks Desktop Pro and Premier?
QuickBooks Pro and Premier typically begin experiencing performance issues when the company file exceeds about 250 MB, which increases the likelihood of payroll-related errors.
What tool should I use if my payroll errors are caused by corrupted data in a large file?
QuickBooks Tool Hub and QuickBooks File Doctor can identify and repair corrupted data, fix structural issues, and restore access to payroll features.
How can I reduce the size of my QuickBooks company file to fix payroll issues?
You can use the Condense Data utility to remove unnecessary audit-trail history or condense selected transactions. This reduces file load and improves payroll performance.
Disclaimer: The information outlined above for “Resolve QuickBooks Desktop Pro/Premier Payroll Errors Due to Large or Oversized Files” is applicable to all supported versions, including QuickBooks Desktop Pro, Premier, Accountant, and Enterprise. It is designed to work with operating systems such as Windows 7, 10, and 11, as well as macOS.
