Excerpt:
Addressing the "QuickBooks Sync Manager Not Working Error" involves specific, file-level troubleshooting applicable only to legacy, unsupported versions of QuickBooks Desktop, as the Sync Manager was officially discontinued by Intuit in 2015. For users encountering errors like 2014, 17_7300, or 5_13944, solutions often require bypassing file corruption by renaming the Sync Manager folder to SyncManager.old , or manually ending essential QuickBooks processes like QBW32.exe via the Windows Task Manager to allow file access . Furthermore, firewall exceptions must be configured for all related executable files and Intuit server URLs to restore data connectivity, as this legacy system relied on less secure, file-based synchronization, which was ultimately replaced by modern, real-time cloud services.
 Add As A Preferred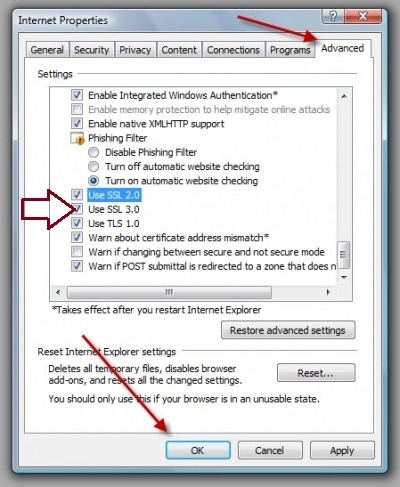
Highlights (Key Facts & Solutions)
SyncManager.old to force the system to create a clean folder upon restart.QBDBMgr.exe, Qbw32.exe) using the Windows Task Manager.Overview
To fix QuickBooks Payroll 12000-series errors such as 12002, 12007, 12029, and 12031, ensure stable internet connectivity, re-configure Internet Explorer and SSL/TLS settings, and allow QuickBooks through the Windows Firewall and antivirus. The 12000 series errors are connection-layer faults that interrupt payroll updates, tax table downloads, and communication with Intuit’s secure servers.
QuickBooks Payroll 12000-series are triggered by network timeouts, blocked ports, invalid SSL certificates, proxy misconfigurations, or security software filtering QuickBooks traffic. When these network and update dependencies break, QuickBooks cannot validate payroll data, retrieve tax updates, or sync subscription information.
Understanding the root causes — such as firewall denial rules, unsupported SSL/TLS protocols, unstable network sessions, or antivirus deep-packet filtering — is critical for resolving QuickBooks error codes 12002, 12007, 12029, and 12031 effectively.
This guide provides a structured diagnostic approach along with validated network and update repair steps to restore successful payroll communication and update functionality.
QuickBooks Desktop Payroll connectivity and update related errors include: Security software blockades; Incorrect internet or browser configuration; Unstable internet connection or network timeout; System date/time errors or outdated software.
Payroll connectivity and update errors arise when the QuickBooks application cannot successfully connect to Intuit’s servers to execute online tasks, such as downloading software updates, retrieving tax tables, or processing payroll data.
The Payroll 12000 series errors occur when QuickBooks Desktop is unable to establish a secure connection with Intuit’s servers due to incorrect system configurations or security restrictions that block the required communication channels.
Third-party antivirus programs or your system’s Windows Firewall may restrict QuickBooks from communicating with Intuit’s servers. The security software often misidentifies the connection process as a threat and blocks the essential network traffic. This interference prevents the program from transmitting and receiving the data needed to verify and complete updates.
QuickBooks relies on your computer’s internet settings, primarily from Internet Explorer or Microsoft Edge, to ensure secure connectivity. If critical security protocols like TLS 1.2 are not properly enabled or if proxy server settings are misconfigured, QuickBooks cannot establish a secure, authenticated connection. This prevents the application from validating its security certificates and downloading updates.
The most direct cause is the failure to complete the connection process within the allotted time. An unstable, slow, or intermittent internet connection causes the system to time out while attempting to reach Intuit’s update server. This network instability results in a dropped connection, preventing the successful retrieval or verification of update files.
A failure to authenticate the secure connection can be caused by a mismatch in system time and date settings, as security protocols require synchronization for certificate validation. Additionally, using an outdated version of QuickBooks Desktop may mean it is incompatible with the latest security standards required by Intuit’s servers, leading to a permanent connection refusal.
QuickBooks Desktop Error 12002 appears when the connection between QuickBooks and Intuit’s update servers times out before the request is completed. This 12002 error happens due to an unstable or slow internet connection, a VPN/proxy interruption, or a temporary block by a security program.
It usually appears while downloading payroll updates, updating QuickBooks Desktop, or validating subscription data. QuickBooks may show: “A network timeout has occurred while accessing the server.”
Error 12002 stops payroll updates, prevents tax table downloads, and interrupts communication with Intuit services until the network environment and timeout conditions are corrected.
QuickBooks Desktop Error 12007 appears when the internet browser settings used by QuickBooks (primarily Internet Explorer settings) are incorrectly configured, or when firewall or antivirus tools block QuickBooks from accessing update servers.
It is commonly seen during a payroll update or while checking for a QuickBooks Desktop update. The message often reads: “QuickBooks failed to connect to the update server.”
Error 12007 blocks payroll updates, prevents subscription validation, and interrupts secure SSL connectivity until browser configuration and security permissions are adjusted.
QuickBooks Desktop Error 12029 occurs when QuickBooks cannot establish a secure connection with Intuit’s payroll servers due to firewall restrictions, SSL/TLS issues, or temporary server rejection.
It usually appears during an update session or when attempting to refresh payroll data from Intuit. QuickBooks displays: “Failed to download payroll or perform update due to server connection failure.”
Error 12029 stops payroll update downloads, halts communication with Intuit servers, and delays payroll processing until the connectivity or firewall restrictions are resolved.
QuickBooks Desktop Error 12031 appears when a secure channel (SSL) used by QuickBooks to access Intuit services is blocked or interrupted by antivirus, firewall, or outdated network protocols.
The QuickBooks Error 12031 occurs during payroll updates or while attempting to access subscribed services. Users may see: “QuickBooks cannot establish a secure internet connection.”
Error 12031 freezes payroll update downloads, blocks authentication with Intuit, and suspends payroll activity until SSL access and security configuration are restored.
Resolving connectivity-based payroll update errors in QuickBooks Desktop involves addressing security software blockades, correcting incorrect internet or browser configuration, stabilizing weak or interrupted internet connections, fixing network timeout conditions, and correcting system date/time or outdated software conflicts.
All these solutions will help resolve QuickBooks Desktop Payroll 12000 series errors, specifically 12002; 12007; 12029; and 12031.
The solution to resolve PSXXX series errors are:
QuickBooks Desktop relies on Internet Explorer (IE) to access online payroll and other connected services. Therefore, incorrect browser configuration or outdated security settings can interrupt payroll updates or cause connection errors. Follow these verified steps carefully to test connectivity and adjust Internet Explorer settings.
Step 1: Download and Run the TLS 1.2 Utility
Open your browser (Microsoft Edge or Google Chrome). Visit the official Intuit QuickBooks support page: https://quickbooks.intuit.com/learn-support. In the search bar, type “TLS 1.2 Utility” and select the official Intuit article titled “QuickBooks TLS 1.2 Readiness Utility.”
Download the utility file and save it to your Desktop. Once downloaded, right-click on the file TLS12Utility.exe and select Run as Administrator. Follow the on-screen instructions to enable TLS 1.2 support for QuickBooks Desktop.
Step 2: Verify Internet Explorer as the Default Browser
Open Internet Explorer. Click the gear icon (Settings) at the top right and select Internet Options. Go to the Programs tab. Under “Default Web Browser,” click Make Default if Internet Explorer is not already the default. Click Apply and OK to confirm.
Step 3: Test Your Internet Connection
Close QuickBooks Desktop if it is open. Open Internet Explorer. Visit a secure website such as https://www.microsoft.com or your bank’s login page.
Step 4: Access Internet Options
In Internet Explorer, click the gear icon or press Alt + X. Select Internet Options from the dropdown menu.
Step 5: Adjust Security Level
Click the Security tab. Select the Globe (Internet) icon. Ensure the Security Level slider is set to Medium-high. Click Apply if changes are made.
Step 6: Configure the Connections Tab
Click the Connections tab. If you do not use dial-up, select Never dial a connection. If you use a dial-up connection, select your Internet Service Provider (ISP) and click OK. Proceed to LAN Settings.
Step 7: Configure LAN Settings
In the Connections tab, click LAN Settings. Check the box labeled Automatically detect settings. Uncheck Use a proxy server for your LAN unless your system administrator has provided a specific proxy address.
If you must use a proxy, note down the proxy address and port number for reference. Click OK to confirm and return to the main window.
Step 8: Adjust Advanced Settings
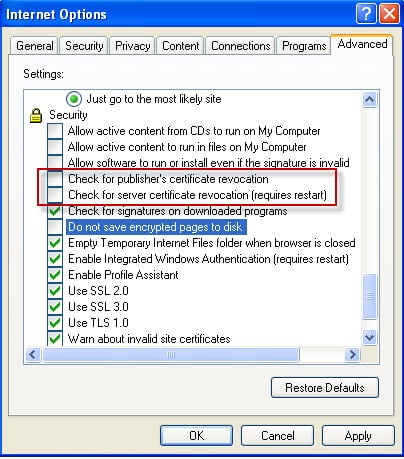
Click the Advanced tab. Click Restore Advanced Settings to reset IE configurations.Scroll down to the Security section and ensure:
Step 9: Save and Restart
Close Internet Explorer. Restart your computer to apply the changes. Reopen QuickBooks Desktop. Attempt your payroll update or online task again to confirm connectivity.
The Windows Firewall is a built-in Windows security feature designed to protect your computer from unauthorized access. However, sometimes it can block QuickBooks Desktop processes, preventing updates or payroll functions from working properly. Manually configuring the firewall ensures that QuickBooks ports are open and communication with the Intuit servers is not interrupted. Follow the steps below carefully to set up both inbound and outbound rules for QuickBooks.
Step 1: Open Windows Firewall Advanced Settings
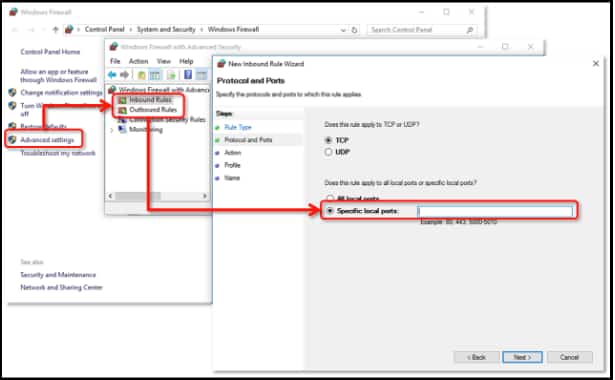
Press the Windows key + R on your keyboard to open the Run dialog box. Type control panel and press Enter. In the Control Panel window, click System and Security. Select Windows Defender Firewall. On the left-hand side, click Advanced Settings. This will open the Windows Defender Firewall with an Advanced Security window.
Step 2: Start a New Inbound Rule
In the left panel, click Inbound Rules. In the right panel, click New Rule under the Actions section. This starts the Rule Creation Wizard, where you can define the rule type and settings.
You will repeat this process later for Outbound Rules as well.
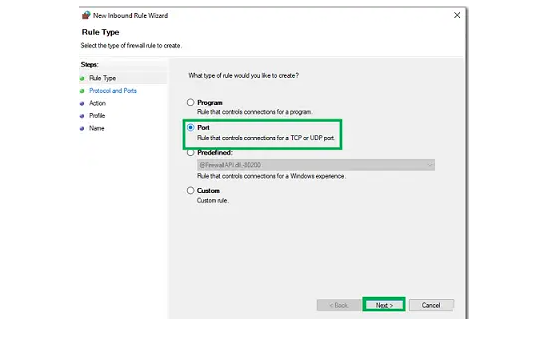
Step 3: Select Port as the Rule Type
When the New Inbound Rule Wizard opens, select Port as the rule type. Click Next to continue.
This tells Windows Firewall that the rule will apply to specific network ports used by QuickBooks.
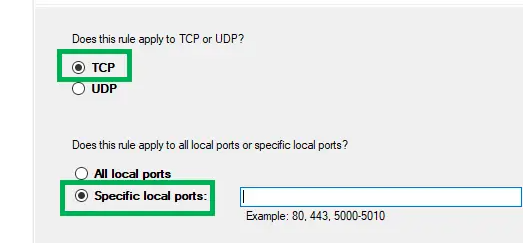
Step 4: Select TCP and Enter QuickBooks Ports
On the Protocol and Ports screen, ensure TCP is selected. In the field labeled Specific local ports, enter the QuickBooks Desktop version ports.
The ports differ by version:
Click Next after entering the correct ports for your version.
Step 5: Allow the Connection
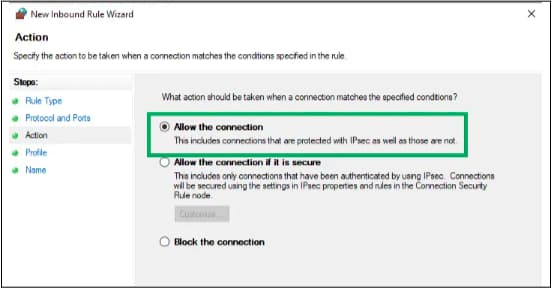
On the Action screen, select Allow the connection. Click Next. This ensures that Windows Firewall will not block these ports during QuickBooks operations.
Step 6: Select Firewall Profiles
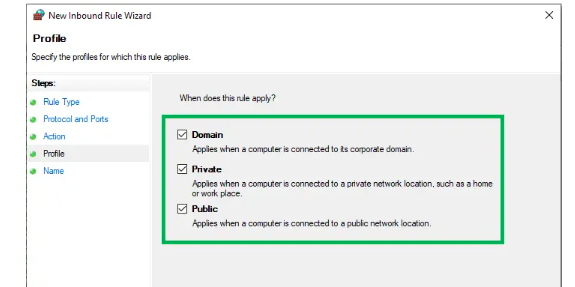
On the Profile screen, check all three options: Domain, Private, and Public. Click Next to continue. This step ensures that QuickBooks can connect properly in all network environments (office, home, or public).
Step 7: Name and Finish the Inbound Rule
On the Name screen, enter a recognizable name for the rule. Example: QBPorts(2025) or QuickBooks Inbound Ports. Click Finish to complete the inbound rule setup.
Step 8: Repeat the Steps for Outbound Rules
In the left panel of the Windows Defender Firewall with Advanced Security window, click Outbound Rules. In the right panel, click New Rule. Repeat Steps 3 through 7 exactly as you did for the inbound rule.
Step 9: Restart Your Computer
After both inbound and outbound rules are created, restart your computer to apply the changes.
Once restarted, open QuickBooks Desktop and attempt to update or access payroll again to confirm that the firewall is no longer blocking connections.
QuickBooks Payroll requires an active subscription and uninterrupted access to Intuit servers for proper updates and direct deposit functionality. If your payroll subscription has expired or your antivirus program is blocking QuickBooks files, you may face payroll service errors. The steps below will help you verify your payroll subscription and configure antivirus exceptions to ensure smooth payroll operations.
Step 1: Verify Payroll Subscription Status
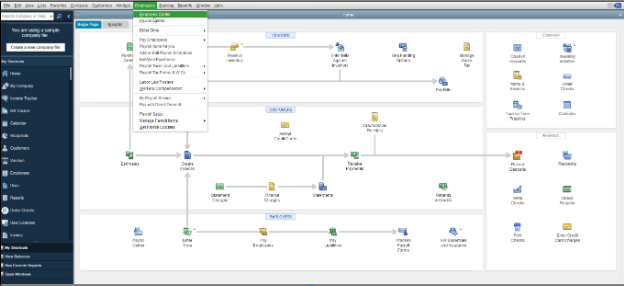
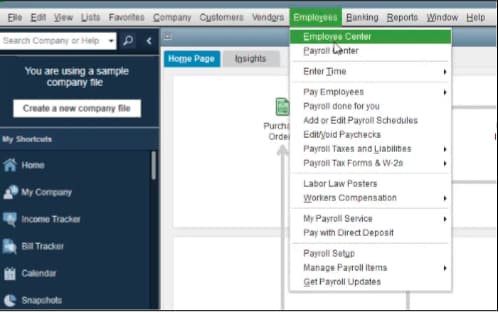
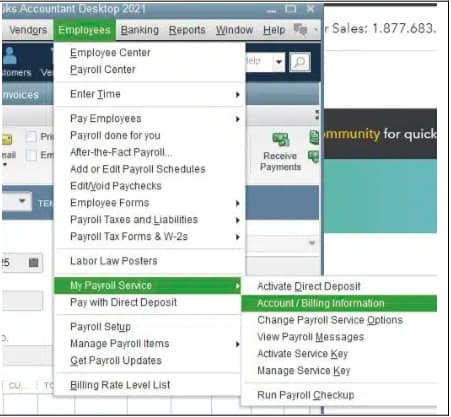
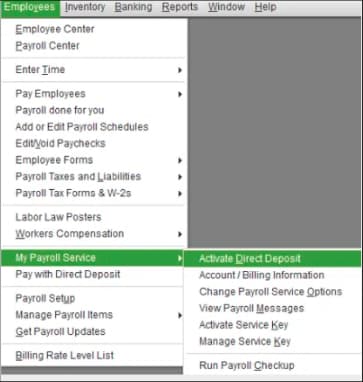
The first step is to make sure your QuickBooks Payroll subscription is active and correctly linked to your company file.
Step 2: Check and Configure Antivirus Exceptions
Antivirus programs can mistakenly block QuickBooks processes or network connections, preventing payroll updates and online access. To avoid this, add QuickBooks program files and Intuit domains to your antivirus exception or exclusion list.
Intuit/QuickBooks Antivirus Exclusion Details (Example)
| Program File | Typical Path Location | Note |
| QBW32.exe | C:\Program Files (x86)\Intuit\QuickBooks (year) | Main QuickBooks Application File |
| QBDBMgrN.exe | C:\Program Files\Common Files\Intuit\QuickBooks | QuickBooks Database Manager Service |
| QBUpdate.exe | C:\Program Files\Common Files\Intuit\QuickBooks\QBUpdate | QuickBooks Update Service |
| IntuitSyncManager.exe | C:\Program Files\Common Files\Intuit\Sync | Used for synchronization and payroll updates |
QuickBooks Desktop may fail to download or install payroll updates if its update components, browser cache, or program files are damaged. Resetting update settings, repairing system files, and reinstalling QuickBooks Desktop using the official tools can resolve these issues. Follow the steps below carefully.
Step 1: Reset QuickBooks Desktop Update Settings
The first step is to refresh QuickBooks’ internal update files and ensure that new updates can be downloaded successfully.
Open QuickBooks Desktop. Go to the top menu bar and click Help. From the dropdown menu, select Update QuickBooks Desktop. In the Update QuickBooks window, go to the Update Now tab. Check the box labeled Reset Update to clear all previous downloaded update files.
Click Get Updates. QuickBooks will start downloading the latest available update files.
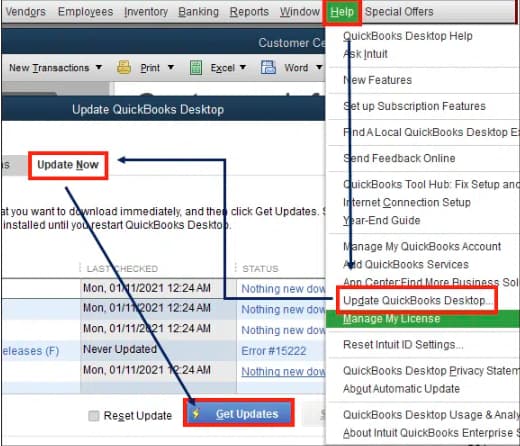
Wait until the update process completes, then close the Update QuickBooks window. Exit QuickBooks Desktop completely once the updates are downloaded.
Step 2: Restart QuickBooks Desktop and Test Payroll Update
Restart your computer after the update files are reset. Once the system restarts, open QuickBooks Desktop again. Go to Employees → Get Payroll Updates.
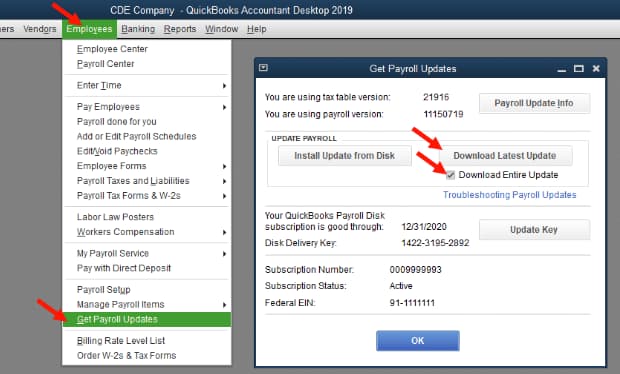
Click Download Entire Update and then select Update. Wait for the process to finish. When the download completes successfully, you’ll see the confirmation message “A new tax table has been installed on your computer.” Try processing a payroll or opening a payroll form to verify that the update issue is resolved.
Step 3: Repair or Reinstall QuickBooks Desktop
If the error persists after resetting updates, proceed with repairing system components or reinstalling QuickBooks Desktop using official Intuit tools.
Press Windows key + R on your keyboard to open the Run dialog box. Type cmd and press Ctrl + Shift + Enter to open Command Prompt as an administrator. In the Command Prompt window, type “sfc /scannow” and press Enter:
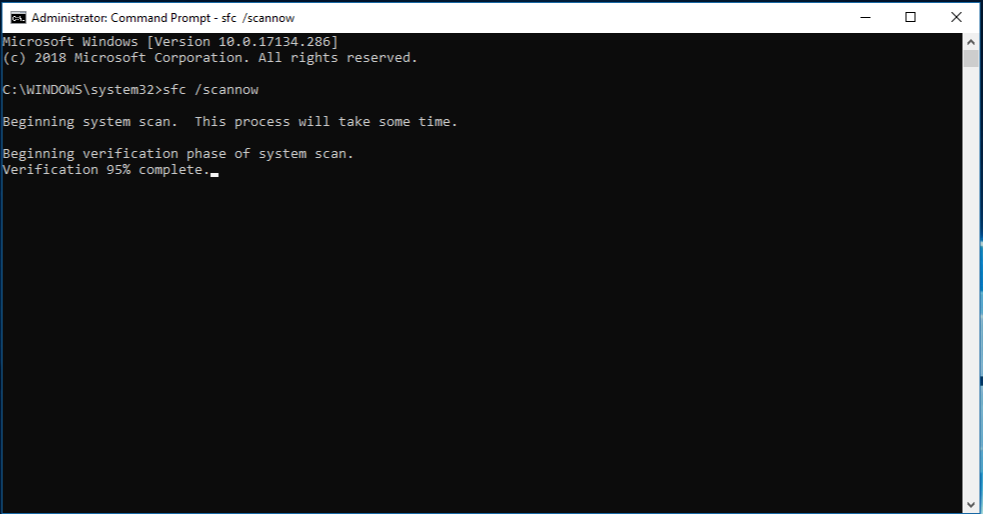
The System File Checker (SFC) tool will scan your system for corrupted files and repair them automatically. Once the scan is complete, restart your computer.
If repairing system files does not resolve the issue, perform a clean reinstallation of QuickBooks Desktop.
Download & Install the Latest Version of QuickBooks Tool Hub
Note: QuickBooks Desktop Tool Hub is only available for Windows operating systems and unavailable for other operating systems like MacOS and Linux.
Download QuickBooks Tool Hub 1.6.0.8
Try a different browser, if you cannot download QuickBooks Tool Hub.
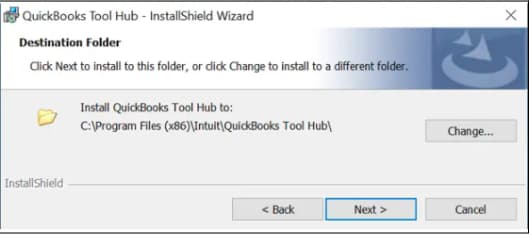
Go to the Downloads section in your browser or the directory where you have downloaded the setup file. Click on the QuickBooksToolHub.exe file twice to begin the installation. Allow QuickBooks Tool Hub to make changes to the computer.
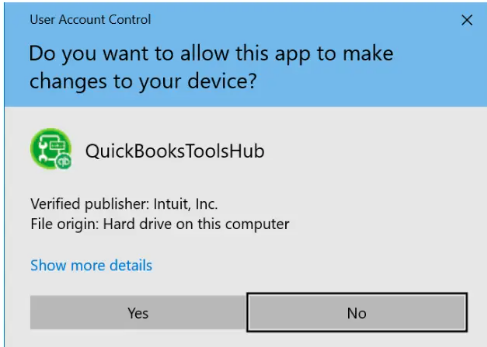
If Windows asks you whether you want to allow QuickBooks Tool Hub to make changes to the computer, choose Yes. Now, you will see the QB Tool Hub installation wizard; choose Next.
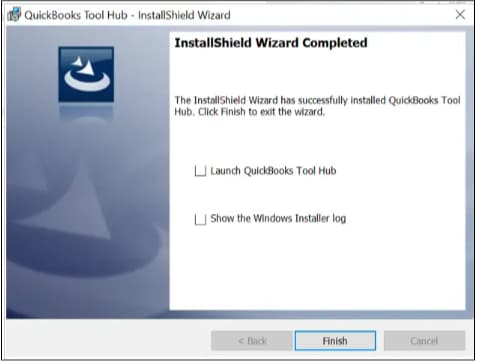
When asked to confirm the license agreement for Intuit QuickBooks Tool Hub, choose Yes. The No will abort the installation.
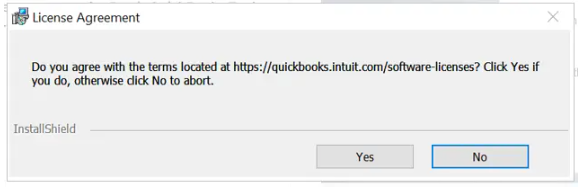
QuickBooks Tool Hub- InstallShield Wizard
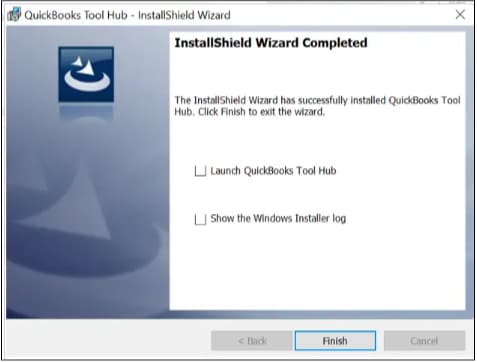
Now, go ahead with the on-screen instructions. When the Tool Hub is installed, you will see a message in the installation window telling you the same. Choose Finish. This will successfully install Intuit Tool Hub on your computer.
Open the QuickBooks Tool Hub once installed. In the Tool Hub main screen, select Installation Issues. Click Clean Install Tool.
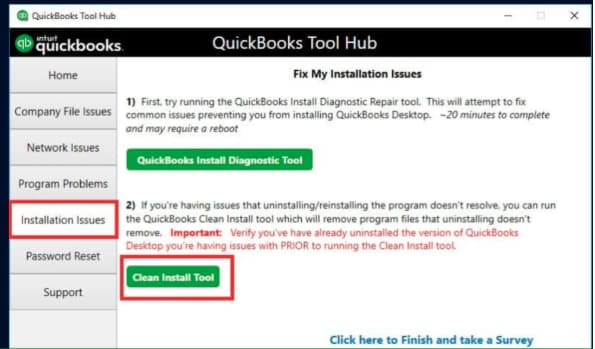
When prompted, select your QuickBooks Desktop version and year, then click Continue. The tool will automatically rename your existing installation folders and prepare your system for a fresh installation.
After the clean install completes, reinstall QuickBooks Desktop from your installation file or Intuit account download page. Once installed, open QuickBooks and download the latest updates again to confirm the issue is fixed.
Step 4: Restart and Verify
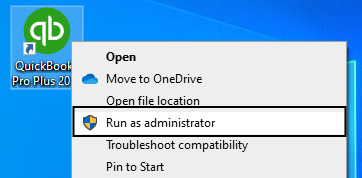
After completing either the repair or reinstall process: Restart your computer. Open QuickBooks Desktop as an administrator. Go to Help → Update QuickBooks Desktop → Update Now, and run the update again to confirm it completes without errors. Test your payroll functions to ensure the software is fully operational.
You are now aware of why QuickBooks Payroll 12000 series errors occur and how to resolve them by correcting internet settings, fixing browser configuration, updating QuickBooks, and removing security blocks that interrupt the connection to Intuit’s servers. Once these connection issues are fixed, payroll updates download smoothly and QuickBooks communicates with Intuit without interruption.
If your specific 12000 error is not listed or you need more clarity, you can look up additional troubleshooters in the knowledge base or get help from a QuickBooks specialist for step-by-step guidance.
With the right corrections, all 12000 series connectivity errors can be fully resolved — allowing you to continue payroll processing confidently and without delays. You have already taken the right step by diagnosing the issue, and a stable and error-free payroll environment is well within reach.
QuickBooks Desktop relies on the core Windows internet components, which are primarily configured through Internet Explorer (IE) settings, regardless of whether you use Chrome or Edge for general browsing.
You must adjust IE settings because:
To ensure QuickBooks can establish a secure connection for payroll and tax updates, you must specifically verify the TLS and Certificate settings within the Advanced tab of Internet Options.
The essential configurations are:
To prevent the Windows Firewall from blocking QuickBooks’s essential communication, you must create inbound and outbound rules for specific TCP ports that differ based on your QuickBooks year.
For recent versions, the necessary TCP ports are:
The ranges (55XXX) are dynamic, but the firewall rules must include all of them.
Antivirus and security software often mistakenly block the main QuickBooks program and its related services, causing the 12000-series errors. You must explicitly add these executable files to your antivirus’s exception list:
QBW32.exe: The main QuickBooks application file.QBDBMgrN.exe: The QuickBooks Database Manager service.QBUpdate.exe: The QuickBooks update service.IntuitSyncManager.exe: Used for synchronization and payroll updates.The file path for these executables depends on your system’s bit type (32-bit or 64-bit), so checking the System Information first is crucial. [Generic Image of an Antivirus/Security software ‘Exclusions’ or ‘Exceptions’ screen showing the file path fields being filled with a common QB executable like QBW32.exe]
Both errors are connection-related, but their root cause diagnoses differ, pointing to different primary fix steps:
Both are resolved by fixing the network environment, but 12007 requires stricter setting adjustments.
Checking the payroll subscription status is a critical initial diagnostic step because an expired or inactive subscription will generate a connection failure error that appears identical to a firewall blockage.
Subscription verification ensures:
You can verify the status by going to Employees ➜ My Payroll Service ➜ Account/Billing Information within QuickBooks Desktop.
If security and network settings fail to resolve the 12000-series errors, the issue may be due to corrupted core QuickBooks program files. The QuickBooks Tool Hub is the official Intuit utility used to resolve these installation and update problems.
The tool helps by:
The tool provides a validated, last-resort fix when browser, firewall, and antivirus settings have been exhausted.


