To fix QuickBooks Error 6150, -1006, begin by repairing your company file, restoring a verified backup, scanning your system for malware, and running the QuickBooks File Doctor tool. These steps help regain access to your data and restore smooth functioning within QuickBooks Desktop.
QuickBooks Error 6150, -1006 usually appears when creating, opening, or working on a company file. It is part of the 6000 error series, which indicates company file damage or improper software configuration. When triggered, the error message prevents you from accessing or editing your financial records.
The issue often arises due to corrupted or missing company files, incomplete QuickBooks installation, or interference from malicious software. Users may also encounter it after changing the file extension of a backup or using an incompatible company file.
This article explains the key causes, warning signs, and verified troubleshooting methods to resolve QuickBooks Error 6150, -1006. It also includes preventive measures and recovery options to help you maintain data security and uninterrupted software performance.
The QB error 6150 1006 flashes out on your screen along with the following error prompt:

Possible Reasons Behind the QuickBooks Error 6150 1006
QuickBooks Company file Error 6150 1006 may occur due to a variety of factors, a few of which are highlighted below:
- The QuickBooks background processes block the QuickBooks company file access.
- You won’t be able to open your company file without having administrator rights.
- The error may also pop up if your company file is infected by the CryptoWall virus and other malicious software.
- The company files are deleted inadvertently or if they are already damaged.
- Corrupted Windows Registry files, or if you’re trying to access a portable file (.qbm) without opening the software.
- Due to system crashes, power outages, software conflicts, or unexpected shutdowns, you may find issues while creating or accessing company files in QuickBooks.
- Lost, missing, or corrupted company file data can cause issues while opening or editing a company file.
- When there are any kind of malware or virus attacks, you may run into this company file error.
- QuickBooks is improperly or incompletely installed in your system.
How to Determine the Effect of QuickBooks Error 6150 1006?
There are certain indicators that will help you to identify the QB Error 6150 1006, which include;
- You may notice the error message on your display itself and crash the program window.
- The Windows runs sluggishly and doesn’t respond to keyboard and mouse inputs.
- Another reason is if your system freezes for a few seconds.
- The system keeps crashing quite frequently when you run the same program. n
- Your company files don’t get opened.
Customized Solutions for QuickBooks Error 6150 1006
- To resolve QuickBooks Error 6150 1006, first, ensure that you have an antivirus installed on your system before opening up the company file. This will remove malicious software or viruses from your system, as well as company files if there are any.
- After this, you need to log in to your company file using the correct admin credentials and download the QuickBooks File Doctor tool from the tool hub.
- Make sure you create and restore a backup of your company before running this tool on your system. Also, you can use the QuickBooks Auto Data Recovery (ADR) feature to restore your lost data. Before you proceed, there are some limitations for the same:
- QuickBooks Auto Data Recovery tool is only compatible with QuickBooks Pro, Premier, and Enterprise Solutions for Windows and is not available for the Accountant versions of QuickBooks.
- The ADR file size has a limitation of 1.5 Gigabytes. If your backup is bigger than 1.5 Gigabytes, QuickBooks won’t generate an ADR file.
- This tool requires an updated version of the software.
- Once done, it will take a few minutes to diagnose and fix your problem. After the process is complete, check for the error status.
- If the error is still bothering you, then you are recommended to perform the following steps in the given order.
Troubleshooting Methods for QuickBooks Error 6150 1006
After implementing all the precautionary steps, if QuickBooks Error 6150, -1006 still appears, follow the methods below to eliminate the error completely and restore your company file access. Each method addresses a specific cause, so apply them sequentially for best results.
Closing background QuickBooks processes helps free up memory and eliminates system conflicts that prevent the software from opening company files. It ensures that no residual QuickBooks instance interferes with file repair or recovery. This step is crucial before performing any diagnostic or data recovery operation.
- To begin with, hold and press Ctrl + Alt + Delete to open the Task Manager.
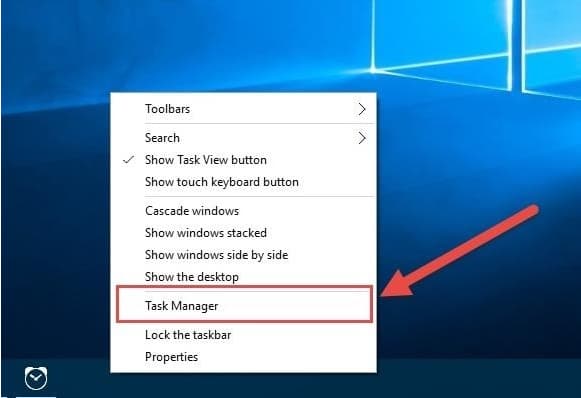
- Now, click on the More Details drop-down at the bottom.
- Hit the Processes tab.
- After this, click the image name to index all open processes.
- Choose and close every single QuickBooks process. For this:
- Click right on the process name and
- Select End Task.

- Once all the QB Processes are closed, make an exit from the task manager and try logging in to the QB company data file.
Method 2: Make Sure you Have Admin rights. If not, log in as an Administrator in QuickBooks
QuickBooks requires administrator privileges to access or modify company files securely. Granting admin rights ensures proper file permissions and prevents access restrictions caused by limited user roles. It also allows QuickBooks to execute updates or file repairs without system-level conflicts.
According to your QB subscription plan, give QuickBooks administrator rights to the users and manage their roles or permissions.
Follow the steps given below:
- Navigate to Settings in QuickBooks and then choose Manage Users.
- Locate the user you want to edit, then click on Edit in the Action column.
- Now, change the user role from the Roles dropdown.
- Select the user settings you wish to manage, if applicable.
- Press Save to set up an administrator in QuickBooks.
- At last, sign out and sign in again to check for the updates.
Method 3: Check for CryptoWall
Malware such as the CryptoWall virus can infect QuickBooks company files and make them inaccessible. Detecting and removing such threats is vital for data protection and to avoid permanent file corruption. Regular antivirus scans prevent recurrence of these issues and maintain system security.
In some cases, the CryptoWall virus and other malicious software can cause QuickBooks Error 6150 1006 and prevent you from accessing your company file in the QuickBooks desktop application.
- Navigate to the Windows Start Menu.
- Then, type File Explorer into the search bar and open the same.
- Now, look for and browse your QuickBooks folder, which is usually on your C: drive.
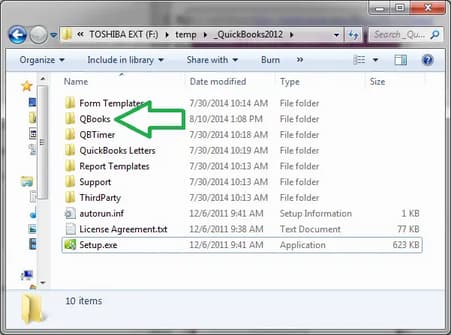
- After this, identify the files that contain words like “decrypt” or “instructions” (.txt or .html).
You are recommended to contact your antivirus provider for help removing the CryptoWall virus if you get any files that fit this description.
Important: Intuit Data Services is unable to repair such affected company files.
Method 4: Create a QuickBooks Desktop Company File
A company file is the most important asset of accounting that holds all the financial information related to your business. You need to start by creating a company file if you’re new to QuickBooks. However, if you already have a company file, you can upgrade it or check if it is the right time to replace your old file.
The steps are here to be followed:
- Firstly, open the QuickBooks Desktop application.
- Navigate to the No Company Open window and then choose Create a new company.
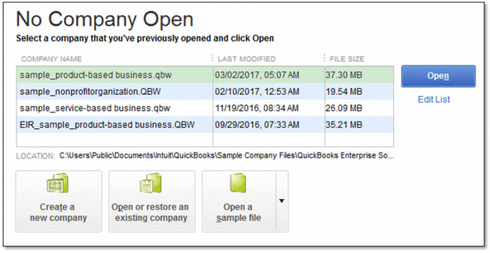
- At this point, you have two setup options, including Express Start or Detailed Start.
- Click on Express Start or Start Setup if you want to get started right away. You are only required to enter your business name, industry, and business type, and choose Create Company File to create your company. Once your company file is created, you can enter this info later on.
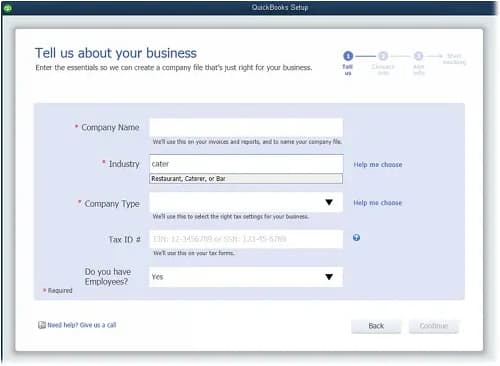
- Select Detailed Start if you wish to do a complete setup, so all your info is in from the start.
- After this, follow the on-screen steps to complete the setup.
Note: If you have an existing QuickBooks company file, give it a unique name. This will prevent QuickBooks from accidentally overwriting your data.
- Choose the Start Working option.
Method 5: Make Use of QuickBooks Tool Hub and Run QuickBooks File Doctor Tool
QuickBooks File Doctor Tool is a file-repairing tool used to resolve common QuickBooks company File errors, such as data damage, connection errors, Windows problems, update errors, and network-related issues. By running this tool, you can fix all of them.
For this, firstly, you have to download and install it from the tool hub. Once it is downloaded successfully, this will scan your company file and start diagnosing the errors you’re getting. Later, it will categorize the identified issues and take appropriate actions to fix them.
Note: You have to wait for a while, as it may take a few minutes to recognize and resolve the issue.
QuickBooks File Doctor will start fixing the issues automatically and determine what may hinder the smooth functioning of your software. When the repair process is done, the QuickBooks File Doctor will provide you with a detailed report that outlines the problems available in your software. This generated report will help you to understand the issues and all the actions performed by the tool.
Method 6: Restore a Backup of your Company File
By using your backup company file, you can easily restore your accounting data, even if it is damaged or lost somehow. All your essential data is stored in the company file, and if there’s any issue with it, your data may be damaged. This is why we recommend you restore your company file Backup to prevent your data from accidental data loss, malware, or virus attacks, etc.
Also, if your system is unexpectedly shut down or you need to undo recent changes, this process allows you to go back to your company and make necessary modifications accordingly.
Method 7: Recover Lost Data Using QuickBooks Auto Data Recovery
QuickBooks Auto Data Recovery (ADR) helps restore lost transactions and recover corrupted files using automatically saved copies. This method minimizes data loss by recreating your latest transactions from backup and transaction logs. It is an essential recovery option when manual restoration fails.
QuickBooks Desktop came up with a feature called Auto Data Recovery (ADR) that helps to recover lost or corrupted data.
It recovers your lost file by:
- Restoring lost transactions with your recent Transaction Log file and a copy of your Company file.
- Recovering all but the last few hours of transactions using a copy of both your Company file and your Transaction Log file.
Recover all the latest transactions using the original .TLG file with .QBW.adr file
To restore the recent transactions, you are required to use the original Transaction Log file and the ADR version of the company file.
- Initially, create a new folder on your Desktop named QBTest.
- Now, open the folder where the company file is stored.
Note: You can check your company file location on the Product Information window (press F2 or Ctrl+1 keys on your keyboard) and the No Company Open Window.
- After this, search for the .tlg file in your company file folder. It has the same name as your company file.
Important: If you’re unable to identify the .tlg file, perform the steps below to show file extensions.
- Hold and press the Windows+E keys on your keyboard to open File Explorer.
- Now, click on Organize, then select Folder and search options.
- Choose Hide extensions for known file types.
- Press Apply, then hit the OK tab.
- Copy the corresponding .tlg file of your company file and paste it into the QBTest folder on your Desktop.

- After this, open the QuickBooksAutoDataRecovery folder. It is available in the same location as your company file.
- Make a copy of the .QBW.adr file and paste it into the QBTest folder. You must now have a .QBW.adr and .tlg file in your QBTest folder.

- Right-click the .QBW.adr file under your QB Test folder and then select Rename.
- Moving ahead, delete .adr at the end of the filename and then open QuickBooks.

- Go to the company file that is saved in your QBTest folder and then open it. Use your account register to review all transactions there.
- Click on File and Utilities, then select Verify Data to analyze the data integrity of the recovered file.
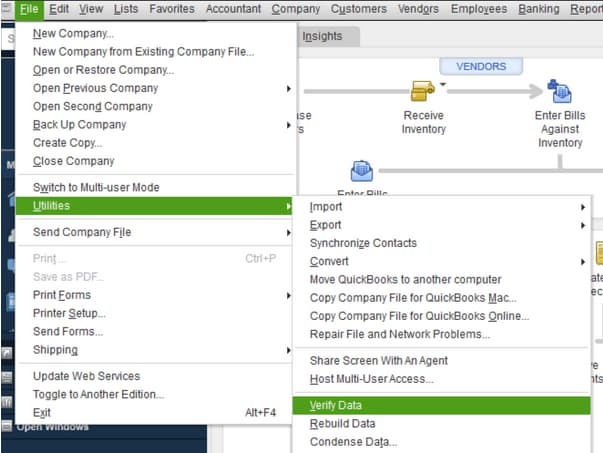
- Finally, you can transfer the damaged company file to a different location and move the copy from QBTest to the original location if the copy of your company file is in good condition.
Recover Recent Transactions Using .QBW.adr and .TLG.adr Files
This solution can be used with both ADR versions .QBW and .TLG files. This will recover all but the last 12 hours of transactions.
Here’s how:
- The first step is to create a new folder on your Desktop titled QBTest.
- Now, open the folder where the company file is stored.
- Look for the QuickBooksAutoDataRecovery folder.
Note: To check the company file location on the Product Information screen (hold down F2 or Ctrl+1 keys on your keyboard), and No Company Open Window.
- Search and locate the .TLG.adr and .QBW.adr files. Make sure these files have the same name as your company file.
Important: If you are unable to detect the .TLG.adr and .QBW.adr files, implement these steps to show file extensions.
- Hold and press the Windows+E keys on your keyboard to open File Explorer.
- Choose the Organize, then select Folder and search options.
- Click on Hide extensions for known file types.
- Press Apply, then hit the OK tab.
- After this, make a copy of the .TLG.adr and .QBW.adr files and then paste them into the QBTest folder.
- Remove the .adr from the end of the file name in your QBTest folder. This will show you the .qbw and .tlg files in your QBTest folder.
- Then, open QuickBooks.
- Browse the company file that is saved in your QBTest folder. It is recommended to use your account register to review all transactions there.
- To verify the data integrity of the recovered file, go to the File menu in the top left, then select Utilities and Verify Data.
- You can transfer the damaged company file to a different location and move the copy from QBTest to the original location in case this copy of the company file is in good shape.
Method 8: Run a Complete PC Scan and Eliminate Any Virus
Getting unfamiliar pop-ups, malicious threats, or other critical Windows-related issues?
This is where the Antivirus scan works. Antivirus scanners are designed to detect, prevent, and remove malicious viruses from your computer. This is the cybersecurity medium that helps to locate and eliminate any viruses or other types of dangerous threats to the device.
These Antivirus programs guard your software against malware such as spyware, trojans, ransomware, adware, viruses, worms, etc. Viruses are carefully coded by skillful programmers to exploit security vulnerabilities in computers. To restrict cyberattacks from stealing personal information, spying on your device resources, and affecting the performance of your computer, conduct a Full Malware Scan in Your System.
When you run an antivirus scanner in the background of your device, it starts checking every file that is having viruses. This method will prevent your device from becoming infected in the first place.
On top of this, the scanner will also run system scans to ensure that no viruses are lying dormant on your device. If your antivirus program locates a virus, it will prevent the file from running in your system and keep it quarantined so that other folders are not affected. After this, you can choose to delete the virus or ignore the warning prompt and allow the file to run if you believe it was a false detection.
Method 9: Update QuickBooks Software to the Most Recent Version
Updating QuickBooks Software to The Latest Release is required from time to time, as outdated versions can no longer access all the exclusive features of the application. Also, you won’t be able to receive any new or critical security updates that may help you protect your software from vulnerable data breaches.
Whenever any update is available, QuickBooks will notify you in advance through email, in-product notifications, the mail, and this page, as services for older versions of QuickBooks Desktop are scheduled to be discontinued. There are two ways to update your software to the most recent version: either you can automatically download and install the latest QB updates, or you can also run the manual updates.
Conclusion
QuickBooks Error Code 6150, -1006 restricts access to company files and disrupts accounting operations. This error usually stems from corrupted company data, incomplete QuickBooks installation, or malware interference.
By repairing the damaged file, restoring a verified backup, or using the QuickBooks File Doctor tool, users can quickly restore file functionality and resume normal operations. Running system scans and ensuring proper security configurations further strengthen data protection.
To prevent future occurrences, keep QuickBooks updated, perform regular data backups, and maintain antivirus protection on your system. Following these best practices helps ensure the continued stability and reliability of your QuickBooks environment.
Frequently Asked Questions!
What is QuickBooks Error Code 6150, -1006?
QuickBooks Error Code 6150, -1006 occurs when QuickBooks is unable to open or access a company file due to issues like file corruption, incomplete installation, or conflicts with security settings.
What Causes QuickBooks Error Code 6150, -1006?
Common causes include damaged company files, incomplete installation of QuickBooks, conflicts with other software, security settings blocking access, or malware infections.
Is it Necessary to update QuickBooks to fix Error Code 6150, -1006?
Yes, keeping QuickBooks updated ensures you have the latest features and security updates, which can help prevent errors like 6150, -1006.
Disclaimer: The information outlined above for “Fix QuickBooks Error 6150, -1006 When Creating, Opening or Using Company Files” is applicable to all supported versions, including QuickBooks Desktop Pro, Premier, Accountant, and Enterprise. It is designed to work with operating systems such as Windows 7, 10, and 11, as well as macOS.
