I’m Uillen, and I’m really struggling to get started with QuickBooks Online. I recently signed up for the service, but I’ve hit a wall trying to set everything up properly. The main problem is, when I try to create invoices, the system either won’t let me save it or throws errors that prevent me from completing the process.
I’ve followed the initial setup steps, entered my company information, and added a few products and customers, but every time I attempt to generate an invoice, QuickBooks gives me vague error messages or just fails to process it. I’ve also double-checked my internet connection and browser settings, but nothing changes.
Because invoicing is critical for my business cash flow, this issue is putting me behind on billing clients and tracking revenue. I’m frustrated because I expected QuickBooks to streamline these tasks, but right now, it’s stopping me from even getting basic billing done.
I need clear guidance or support on how to properly complete the setup and create invoices without errors. If this is a bug or a configuration issue, I need it fixed quickly so I can get my accounting processes up and running without further delays.
Hi Uillen,
It sounds like you’re currently facing a major roadblock in QuickBooks Online every time you try to create an invoice, the system either won’t let you save it or shows unclear error messages that prevent you from completing the process.
We completely understand how frustrating that can be. You’ve already taken all the right steps by signing up, entering your company details, and adding your products and customers. But now that you’re trying to move forward with invoicing, you’re getting stuck, and that can be incredibly discouraging.
When invoicing doesn’t work, it directly impacts your ability to bill clients and manage your cash flow smoothly. QuickBooks is supposed to make accounting easier, not more stressful and right now, it’s getting in the way.
The good news? These kinds of issues are often caused by a few common setup mistakes, browser glitches, or configuration errors and they’re usually easy to fix. In this guide, we’ll walk you through step-by-step solutions to help you get your invoicing up and running.
Common Reasons That Prevent Invoice Creation in QuickBooks Online!
Uillen, many QuickBooks Online users run into issues with invoice creation even after completing the initial setup. This usually happens due to missing required fields, incomplete product or customer details, browser-related problems, or limited user permissions that can block access to key invoicing features.
- Required fields like customer name, invoice date, or item details are left blank.
- The selected product or service is missing price or income account information.
- Browser cache or outdated extensions are interfering with QuickBooks functionality.
- User role permissions do not allow invoice creation or editing.
- Company file setup is incomplete or contains data conflicts.
- Using an unsupported or outdated browser version.
- An incomplete or unsaved customer profile blocks QuickBooks from linking the invoice to a valid customer.
- Third-party apps or integrations interrupt form submission and prevent saving.
- Unstable internet connection disrupts form entry or saving.
- Pop-up blockers or script restrictions prevent the invoice from saving.
Step-by-Step Guide to Resolve Invoice Creation Errors in QuickBooks Online!
Follow this step-by-step guide to identify what’s preventing you from creating invoices in QuickBooks Online. From checking missing fields to reviewing browser settings, and adjusting user permissions, these targeted solutions will help you to fix the issue and resume invoicing without further delays.
Solution 1: Use a Supported Web Browser
QuickBooks supports the current and two previous versions of browsers. We don’t always support older versions. The following browsers are supported on both web and mobile devices:
Note: Internet Explorer is no longer a supported browser.
- Google Chrome: version 78 or newer
- Mozilla Firefox: version 76 or newer.
Note: To preview and print forms on Mac OS, you’ll also need the Firefox PDF plugin.
- Microsoft Edge: version 79 or newer
- Safari: version 12 or newer (Mac only)
- Opera: version 68 or newer
- Samsung: version 10 or newer
QuickBooks Online uses browser cache and cookies to run faster. But sometimes these can also block web pages from loading.
Step 1: Clear Your Browser Cache
Your browser’s cache saves files on your computer to load websites faster on your next visit. But over time, it can become outdated and cause issues. Outdated or corrupted cache files often prevent you from accessing QuickBooks features like invoice creation.
Google Chrome
- Open Chrome on your computer.
- Click More at the top right corner of the screen and select Delete browsing data.
- Select a time range, like Last hour or All time.
- Choose the types of information you want to remove.
- Click Delete data.
Note: If you delete cookies while signed in to Chrome, you won’t be able to log out of your Google Account.
Mozilla Firefox
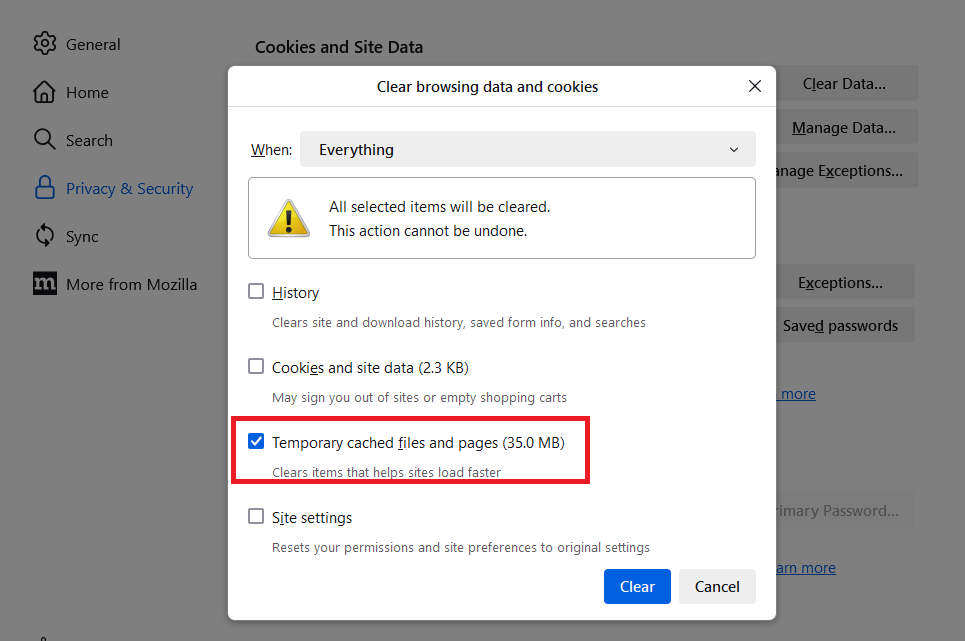
- Click the menu button and go to Settings.
- Select the Privacy & Security panel.
- Under the Cookies and Site Data section, choose Clear Data…
- The Clear browsing data and cookies dialog will open.

- From the dropdown next to When:, select Everything. Ensure that only Temporary cached files and pages are checkmarked.
- Click the Clear button.
- Close the Settings page. Any changes you’ve made will automatically be saved.
Safari for Mac
- Navigate to the Safari app on your Mac.
- Select History > Clear History, and click the pop-up menu.
- Choose how far back you want your browsing history cleared.
Step 2: Clear Intuit-specific cookies from your browser
Most of the time, you only need to clear your browser’s cache. But if you keep having the same problem even after doing that, you can clear Intuit-specific cookies in your browser settings, then restart your browser. This helps refresh website preferences that might be causing problems when you use QuickBooks.
Google Chrome
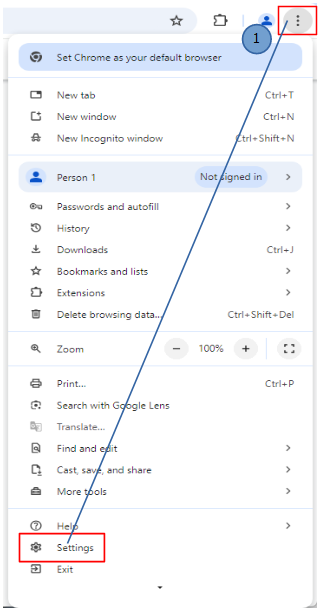
- Click the More (⋮) icon at the top right of your screen.
- Select Settings.
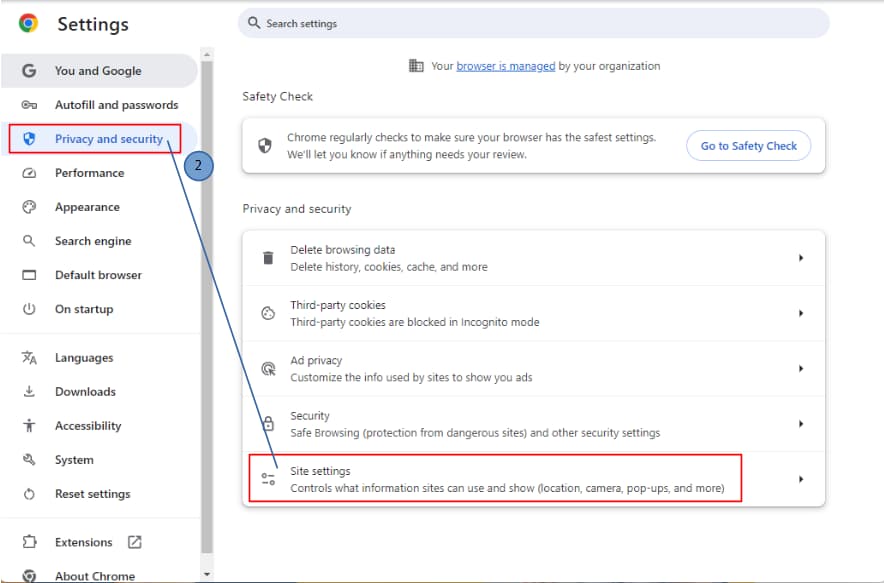
- Choose Privacy and security.
- Select Cookies and other site data.
- Choose See all cookies and site data.
- Enter “intuit” in the search bar to find Intuit cookies.
- Click Remove all shown or the trash can icon.
- Restart Google Chrome for the changes to be applied.
Mozilla Firefox
- Go to the Menu ☰ icon at the top right corner of the screen.
- Click Settings.
- Select Privacy & Security.
- Choose Manage Data under Cookies and Site Data.
- Enter “intuit” in the search bar and select Enter to find Intuit cookies.
- Click Remove All Shown and choose Save Changes.
- Restart Mozilla Firefox for the changes to take effect.
Safari
- Open Safari, and choose Safari beside the apple icon to the top left.
- Select Preferences.
- Choose Privacy, and Manage Website Data.
- Enter “intuit” in the search bar to find Intuit cookies.
- Select Remove All and choose Remove Now.
- Click Done.
- Restart Safari to apply the changes you made.
Solution 3: Disable Pop-Up Blockers
Most browsers include pop-up blockers to prevent unwanted windows, but QuickBooks Online relies on pop-ups for key actions like saving, emailing, or previewing invoices. If blocked, these features may not work correctly. To fix this, add https://accounts.intuit.com/app/sign-in?app_group=QBO&asset_alias=Intuit.accounting.core.qbowebapp&app_environment=prod as an exception in your browser’s pop-up settings.
- Open Chrome, select More and click Settings.

- Choose Site settings under Privacy and security.

- Select Pop-ups and redirects.
- Switch the setting to Sites can send pop-ups and use redirects or Don’t allow sites to send pop-ups or use redirects.
- If you prefer to keep pop-ups blocked, add an exception for QuickBooks Online instead:
- Click Add to the right of Allowed to send pop-ups and use redirects.
- Enter qbo.intuit.com.
- Select Add.
Solution 4: Manage User Roles or Permissions
Certain features in QuickBooks Online, including access to custom fields, are restricted based on user roles. If you can’t see or use custom fields, your current role may not have the necessary permissions. An admin user can review and update your role from the Manage Users section under Settings. Make sure your role includes full access to sales forms and custom fields.
- Navigate to Settings, and choose Manage users.
- Find the user you want to edit, and select Edit in the Action column.
- You can change the user role from the Roles dropdown menu.
Note: Time tracking roles can’t be edited. To change these, delete the user and re-add them with the correct role.
- Select the account management settings you want to manage.
- Click Save.
Solution 5: Review Custom Field Settings
You can have up to 12 active custom fields for each type of form (invoice, estimate, purchase order, expense, bill, and so on), and each type of profile (customer and vendor). Besides text, you can also create custom dropdown, date, and number fields.
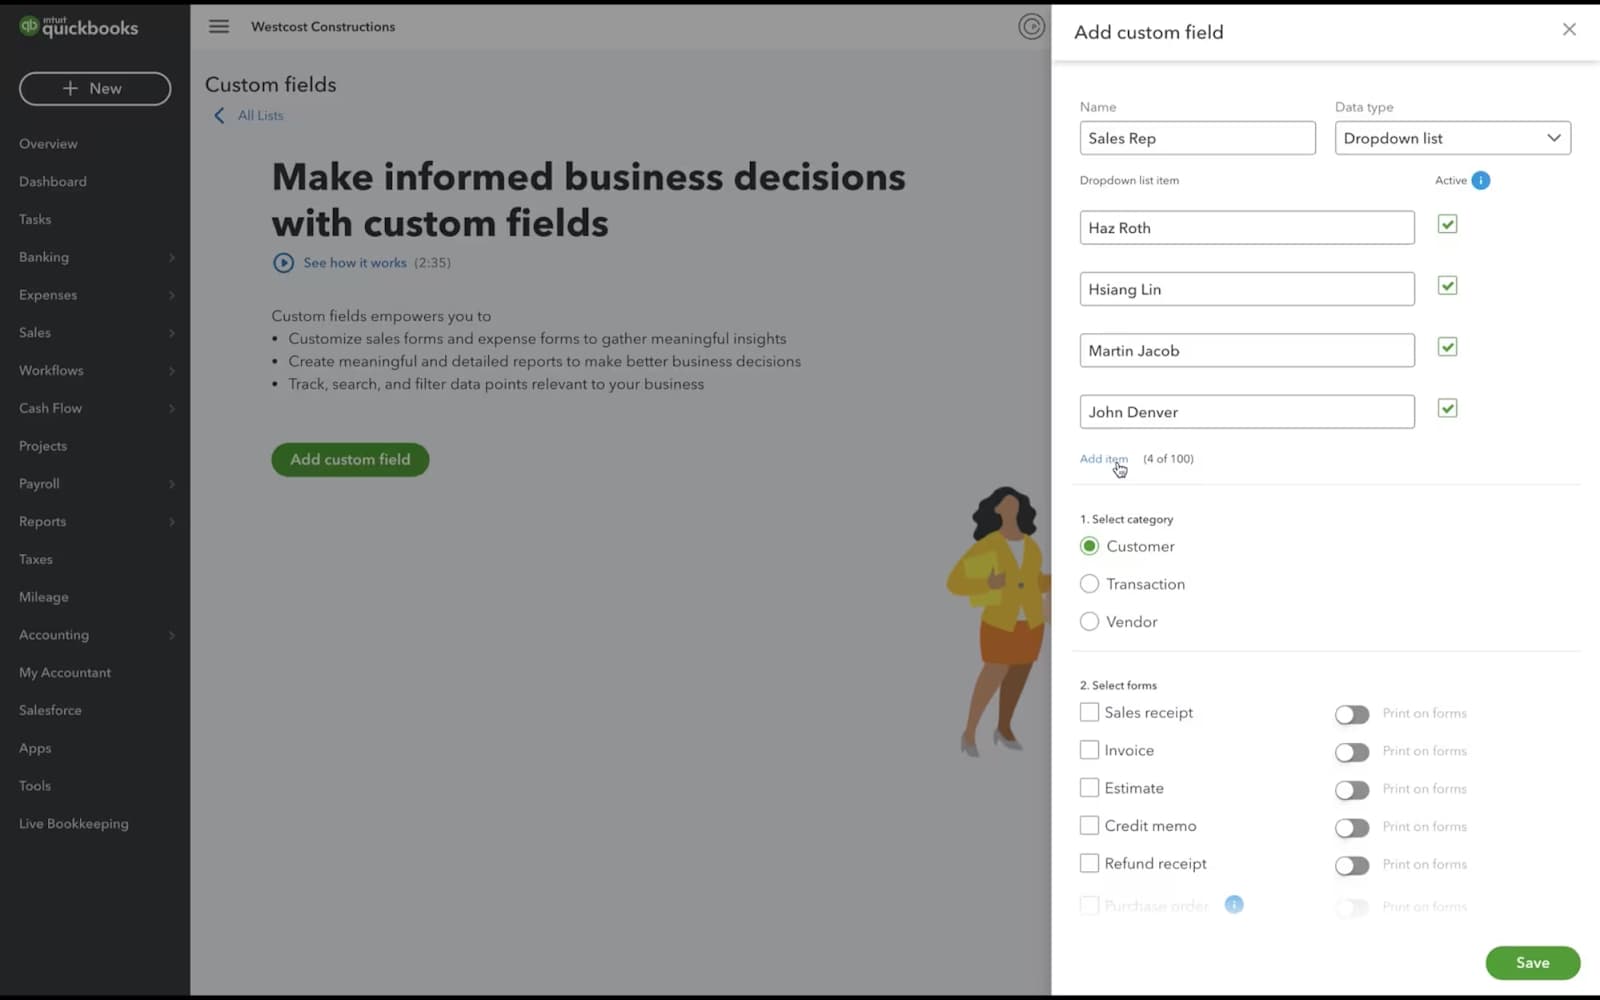
- Navigate to Settings and select Custom fields.
- Click Add custom field. If custom fields already exist, you’ll see “Add field” instead of “Add custom field.”
- Enter the name of the custom field in the Name field.
- Choose the type of data from the Data type dropdown that will go in your custom field: Text and number, Number only, Date, or Dropdown list. If you choose the Dropdown list, add the items you want included.
- Select the category the custom field belongs to: Customer, Transaction, Vendor, or Project. Customer fields are for customer profiles, and vendor fields are for vendor profiles. You can assign transaction fields to sales forms (like invoices, estimates, and sales receipts) and purchase forms (like purchase orders, bills, expenses, and checks).

- Choose the forms where the custom field should appear. Note: To use custom fields on purchase orders, make sure purchase orders are enabled in your settings.
- Select Print on form to display the field on customer or vendor forms (like invoices, estimates or purchase orders). You can enable this for up to 3 custom fields per form type.
- Once done, click Save.
Solution 6: Update Customer Profile
Missing or outdated customer details can cause issues when creating invoices. Ensure each profile includes key information like name, email, billing address, and payment terms for smooth transactions.
- Choose Sales from the sidebar menu.
- Select the Customers tab.
- Locate the customer you want to edit, and choose the name to open their profile.
- Click the Edit button, and navigate to the Payment and billing section.
- Update the terms and make the necessary changes.
- When you’re ready, click Save.
Solution 7: Change the Income Account for Product/Service Items
Incorrect or misconfigured income account settings linked to your products or services can prevent invoices from being saved. The income account determines where QuickBooks reports the sales revenue for each item. To avoid errors, make sure each item is mapped to the correct income account, especially one categorized under “Sales of Product Income.”
- Navigate to Settings and choose Products and services.
- Locate the item and click Edit.
- Under the Income account dropdown menu, select the account you want to use.
Note: Can’t see the account? Make sure the account’s detail type is Sales of Product Income.
- Click Save and close.
Note: You can only change the account for an item one at a time.
Smart Ways to Avoid Common Mistakes When Creating Invoices in QuickBooks Online!
Even after resolving errors, it’s important to take proactive steps to prevent invoice creation issues in the future. From keeping customer data updated to regularly reviewing product/service mappings, these best practices help you to maintain smooth invoicing workflows in QuickBooks Online. Follow these best practices to minimize disruptions and ensure accurate, error-free billing every time.
- Make sure customer profiles contain accurate names, emails, and billing addresses.
- Update payment terms and billing preferences at regular intervals.
- Associate each product or service with the correct income account.
- Use consistent naming conventions for items and customers.
- Disable any active pop-up blockers in your browser settings.
- Avoid using special characters or emojis in custom fields.
- Confirm all mandatory custom fields are properly filled.
- Assign appropriate user roles with access to create and manage invoices.
- Keep your QuickBooks Online account and browser updated.
- Review inactive or outdated items and remove them from forms.
Final Verdict!
Uillen, I completely understand how frustrating it is when you’re all set to create an invoice in QuickBooks Online, only to run into unexpected errors that seem to come out of nowhere. It can feel overwhelming, especially when timely billing is essential for your business.
The good news is, you’re already on the right track. Whether it’s reviewing your custom fields, checking browser pop-up settings, adjusting user permissions, or making sure each product is correctly linked to a valid income account, each step helps eliminate the common roadblocks that cause invoice creation to fail.
Make sure your browser allows QuickBooks pop-ups, all customer and item details are properly filled in, the user role includes invoicing permissions, and each product or service is assigned to the correct income account. Also, avoid using more than three “Print on form” custom fields per form type.These small checks can go a long way in preventing errors and keeping your invoicing workflow running smoothly.
If you ever find yourself stuck again or just need help with configuring templates, setting up custom fields, managing item categories, or even optimizing your sales workflow in QuickBooks Online, don’t hesitate to reach out to us.
Disclaimer: The information outlined above for “Why Won’t QuickBooks Online Let Me Create Invoices After Setup?” is applicable to all supported versions, including QuickBooks Desktop Pro, Premier, Accountant, and Enterprise. It is designed to work with operating systems such as Windows 7, 10, and 11, as well as macOS.
