Recording cash-back rewards in QuickBooks correctly is essential for maintaining accurate financial records and supporting better financial management.
Cash-back rewards are one of the main and most attractive options, along with credit cards, which can be used to compensate for costs or add to savings.
Cash-back rewards function as a “contra-expense” on the profit and loss statement, showing a reduction in expenses rather than income.
Whether you use QuickBooks Desktop or QuickBooks Online, you should document these kinds of rewards well to provide the correct picture of your financial situation.
How Do You Record Credit Card Cashback Rewards in QuickBooks Desktop?
Step 1: Create a Cash-back Rewards Account
Step 1: Access the Chart of Accounts
- From the top menu bar, click on Lists.
- In the drop-down menu, select Chart of Accounts.
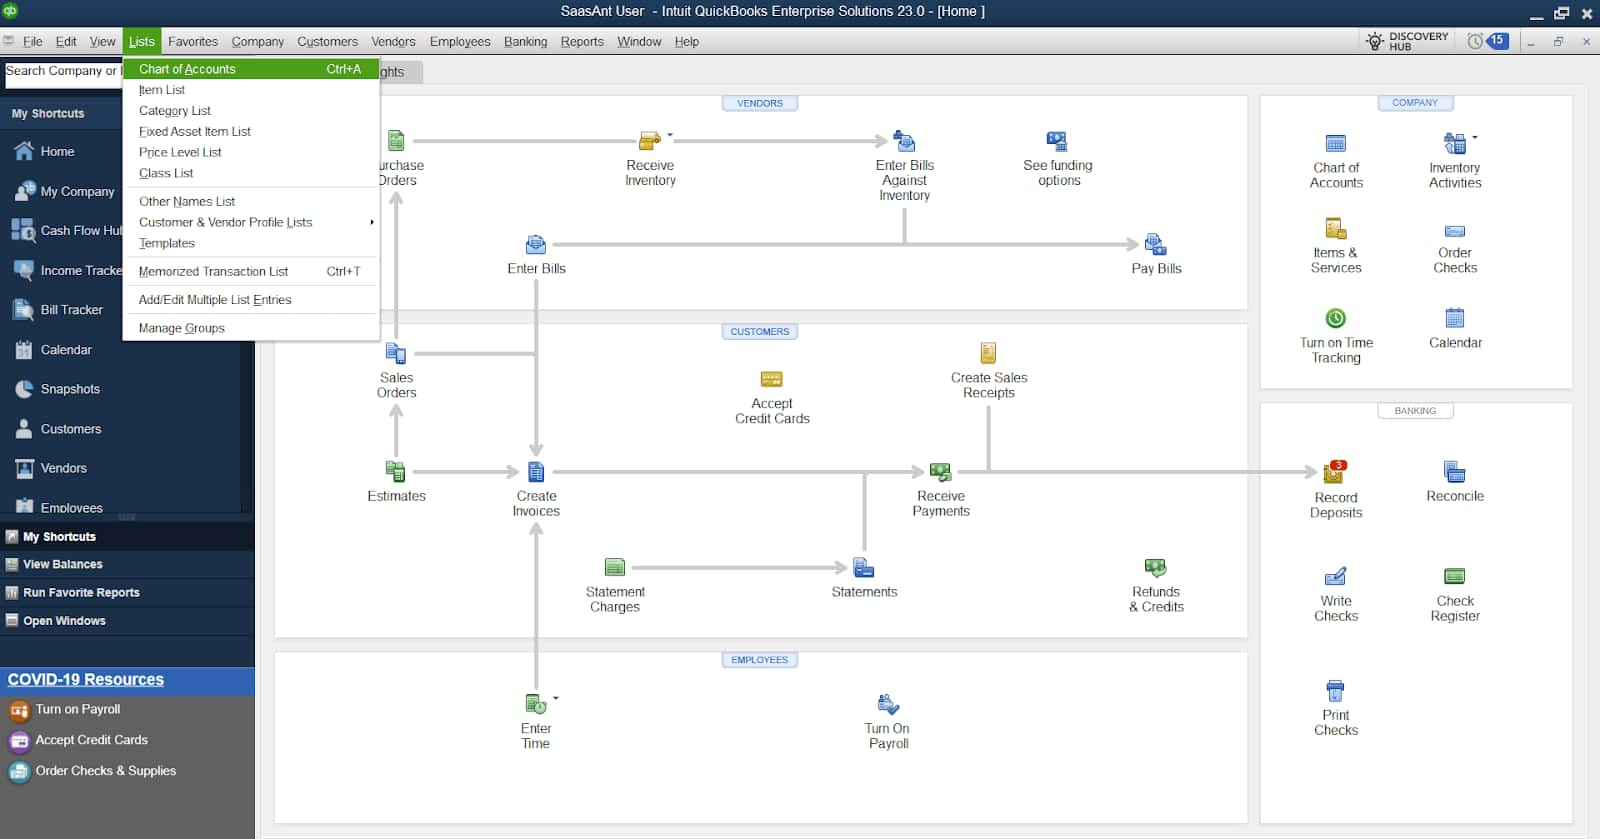
- The Chart of Accounts window will open, listing all your accounts.
Step 2: Set Up the New Account
- Click the + New button at the bottom left of the Chart of Accounts window.
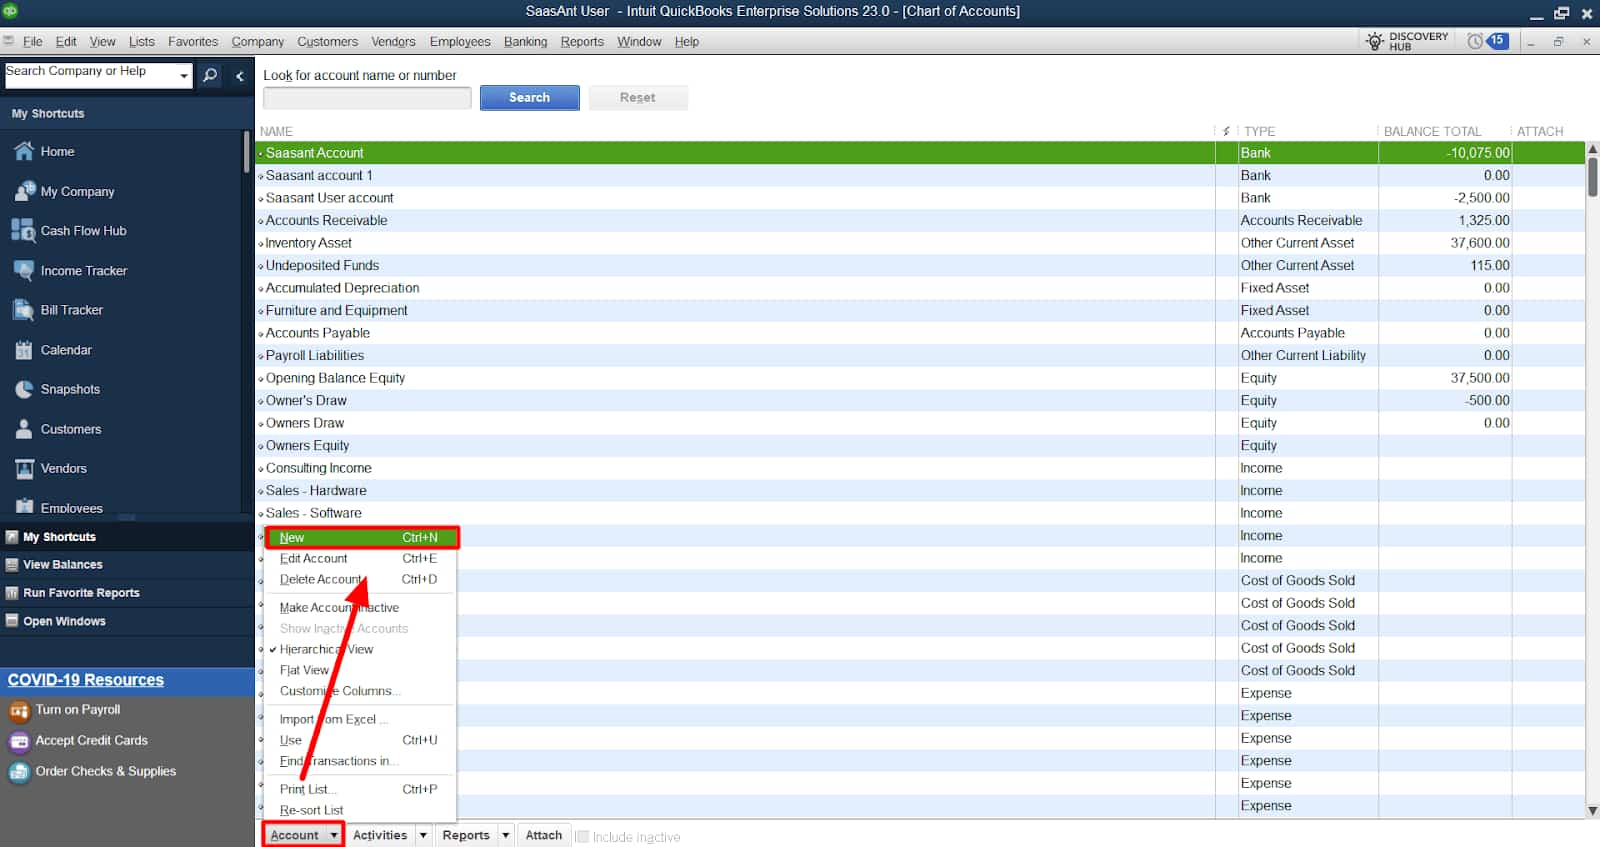
- In the Account Type field, select Income from the drop-down menu.
- In the Other Current Assets, enter a name for the account, such as “Cash-back Rewards.”
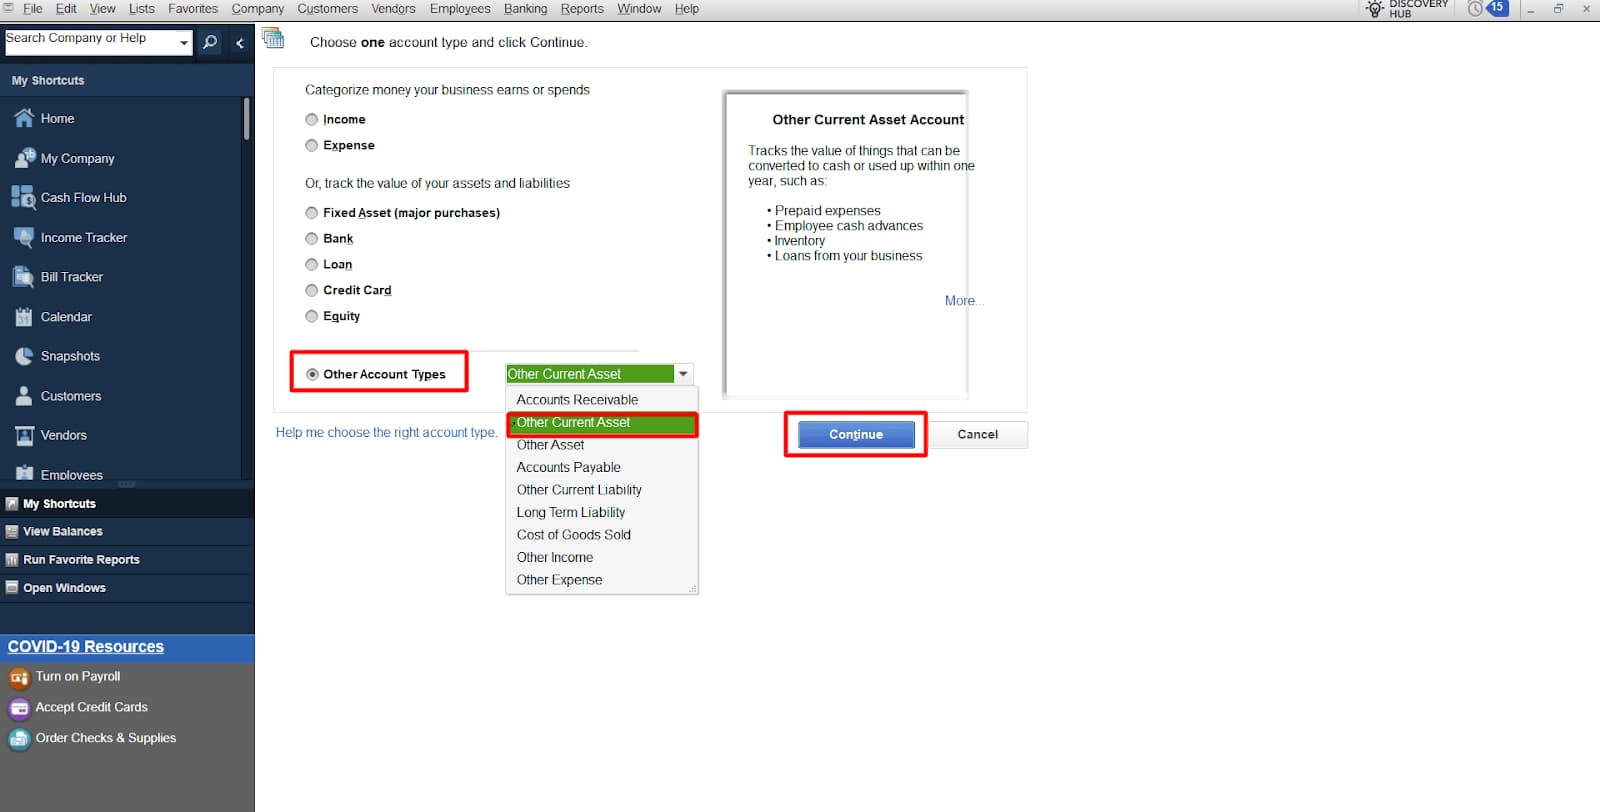
- In the Description field (optional), provide additional details if needed.
- Set any other necessary account details (e.g., Account Number, Tax Line Details, etc.) if required.
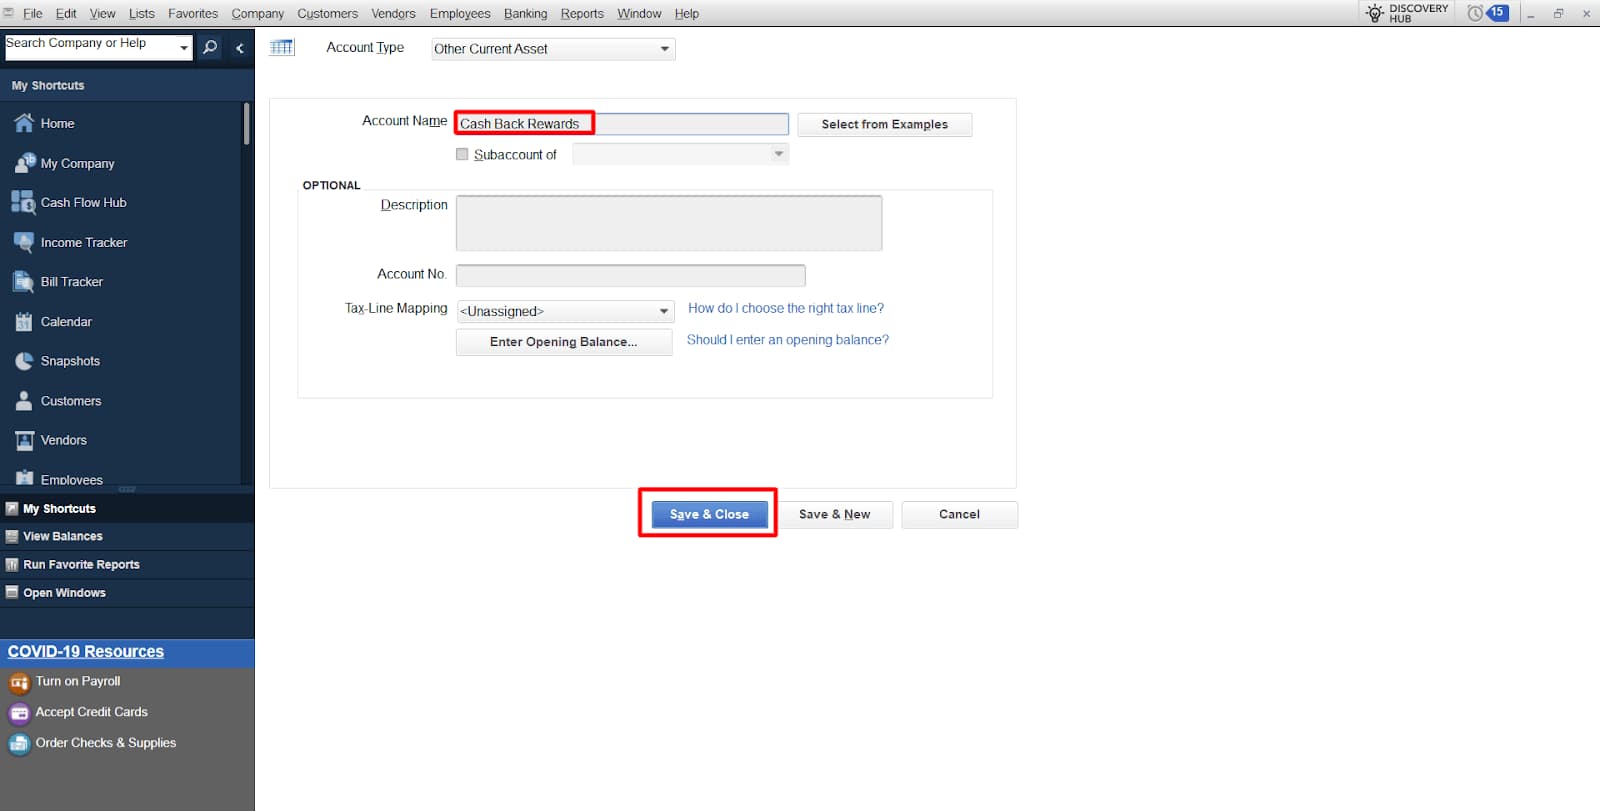
- Click Save and Close to create the account.
Step 2: Record the Cashback Reward
Step 1: Open the Credit Card Charges Entry Screen
- From the top menu bar, click Banking.
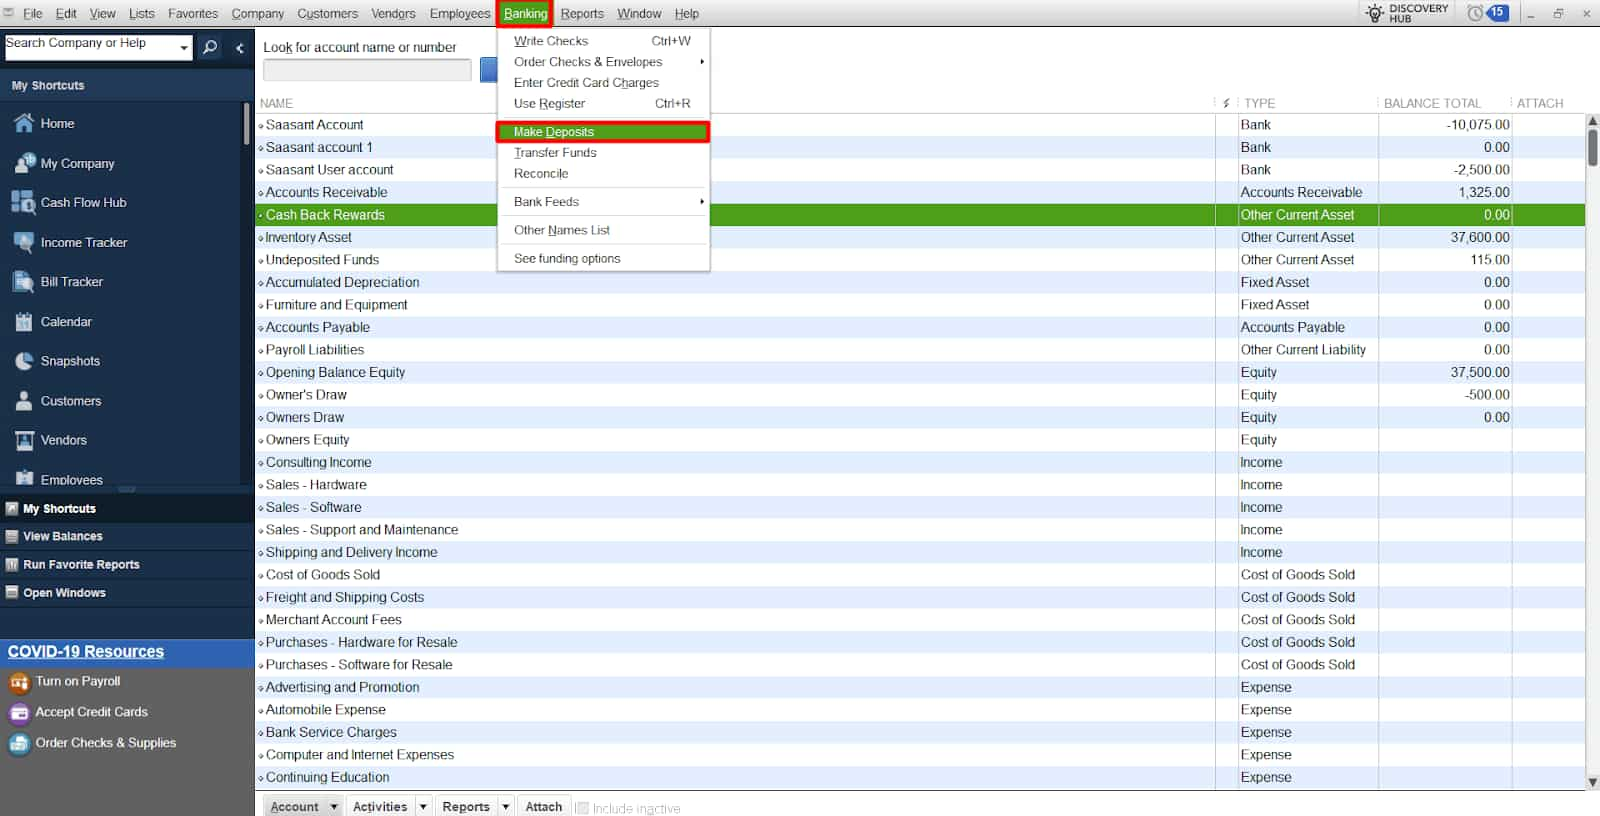
- In the drop-down menu, select Enter Credit Card Charges.
- The Credit Card Charges window will open.
Step 2: Enter the Cashback Transaction
- In the Payee field, select the name of the credit card issuer or the specific vendor from which the cashback originated.
- In the Account field, select the Cash-back Rewards account you created earlier.
- In the Payment/Credit section, choose Refund/Credit.
- In the Amount field, enter the amount of cashback you received.
- Optionally, add any other details, like a memo or description for reference.
Step 3: Save the Transaction
- After entering all the required details, click Save and Close to complete the transaction.
Step 3: Assign the Appropriate Expense Account
After you’ve recorded the deposit, you must apply the cash-back incentives to the proper spending account.
- Navigate to the Banking menu and choose Use Register.
- Locate the deposit you made in the register and double-click it to initiate the transaction.
- In the transaction window, choose the Account field from the Account column.
- Choose the appropriate expenditure account for the initial expense linked with the cash-back incentives. For example, if the payback is for travel expenditures, choose the Travel Expense account.
- If required, create a note to offer more information about the transaction.
- To save your changes, click on Save & Close.
Step 4: Review and Analyze
To examine the classification of cashback rewards:
- Go to the Reports option at the top of the screen.
- Select Custom Reports, then Transaction Detail.
- Customize the report options to include the Cash Back Rewards and corresponding spending accounts.
- Run the report to examine and evaluate the cash-back incentives sorted by spending account.
- Other reports, such as Profit & Loss and Expense by Vendor, will help you better understand your savings and costs.
How Do You Record Credit Card Cashback Rewards in QuickBooks Online?
Step 1: Create an Income Account
To help improve your record keeping, you should open a separate account on QuickBooks online for your cash-back earnings.
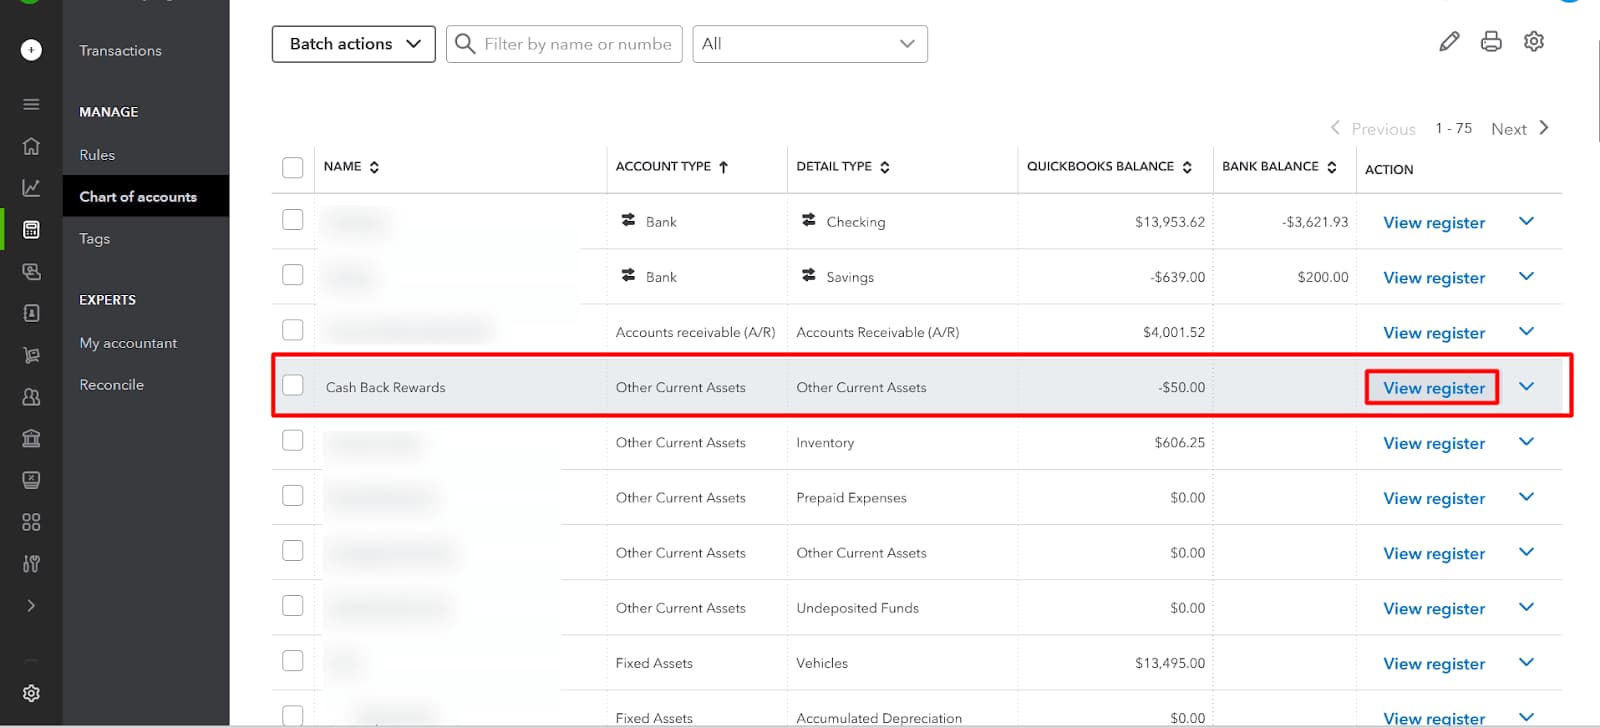
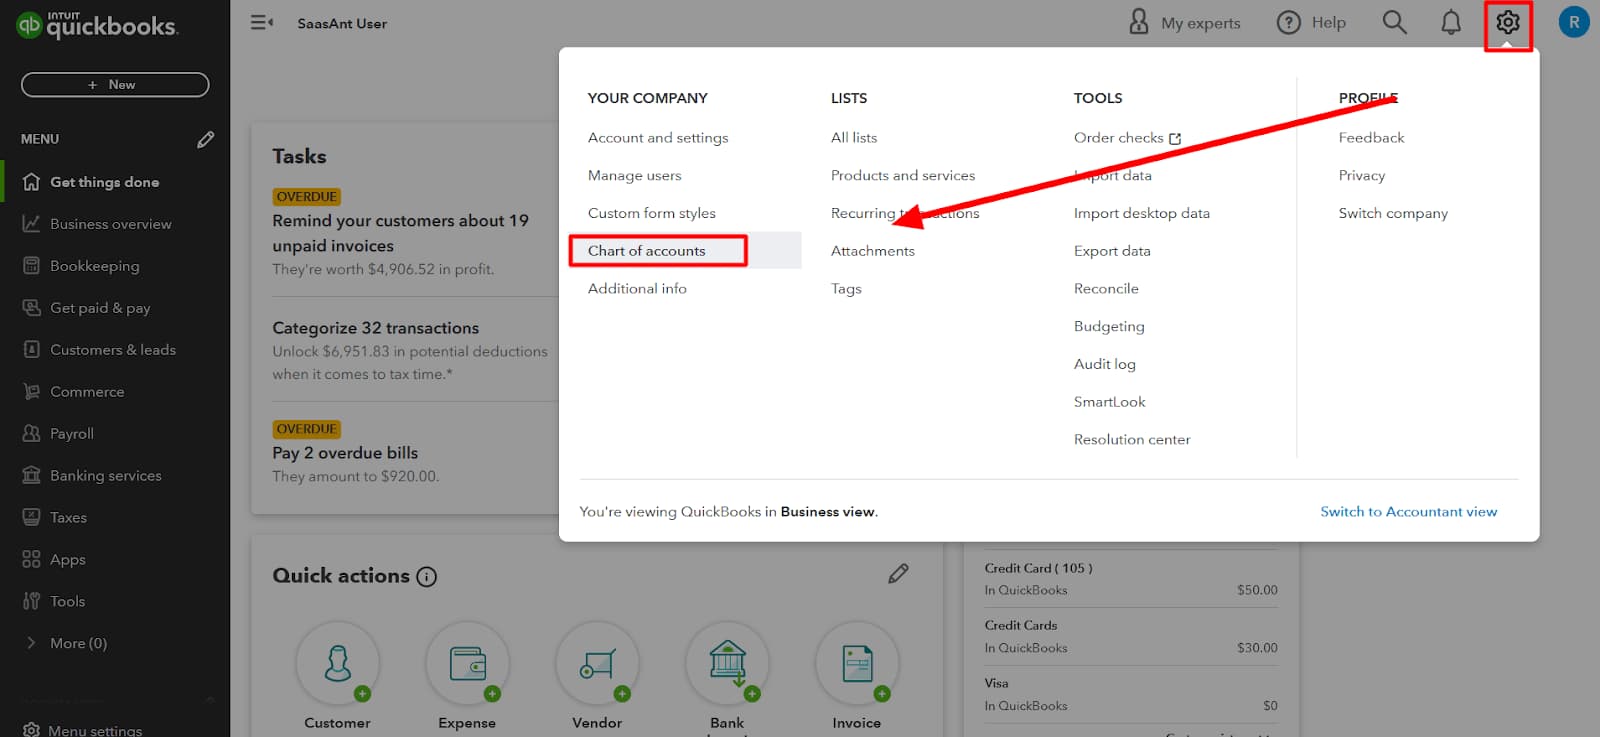
- Navigate to the Chart of Accounts.
- Click on New to create a new account.

- Select Other Current Asset as the account type.
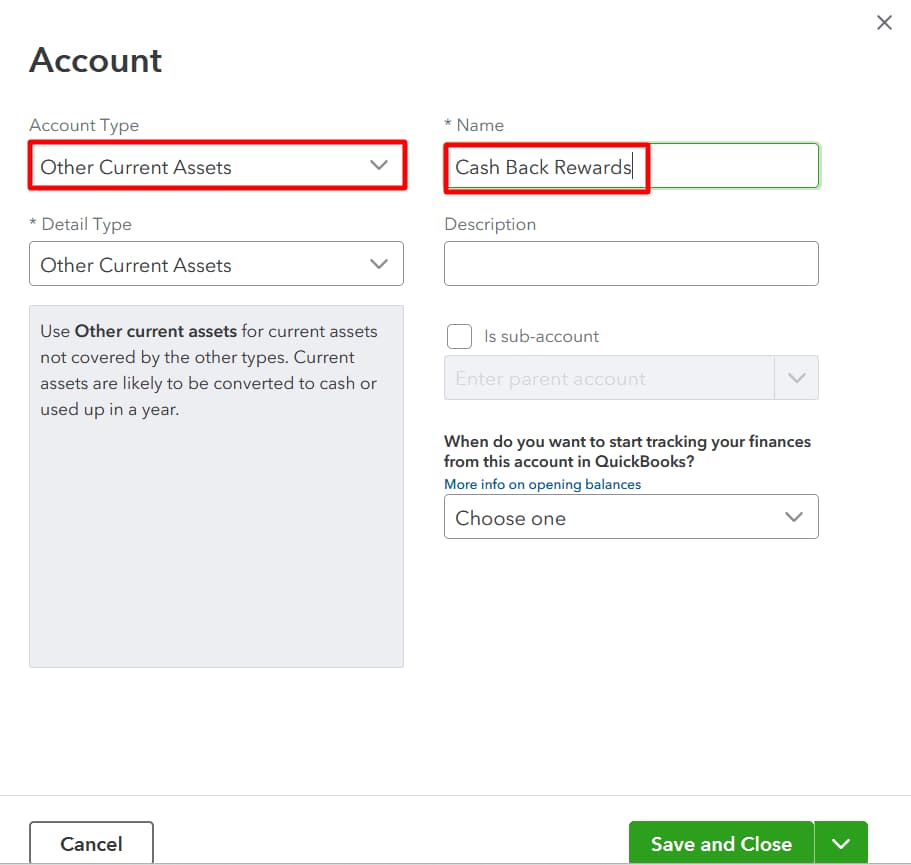
- Name the account Cash Back Rewards.
- Click Save and Close.
Step 2: Record Cash Back Transactions
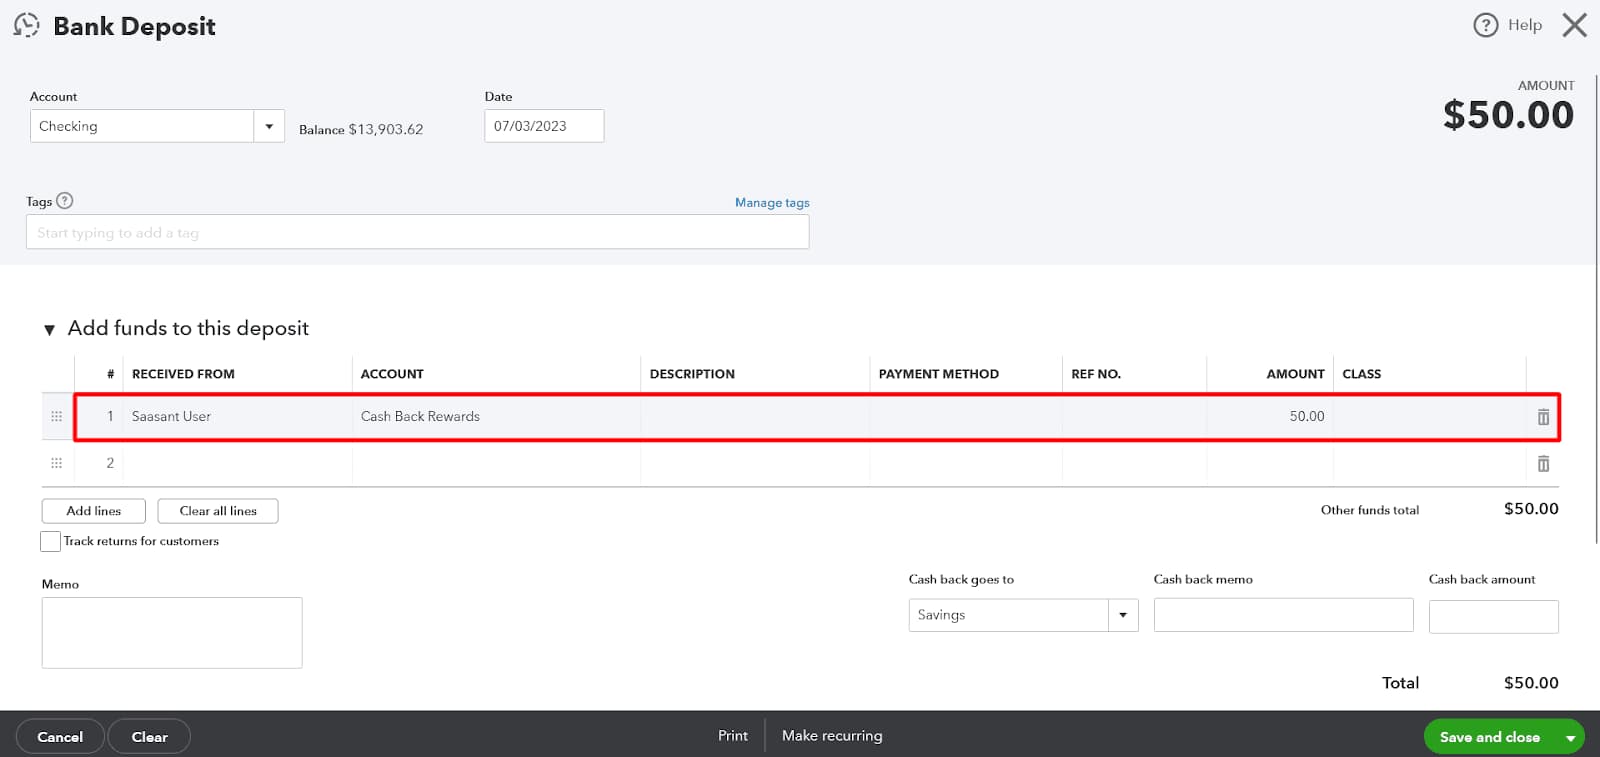
If you get any form of cash back on your credit card, be sure to enter it as a deposit to QuickBooks Online.
- Click on the + New button at the top left corner and select Bank Deposit.
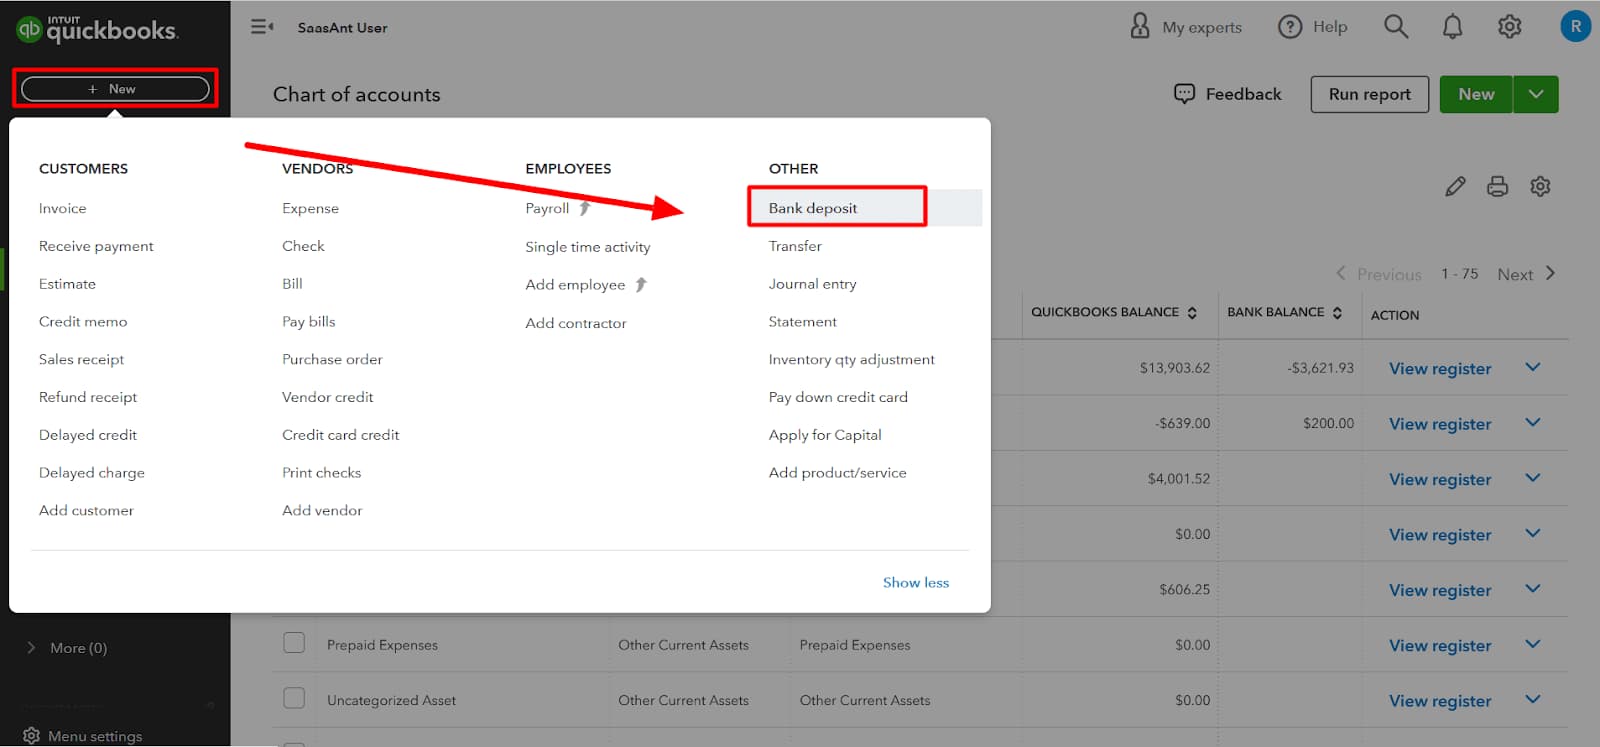
- Choose the bank account where you received the cash-back rewards.
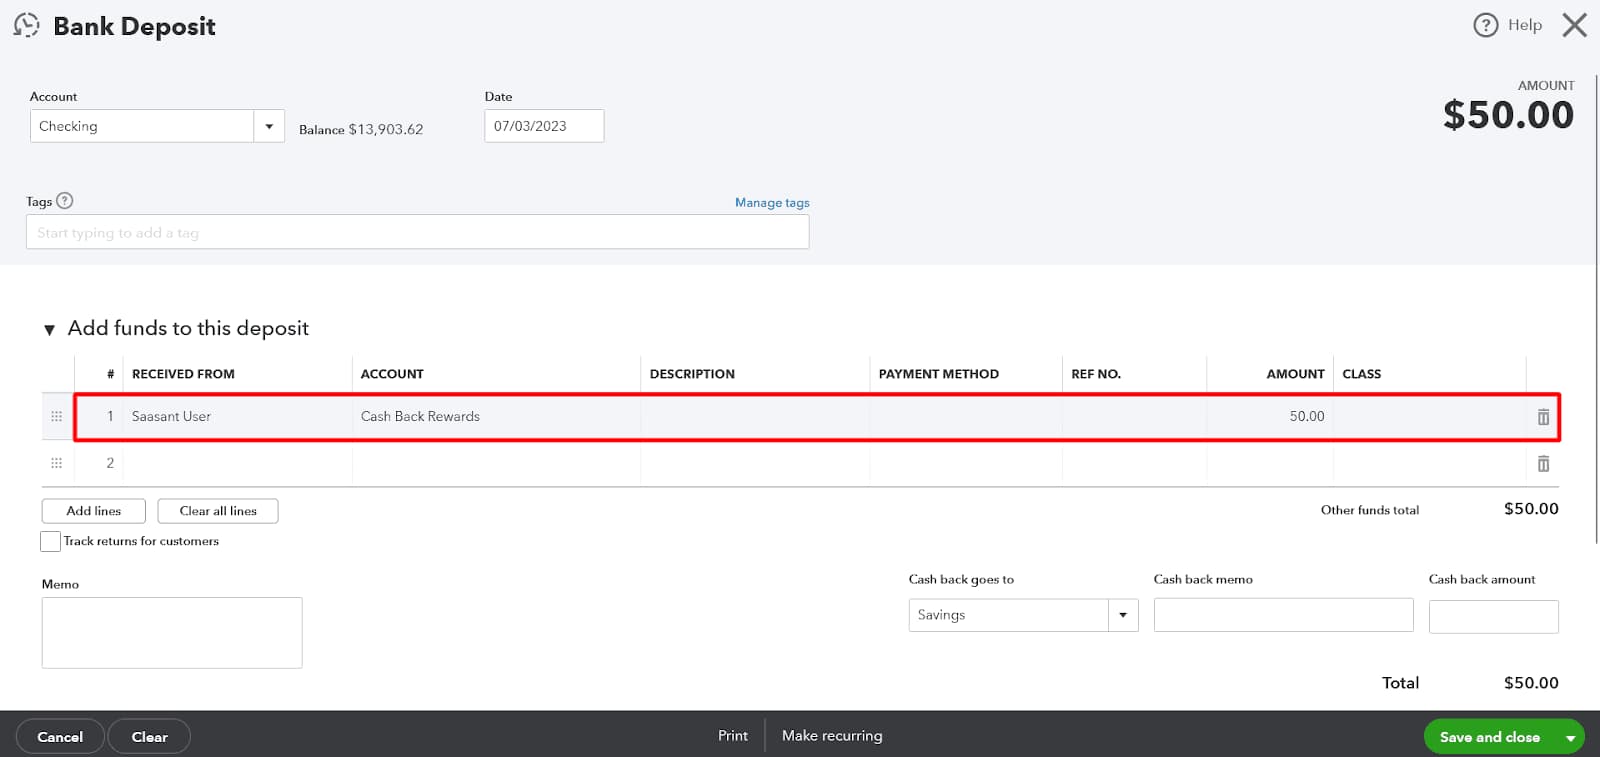
- In the Add funds to this deposit section, select the Cash Back Rewards account you created.
- Enter the amount of the cash-back rewards in the Amount field.
- Click Save and Close to record the deposit.
Step 3: Assign an Appropriate Category
After you’ve recorded the deposit, you must accurately classify the cash-back benefits.
- Navigate to Chart of Accounts.
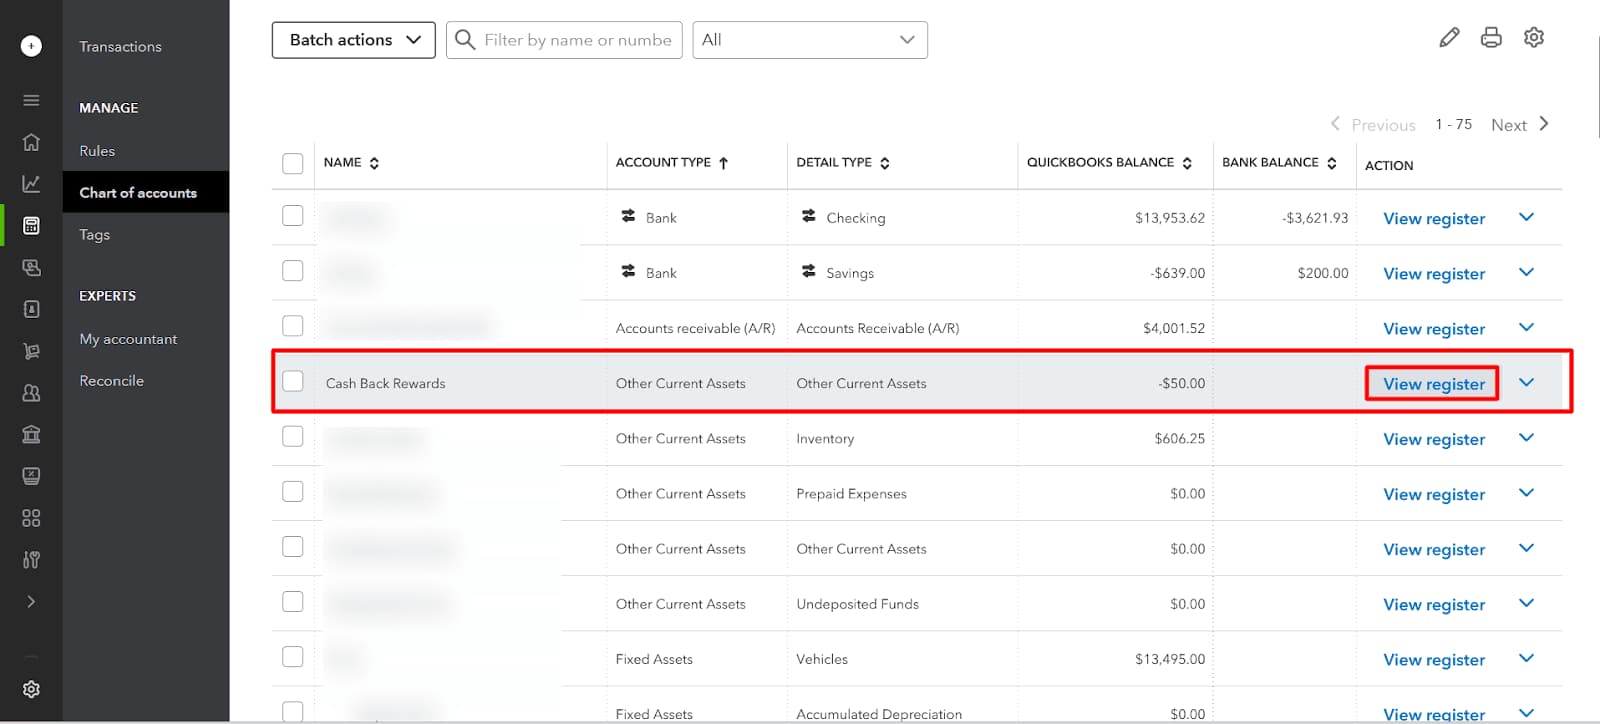
- Locate the deposit you made and click on it to initiate the transaction.
- In the transaction window, click on the Category column and choose the category that corresponds to the original cashback expenditure. For example, if you received cash back on office supplies, choose Office Supplies Expense.
- Select Save and Close.
Step 4: Review Reports
Making sure that cash-back rewards are correctly categorized requires routinely going over reports in QuickBooks Online.
- Select All Reports from the Reports option, or pick certain reports such as Profit & Loss or Expense by Vendor.
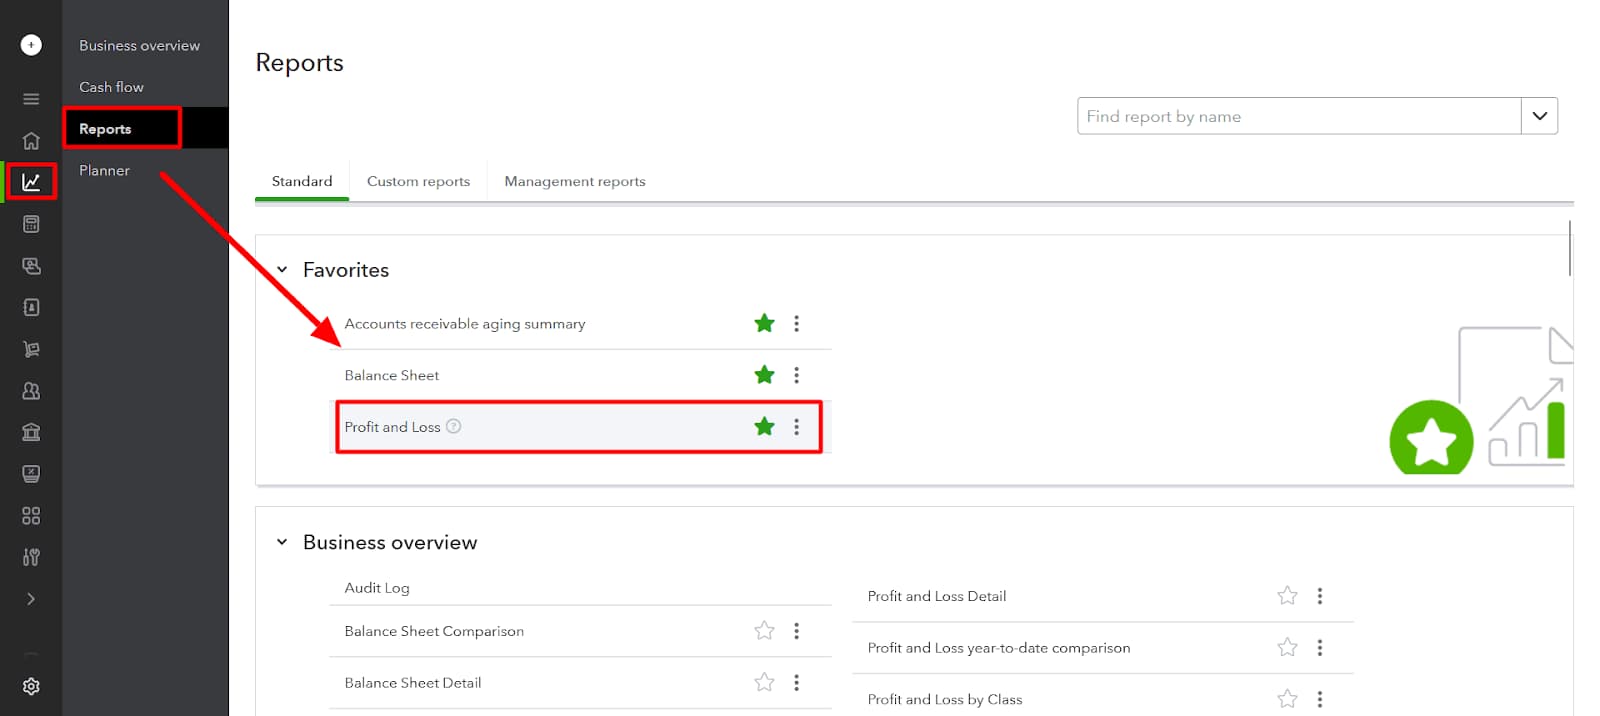
- Add the Cash Back Rewards account and the corresponding spending categories to the report settings.
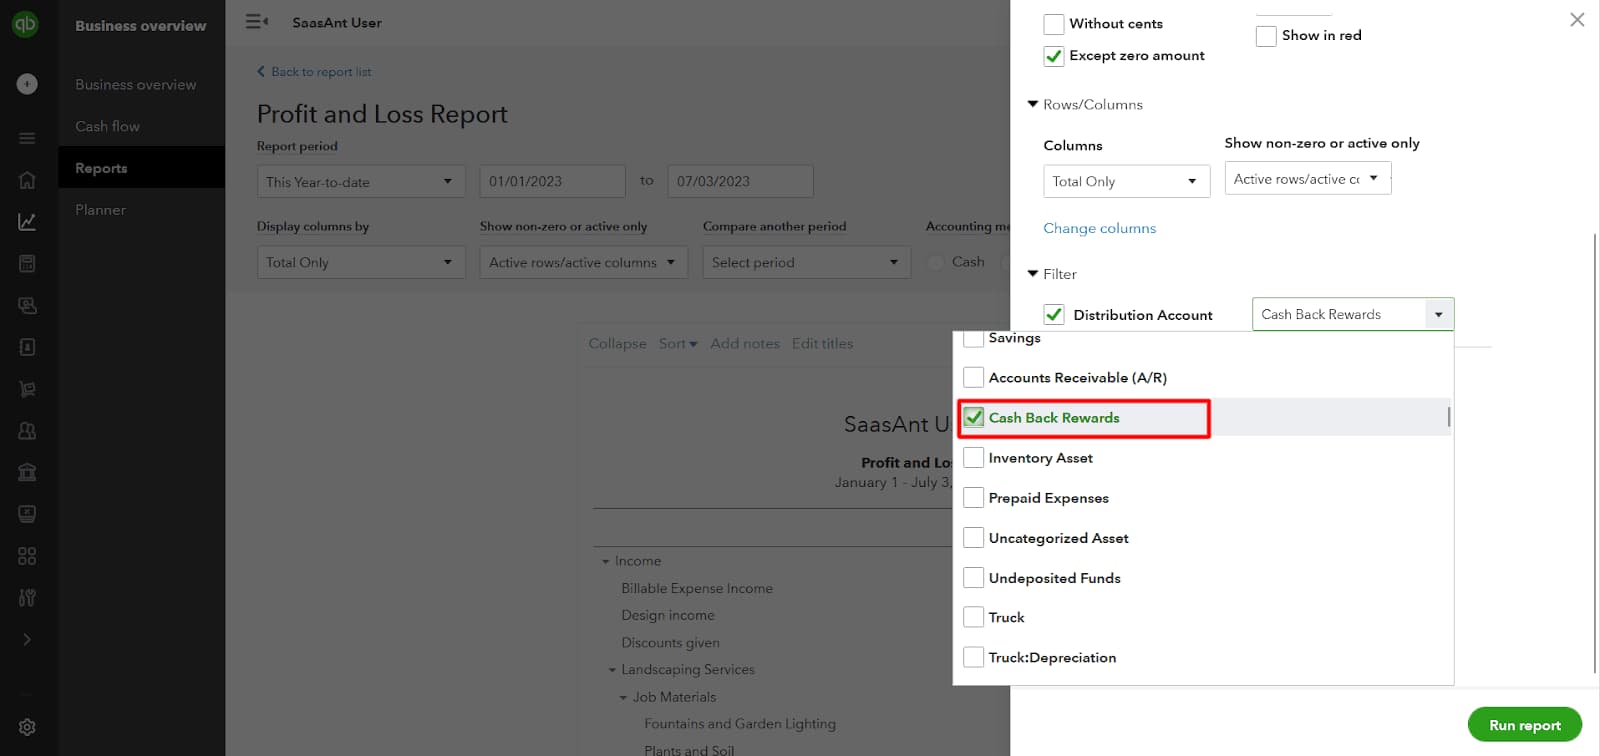
- Examine the reports to track the amount of money you are saving in each area, thanks to cash-back rewards.
Why is it Important to Record “Cash Back Rewards”?
Recording Cash Back Rewards is important for several key reasons:
- Accurate Financial Tracking: Recording cash back rewards allows tracking of all often or savings obtained from the rewards program as a way of enhancing the accountancy of the business.
- Expense Categorization: These are mostly derived from certain purchases or kinds of purchases or products and services (for example, office supplies, travel, etc.). Writing these benefits facilitates the proper classification of the rewards because your reports will include real cost savings.
- Improves Financial Insights: It is helpful to monitor the cash-back rewards as they are informational in terms of how much savings are functioning and how much they are functioning well enough to be rewarded from specific expenditures.
- Tax Purposes: When filing tax returns, proper recording and categorization of cash back rewards will help in following the law and, in addition, enable the faculty to maximize its tax benefit or minimize its taxable income by indicating where the cash back rewards had been utilized.
- Budgeting and Cost Efficiency: It also enables you to have an insight into how much you are to earn and thus have a clue on how to balance your earnings and expenditures well.
Conclusion
Businesses must record cash back rewards in their QuickBooks accounting software to maintain complete records of all incoming auxiliary income and gains. Cash-back rewards are recorded as revenue in the company’s books of accounts and are shown in the Statement of Profit and Loss as income received.
Frequently Asked Questions!
What if the Cash-Back Rewards are Given as a Check or Direct Deposit?
If the cash-back rewards are given to you as a check or a direct deposit, treat them as a deposit transaction:
- In QuickBooks Desktop, go to Banking > Make Deposits and enter the reward amount, selecting your cash-back rewards account.
- In QuickBooks Online, go to + New > Bank Deposit and choose the income account set up for cash-back rewards.
Do I Need to Treat Cash-Back Rewards as Taxable Income in QuickBooks?
Cash-back rewards are generally considered a reduction of business expenses rather than taxable income. When setting up an income account for rewards, consult with your accountant to determine if any portion of it may be taxable. Most businesses, however, treat cash back as a deduction on expenses, which lowers their total business expenses rather than adding it as taxable income.
Can I Categorize Cash-Back Rewards as Income from Other Financial Institutions?
Yes, if you receive cash-back from various sources, you can set up multiple income sub-accounts under “Cash-Back Rewards” or “Other Income” to track each one individually. This is especially useful if you want to keep cash-back from different cards or programs separate for better visibility. In QuickBooks Online, you can use + New > Bank Deposit and select the sub-account for the specific reward source.
Disclaimer: The information outlined above for “How to Record Credit Card Cash Back Rewards in QuickBooks Desktop and Online?” is applicable to all supported versions, including QuickBooks Desktop Pro, Premier, Accountant, and Enterprise. It is designed to work with operating systems such as Windows 7, 10, and 11, as well as macOS.
