Excerpt:
If you're dealing with negative deposits in QuickBooks due to refunds, reversals, or corrections, this guide shows you how to resolve the issue. Whether you're using QuickBooks Online or Desktop, methods like journal entries, refund receipts, and clearing accounts can help you record negative deposits. This ensures your financial records stay accurate while offsetting negative values, particularly with Undeposited Funds and credit card transactions. Follow the detailed steps to keep your accounts balanced and error-free.
 Add As A Preferred
Negative Deposit Recording in QuickBooks is necessary when managing customer refunds or credit card chargebacks, but the software structurally prohibits entering a negative value directly into the Make Deposits screen. To accurately record money leaving the account, users must utilize specialized accounting tools: a Journal Entry, a Refund Receipt (QBO), or a Credit Memo (QBD). The core solution involves using the Undeposited Funds account as a clearing mechanism, requiring a Journal Entry to offset the negative banking transaction with a corresponding positive entry in Undeposited Funds. This procedure culminates in a zero-sum bank deposit that clears the linked transactions simultaneously, ensuring accurate bank reconciliation and preventing errors caused by complex scenarios like negative credit card batches.
Undeposited Funds Account in QuickBooks is a nominal account for the amounts of money collected but not yet banked. This facilitates the monitoring of outstanding deposits, ensuring that several payments are recorded in a single bank deposit entry as seen in the actual bank statement.
A negative deposit is a situation in which money has been withdrawn from an account or when a deposit amount must be changed because of a refund, reversal, or correction.
As you may note when using the ” Make Deposits ” option, depositing a negative amount to QuickBooks Online or Desktop is not possible. But there are ways to tackle situations where you have to record a negative deposit, for instance, refunds or adjustments.
If you receive a correction for service, you need to record it as a separate transaction. Once done, you can apply it to the Bill. It’s a very simple way to ensure your records are accurate and up-to-date in QuickBooks.
Here’s how you can manage it:
There are 3 methods to record a negative deposit issue in QuickBooks Online:
By making a reverse journal entry, this issue can be resolved:
This situation can also be resolved by filling a refund receipt:
A negative deposit issue can also be resolved by setting up a clearing account by following the below steps:
There are also 3 methods to record a negative deposit issue in QuickBooks Desktop:
Follow the steps to resolve the issue with a journal entry:
In QuickBooks Desktop, creating a credit memo will also resolve this issue:
Follow the below steps to resolve the issue using a clearing account:
These are logical instructions for documenting negative deposits in QBO and QBD, offered in a simple structure.
Since the refund is larger than the amount in your undeposited account, you may need to create a Journal Entry in QuickBooks Desktop for Windows or Mac to offset the Undeposited Funds.
To record negative credit card batch transactions in QuickBooks Desktop, go to Company, select Make General Journal Entries, adjust the date, and enter the necessary details to offset Undeposited Funds.
Let’s see how:
Step 1: Navigate to Company
Step 2: Select Make General Journal Entries
Step 3: Fill out the Date column
Step 4: Finishing up
QuickBooks Desktop (QBDT) won’t allow a negative total amount when recording transactions manually. However, you can use the Batch Enter Transactions option to enter negative amounts for credit card charges or credits.
To record negative deposits using Batch Enter Transactions in QuickBooks Desktop, go to Accountant, select Batch Enter Transactions, choose Checks, enter date, number, payee, and credit card details, and input the amount as positive. This will decrease both bank and credit card balances.
Below are the steps you must follow:
Step 1: Go for Batch Enter Transactions
Step 2: Select Checks as the Transaction Type
Step 3: Enter the Date, Number, and Payee
Step 4: Add the credit card
Step 5: Finishing up
Note: This process will decrease both bank and credit card balances.
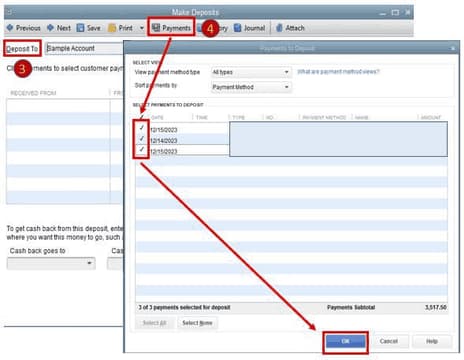
Record credit card charges in QuickBooks Desktop, go to Banking, select Make Deposits, choose your Deposit To account and date, click Payments, review transactions, add the charge, and save.
Following the step-by-step information below:
Step 1: Navigate to Banking
Step 2: Select Make Deposits
Step 3: Add your Deposit To account
Step 4: Click Payments
Step 5: Check the transactions used to pay the refund
Step 6: Create another line for the charge
Step 7: Finishing up
At times, negative value transactions show up in Undeposited Funds and appear on the Bank Deposit screen (for instance, if you issue a customer refund from Undeposited Funds). You can’t deposit a negative value entry by itself. The net deposit must be a value greater than or equal to zero. To resolve issues with negative transactions in Undeposited Funds, make a zero-value deposit and record the negative-value deposit with it.
How do you record negative entries from Undeposited Funds in QuickBooks Online? Create a journal entry with the Undeposited Funds and bank accounts, enter amounts in debit and credit columns, and then save. Next, use Bank Deposit to offset the negative value, ensuring the total is zero.
Create a Journal Entry, click + New, select Journal Entry, enter the date, choose Undeposited Funds in the Debit column, select the bank account for the Credit column, then save and close.
Step 1: Select Journal Entry
Step 2: Type the transaction date
Step 3: Add the Undeposited Funds Account
Step 4: Enter the single-line deposit amount
Step 5: Opt for the bank account
Step 6: Re-enter the single-line deposit amount
Step 7: Finishing up
To offset the negative value, click + New, select Bank Deposit, add the payment and the Journal Entry ensuring the total is zero, then save and close.
Step 1: Select Bank Deposit
Step 2: Add the payment and the Journal Entry
Step 3: Finishing up
Record a negative deposit in QuickBooks Online, create a Journal Entry, set Undeposited Funds for Debits and a bank account for Credits, ensuring the amounts match the negative balance. Save and close.
You can choose your undeposited funds and bank account as the source account of your journal entry to zero out the negative balance.
Here’s how:
Step 1: Select Journal Entry
Step 2: Enter the date of your Journal Entry
Step 3: Add Undeposited Funds
Step 4: Type the amount equal to the negative balance
Step 5: Opt for any Bank Account
Step 6: Write down the same account
Step 7: Finishing up
How to Deposit the journal entry to offset the negative credit card balance, click + New, select Bank Deposit, choose the journal entry created, and then hit Save and Close.
Step 1: Go for Bank Deposit
Step 2: Select the Journal Entry
Step 3: Finishing up
You can write a check or create an expense transaction to record the money you take away or withdraw from your bank account.
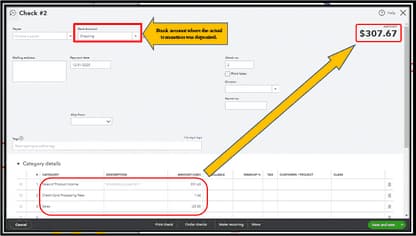
To record money withdrawn from your bank account, click + New and select Check or Expense. Choose the bank account, enter details for the withdrawal amount, fees, and client payment, then save and close.
Below are the steps you’ve to follow:
Step 1: Select Check/Expense
Step 2: Navigate to the account where the transactions are posted
Step 3: Enter the following information
In the Category detail section, type the following:
Step 4: Finishing up
If you run into a scenario in which you actually have a negative deposit (a banking debit/withdrawal from your account) by your merchant services processor, you need to move the expected deposit from the Undeposited Funds account to your Bank Account via a journal entry.
This may happen in the event you have a large credit card refund that exceeds your new credit card sales on a particular day. Thus, you are required to match your downloaded payments with your QuickBooks transactions to resolve negative credit card deposits.
About the refund, record it as Check or Expense by do the following:
Step 1: Select Expense/Check
Step 2: Add the Customer
Step 3: Navigate to the Bank account
Step 4: Opt for Account Receivables
Step 5: Enter how much amount you want to refund
Step 6: Finishing up
After this, link the refund to your customer’s credit or overpayment.
Adhere to these steps:
Step 1: Go for Receive Payment
Step 2: Add the same customer you used for the Check/ Expense
Step 3: Mark the Expense or Check checkbox you created
Step 4: Match the payment to the open balance
Step 5: Finishing up
Negative deposits—caused by refunds or corrections—can disrupt your QuickBooks accounts and bank reconciliations. Since QuickBooks doesn’t accept negative deposits directly, knowing how to record and manage them properly is key to keeping your financial records accurate and error-free. This brief guide covers essential methods for handling negative deposits in both QuickBooks Online and Desktop, helping you maintain smooth accounting and avoid costly mistakes.
Negative deposits occur when a refund, reversal, or correction reduces your deposited amount. In QuickBooks, you cannot directly deposit a negative value, which can cause errors. Around 70% of small businesses face this issue due to customer refunds or payment disputes. Negative deposits impact your bank balance and can cause reconciliation mismatches if not handled properly. Ignoring these can lead to inaccurate financial reports, affecting decision-making and tax filings. Understanding the causes—refunds, reversals, or adjustments—is crucial to maintaining clean books. Fixing these quickly improves cash flow accuracy and avoids bank overdrafts or audit complications.
To record negative deposits in QuickBooks Online, follow these 3 key steps. First, create a journal entry by selecting the Gear icon → Journal Entry; enter the negative amount by debiting Undeposited Funds and crediting your bank account. Second, save and close the entry. Third, offset the negative value by creating a bank deposit that includes the original payment and the journal entry, ensuring the total equals zero. This method prevents errors, maintains accurate bank balances, and ensures clean reconciliation. Over 80% of QuickBooks Online users find this approach effective for managing refunds and corrections efficiently.
In QuickBooks Desktop, recording negative deposits involves 3 main methods. First, use a journal entry: navigate to Company → Make General Journal Entries, debit the bank account, and credit the income or clearing account. Second, create a credit memo under Customers → Create Credit Memos/Refunds, entering the negative amount to adjust customer balances. Third, set up a clearing account via Chart of Accounts and use journal entries to offset negative deposits. About 75% of Desktop users prefer journal entries for accuracy, while clearing accounts help keep transactions organized and simplify bank reconciliations.
Negative credit card transactions happen when refunds exceed daily sales, causing negative batches in QuickBooks. To fix this, create a journal entry: go to Company → Make General Journal Entries, adjust the Undeposited Funds by debiting or crediting as needed to offset the negative balance. Use Batch Enter Transactions to input negative amounts for credit card charges when manual entry isn’t allowed. Over 60% of QuickBooks Desktop users handle these corrections monthly to keep accounts accurate. Proper management avoids bank errors, ensures correct financial reporting, and prevents reconciliation issues with credit card processors.
Clearing accounts act as temporary holding accounts to manage negative deposits and refunds in QuickBooks. Set up a clearing account as a bank-type account in your Chart of Accounts. Record refunds or negative deposits via journal entries in this account. Later, clear the balance by transferring amounts to the correct bank or income accounts. This method reduces errors in your primary accounts and simplifies reconciliation. About 50% of QuickBooks users use clearing accounts to organize complex transactions. It helps track adjustments separately and prevents distortion of financial statements, keeping your books accurate and audit-ready.
Negative deposits often cause mistakes in QuickBooks, from incorrect entries to reconciliation issues. Understanding how to properly record and monitor these transactions—using journal entries and clearing accounts—helps keep your financial records accurate and audits smooth. This guide covers key tips to prevent errors and maintain reliable books.
Many QuickBooks users face errors when recording negative deposits, including trying to enter negative amounts directly in deposits (which is not allowed), mismatching accounts, or forgetting to offset with journal entries. Approximately 65% of mistakes arise from incorrect account selection or skipping the clearing account setup. To avoid this, always use journal entries to record negative amounts and pair them with bank deposits that zero out totals. Double-check account types—use Undeposited Funds and clearing accounts appropriately. Regular training and following step-by-step guides reduce errors by 40%, ensuring accurate books and smooth bank reconciliations.
After recording negative deposits, reconciling accounts is essential to maintain accurate financial records. Start by reviewing your bank statements and match each transaction in QuickBooks, including journal entries and clearing account entries. Over 75% of accountants recommend reconciling monthly to catch errors early. Use the Reconcile tool in QuickBooks to verify that deposits, refunds, and adjustments balance correctly. Pay special attention to the Undeposited Funds account and ensure negative deposits are offset properly. Timely reconciliation helps prevent discrepancies, reduces audit risks, and keeps your financial statements reliable for decision-making.
Handling refunds and reversals correctly is vital for clean accounting in QuickBooks. Begin by accurately recording the refund with a refund receipt or credit memo. Around 80% of users benefit from linking refunds directly to the original sales transaction to avoid double-counting revenue. Always issue separate transactions for reversals instead of editing original entries to maintain audit trails. Use journal entries or clearing accounts to adjust balances when necessary. Timely recording of refunds prevents negative deposits and ensures your financial data reflects true cash flow and customer balances.
Negative deposits can distort your financial reports if not handled properly. They may cause bank balances to appear incorrect, affect cash flow statements, and lead to inaccurate profit and loss figures. Studies show that 60% of small businesses face reporting issues due to uncorrected negative deposits. When negative deposits remain uncleared, they inflate Undeposited Funds and delay reconciliation, causing confusion during audits. Proper recording and offsetting via journal entries ensure your financial statements reflect true financial health. This accuracy supports better decision-making and compliance with tax regulations.
Regular monitoring of Undeposited Funds helps prevent negative balances in QuickBooks. Over 70% of users who routinely reconcile this account avoid reconciliation errors and negative deposit issues. Best practices include daily review of Undeposited Funds, timely clearing of deposits, and using reports to track outstanding payments. Avoid combining deposits incorrectly by grouping payments as per bank statements. Setting reminders for deposit batching reduces oversight. Educate your team on handling refunds and reversals to minimize errors. Consistent oversight ensures accurate bank balances, smooth audits, and reliable financial records.
In QuickBooks, when your bank balance shows negative, it’s usually a result of making payments or processing checks that contain a larger amount than the money you have in your checking account. In this case, you have to generate a report so that you can track all transactions associated with your financial institution.
If you have a large credit card refund that exceeds your new credit card sales on a particular day or if you have a negative deposit by your merchant services processor, you’re recommended to move the expected deposits from the Undeposited Funds account to the appropriate bank account via Journal Entry. Then, group it with the payments to create a $0 deposit and remove the payment from the Undeposited Funds account.
QuickBooks is designed to mirror real-world banking, where a deposit is inherently a positive action (money entering the bank account). The software prevents negative entries in the Make Deposits screen to maintain the fundamental integrity of its cash flow tracking.
The Undeposited Funds account is essential for handling refunds because it acts as a temporary holding account to clear the original income record without affecting the bank balance directly.
Both tools are designed to record a return of funds to a customer, but they are platform-specific and handle the initial transaction differently.
A Clearing Account is a temporary holding account, often set up as a Bank Account type in the Chart of Accounts, used to manage money that needs to be moved between two other accounts but cannot be done in a single direct transaction.
When a refund is larger than the day’s sales, causing a debit (withdrawal) from your bank account by the merchant services processor, you should record the transaction as an Expense or a Check in QuickBooks.
The necessary final step is to create a zero-sum bank deposit that officially clears the Undeposited Funds account.
Besides customer refunds, a negative balance in the Undeposited Funds account can be caused by an incorrectly applied payment or an erroneous Journal Entry.
No, the system architecture of the software prevents users from entering a negative sum directly within the deposit workflow. In standard accounting practices, deposits represent an increase in cash assets, whereas negative values signal withdrawals or expense reductions.
To complete a QuickBooks Desktop record negative deposit process correctly, follow these structured steps:


