Excerpt:
Accurate tracking of business debt and lending activity is mandatory for sound financial management. This resource provides expert, step-by-step guidance on how to establish and record both Loan Payables (money borrowed) and Loan Receivables (money lent) within QuickBooks Desktop and Online. The instructions detail the crucial separation of Principal and Interest components during repayment, ensuring financial statements accurately reflect liability and expense. The guide covers advanced procedures such as setting up liability accounts, utilizing General Journal Entries for non-cash loans like equipment financing, and properly closing out loan accounts after final payment. By following these validated accounting practices, users can leverage tools like the Loan Manager (Desktop) to create amortization schedules, prevent common reconciliation errors, and maintain audit-ready financial records.
 Add As A Preferred
Highlights (Key Facts & Solutions)
Overview
While recording the loan under QuickBooks, a small business can monitor all the long-term or short-term loans while keeping a track of all the loan deposit amount and loan repayment.
Do you have trouble entering loans into QuickBooks? Accurate financial management requires knowing how to set up and record loans in QuickBooks, whether you work as an accountant or as a small business owner.
While handling a business, you will encounter many scenarios where you have to borrow money to fund your business or lend money.
There are two such scenarios as per accounting rules:
When the company borrows money, it is mandatory to record the loan as “payables” under the liability account to maintain financial records. And when you lend money to someone else, then the loan is recorded as “receivables” in the asset side of the balance sheet.
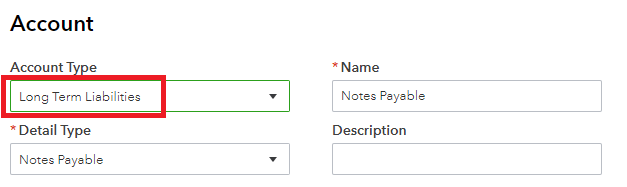
To efficiently manage financial transactions, setting up a loan in QuickBooks entails opening a loan account, entering loan details, and establishing loan installments. To initiate the process of creating a loan account in QuickBooks, go to the Chart of Accounts and choose the ‘New’ option to establish a new account. Next, you can designate an appropriate account name and select “Long Term Liabilities” as the account type.
Once the loan account has been created, you can add specific loan details like the loan amount, interest rate, and period once the loan account has been created. In order to guarantee precise loan payment tracking and administration, QuickBooks gives you the option to customize loan payment settings by establishing recurring payment schedules.
To effectively record financial obligations and manage loan transactions within the accounting system, you must first create a loan account in QuickBooks. The process entails multiple crucial phases, commencing with accessing the Chart of Accounts and choosing the Add New Account option.
You’ll need to provide important information while creating the loan account, including the loan amount, interest rate, conditions of repayment, and lender details. For these data entries, QuickBooks offers dedicated fields, so you can precisely record the loan terms in the system.
To ensure accurate financial reporting, you can tailor the account to fall under the long-term liabilities category. You can make sure that your loan transactions are correctly documented and efficiently handled by adhering to these guidelines.
To ensure thorough financial record-keeping and analysis, loan details such as principal amount, interest rate, and repayment terms must be precisely entered into QuickBooks. This procedure provides the basis for monitoring how the loan affects the company’s financial situation. QuickBooks makes it easier to calculate interest payments to ensure accurate financial reporting.
To ensure compliance and transparency, loan details including loan agreements, payment plans, and any collateral involved must be properly documented. Businesses can obtain a comprehensive understanding of their financial obligations by integrating these components with QuickBooks, which facilitates improved strategic planning and decision-making.
In order to facilitate smooth loan administration within QuickBooks, setting up loan payments requires establishing payment schedules, connecting bank accounts, and guaranteeing precise transaction categorization. The first step in this process is to use QuickBooks’ “Loan Manager” feature to enter the loan information, such as the principal amount, interest rate, and loan period. Users can specify a payment plan that is either monthly, bi-weekly, or based on a custom time frame after entering the loan details.
It is important to link the relevant bank account to expedite the payment process and guarantee that transactions are appropriately displayed in the software. By correctly classifying these transactions in QuickBooks, users may efficiently monitor how the loan is affecting their financial statements.
How to record a loan in QuickBooks Desktop, first create a liability account under Chart of Accounts. Set up the vendor and an expense account for interest. Use the Make Deposits feature to record the loan amount and Write Checks to record loan payments, including principal and interest.
To record a loan in QuickBooks Desktop, create a liability account under Chart of Accounts, set up the vendor, and an expense account. Record the loan via Make Deposits and loan payments via Write Checks.
In order to track your loan in QuickBooks Desktop for Windows, kindly follow the steps below:
Step 1: Create a liability account.
You must choose a liability account when you record a loan in QuickBooks.
Step 2: Set up the vendor
Step 3: Set up an expense account.
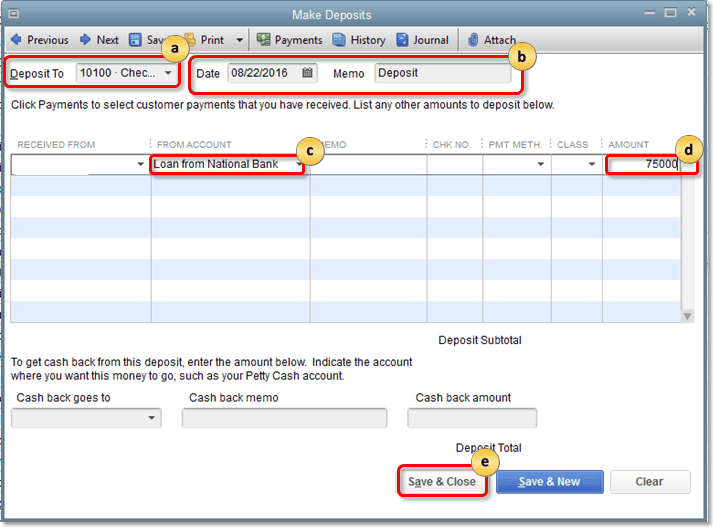
Step 4: Record the loan account
In this step, you will get to know how to record entries for Cash Loans in QuickBooks Desktop:
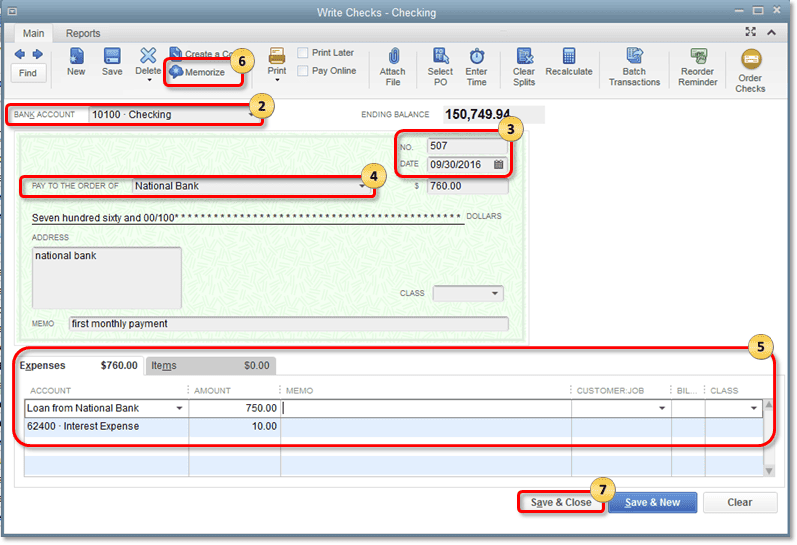
Step 5: Record loan payment
First , create the liability account and set up the vendor, to know the steps (read under the heading above “ Step 1: Create a liability account and Step 2: Step up the Vendor“), then follow the below mentioned steps:
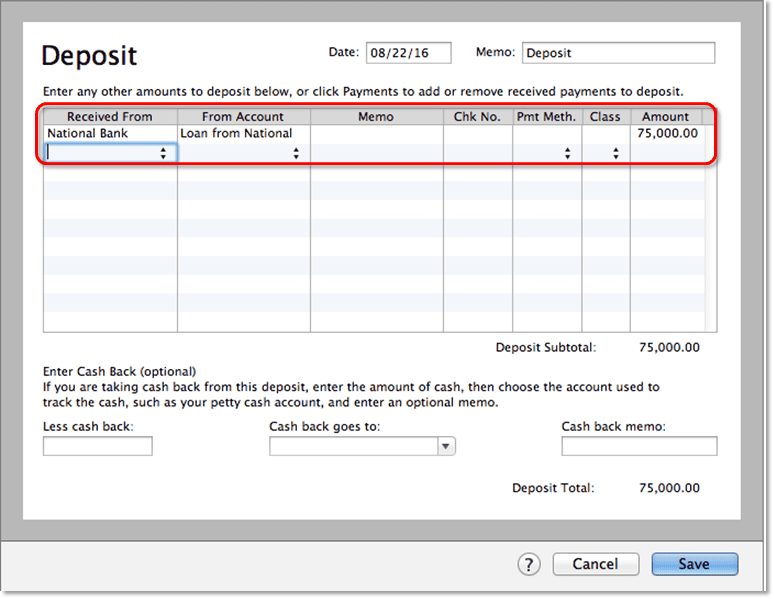
Step 3: Record the loan amount
In this step, you will get to know how to record entries for Cash Loans in QuickBooks Mac:
Step 4: Record the loan payment
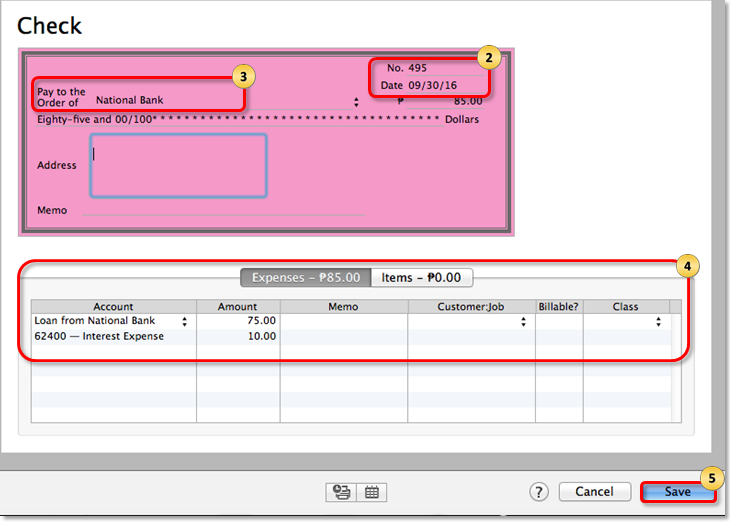
In QuickBooks Desktop, record loan entries by creating a liability account, setting up the vendor, and an expense account for interest. Use Make Deposits to log the loan and Write Checks for payments, including both principal and interest.
First, you can write a check to the relevant expenditure account that is utilized to track loan interest for the interest-only payments. You must first create an expense account, though.
How to do it is as follows:
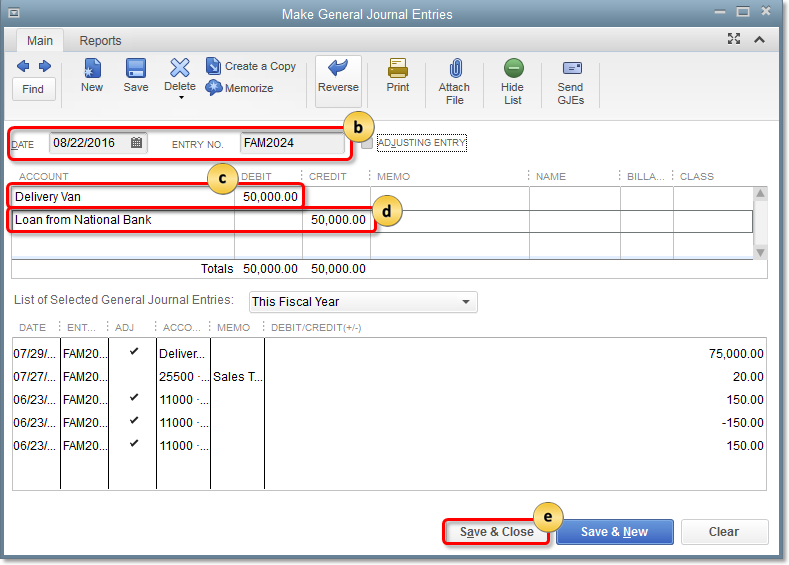
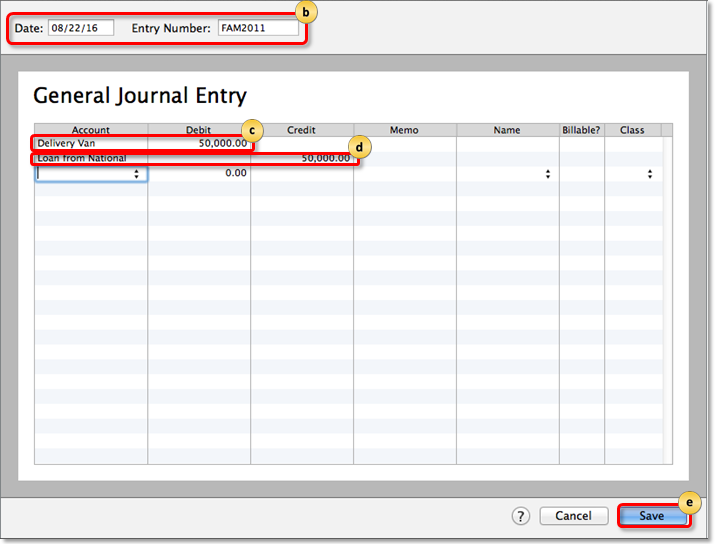
There are different processes for recording non-cash loans in Windows and Mac for QuickBooks Desktop.
Below are the mentioned processes:
In Windows
In Mac
Follow the steps below to record the entries for non-cash loans:
Record a loan in QuickBooks Online, create a liability account, specify the loan balance, and record repayments by selecting the liability account, entering payment amounts, and categorizing interest and fees. Save the details to complete the entry.
By this method, you can record:
Now, it’s time to learn to set up and record loans in QuickBooks Online and then enter the record as per the scenarios.
Step 1: Create a liability account
The first step includes creating a liability account in your QuickBooks account.
Follow the below-mentioned steps:
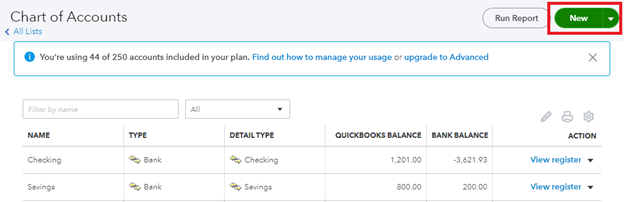
Step 2: Specify the loan balance
In this step. We will determine the type of loan – whether it is a new loan or prior loan, you need to record both of them.
Step 3: Record the loan repayment
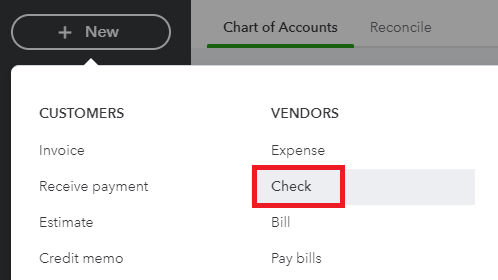
Now, it’s time to enter the Category details in the check section. Make sure to document all the following information:
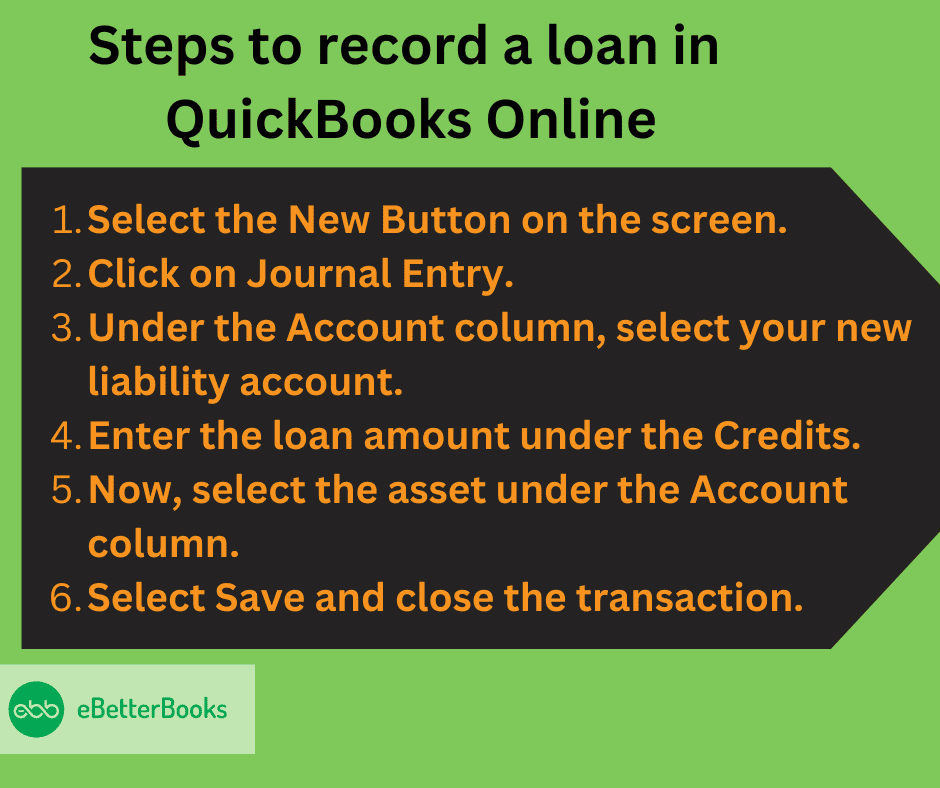
To record a loan in QuickBooks Online, click the New button, select Journal Entry, choose your liability account, enter the loan amount under Credits, select the asset account, then save and close the transaction.
Following the step-by-step information below:
Step 1: Click on the New Button
Step 2: Start a Journal Entry
Step 3: Choose the Liability Account
Under the Account column, select your new liability account.
Step 4: Enter the Details
Sep 5: Select the Asset
Step 6: Finishing Up!
To record a customer’s invoice-based loan in QuickBooks Online, create a liability account, enter the loan amount using a journal entry, and record payments via the “Make Deposits” feature. Set up a recurring invoice for loan repayments and track interest income in the appropriate accounts.
Following the step-by-step information below:
In order to record a loan to close open invoices, you must have a liability account (if you don’t have one, first create that, read under the heading above “ Step 1: Create a liability account “ ), then follow the below mentioned steps:
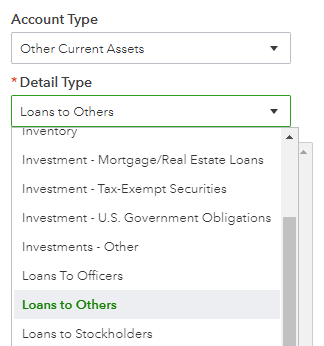
Note: While creating the liability account:
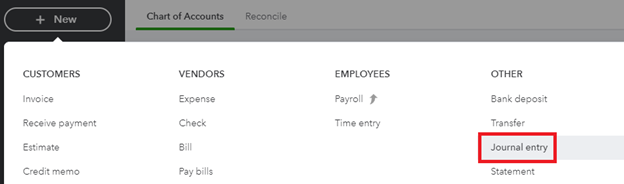
In order to enter the loan amount with a Journal Entry, follow the below mentioned steps:
In order to record a general loan for a customer, you must have a liability account (if you don’t have one, first create that, read under the heading above “ Step 1: Create a liability account “ ), then follow the below mentioned steps:

In order to record the customer loan payments you must have a liability account (if you don’t have one, first create that, read under the heading above “ Step 1: Create a liability account “) , then follow the below mentioned steps:

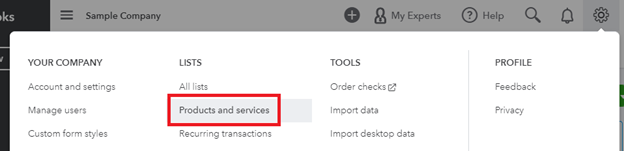
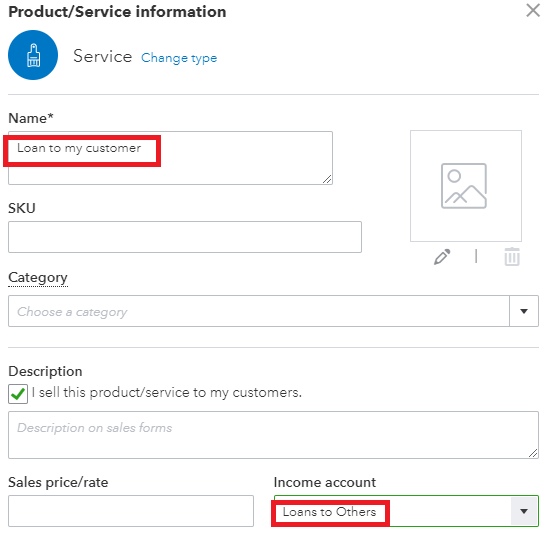
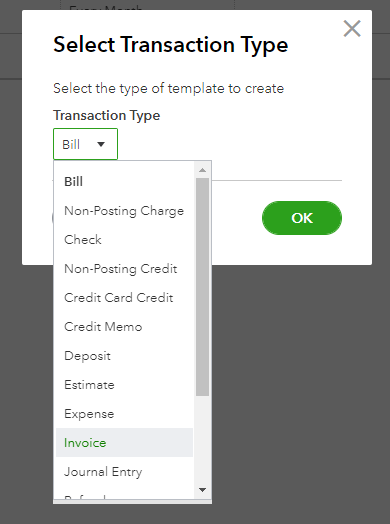
In order to record the entries for loan receivables, you must have a loan account (if you don’t have one, first create that, read under the heading above “ Step 1: Create a liability account “) , then follow the below mentioned steps:
Create a loan repayment schedule in QuickBooks, enter the loan as a journal entry, set up expense accounts for interest and fees, input loan details, and use “What If Scenarios” to calculate and print the repayment schedule.
Following the step-by-step information below:
One more important process is to get a loan account in QuickBooks to zero out at the end of the cycle. When payments are final and when you are required to book a loan account fully, you are expected to clear the loan account to represent the correct amount of liability.
Here’s how you can do this:
Follow the below steps to zero out a loan in QuickBooks Online:
Follow the steps to zero out a loan in QuickBooks Desktop:
Tip: Make sure the accounts are cleared before the loans are written off to avoid discrepancies.

QuickBooks offers powerful tools to manage diverse loan types with precision. From distinguishing short- and long-term loans to handling non-cash assets, it ensures accurate financial records. Custom payment schedules and dedicated expense accounts streamline tracking, while journal entries maintain clarity and reduce errors for smoother loan oversight.
QuickBooks supports two main loan types: short-term and long-term loans. Short-term loans are typically due within 12 months, while long-term loans extend beyond one year. Correct classification impacts your financial reports and tax calculations. You must record loans as liabilities — “Loan Payables” if you borrowed money, and “Loan Receivables” if you lent money. Accurate tracking of principal and interest for each type is crucial to avoid errors. QuickBooks allows you to set separate accounts for each loan type, enabling clearer cash flow analysis and helping you manage over 5 different loan agreements efficiently.
In QuickBooks, creating dedicated expense accounts for loan interest and fees is essential. Proper categorization helps you track how much you spend on interest annually, which can be over 10% of your loan amount. It also simplifies tax deductions and financial analysis. To set up, go to Chart of Accounts, create a new expense account named “Loan Interest Expense,” and another for fees if applicable. This separation lets you monitor multiple loans’ costs clearly, avoid mixing with other expenses, and provides a precise overview of your financial obligations each quarter or fiscal year.
Non-cash loans, like equipment or vehicle loans, require special handling in QuickBooks. Instead of cash deposits, you record these as assets and liabilities simultaneously. Create an asset account (e.g., “Vehicle Asset”) and a liability account for the loan. Use journal entries to debit the asset and credit the loan liability for the exact value. This ensures your balance sheet reflects both the asset and the debt accurately. Handling non-cash loans this way helps you manage at least 3 types of non-cash transactions, keeps reports precise, and avoids misrepresenting your company’s financial position.
QuickBooks lets you customize loan payment schedules to match your repayment plans. You can set monthly, bi-weekly, or custom intervals, ensuring timely tracking of principal and interest payments. This feature helps manage over 12 months of payments efficiently, reducing manual errors and missed deadlines. By linking payment schedules to bank accounts, QuickBooks automates transaction recording and improves cash flow visibility. Custom schedules also support forecasting, allowing you to plan future expenses and manage budgets better. Using this tool can save you up to 30% of the time spent on loan management tasks annually.
Journal entries in QuickBooks help you record loans precisely by capturing both sides of the transaction. Debit the asset or cash account for the loan amount and credit the liability account to show your obligation. This dual-entry method ensures your balance sheet stays balanced and financial reports remain accurate. For interest and fees, separate entries track expenses without affecting the principal. Using journal entries reduces errors by 20%, simplifies audits, and improves transparency. This approach works well for complex loans or partial payments, helping you manage multiple loans smoothly and keep your books compliant.
Effective loan management in QuickBooks hinges on consistent updates, clear categorization, and regular reconciliation. By leveraging QuickBooks Loan Manager and avoiding common mistakes, you can streamline tracking, reduce errors, and maintain accurate financial records. These best practices not only simplify audits but also enhance your overall financial clarity and control.
Maintaining accurate loan records in QuickBooks starts with consistent data entry and regular reconciliation. Update loan payments at least monthly to track principal and interest separately. Use reminders or calendar alerts to avoid missed payments, which can save you from 15% in late fees annually. Always verify loan balances against lender statements every quarter to catch discrepancies early. Categorize all loan-related transactions clearly using dedicated accounts. Backing up your QuickBooks data weekly ensures no loss of critical financial info. These practices enhance financial clarity, reduce errors by up to 25%, and support smoother audits or tax filings.
QuickBooks Loan Manager simplifies tracking by consolidating all loan details in one place. It helps you monitor principal balances, interest rates, and payment schedules for multiple loans—up to 10 loans simultaneously. The tool automatically calculates interest and suggests payment amounts, saving you up to 40% time on manual calculations. You can generate reports showing loan status and upcoming payments, improving your financial planning. Using Loan Manager reduces errors, enhances accuracy, and ensures timely repayments, helping you maintain strong lender relationships and avoid penalties.
Avoid common loan recording errors like mixing principal and interest payments in one account, which can misstate your financials by up to 20%. Failing to update loan balances regularly leads to inaccurate reports and poor cash flow management. Another mistake is neglecting to set up separate liability and expense accounts, making tax deductions harder. Not linking payments to the correct bank account causes reconciliation issues. Lastly, skipping documentation like loan agreements or payment schedules can create compliance risks. Staying vigilant on these points keeps your books accurate, saves time during audits, and supports smarter financial decisions.
Adjusting and reconciling loan balances in QuickBooks ensures your records match lender statements accurately. Start by comparing your loan account balance with your latest loan statement each month. Use journal entries to correct any discrepancies in principal or interest amounts. Reconcile payments against bank transactions to confirm accuracy, preventing errors that can skew your financial reports by up to 15%. Regular reconciliation helps avoid overdue payments and supports audit readiness. Setting a monthly schedule for review can save you hours annually and keeps your bookkeeping transparent and reliable.
Zeroing out loan accounts in QuickBooks ensures your liabilities reflect actual balances and prevents confusion in financial reports. Once a loan is fully paid, record a final payment to bring the loan balance to zero. Then, mark the loan account as inactive to keep your Chart of Accounts clean. This process avoids errors in future reconciliations and improves report accuracy by up to 10%. Always verify zero balances through reports before closing accounts. Following this practice helps maintain organized records, simplifies audits, and keeps your bookkeeping streamlined.
While dealing with the financial record, calculating a loan is a big matter for businesses. You don’t want a small calculation error to ruin your entire balance sheet. Consequently, QuickBooks offers a QB loan manager to monitor every transaction meticulously and ultimately determine the outstanding balance.
Still have questions? Explore our detailed FAQs.


