Highlights (Key Facts & Solutions)
- Last Resort Usage: Journal entries should only be used when standard QuickBooks forms like invoices or bills cannot record the transaction, as manual entries do not automatically update sub-ledgers.
- Double-Entry Requirement: Every journal entry must have a debit and a credit of equal value to keep the books balanced and allow the transaction to be saved.
- Accounting Logic: Debits increase asset and expense accounts, while credits increase liability, equity, and income accounts .
- Mandatory Naming: Transactions involving Accounts Receivable (A/R) or Accounts Payable (A/P) require a customer or vendor name to prevent discrepancies in aging reports.
- Automated Reversals: The Reverse button automatically swaps debits and credits and dates the new entry for the first day of the following month, which is ideal for managing accruals.
- Voiding vs. Deleting: Voiding is preferred for correcting errors because it maintains a chronological record and audit trail by zeroing out the amount rather than erasing the entry entirely.
- Recurring Entries: For fixed monthly adjustments like depreciation, users can set up recurring templates to automate the process and reduce manual entry errors.
- Reconciliation Caution: Editing a journal entry that has already been reconciled will disrupt the bank balance and require a manual re-reconciliation or a new adjusting entry.
Overview
Journal entries are the last resort for entering transactions. They allow you to move money between accounts and force your books to balance in specific ways. It is a record of accounting transactions that are kept in a general ledger.
In simple words, it is a record of transactions that shows the credit and debit balance of the company. Journal entries are considered to be a very important and essential part of business accounting as all of your business’s financial reports depend on them. All the journal entries are the foundation of Balance sheets, income statements, and cash flow statements, etc. So, you’re recommended to use them only if you understand accounting or by following the advice of your accountant. Plus, you must have a good understanding of debits and credits to keep your books up-to-date.
Understanding Journal Entries
Each journal entry contains the data significant to a single business transaction, including the date, the amount to be credited and debited, a brief description of the transaction and the accounts affected. Depending on the company, it may list affected subsidiaries, tax details and other information.
It’s crucial to accurately enter complete journal data so that the general ledger and financial reports based on this information are also accurate and reliable. Journal entries are made in chronological order and follow the double-entry accounting system, meaning each will have both a credit and a debit column. Even when debits and credits are linked to multiple accounts, the amounts in both columns must be equal.
For instance, let’s say a company spends $277.50 catering lunch for employees. The expenses account increases by that amount, while the cash account, which is an asset, decreases by $277.50 because that money is now spent.
What is the Purpose of a Journal Entry?
The purpose of a journal entry is to physically or digitally record every business transaction properly. If a transaction affects multiple accounts, the journal entry will detail that information as well.
The primary purpose of journal entries include:
- Recording Transactions: Every financial transaction is systematically logged, ensuring no event goes unnoticed.
- Tracking Activity: Journal entries provide a chronological record of all economic events impacting a business.
- Facilitating Audit Trails: They enable auditors to trace any discrepancies or anomalies back to their origin, which helps to ensure financial integrity.
- Preparing Financial Statements: With accurate and consistent record-keeping, journal entries directly inform the generation of the income statement, balance sheet, and cash flow statement.
- Maintaining Accuracy: Journal entries help to ensure accuracy in financial records. The dual-entry system, where every transaction has a debit and a credit entry, determines errors and discrepancies. If the entries do not balance, it shows an error that needs to be corrected.
Key Components: Debits & Credits
In double-entry accounting, every transaction is recorded with a debit and credit in two or more accounts, which categorize different types of financial activities in a company’s general ledger. Debits and credits are both opposite and equal (though each line debit/credit doesn’t necessarily have an equal counterpart), occur simultaneously and represent a transfer of value.
Debits add to expense and asset accounts and subtract from liability, revenue and equity balances, while credits subtract from expense and asset balances and add to liability, revenue and equity accounts.
For example, if a company purchases a new computer for $1,200 on credit, it would record $1,200 as a debit in its account for equipment (an asset) and $1,200 as a credit in its accounts payable account (a liability). However,if instead, it pays for the computer with cash at the time of purchase, it would debit and credit two types of asset accounts: debit for equipment and credit for cash.
Common Journal Entries Examples
The precise journals you use for your bookkeeping will depend on what kind of business you run. They’re split into two categories: The general journal and the special journals.
The general journal contains entries that don’t fit into any of your special journals—such as income or expenses from interest. It can also be the place you record adjusting entries.
On the other hand, the special journals, also referred to as accounts, are used to record the common, day-to-day transactions in your accounting system. All of your special journals are listed in your chart of accounts.
Here are some common examples of account names include:
- Sales: Income you record from sales
- Accounts Receivable: Money you’re owed
- Cash Receipts: Money you’ve received
- Sales Returns: Sales you’ve refunded
- Purchases: Payments you’ve made
- Accounts Payable: Money you owe
- Equity: Retained Earnings and Owners’ Investment
A journal entry is the fundamental record of every financial transaction. Here’s some basic examples:
- Sample Entry: A journal entry records both sides of the transactions in the form of a debit and credit value.
Let’s see how:
Date: July 7, 20XX
| Particulars | LF | Amount (Dr.) | Amount (Cr.) |
| Cash Account | 1,000 | ||
| Sales Revenue | 1,000 |
Explanation: This entry reflects a cash sale of $1,000. The Cash Account is debited to show the increase in cash, and the Sales Revenue Account is credited to record the revenue generated.
Cash Sales Journal Entry: When goods or services are sold for cash, the entry will be:
Date: July 12, 20XX
| Particulars | LF | Amount (Dr.) | Amount (Cr.) |
| Cash Account | 800 | ||
| Sales Revenue | 800 |
Explanation: This entry represents a cash sale of 800. The Cash Account is debited to reflect the increase in cash, while the Sales Revenue Account is credited to show the revenue.
Salary Paid Journal Entry: When salaries are paid to employees, the entry is:
Date: July 23, 20XX
| Particulars | LF | Amount (Dr.) | Amount (Cr.) |
| Salary Expenses | 2,500 | ||
| Cash Account | 2,500 |
Explanation: This entry records the payment of salaries. The Salary Expenses Account is credited to recognize the expense, and the Cash Account is debited to show the cash outflow.
Why to Create Journal Entries?
Below we’ve listed why you need to create Journal entries in QuickBooks:
- When sending the money between income and expense accounts.
- When transferring money from an asset, liability, or equity account to the income or expense account.
- Also, when you enter the debits and credits in the general journal or the ledger.
Points to Remember When Creating Journal Entries in QuickBooks
- Always remember that QuickBooks does not support multi-currency in a single journal entry. This indicates that each and every currency has its own journal entry.
- If you create an entry and want to fix the transaction, then it can be done by deleting and reversing the journal entry.
- Do not make journal entries to inventory or payroll accounts.
- The entry to the accounts payable type or the accounts receivable needs a customer or vendor.
- It is essential to use the accounts receivable or accounts payable account on the second line of the journal entry.
- Add one account receivable or accounts payable type account in every entry.
- You will have to view the additional column for the location and class in case you are using QuickBooks Online Plus.
- To access the sales or expenses tab, make sure that the entry has a line for either A/R or A/P and also the vendor or customer name.
Step-by-Step Guide to Creating a Journal Entry
Creating and managing Journal entries is a great help to managers and accountants to record transactions or transfers amounts between accounts.
By following this step-by-step guide, you can easily make the most general journal entries in QuickBooks Desktop which are as follows:
Step 1: Go to the Journal Entry Feature
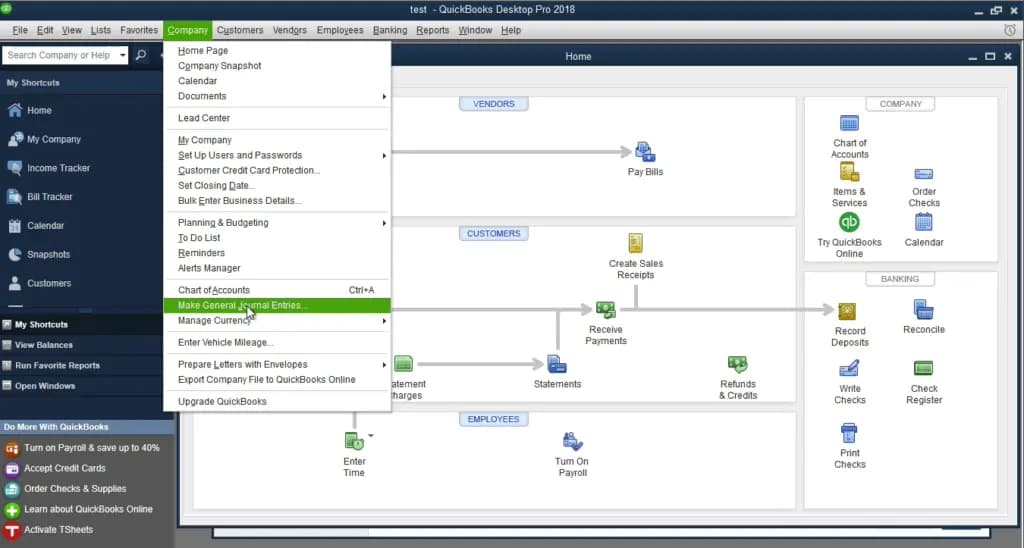
- Search for the journal entry feature from the Company option.
- Hit the ‘+’ icon at the top right corner of the file for a drop-down menu.
- The Create option will start displaying on your screen where you see the Journal Entry option. Then, you need to click on it.
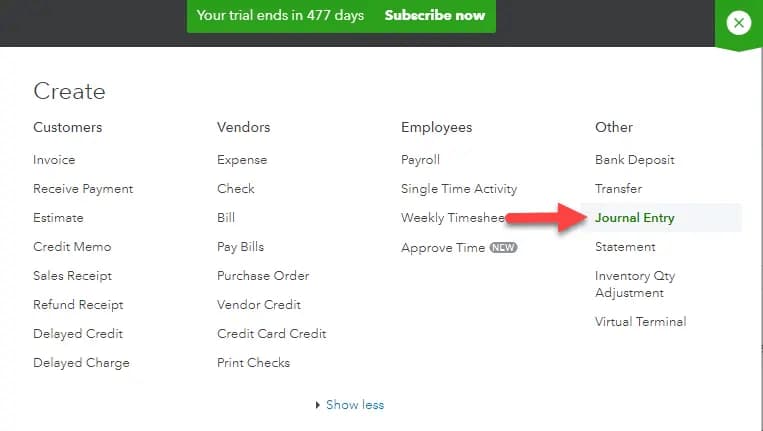
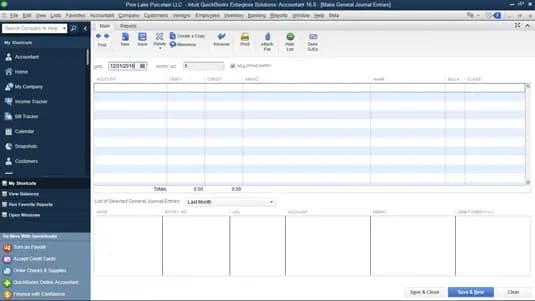
- This will direct you to the Make Journal Entries window which has the necessary blank for the information to add on.
Step 2: Enter the Date and Journal Entry Number
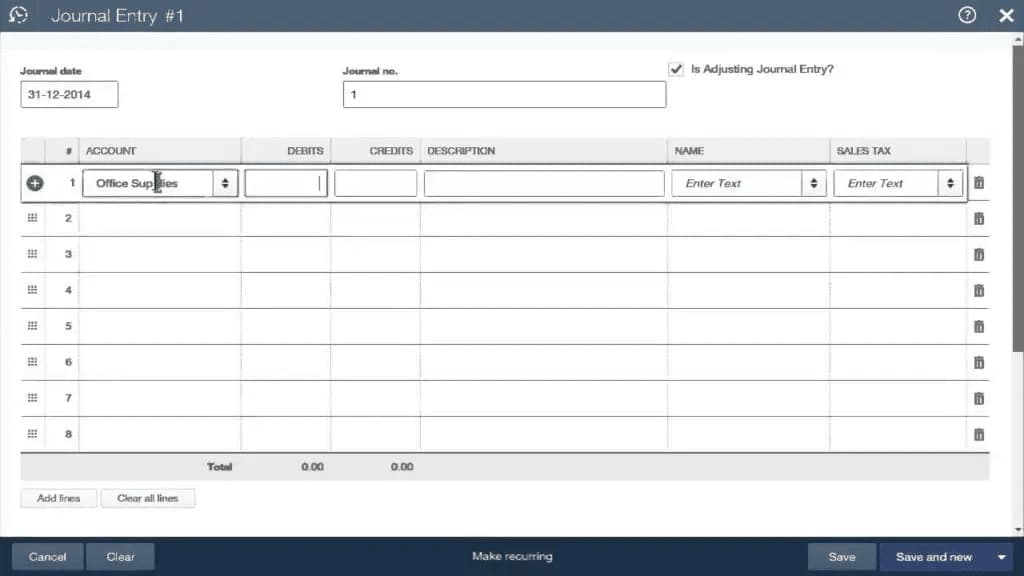
- Once the form opens up, modify the journal date, whereas the current date will be entered by QuickBooks on its own.
- Now, if you are recording any entry from any other date, then make sure to correct the date before moving further.
- When the date is corrected, you need to write down the journal number.
- Or else, QuickBooks will automatically enter the sequential number.
Step 3: Enter the other Necessary Information
After entering the date and journal entry number, fill out the other required information.
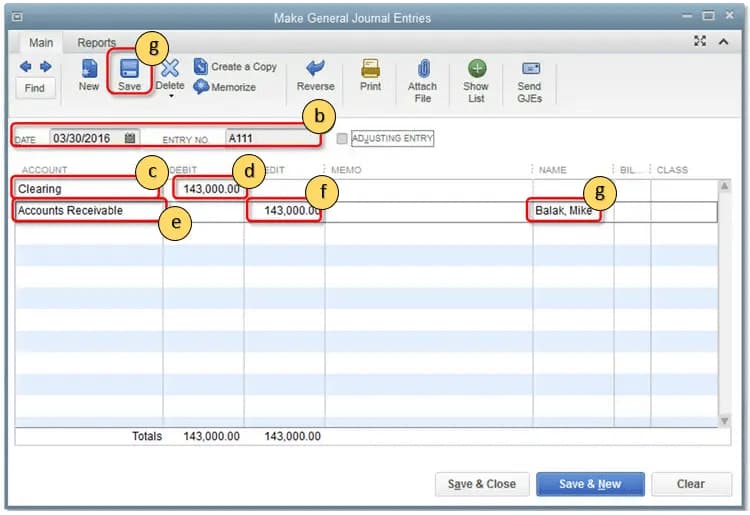
- Account column – Type the journal ledger account number into the account column.
- Journal Code – Another important thing is that you need to enter a new code for your journal. Be certain to use the same code which is also used by transactions for the debit and credit accounts.
- Debit and Credit Column – Now in the Journal entry list the Debit accounts first and then credit accounts from the drop-down menu. Write down the amount which is debited in the debit column. Whereas QuickBooks automatically enters the credited amount under the Credit Column.
To make the entry balanced sum of both the debit and credit entries must match otherwise repeat the same steps. You need to repeat until the entries completely match with each other and the transaction reaches a zero balance then only the journal entries will be properly balanced.
- Memo Column – Once done, you should now enter a descriptive memo under the Memo field so that you can check the transaction details on the report. This step is optional but it will help you to remember later why the entry was made.
- Name – Lastly you can also add the name of the customer, employee, or vendor and mark both the amounts as billable.
If the total of the debit column doesn’t tally with that of the credit column, then fill out the distribution line until the total of both tallies.
Step 4: Choose to Make Recurring Journal Entry Schedule
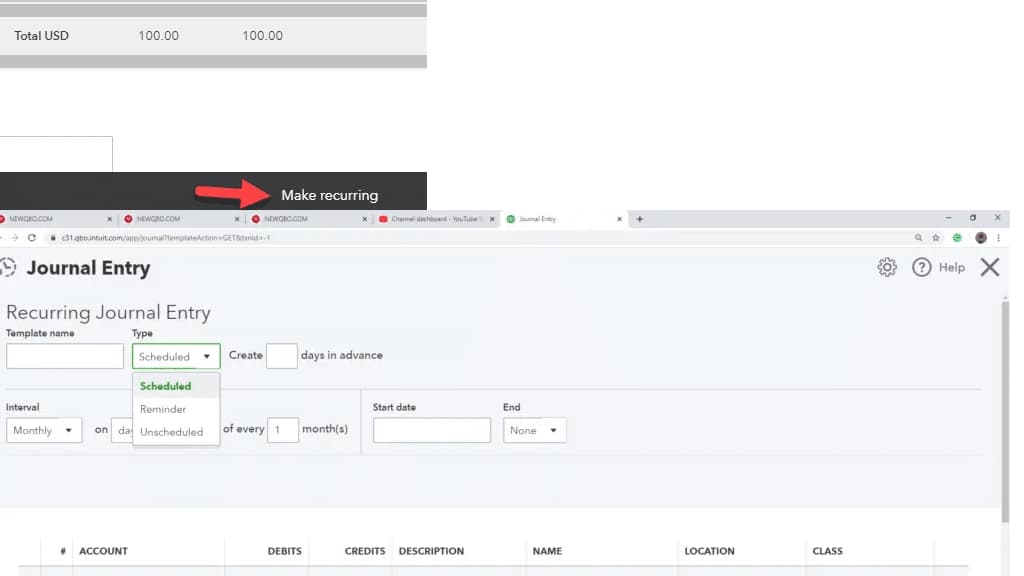
- Once done with cross checking all the information and debits and credits total, select the recurring journal entry schedule.
- Then, press Save & Close to save the journal entry and close the window.
- Or, click on Save & New where you can save the journal entry and open a new window.
Editing Journal Entries
Steps to Edit a Journal Entry in QuickBooks
Here are some quick steps to edit a journal entry in QuickBooks.
Let’s have a look:
- Navigate to the Company menu and then select Make general journal entries option.
- Enter the name, date, entry no, or amount and then click on the Find tab.
- Once done, double click the journal entry and make the updates.
- Press Save and Close icons.
- Hit the Yes tab to record changes.
You can only edit a journal entry as long as:
- The journal entry is unreconciled or uncleared.
- The journal entry was not migrated from a previous accounting system.
- You have full access permission to Accounting.
- The journal entry was not posted before the lockdown date.
Deleting and Voiding Journal Entries
Differences Between Deleting and Voiding
When you void a transaction in QuickBooks, you still have a record of the transaction, but it won’t affect your account balances or reports.
On the other hand, when you delete a transaction in QuickBooks, the transaction is completely erased from your books, and it won’t display on any reports or in any accounts.
You can recover some details of the transaction using the audit log in QuickBooks, but you can’t recover the whole transaction. Only delete a transaction if you’re sure you don’t need a record of it.
For good bookkeeping, it’s better to void a transaction rather than delete it so you keep a record of the transaction. You can delete all transaction types in QuickBooks, but you can only void certain transaction types.
The following transactions can’t be voided:
- Estimates
- Deposits
- Supplier credits
- Purchase orders
- Delayed charges
Note: You can’t void bills, but you can void bill payments.
Step-by-Step Instructions for Each Process:
Delete or Void Journal Entries
Sometimes, you might need to delete or void a journal entry in QuickBooks.
The steps are as follows:
- Go to the company menu and then select Make general journal entries.
- Opt for the find option and enter the name, date, entry no, and other info.
- Click twice on the Journal entry and then choose the Delete or Void icon. Also, hit the OK tab.
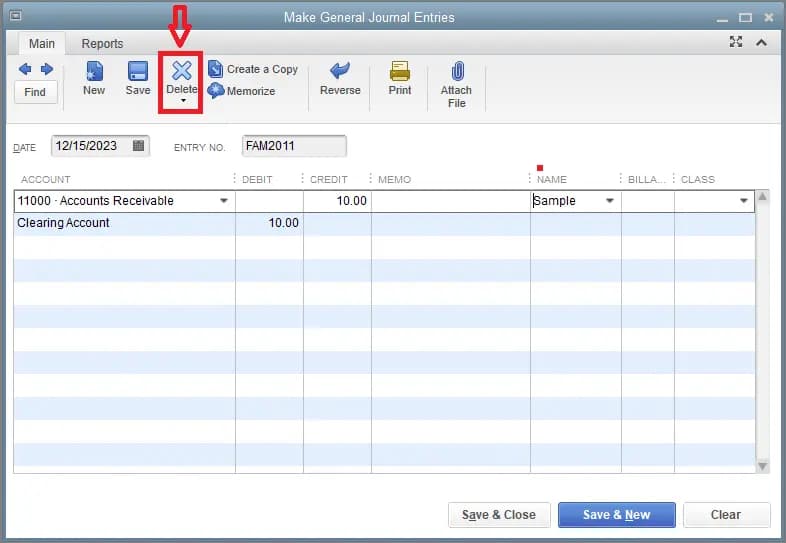
- Press the Save and Close buttons.
Reversing Journal Entries
- Understanding Reversing Entries and Their Purpose
Reversing entries are accounting journal entries you make in a certain period to reverse, or cancel out, some entries of a previous accounting period. Such as wage accrual which is replaced by an actual payroll expenditure. You can make them at the beginning of an accounting period, and they usually adjust some entries for accrued expenses and revenues from the end of the previous period. You can use reversing entries to adjust records instead of deleting them to help you maintain the integrity of your company’s financial records.
Reversing entries are optional to use as they don’t have a significant effect on financial statements. The purpose of these entries is to reverse the adjusting entries that were made in the previous financial reporting period. It is commonly used for revenue and expense accounts which had accruals or prepayments in the preceding accounting cycle and the accountant prefers not to keep these in the accounting system.
How to Reverse a Journal Entry
The process to reverse a journal entry in QuickBooks Desktop involves the following steps:
- Hover over to the Company Menu and then select Make General Journal Entries.
- Look for a Journal Entry that needs to be reversed.
- If you use QuickBooks for windows, hit the Find tab and then type the name, date, entry no, or amount. Also, select the Find option.
- However, if you are a QuickBooks for Mac user, then search for and choose the Journal Entry that is to be reversed on the left side of the Make General Journal Entries window.
- After this, select the Reverse option.
- Press the Save and Close icons.
Note: The Reversed Journal has an R next to the entry number and any debit and credit amounts that are reversed. The new entry will be dated the first day of the next month, following the original transaction date.
Recurring Journal Entries
Setting Up Recurring Entries for Regular Transactions
If you’re using a recurring template for your journal entries and it stopped creating transactions, there are a few reasons for it. It’s possible that either the recurrence has been turned off or the template is corrupted.
To get it fixed, you can delete and recreate the recurring template to refresh everything. Then, you can manually create the Journal Entries that were not created before.
Follow the steps below to delete an old template:
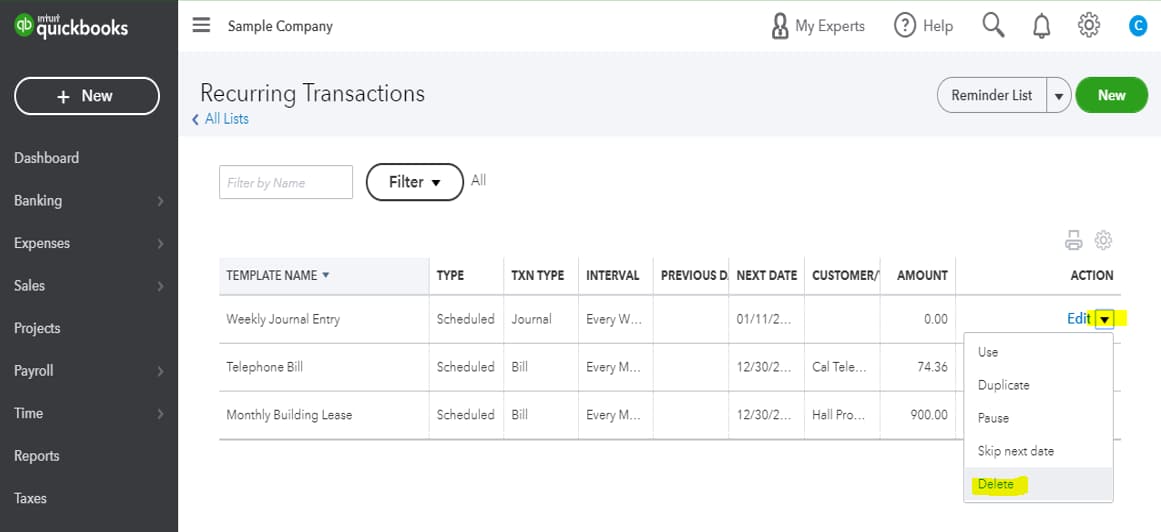
- Navigate to the Gear icon at the upper right corner of your screen.
- Choose Recurring Transactions under the Lists menu.
- Locate the Recurring Transaction from the list.
- Press Delete from the Edit drop-down menu.
- Review the transaction details and add more if necessary.
- Hit the Save and Close tabs.
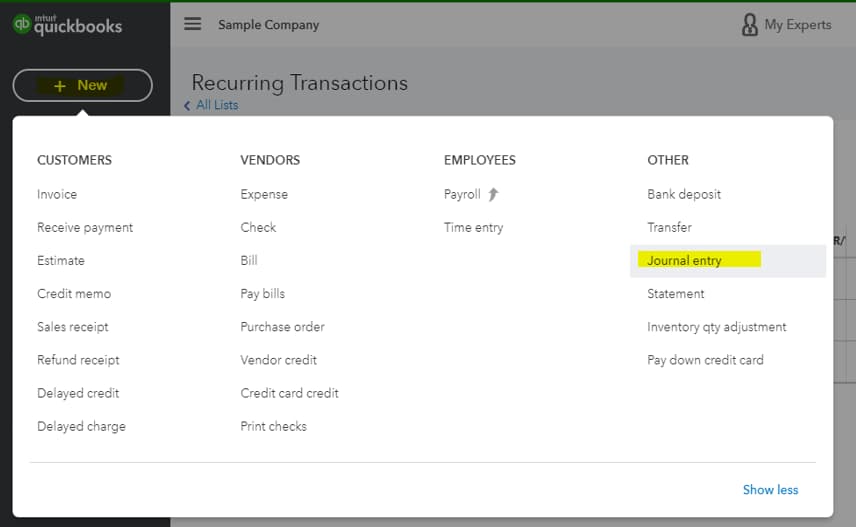
- Once done, recreate the template using the New button on the Recurring Transactions page.
- Create Journal Entries manually using the + New icon and selecting Journal Entry.
Benefits of Automating Journal Entries
Automating journal entries can lead to an accounting environment that is more accurate, more efficient and better able to focus on higher value tasks. At the same time, automation lowers several risks endemic to the accounting close process. Here are the benefits of automating journal entries:
Increased Accuracy & Consistency
Reducing the degree of manual intervention in the journal entry process can cut down on errors in amounts, account coding and instances of journal entry duplication and omission. It also ensures that transactions are coded consistently.
Refocused Staff Time
When the majority of journal entries are automated, staff can be redeployed to dealing with exceptions and to higher-level activities, such as reviewing, approving, reconciling and analyzing financials, rather than simply recording.
Faster Accounting Closes
The combination of automated journal entries with redeployed manpower can help companies close their books more quickly. A continuous close is more easily achieved as well. Plus, the increased transparency, streamlined approvals and process monitoring help resolve speedbumps more quickly.
Earlier Access to Information
Information used for decision-making, such as financial reporting, forecasting and key performance indicator (KPI) analysis, can be available sooner because the financial close is completed more quickly.
Risk Reduction
Several features of journal entry automation — including less manual intervention, increased controls and earlier visibility into the data — can have the synergistic effect of detecting fraud faster and reducing the likelihood of it occurring.
Smoother Audits
Digital storage of journal entry supporting documents makes it easier for auditors to access data and verify transactions. Audits that run more smoothly minimize effort for all parties and can lessen fees.
Best Practices for Managing Journal Entries in QuickBooks Desktop
Journal entries are essential for maintaining accurate financial records and streamlined workflow. Here are some best practices to consider:
- Know when to use Journal Entries
You can use journal entries for transactions that cannot be entered through standard QuickBooks modules (e.g., adjusting entries, depreciation, accruals).
- Descriptive Memo Fields
Use the memo field to describe why the journal entry was created. This helps during audits or when reviewing past entries. Make sure you avoid vague descriptions like “Adjustment.” Instead, use specifics like Adjust accrued revenue for December.
- Regular Reconciliation
Ensure that journal entries align with bank statements, subsidiary ledgers, or other supporting documents. Always verify that the total debits equal total credits in each journal entry.
Set Up Recurring Entries for Repetitive Adjustments
For regular adjustments like monthly depreciation, set up recurring journal entries to save time and reduce errors. Ensure that you review recurring entries for accuracy before posting them.
- Review Entries Periodically
Add journal entry reviews in your monthly closing process to catch errors early. If using reversing entries, ensure they’re set to reverse in the correct period.
Common Scenarios for Journal Entries in QuickBooks Desktop
Below are some common instances for Journal Entries in QuickBooks Desktop:
- Adjusting Entries: Record accrued expenses or revenue at period-end.
- Depreciation: Allocate asset costs over their useful life.
- Prepaid Expenses: Adjust expenses paid in advance for the current period.
- Unearned Revenue: Recognize revenue from advance payments over time.
- Loan Payments: Separate principal and interest in loan repayments.
- Year-End Adjustments: Adjust for taxes and close accounts to retained earnings.
- Inventory Adjustments: Write off damaged or obsolete inventory.
- Foreign Currency Transactions: Record exchange rate gains or losses.
- Reclassification: Correct misclassified transactions between accounts.
- Payroll Adjustments: Record manual payroll liabilities or corrections.
- Bad Debt Write-Offs: Record uncollectible invoices as expenses.
- Reversing Entries: Reverse temporary adjustments in the following period.
Reporting and Analyzing Journal Entries in QuickBooks Desktop
To simplify audits and manage accurate financial records, you need to effectively report and analyze journal entries in QuickBooks.
Here’s how:
- Customized Reports: Apply filters like transaction type, date range, and fields for precise analysis.
- Verify Balances: Ensure debits equal credits in all journal entries.
- Review Accounts: Check account classifications and memos for accuracy.
- Enable Audit Trail: Track changes to journal entries using the audit trail feature.
- Reconcile Entries: Match journal entries with bank statements or supporting documents.
- Collaborate with Accountants: Share journal reports with accountants for expert insights.
- Access Search Tools: Use QuickBooks search feature to find specific journal entries quickly.
- Compliance Check: Ensure journal entries meet accounting standards and tax rules.
FAQs:
1. Why is it generally recommended to use journal entries as a last resort in QuickBooks?
QuickBooks is built to automate accounting through specialized forms (like invoices, bills, and checks). Using journal entries manually bypasses these automation layers, often causing discrepancies in subsidiary reports.
- Sub-ledger Integrity: Standard forms update sub-ledgers automatically (e.g., an invoice updates the A/R Aging report). A journal entry only affects the general ledger, which may lead to a balance sheet that does not match your detailed customer or vendor summaries.
- Audit Trail: Forms link transactions together (e.g., linking a bill to a payment). Journal entries are isolated and harder to trace during an audit.
- Inventory and Tax Automation: Standard forms handle complex calculations like Sales Tax and Cost of Goods Sold (COGS) behind the scenes. Manual entries require you to calculate these yourself, increasing the risk of error.
2. Can I use a single journal entry to record transactions involving multiple currencies?
QuickBooks does not support multiple currencies within a single journal entry. Each entry is strictly tied to one currency assigned at the header level.
- Software Constraint: The currency selected in the “Currency” field applies to every line item in that specific journal entry.
- The Workflow: If you need to move funds between accounts held in different currencies, you must use a “Wash Account” or “Clearing Account” in your home currency to bridge the two separate journal entries.
- Alternative: For moving funds between banks of different currencies, using the Transfer feature is more efficient than a manual journal entry as it handles the exchange rate conversion in one step.
3. Why must I assign a Name (Customer or Vendor) when using Accounts Receivable or Accounts Payable in a journal entry?
Assigning a “Name” is a hard requirement in QuickBooks to ensure that the total balance in the general ledger matches the total of the individual customer or vendor balances.
- Sub-ledger Synchronization: Accounts Receivable must know who owes the money to populate the Customer Balance Detail report.
- One Name Rule: QuickBooks generally allows only one A/R or A/P account per journal entry to ensure the transaction is clearly attributed to a single entity.
- Unapplied Credits: Be aware that a journal entry credited to A/P or debited to A/R creates an “unapplied” transaction that you must later link to an invoice or bill using the “Receive Payments” or “Pay Bills” window.
4. What is the impact of “Voiding” a journal entry versus “Deleting” it from the ledger?
The choice between voiding and deleting affects how your historical record is preserved and whether audit logs can easily track the change.
- Voiding: This changes the transaction amounts to zero but keeps the record and journal number in your system. This is the preferred method as it leaves a clear “paper trail” for auditors.
- Deleting: This completely removes the entry from your financial reports and registers. While you can find the deletion in the Audit Log, the transaction effectively disappears from your chronological numbering.
- Continuity: Voiding preserves the sequence of your journal numbers, which helps identify if a record was accidentally tampered with later.
5. When should I use a “Reversing” journal entry instead of just editing the original transaction?
Reversing entries are essential for accrual accounting to ensure that income and expenses are recognized in the correct period without being double-counted.
- Accrual Management: If you record a utility expense in December that isn’t paid until January, you “Reverse” the entry on January 1st to cancel out the accrual when the actual bill is entered.
- Prior Period Integrity: Reversing ensures that your closed-month financial statements remain accurate while the correction or offset happens automatically in the new month.
- Automation: In the journal entry window, clicking Reverse creates a second entry with flipped debits and credits, dated for the first day of the next month.
6. Why should I avoid making manual journal entries to Inventory or Payroll accounts?
Manual entries to these accounts often “break” the background tracking systems QuickBooks uses for inventory costing and tax liabilities.
- Inventory Costing: A journal entry to the “Inventory Asset” account changes the balance on your Balance Sheet but does not update the Inventory Valuation Summary. This causes your reports to disagree.
- Payroll Taxes: Journal entries to payroll accounts do not link to employee records or tax forms (like Form 941). This results in financial books that don’t match your actual government filings.
- Correct Procedure: Use the Adjust Quantity/Value on Hand tool for inventory and Payroll Liability Adjustments for payroll-related corrections.
7. How do I fix a journal entry that has already been reconciled in a bank statement?
Editing or deleting a reconciled journal entry will throw your bank reconciliation out of balance and create a “Beginning Balance Discrepancy” for the next month.
- Discrepancy Report: If a reconciled entry is changed, run the Reconciliation Discrepancy Report to identify the exact transaction that was modified.
- Manual Re-reconciliation: If you must edit a reconciled entry, you will need to open the account register and manually mark the transaction with an “R” in the checkmark column to restore its reconciled status.
- Safety Tip: It is often safer to create a new “Adjusting Entry” in the current month rather than touching a transaction from a month that has already been closed and reconciled.
