Error Initializing QBPOS Application Log usually occurs when you fail to synchronize your data between QuickBooks Point of Sale and QuickBooks Desktop. It can be seen when you try to open the QuickBooks Point of Sale program in your system. Also, if the two software are not compatible with each other or Windows files are corrupted or damaged.
The QBPOS (QuickBooks Point of Sale) Application Log is a file that stores entries related to transactions, inventory updates, and system errors. The application log file helps you to keep accurate and updated records.
QuickBooks POS enables its users to enter the sales data into the required bookkeeping software.
It provides features such as making payments and processing returns with inventory management. This allows you to keep track of inventory, monitor items that are close to selling out, and place orders for the items that need to be restocked.
The following error prompt flashes out on your screen while opening the QB Point of Sale program:

What exactly is the QBPOS Application Log?
The QBPOS Application Log is a file that charts various entries, including transactions, inventory, and QuickBooks POS system errors. It also helps guarantee that you have accurate and updated information.
When linked to QuickBooks Desktop, QBPOS allows the smooth exportation of sales and inventory data into the bookkeeping software for enhanced management of payments, returns, and inventory. If the synchronization process is interrupted, then there may be an error when the program opens.
Primary Factors behind the Error Initializing QB pos Application Log
There can be some common reasons that are responsible for initializing QuickBooks Point of Sale application log error, a few of them are outlined below:
- QBPOS Shell folder is damaged or corrupted
- Windows Framework is corrupted or degenerated and affects the PC framework.
- You are not logged in as an admin user into QBPOS.
- The QuickBooks software is outdated or not updated to the latest release.
How to Recognize the Effect of Error Initializing QBPOS Application Log?
Below are some common indicators that may help you to identify the Error Initializing QBPOS Application Log. Let’s have a look:
- The error prompt starts appearing on your screen itself.
- You’re unable to open the QuickBooks Point of Sale program.
- Failure to make or receive payments due to outdated QB Point of Sale.
- Slow or sluggish response to your commands.
- Either the Windows operating system or your software is crashing, freezing, and not functioning properly.
Customized Solution for Error Initializing Qbpos Application Log
- To rectify the Error Initializing Qbpos Application Log, ensure that you have a stable internet connection, or else you won’t be able to open QB Point of Sale in your system.
- After this, check the compatibility between your Windows version and the QuickBooks Point of Sale program. If any of them need to be updated, do it as soon as possible; otherwise, the old Windows version prevents you from opening QuickBooks POS in your system.
- Now, you need to create a new user account or give permission to access your login credentials if you’re not added as a Windows admin or you don’t have administrative privileges.
- Once you’re logged in successfully, don’t forget to update your software to the latest version.
- If the error continues to bother you, go through the solutions we have discussed below.
Best Troubleshooting Methods to Fix Initializing QBPOS Application Log Error:
Here’s a list of some precautionary steps that must be followed carefully before moving forward with the solution part:
Solution 1: Process of Removing Duplicate QBPOS Shell Files
1. Check for Conflicts
Make sure that QBPOSShell.exe does not conflict with other third-party programs installed on your computer keyboard. Also, make sure the right folder is chosen before deleting the QBPOSShell task.
2. Backup QBPOSShell File
It is important to create a backup copy of the QBPOSShell.exe file before renaming the folder that contains it.
3. Log in as Administrator
Enter the right administrator username and password. If necessary, take notes on them to use later when you wish to remind yourself of these things.
4. Proper Installation and Updates
Make sure that the QuickBooks POS and other related software are well-installed and updated on your system.
5. Avoid Excel Data Errors
- When updating data via Excel:
- Detach unused columns and clear empty rows/columns.
- Do not use dashes, formulas, hyperlinks, or special symbols (for example, @, #, $, %, &,*, etc.).
- Clear Contents should be used in comparison to manual deletion of information.
Solution 2:
Once done with following all the precautionary steps, now it’s time to fix QuickBooks Error 6000 301 if it continues to bother you. So, let’s adhere to the steps presented below:
Step 1: End QBPOSShell Task
- Open the Task Manager by clicking Ctrl + Alt + Del Keys together, then select the Processes Tab.
- Select the Task named QBPOS Shell, and choose to end the task
- Go to the search bar and open the Windows browser

Step 2: Show hidden folders

- Make sure Windows is displaying Hidden Files and Folders:
- Open Windows File Manager (File Explorer).
- Click on Organize in the top right corner and select Folder and Search Options.
- Choose the View tab and click the radio button beside Show Hidden Files, Folders, and Drives.
- Click Apply and then press OK.
- Locate the QBPOS Shell File:
- Go to C:\Users\[User Name]\AppData\Local.
- Click on the Intuit® folder that appears.
- Find the file named QBPOS Shell with the .exe extension.
- Rename the Config File:
- Search for the config file, right-click on it, and select Rename.
- Rename it to configold.
- Restart the PC:
- Close all opened windows and restart your computer.
- Check if the Issue is Resolved:
Open QBPOS to check if the “Error Initializing QBPOS Application Log” issue is fixed.
For Windows 7 only
- Click on the Windows icon at the left corner of your screen and then open the Control panel.
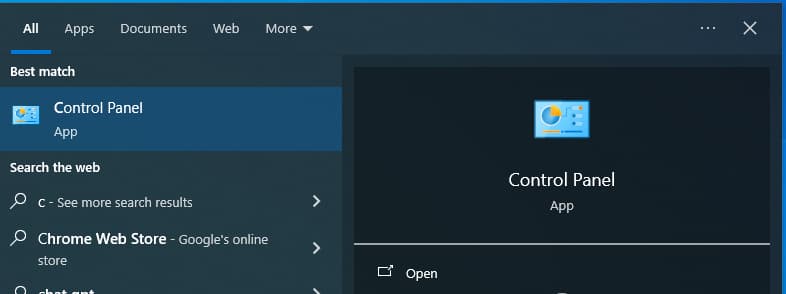
- Navigate to the Folder options and hit the View tab.
- After this, select the Show hidden files, folders, and drives under the Advanced settings.

- Press Apply and then choose OK.
- Go to the C:\Users\User name\Appdata\local\intuit\QBPOSshell.exe.
- Now, hit right-click on the User.config and select the Rename option.
- Change the name of it to User.config.old.
- In the end, close all the Windows and reopen QuickBooks Point of Sale for desktop.
Method 2: Create a New Windows admin
For Windows 11
Create a local user account
- Firstly, go to the Start menu and click on Settings.
- Now, select Accounts and then choose Family & other users. (In some Windows versions, you’ll see Other users.)
- Click on Add account next to Add other user.
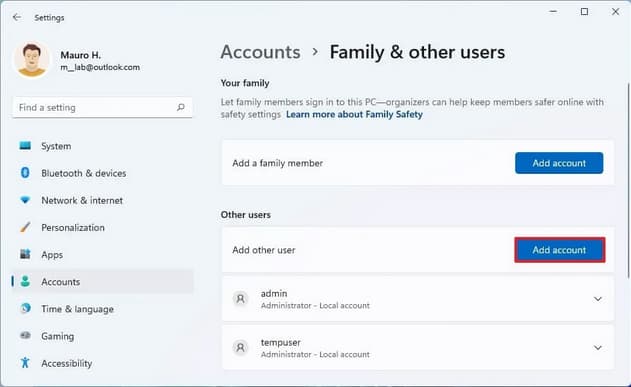
- Select the option I don’t have this person’s sign-in information.
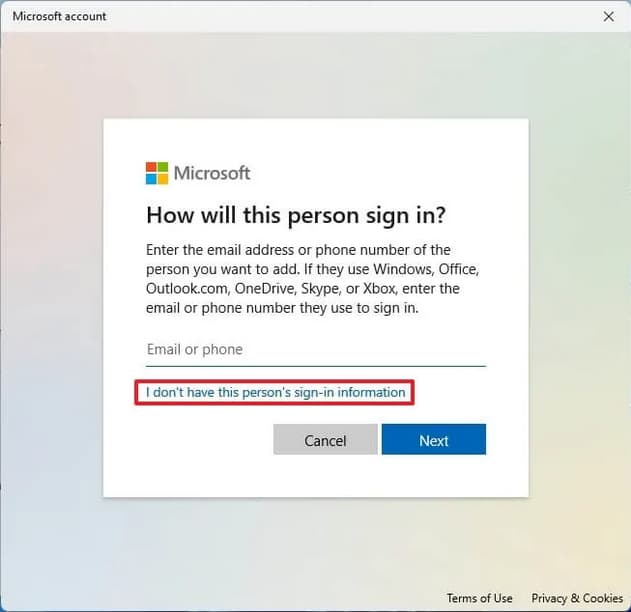
- Then, press Add a user without a Microsoft account on the next page.
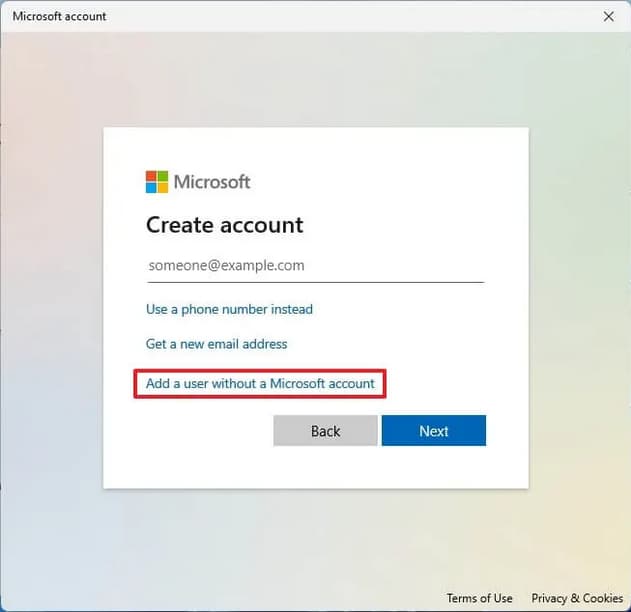
- After this, type a user name, password, or password hint—or choose security questions—and then hit the Next tab.
Change a local user account to an administrator account
- Click the Start menu then select Settings and Accounts.
- Next, choose the account owner name under Family & other users (you will see “Local account” below the name), then select Change account type.
Note: If you click on an account that shows you an email address or doesn’t say “Local account”, then you’re giving administrator permissions to a Microsoft account, not a local account.
- After this, select Administrator under Account type and then press the OK button.
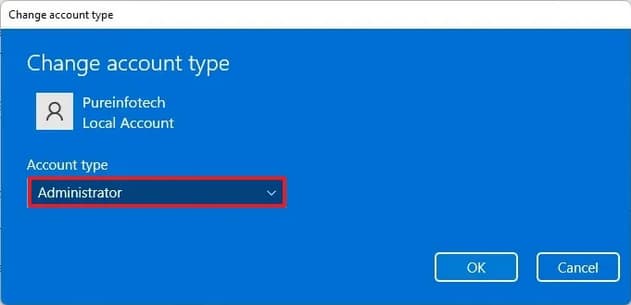
- When everything is OK, sign in using a new administrator account.
For Windows 10
Create a local user account
- Head to the Windows Start menu and then hit the Settings icon.
- Now, choose Accounts, then Family & Other Users (in some Windows versions, you’ll see other users).

- After this, click on Add someone else to this PC.
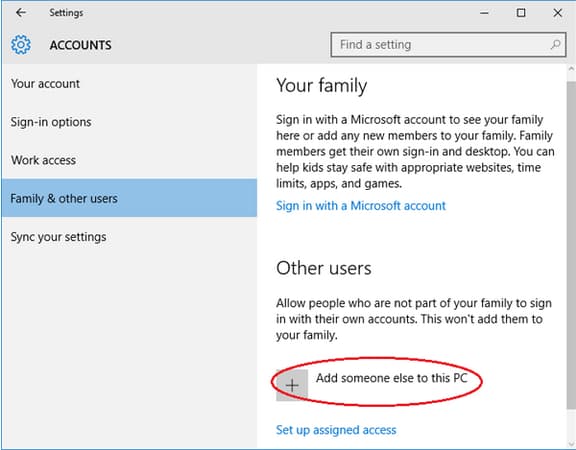
- Select the option I don’t have this person’s sign-in information.
- Choose the option Add a user without a Microsoft account on the next page.
- At last, enter a username and password and then press the Next button.
Change the local user account to an admin account
- Head to the Windows Start menu and click on Settings.
- Then, select Accounts and choose the account owner name under Family & Other Users.
- Choose the username you created before and then hit the Change account type icon.
- After this, click Administrator under Account type, then press OK.
- To finish, log in as admin.
- Once done, try to open QuickBooks Desktop Point of Sale.
For Windows 8.1
Create a Microsoft account
- Swipe in from the right corner of the screen, click Settings, and then select Change PC settings.
Note: If you’re using a mouse, go to the lower-right corner of the screen, move the mouse pointer up, hit the Settings tab, and then choose Change PC settings.
- Now, choose Accounts, and then click Other Accounts.
- Select the Add an Account option.
- After this, enter the account info for this person to sign in to Windows. There are four methods to do this:
- If the person you’re adding already has a Microsoft account, you can enter it now.
- However, if the person you add doesn’t have a Microsoft account, use their email address to create one. Also, write down the email address that the person uses frequently.
- If the person you’re going to add doesn’t have an email address, hit Sign up for a new email address. It’s completely free.
- Follow all the on-screen instructions to set up the account.
Create a local account
- Firstly, swipe up from the right corner of the screen and click Settings, then select the option Change PC settings.
Note: If you’re using a mouse, point to the lower-right edge of the screen, move the mouse pointer up, hit the Settings tab, and then choose Change PC settings.
- Now, click Accounts, and then select Other Accounts.
- Choose Add an account, then hit Sign in without a Microsoft account (not recommended).
- After this, click the Local Account icon.
- Type a user name for the new account.
- If you want this person to log in using a password, enter and verify the password, add a password hint, and later press Next. You might be able to skip this step depending on the domain’s security settings if your PC is on a domain and click Next, if you prefer.
- Hit the Finish icon at the end.
For Windows 7
My computer is on a domain
- Press the Start button to open Microsoft Management Console, type mmc into the search box, and then hit the Enter key.

Note: Enter the Administrator password if you’re prompted for an administrator password or confirmation.
- Now, select the Local Users and Groups option from the left pane of Microsoft Management Console.
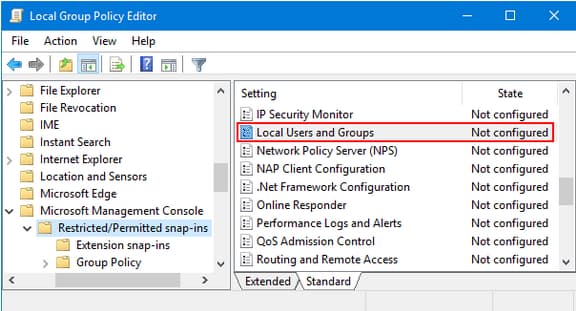
Note: If you are unable to see Local Users and Groups, it’s probably because that snap-in is not added to the Microsoft Management Console. Adhere to the following steps to install it:
- Under Microsoft Management Console, hit the File menu, and then choose Add/Remove Snap-in.
- Next, select Local Users and Groups, and then press Add.
- Click Local computer and hit the Finish and OK tab.
- Choose the Users folder option.
- Press Action, and then hit the New User icon.
- After this, enter the appropriate information in the dialog box, and then press Create.
- Once you are finished creating user accounts, click the Close tab.
My computer is in a workgroup
- To open User Accounts, hit the Start button and open the Control Panel.
- Now, select User Accounts and Family Safety, and then click User Accounts.
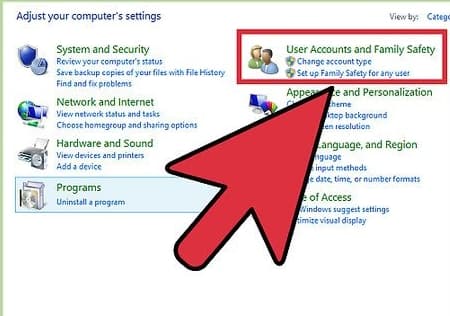
- Choose the Manage Another Account option.
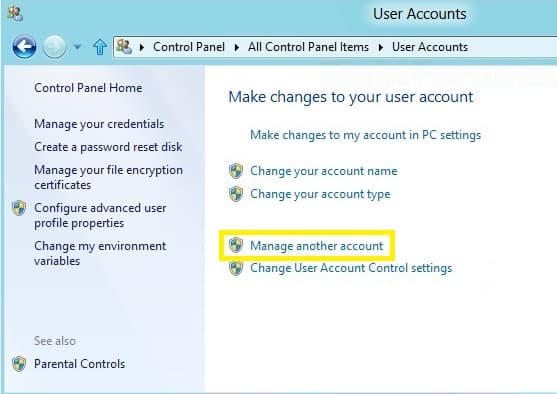
Note: Administrator permission is required If you’re prompted for an administrator password or confirmation.
- After this, choose to Create a new account.
- Enter the name you’d like to give the user account, select the Account type, and click Create Account.
Method 3: Create A New User Account with Administrative Rights
For Windows 10, 8, 8.1
- Navigate to the lower-left corner of your desktop screen and then press the Start button.
- After this, open the Control Panel.
- Hover over User Accounts and Family Safety and then select User Accounts.
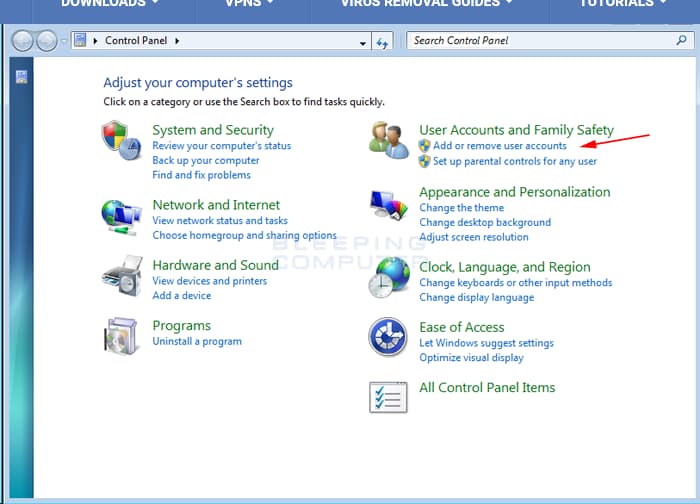
- Now, choose the option Add a New User under the Manage Accounts.

- Hit Add a user and then click on the Sign in without a Microsoft Account link.
- Once done, select Local Account, then type a username and leave the password field blank.
- Press the Next button and click Finish.
- Restart your system and try signing in using new login credentials.
- When everything is OK, reopen QuickBooks Point of Sale.
For Windows 7 Users
- Go to the Windows Microsoft Start menu and then click the Control Panel.
- Now, choose the User Accounts option.
- After this, click on Manage Another Account and then select Create a New Account.
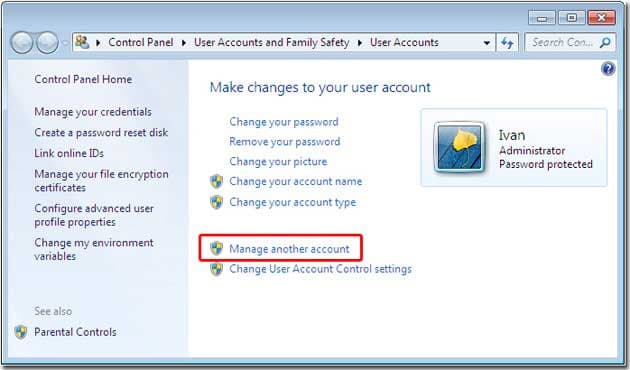
- Once done, give the new account a unique name and hit the Administrator tab.
- Select Create a new Account.
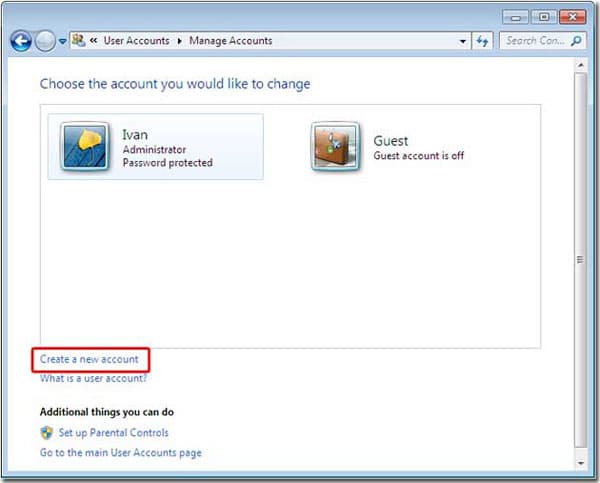
- Lastly, restart your system and log in with a new administrator account, then open QuickBooks POS again.
For Windows XP
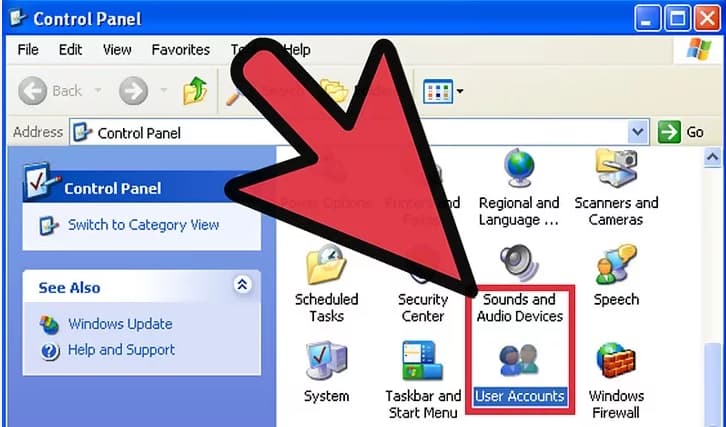
- Hit the Windows Start button and hold down the Win + R keys to open the Run command.
- Search and locate the Control Panel in the text field and then press OK.
- Now, click twice on the User Accounts.
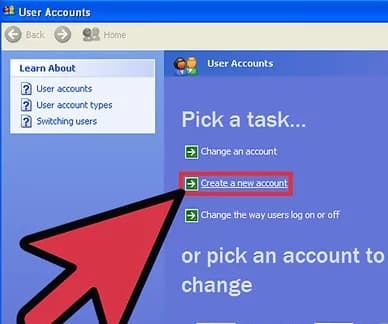
- Select the option Create a New account and then follow the on-screen prompts to make a new user account with administrative rights.
- When you’re ready, restart your computer and re-login using new details.
- After this, run QuickBooks Point of Sale and check for the error status.
Method 4: Update QuickBooks to the Latest Version
Step 1: Enable Automatic Updates
- QuickBooks will notify you about available updates via email, in-product notifications, and the product page.
- If you choose automatic updates, QuickBooks will automatically download updates when available.
Step 2: Install Automatic Updates
- Once the update is downloaded, you’ll see the update notification in the status bar (top right corner).
- The update will install automatically when you close QuickBooks and leave your system/PC on.
Step 3: Manual Update Option
- If you prefer to update manually, follow the manual instructions provided by QuickBooks instead of enabling automatic updates.
Frequently Asked Questions
Can restoring the backup help rectify the QuickBooks POS Shell Folder has Stopped Working Error?
Yes, you can rectify the QBPOS Shell Folder has stopped working error by restoring the backup.
The restoration steps are as follows:
- Select the File option in QuickBooks.
- Choose Open or Restore from the drop-down menu.
- Select Restore a Backup Copy and click Next.
- Choose the Local Backup option to restore the data file and hit Next.
- Find the backup file, select the folder where you want to save it.
- Click Open, then Save to complete the process.
Can a damaged installation cause the “Error Initializing QBPOS Application Log” error?
Yes, a damaged or incomplete installation of QuickBooks POS can lead to errors, including issues with initializing the application log. Reinstalling the software often helps resolve installation-related problems by repairing corrupted files and setting up the system correctly.
Can antivirus or firewall settings cause the “Error Initializing QBPOS Application Log” error?
Yes, security software such as antivirus programs or firewalls can block QuickBooks POS from accessing necessary files, including the application log. Make sure to add QuickBooks POS as an exception in your security software settings to prevent this issue.
Disclaimer: The information outlined above for “How To Fix Error Initializing QBPOS Application Log: Best Solutions” is applicable to all supported versions, including QuickBooks Desktop Pro, Premier, Accountant, and Enterprise. It is designed to work with operating systems such as Windows 7, 10, and 11, as well as macOS.
