

Resolving customer overpayment issues within QuickBooks Online is a common financial challenge for businesses, and this overview details the essential procedures for accurate resolution. Overpayments, which occur due to duplicate entries, incorrect invoice reading, or manual entry errors, necessitate accurate accounting to prevent distorted financial reports and maintain customer satisfaction.
The core solution involves classifying the excess payment correctly using one of three methods: applying the funds as a Credit Memo against future invoices, processing an immediate cash return using a Refund Receipt, or managing a vendor-related refund through a Vendor Credit. Effective management requires careful reconciliation, clear communication with the customer about the resolution path, and diligent avoidance of common mistakes like misapplying credits or delaying refunds.
By following these structured steps for customers, vendors, and even tax overpayments, businesses ensure accurate financial records and prevent future issues through improved invoicing and payment application practices.

Highlights (Key Facts & Solutions)
- Definition and Cause: Overpayments happen when a customer pays more than the invoice amount, often due to duplicate payments, incorrect manual entry, or timing issues, which can distort accounts receivable.
- Three Core Solutions:
- Apply Credit: Use a Credit Memo to hold the overpayment as credit against the customer’s future invoices.
- Issue Refund: Use a Refund Receipt (via check, credit card, etc.) to immediately return the overage to the customer.
- Vendor Management: Use Vendor Credit when a vendor owes your business a refund for an overpaid bill, which can then be applied to future vendor bills.
- Process Steps Highlight: The process involves selecting the appropriate transaction type from the + New menu in QuickBooks Online, correctly inputting the amount, and ensuring the payment method matches the desired refund type.
- Prevention Best Practices: Key preventative measures include double checking invoice details for accuracy, clearly communicating payment terms to clients, and regularly reviewing customer accounts for unapplied credits.
- Mistake Avoidance: Users must avoid common errors such as failing to record the overpayment correctly, misapplying credits to the wrong accounts, and delaying the refund process.
- Tax Overpayment: Overpaid payroll taxes can be resolved by selecting the Resolve option under Payroll Tax payments to either apply the amount to a future tax payment or request a refund from the relevant government agency.
What is the QuickBooks Online Refund Customer Overpayment Error?
Users can record their repayments when the other party overpays them using the QuickBooks online refund tool. Then, you have three options for returning the overpayment: using the credit against the prepared invoice, adjusting the amount on the subsequent invoice, or immediately refunding the party with a check.
Regardless of your method, you must be sure to update information on the QuickBooks program.
Why Does Customer Overpayment Issue Occur?
Customer overpayment issues in QuickBooks Online typically occur due to several common reasons:
- Incorrect Invoice Amounts: The customers can indirectly overpay when they read the invoice total and end up paying more than the actual amount charged by the business.
- Duplicate Payments: Some customers might pay more than once for the same order, which results in overpayment on the same invoice.
- Payment Method Errors: Overpayment can occur if the wrong payment method is used, such as paying twice or entering excess information on the checkout page.
- Timing Issues: The tendency to pay before invoices are generated or processed could mean overpayment in cases where customers pay earlier than necessary.
- Manual Entry Mistakes: For instance, overpayment results from mistakes such as entering the wrong figures in payment fields during manual data entry.
- Payment Processing Errors: These can mainly be attributed to technical errors, such as problems with payment processors or bank interfaces, which can lead to overpayments.
- Confusion Over Partial Payments: Through partial payments, customers may pay an amount that is bigger than the intended amount. Thus, they may end up paying more.
Tips for Resolving QuickBooks Online Refund Customer OverPayment Issue
| Conditions | Error Causes | Solutions |
| Apply Credit to Invoice | Overpayments occur due to clients paying more than the invoice amount | Verify invoice totals to avoid overpayments. Apply credits to outstanding invoices. |
| Refund to Customers When an Invoice has been Paid | Payment mistakes or misreading of invoice amounts lead to overpayments. | Educate customers on the correct payment process and refund procedures. |
| Refund to Vendors When a Bill has been Paid | Payment processing errors result in unintended vendor overpayments. | Double-check payment amounts and refund vendors properly. |
| Refund to Vendors on a Credit Card | Credit card overpayment mistakes occur during purchases. | Educate on using credit cards properly and managing refunds. |
| Refund for Returned Goods/Services | Misallocation of payments due to incorrectly recorded returned items/services. | Misallocation of payments due to incorrectly recorded returned items/services. |

Steps To Fix QuickBooks Online Refund Customer Overpayment Error
To fix the QuickBooks Online Refund Customer Overpayment issue, follow the below instructions:
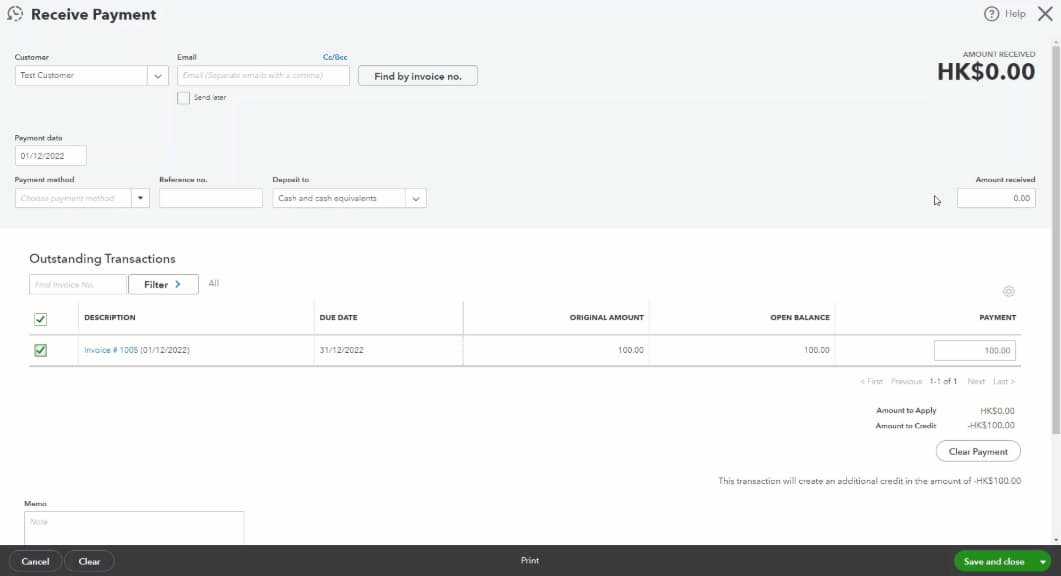
1. Apply Credit To Invoice
Customers who overpay might have their excess funds applied to future invoices as credit.
Steps:
- Select the Credit Memo option from the Add New button.
- Choose the Customer Name and input the essential information, including the overpayment amount.
- Save the credit memo and then close it.
- Open the invoice and apply the credit note by clicking Receive Payment and choosing the credit as payment method.
2. Refunds to Customers When an Invoice is Paid
If the consumer wishes to have their overpayment reimbursed rather than used as credit:
Steps:
- Choose Refund Receipt from the + New menu.
- Enter the customer’s name and refund amount.
- Select the return payment method (for example, check credit card).
- Save and close the file.
3. Refund to Vendors When a Bill Has Been Paid
For refunds from vendors after a paid bill:
Steps:
- Select Vendor Credit from the + New option.
- Fill out the vendor information and the return amount.
- Consider saving the credit.
- You can use the credit to pay an open bill by going to Pay Bills, choosing the bill, and applying the vendor credit.
4. Credit Card Refunds for Vendors
For refunds credited to your credit card:
Steps:
- Click Add New and choose Expense.
- Choose the Credit Card Account for payment.
- Enter a negative number for the vendor information and the refund amount.
- Close and save.
5. Refund for Returned Items/Services
Process refunds for returned products or services:
Steps:
- Go to + New and select Refund Receipt (for customers) or Vendor Credit (for vendors).

- Include the item or service details related to the refund.

- Enter the refund amount and confirm the payment method or account.
- Save and close.
How Do QuickBooks Pro, Online, or Enterprise Users Refund a Deposit?
These procedures must be followed to refund a deposit in QuickBooks Pro, Online, or Enterprise:
- Open QuickBooks: Launch the QuickBooks application, then log in to your account.
- Access Customer Center:
- QuickBooks Pro/Enterprise: Select Customer Center from the Customers menu.
- QuickBooks Online: Using QuickBooks Online, Find the Customers tab by navigating.
3. Locate the Customer:
- QuickBooks Pro/Enterprise: Discover and choose the client that deposited QuickBooks Pro/Enterprise.
- QuickBooks Online: Find the client from the list in QuickBooks Online.
4. View Customer Transactions:
- QuickBooks Pro/Enterprise: To examine their transactions in QuickBooks Pro/Enterprise, choose the “Transactions” tab.
- QuickBooks Online: To examine their activity, click “Transaction List” or “Transactions” in QuickBooks Online.
5. Identify the Deposit:
- Find the deposit you want to return; it will often be marked as a payment or deposit.
6. Issue a Refund:
- QuickBooks Pro/Enterprise: If you utilize a Payments item in QuickBooks Pro/Enterprise, open the transaction, adjust the amount to a refund, and then save.
- QuickBooks Online: QuickBooks Online: Click “Refund” for an Online Payment, then enter the desired return amount.
7. Record the Refund:
- QuickBooks Pro/Enterprise: In the Payments box of QuickBooks Pro/Enterprise, choose the “Refund” option, then pick the appropriate payment option.
- QuickBooks Online: Using QuickBooks Online, Enter the Refund’s specifics, including the date, account, and sum.
8. Save and Close:
Ensure all necessary information is correct, then click “Save” to record the Refund.
9. Verify the Refund:
Verify the customer’s transactions again to be sure the Refund was recorded correctly.
How to Handle Customer Overpayment in QuickBooks Online?
If a customer overpays an invoice in QuickBooks Online, you can easily manage it by following these steps:
- Record the Overpayment: When entering a payment, QuickBooks will automatically apply the overpayment to the customer’s account. If the overpayment isn’t immediately applied, you can manually enter it as a credit.
- Apply the Credit: You have the option to either apply the credit toward future invoices or issue a refund to the customer. You can choose which option suits your business needs.
- Issue a Refund (If Necessary): If the customer requests a refund, you can process it directly through QuickBooks by recording the refund transaction.
This process ensures you keep accurate records while managing overpayments efficiently in QuickBooks Online.
Best Practices for Handling Overpayments in QuickBooks Online
When dealing with overpayments in QuickBooks Online, it’s important to follow the right steps to ensure accurate financial records. Here’s how you can effectively manage them:
- Apply Overpayment to an Invoice
If the overpayment is linked to an existing invoice, simply apply the extra amount directly to that invoice. QuickBooks will automatically adjust the balance. - Create a Credit Memo
For customers who have overpaid, create a credit memo. This allows you to either refund the customer or apply it as a credit toward future purchases. - Issue a Refund
If you prefer to return the overpayment, create a refund check in QuickBooks Online. This ensures the overpayment is cleared from your records. - Record Overpayment as a Credit
If the customer does not request a refund immediately, you can leave the overpayment as a credit to be used in future transactions. - Monitor Your Accounts
Regularly review your accounts receivable and customer balances to identify any overpayments and resolve them promptly.
By following these steps, you can maintain accurate records and ensure smooth transactions in QuickBooks Online.
Common Mistakes When Handling Overpayments in QuickBooks Online
When managing customer overpayments in QuickBooks Online, it’s easy to make errors that can affect your financial records and customer relationships. Here are some common mistakes to avoid:
- Not Recording the Overpayment Correctly Failing to properly record an overpayment can lead to discrepancies in your accounts. Ensure the overpayment is logged accurately as either a credit or a refund.
- Misapplying Credits or Refunds Mistakenly applying credits or refunds to the wrong invoice or customer can cause confusion and affect your accounting records. Always verify that credits are applied to the correct transaction.
- Not Communicating with Customers Lack of communication with customers about overpayments can lead to dissatisfaction. Always inform your customers about the overpayment and the steps you’re taking to resolve it, whether it’s applying the credit or issuing a refund.
- Not Reconciling Accounts Overpayments can throw off your bank or credit card reconciliation if not handled properly. Be sure to reconcile any overpayment-related transactions in your accounting records.
- Delaying Refunds Delaying the refund process can damage your business’s reputation. Once an overpayment is identified, process the refund promptly to maintain a positive relationship with your customers.
How to Handle Overpayments in QuickBooks for Tax Purposes?
If you’ve overpaid taxes in QuickBooks, you can either apply it to a future tax payment or request a refund. Here’s how to manage it:
1. Apply to a Future Tax Payment
- Go to Taxes > Payroll Tax > Payments.
- Find the overpaid tax and select Resolve.
- Choose Apply to a future tax payment and confirm.
2. Request a Refund
- Go to Taxes > Payroll Tax > Payments.
- Find the overpaid tax and select Resolve.
- Choose Request a refund and contact the IRS or your state agency for the refund.
You can also apply the overpayment to a previous year if needed.
How to Prevent Overpayment Issues in QuickBooks Online?
To avoid overpayment issues in QuickBooks Online, follow these best practices:
- Accurate Invoicing:
- Double-check invoice details, such as quantities and prices, before sending.
- Use item lists in QuickBooks to prevent manual entry mistakes.
- Payment Application:
- Carefully match payments to the correct invoices to avoid overpayment.
- Use QuickBooks’ automatic payment matching feature when available.
- Clear Customer Communication:
- Clearly communicate payment terms, including due dates, to customers.
- Send reminders for overdue invoices to reduce errors in payments.
- Credit Memo Management:
- If an overpayment happens, create a credit memo and apply it to future invoices or issue a refund.
- Regular Account Review:
- Periodically review customer accounts to catch any potential overpayments or credit balances early.
- Staff Training:
- Train staff on proper invoicing and payment application procedures to avoid errors.
Additional Tools:
- Customer Portal: Allows customers to pay invoices online, minimizing manual errors.
- Payment Gateways: Integrate with QuickBooks to streamline payment processing.
If an overpayment occurs:
- Identify the issue: Verify the invoice and payment details.
- Create a credit memo: Apply it to future invoices or issue a refund if needed.
- Communicate with the customer: Notify them about the overpayment and how it will be resolved.
These steps will help you prevent overpayment errors and keep your QuickBooks Online accounting accurate and efficient.
Conclusion
The measures mentioned above are rather simple to carry out. However, there may be times when trying to follow the stages leaves you stranded. You may contact our professionals in this circumstance, and they will assist you in addressing QuickBooks Refund Customer Overpayment problems or resolving the challenges you are having with updating the records.
They will either speak with you over the phone, log into your system remotely, or complete the entire process on your behalf. As a result, you shouldn’t be concerned if you become stuck at any moment. Please feel free to contact our professionals at 1-802-778-9005.
FAQ
How do I correct an overpayment that was incorrectly applied to the wrong customer or invoice?
When an overpayment is mistakenly applied, you need to un-apply the payment first. In QuickBooks Online (QBO), locate the incorrectly applied Payment or Refund Receipt in the Customer’s transaction list. Open the payment, uncheck the associated invoice(s), and save it. This will move the overpayment back into the customer’s account as a credit. You can then correctly apply that credit to the right invoice or customer.
My customer paid via credit card, and now I need to refund the overpayment. Can I just write them a check?
No, you should process the refund back to the original credit card. Issuing a check for a credit card payment causes discrepancies in your merchant account reporting and QBO reconciliation. The best practice is to use the Refund Receipt tool in QBO, ensuring you select the original payment method (the credit card account) to process the funds reversal through your payment processor.
What is the difference between a “Credit Memo” and a “Refund Receipt” in QBO for handling overpayments?
A Credit Memo is an internal accounting record used to reduce the amount a customer owes you. For an overpayment, it marks the excess funds as a credit that can be applied to a future invoice. A Refund Receipt is used when you are immediately sending money back to the customer (via check, cash, or credit card reversal), thereby removing the overpayment entirely from your accounts.
I see the overpayment in my bank feed, but I don’t see the corresponding customer credit in my Accounts Receivable. Why is the payment not matching up?
This often happens when the payment was recorded as a generic Deposit or was mistakenly categorized directly to a revenue account instead of being received against the customer’s account. To fix this, you must undo the deposit or expense transaction. Then, correctly re-record the payment using the Receive Payment function, matching it to the customer and allowing the excess to correctly create a customer credit balance.
If I choose to keep the overpayment as a credit, how do I apply it to the customer’s next invoice?
When you create a new invoice for that customer, and they have an outstanding credit balance, QBO will usually prompt you automatically. If not, when you go to Receive Payment for the new invoice, the system will show the available Credit from the previous overpayment at the top right of the payment screen. You must click to apply this credit before recording any new payment amount. This is crucial for clearing the credit balance.
The article mentions “Refund to Vendors When a Bill Has Been Paid.” Why would a vendor send me a refund?
This step addresses the reciprocal situation: Your business is the customer who overpaid the vendor. If you overpaid a bill, the vendor may send you a refund check or apply a credit to your account. In QBO, you record the vendor’s refund using a Vendor Credit transaction. This credit can then be used to reduce the amount you pay on a future bill from that specific vendor.
How does a customer overpayment impact my sales tax liability?
A customer overpayment on a standard invoice does not affect sales tax liability immediately because sales tax is calculated on the value of the goods or services provided, not the total cash received. If you later issue a Refund Receipt for the overpaid amount, that portion of the refund is simply a return of principal and also has no sales tax implications. Only refunds related to returned goods or services will affect your sales tax payable.
Disclaimer: The information outlined above for “How to Fix QuickBooks Online Refund Customer Overpayment Issue?” is applicable to all supported versions, including QuickBooks Desktop Pro, Premier, Accountant, and Enterprise. It is designed to work with operating systems such as Windows 7, 10, and 11, as well as macOS.