I’m James Brown, and right now I’m dealing with a frustrating issue in QuickBooks Desktop Pro 2024. Every time I try to send an email directly from QuickBooks with a PDF attachments—like an invoice or report—it either doesn’t send at all, or it goes out without the attachment included.
My email setup is correct inside QuickBooks, and I’m using Outlook, which has always worked fine before. But recently, when I click “Send,” the program just stalls for a few seconds and then nothing happens. In some cases, I get no confirmation, and in others, my clients are telling me the email came through, but the PDF wasn’t attached.
This is throwing a wrench into my workflow. I’m losing time having to manually save PDFs and email them outside of QuickBooks, which defeats the purpose of using the built-in feature. It’s especially frustrating when I have a batch of invoices to send out and can’t rely on QuickBooks to handle something as basic as email attachments.
I need immediate help to resolve this issue quickly. It’s not just an inconvenience it’s affecting how I communicate with clients and how efficiently I run my business.
Hey James Brown,
The inability to send emails with PDF attachments from QuickBooks Desktop Pro 2024 is typically a multi-faceted technical issue stemming from conflicts between QuickBooks, Microsoft Outlook, and core Windows components. This is not a permanent error; it is fixable by systematically addressing potential points of failure, including compatibility issues, corrupted files, and incorrect system permissions. Solutions require a specialized, step-by-step approach covering system settings, application repairs, and component integrity checks to restore seamless email functionality for business operations.
Highlights (Key Facts & Solutions)
- Primary Issue: QuickBooks stalls or sends emails without PDF attachments (like invoices) due to a communication glitch between the QuickBooks application and the default email client, typically Outlook.
- Most Critical Fixes (Intuit’s Official Tool):
- Run the QuickBooks PDF & Print Repair Tool found within the QuickBooks Tool Hub to automatically diagnose and fix internal PDF generation components.
- Windows and Permissions Checklist:
- Verify that Outlook is set as the default email program in Windows settings.
- Ensure the Microsoft XPS Document Writer component is enabled and functioning, as QuickBooks relies on this virtual driver to create the PDF file.
- Reset the permissions for the
%TEMP%folder to Full Control to ensure QuickBooks can write the temporary PDF file before attempting to attach it.
- Application Integrity Checks:
- Repair or reinstall Adobe Reader/Acrobat, as a corrupted installation of the PDF viewer can interfere with QuickBooks’ ability to generate and attach the file.
- Update both QuickBooks Desktop and Microsoft Outlook to their latest versions to resolve known compatibility issues introduced by recent system changes.
- Consider performing an Online Repair of Microsoft Office/Outlook or creating a new Outlook Profile if the issue is persistent and tied to email client corruption.
- Best Practice: Running QuickBooks as an Administrator can resolve permission conflicts that prevent the software from properly integrating with system-level applications like Outlook.
Possible System Conflicts Causing PDF Email Issues in QuickBooks Desktop Pro 2024
Certain system-level conflicts can prevent QuickBooks from sending emails with PDF attachments. This often happens due to outdated or incompatible versions of Outlook, missing or misconfigured PDF drivers, or Windows updates that change default app settings. In some cases, antivirus or firewall software may block QuickBooks from connecting to your email program. Identifying and fixing these conflicts is essential to restore normal email functionality.
- QuickBooks and Outlook are not properly integrated.
- Outlook is not configured as the default email program in Windows.
- QuickBooks is not running with administrator privileges.
- The QuickBooks PDF converter component is damaged or outdated.
- Adobe Reader is either not installed or not set as the default PDF viewer.
- Recent Windows or Office updates may have changed system settings.
- Security software is blocking email or attachment functions.
- QuickBooks is not fully updated to the latest release.
- Outlook email profile is damaged or misconfigured.
- Background processes or third-party plugins are causing conflicts.
Step-by-Step Fixes for PDF Email Attachment Issues in QuickBooks Desktop Pro 2024
James, I know this issue with QuickBooks not sending PDF attachments is disrupting your day-to-day operations. The steps below are designed to help you fix it—by checking your Outlook settings, updating QuickBooks, repairing the PDF component, and ensuring all tools are properly synced. Follow each step carefully to restore normal email functionality and get back to handling client communication smoothly.
Solution 1: Set Outlook as the Default Email Program
If you use multiple email programs on your computer, it’s easy to feel overwhelmed. By setting up Outlook as your main hub, you can manage all your emails, contacts, and calendar events in one place.
- In Windows, click Start and enter Default apps in the Search box.
- Select Default apps from the suggestions.
- Under the Windows Settings app, do one of the following on the Default apps page:
- In Windows 10:
- Navigate to Email.
- Choose the current app listed.
- Select Outlook from Choose an app.
- In Windows 11:
- Go to Set defaults for applications.
- Scroll to locate Outlook, and select it.
- Set the default mail app for file type (.eml, .hol, etc.) and link type:
- Choose an item.
- Select Outlook.
- Click Set default to confirm.
Solution 2: Run the QuickBooks PDF & Print Repair Tool from the Tool Hub
When QuickBooks can’t attach PDFs to your emails, it may be due to issues with its built-in print or PDF components. The PDF & Print Repair Tool, available inside the QuickBooks Tool Hub, is designed to automatically detect and fix these problems. Running this tool can quickly resolve common errors without needing to make manual changes.
Step 1: Download & Install the QuickBooks Tool Hub
The QuickBooks Tool Hub helps to fix common errors. You’ll need to close QuickBooks to use the tool hub. For the best experience, we recommend you use Tool Hub on Windows 10, 64-bit.
- Close QuickBooks.
- Download and install the most recent version (1.6. 0.8) of QuickBooks Tool Hub.
- Save the file somewhere you can easily find it such as your Downloads folder or your Windows desktop.
Note: To find out which tool hub version you have, select the Home tab and the version will be on the bottom.
- Open the downloaded file QuickBooksToolHub.exe to start the installation.
- Follow the on-screen steps to install and agree to the terms and conditions.
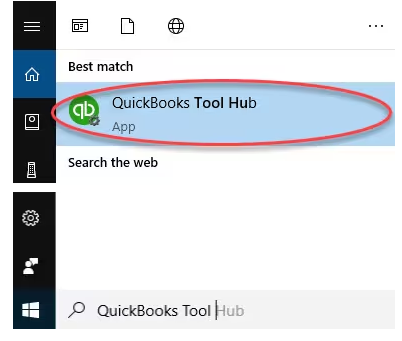
- When the installation finishes, click twice on your Windows desktop icon to open the tool hub.

Note: If you are unable to find the icon, do a search in Windows for QuickBooks Tool Hub and select the program.
Step 2: Run the QuickBooks PDF & Print Repair Tool
- Choose Program Problems under the QuickBooks Tool Hub.
- Select QuickBooks PDF & Print Repair Tool. It will take up to a minute to run.
- Print, email, or save as a PDF from QuickBooks Desktop again.
Solution 3: Update QuickBooks and Microsoft Outlook
Outdated versions of QuickBooks or Outlook can cause compatibility issues, especially when sending emails with PDF attachments. Updating both ensures smooth integration and includes the latest fixes to resolve common errors.
Update QuickBooks Desktop
Get Automatic Updates
QuickBooks Desktop is designed to automatically download and install updates when they become available. To ensure this feature is enabled:
- Open QuickBooks Desktop.
- Navigate to the Help menu and choose Update QuickBooks Desktop.
- Make sure Automatic Update is selected under the Options tab.
Get Manual Updates
If you prefer to manually check for updates, follow these steps:
- Close your company files and QuickBooks.
- Open the Windows Start menu and look for QuickBooks Desktop.
- Right-click the icon and select Run as administrator.
- Navigate to the Help menu on the No Company Open screen.
- Select Update QuickBooks Desktop.
- Under the Options tab, select Mark All and click Save.
- Choose the Update Now tab and tickmark the Reset Update checkbox.
- Select Get Updates to start the download.
- Once done, close and reopen QuickBooks Desktop.
- When prompted, click Install Now to install the updates again and then restart your computer.
Update Microsoft Outlook
To download Office for Windows updates, do the following:
- Open any Office app, such as Word, and create a new document.
- Navigate to File > Account (or Office Account if you opened Outlook).
- Select Update Options > Update Now under the Product Information window.
Note: You need to click Enable Updates first if you can’t see the Update Now option right away.
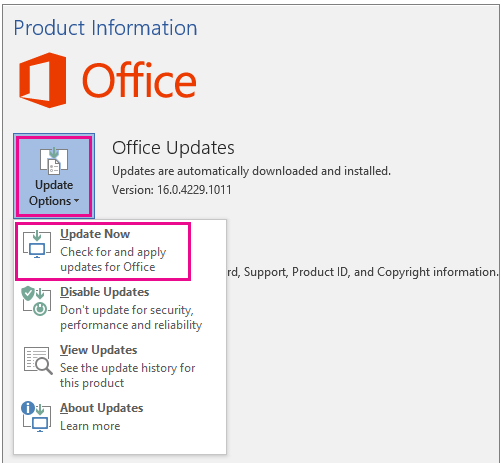
- Close the “You’re up to date!” window after Office is done checking for and installing updates.
You can also choose the Update Options button to Disable Updates or to View Updates that were previously installed.
Solution 4: Integrate QuickBooks with Microsoft Outlook
For QuickBooks to send emails properly with PDF attachments, it must be correctly integrated with Microsoft Outlook. This ensures QuickBooks can access your default email client without errors or delays. Proper integration allows seamless communication and prevents attachment issues during email sending.
Step 1: Contact your Internet or Email Provider
You need to reach out to your email provider or internet connection to get the following info:
- Username
- Password
- Incoming email server address
- Incoming email server type
- Outgoing email server address
Step 2: Set up Outlook
- Navigate to the QuickBooks Edit menu.
- Choose Preferences and Send Forms.
- Select Outlook and click OK.
Solution 5: Repair, Uninstall & Reinstall Adobe Reader/Acrobat
QuickBooks relies on a stable PDF viewer to generate and attach documents. If Adobe Reader or Acrobat is missing, outdated, or corrupted, it can interfere with this process. Repairing or reinstalling Adobe Reader ensures your system has the right tools for handling PDF attachments without errors.
Repair Adobe Reader/Acrobat
If you’ve updated to the latest version of Adobe Reader/Acrobat and it hasn’t fixed the problem, you’ll need to repair your Adobe installation.
- Close Acrobat/Reader and all open web browser windows.
- Press the Start button at the bottom left of your screen.
- Type Control Panel, and click Enter.
- Select Programs and Features.
- Choose Acrobat or Adobe Reader, and click Uninstall/Change.
- Under the Setup dialog box, select Next.
- Select Repair, and click Next.
- Choose Install.
- Once done, click Finish and restart your computer.
- Log back in to QuickBooks desktop, and try to print.
Uninstall Adobe Reader/Acrobat
- Close Acrobat/Reader and all open web browser windows.
- Press the Start button at the bottom left of your screen.
- Type Control Panel, and press Enter.
- Choose Programs and Features.
- Select Acrobat or Adobe Reader, and click Uninstall/Change.
- Click Yes to confirm.
Note: Acrobat Professional is a paid program, unlike the free Adobe Reader. Don’t uninstall Acrobat Professional unless you have the installation file and product key or plan to replace it with Adobe Reader.
Re-install Acrobat Professional
To reinstall Acrobat Professional, use the DVD or the installation download you received from Adobe. To reinstall Adobe Reader, visit https://get.adobe.com/reader/.
Solution 6: Create a New Outlook Profile
Sometimes, a corrupted Outlook profile can prevent QuickBooks from sending emails with PDF attachments. Creating a new profile helps reset email settings and often resolves issues related to broken configurations or failed connections between Outlook and QuickBooks.
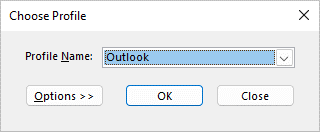
- Hold Shift while starting Outlook.
Tip: To access the profile picker in Outlook, use one of these options:
- Press Windows + R, type Outlook.exe /profiles, and click Enter.
- Or go to File > Account Settings > Change Profile (Outlook will restart)
- Select Options on the profile picker dialog box.
Note: Before clicking New, consider checking “Prompt for a profile to be used.” This option lets you choose a profile each time Outlook starts. It is useful if you manage multiple profiles and need to switch between them.
- Click New.
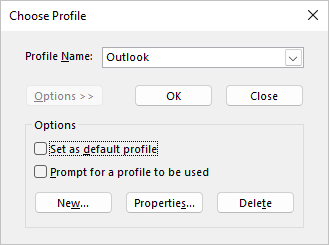
- Enter a name for the new Outlook Profile and choose OK.
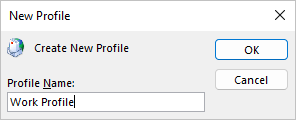
- Once the new profile is created, add an email account to the profile. In the add account dialog box, you can optionally add more accounts.
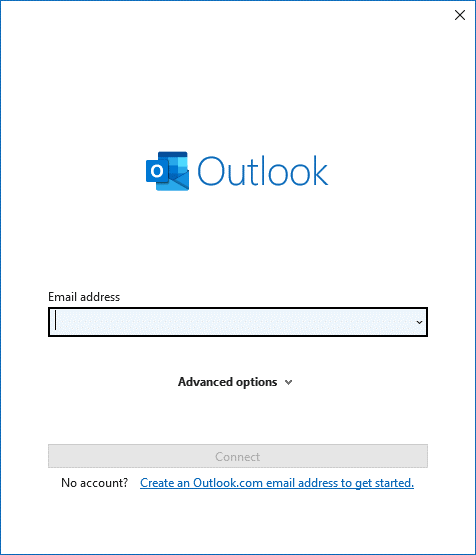
Note: You can add more (non-Exchange) mail accounts to your profile, like Gmail or Live.com.
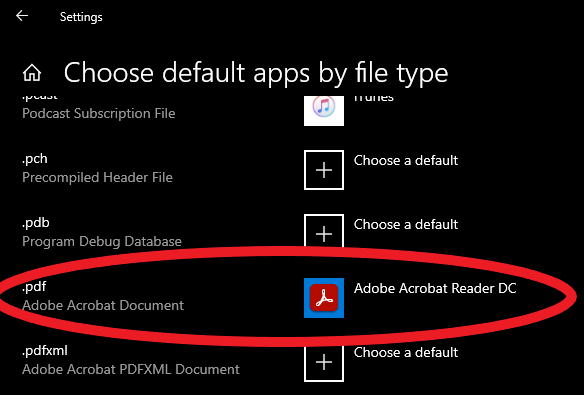
Solution 8: Set Adobe Reader as the Default PDF Viewer
- Click the Start menu on your keyboard and select Settings.
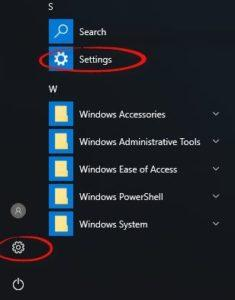
- Choose Apps, and select Default apps.
- Scroll down, and select the Choose default apps by file type option.
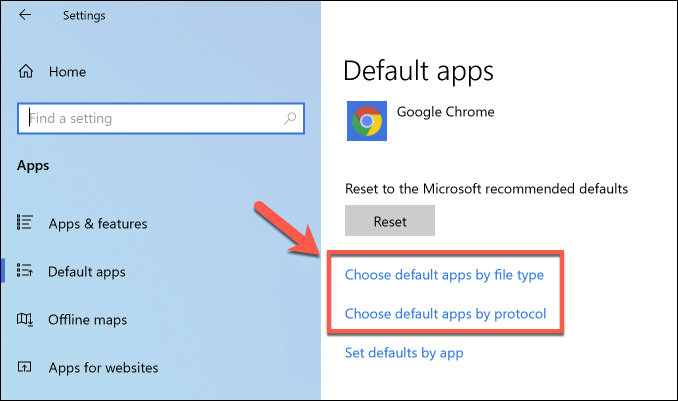
- Select the current default app for PDF file format.
- Choose Adobe Acrobat Reader DC to set it as the new default.
Solution 9: Reset Your Temp Folder Permissions
QuickBooks relies on your system’s temporary folder to create and attach PDF files to emails. If the permissions for this folder are restricted or incorrectly set, it can prevent email attachments from working. By resetting the temp folder permissions, you ensure QuickBooks has the proper access it needs to handle PDF files and restore normal email functionality.
- Restart your computer and send the email again.
- Hold and press the Windows key + R to open the RUN command.
- Type %TEMP% and click Enter.
- Right-click an empty area of the temp folder, and choose Properties.
- Select Security and make sure all user names and groups in Security have Full Control.
- When the permissions have been set to Full Control, save as a PDF again in QuickBooks.
Solution 10: Test if You Print to the MS XPS
QuickBooks uses the Microsoft XPS Document Writer to create PDF files. If this component isn’t working correctly, it can interfere with email attachments. Testing the XPS printer helps you verify whether the print-to-PDF function is working as expected. If the test fails, repairing or reinstalling the XPS Document Writer may resolve the issue.
- Open Notepad.
- Type Test.
- Select File and click Print.
- Choose the XPS Document Writer, and click Print.
- Enter a filename and save it to your desktop.
- Navigate to your desktop and review the XPS document you printed from the notepad.
If you can’t see XPS Document Writer, allow your computer to print to your XPS printer.
- Go to your Windows Control Panel and switch to Category View.
- Choose Programs.
- Select Turn Windows features on or off under Programs and Features section.
- Check Microsoft XPS Document Writer in the list of services.
- Click OK.
Solution 11: Repair Microsoft Outlook
Corrupted or damaged Outlook files can prevent proper integration with QuickBooks. Repairing Outlook may resolve issues with PDF attachments not sending.
- Right-click the Start button and select Installed apps on the pop-up menu.
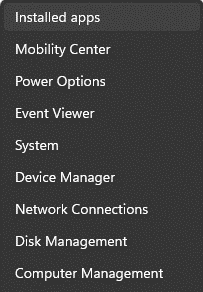
- Choose the Microsoft 365 or Office product, click the ellipses (⋯) next to it, and select Modify.
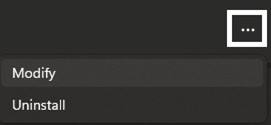
- Depending on your Microsoft 365 or Office installation type, choose the following options to proceed with the repair.
- Click-to-run: Select Online Repair > Repair for a thorough fix in the “Repair your Microsoft 365 and Office Programs” window. Or, try Quick Repair for a faster, basic scan and file replacement.
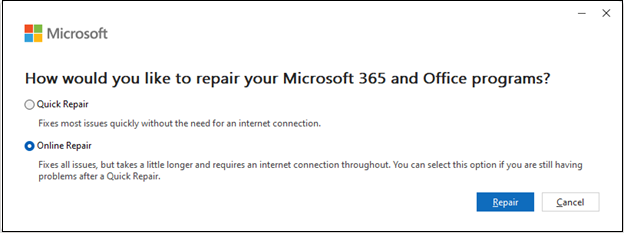
- MSI-based: Select Repair under the Change your installation window and click Continue.
- Follow the on-screen instructions to complete the repair.
Future Tips to Prevent PDF Email Failures in QuickBooks Desktop Pro 2024!
Keep QuickBooks and Outlook updated, use Adobe Reader as the default PDF viewer, avoid corrupt Outlook profiles, and clear temp folders periodically will help you keep your system, software, and settings optimized for smooth and consistent email functionality.
- Keep QuickBooks and Microsoft Outlook updated to their latest versions.
- Set Adobe Acrobat Reader as your default PDF viewer.
- Run QuickBooks as Administrator to ensure proper email permissions.
- Avoid third-party PDF tools that may override QuickBooks PDF converter.
- Regularly clear and reset TEMP folder permissions (%TEMP%) to avoid access errors.
- Run the QuickBooks PDF & Print Repair Tool via Tool Hub as periodic maintenance.
- Ensure Microsoft XPS Document Writer is installed and working properly.
- Create a fresh Outlook profile if your current one shows signs of corruption.
- Confirm your email is properly integrated in QuickBooks (Outlook/SMTP settings).
- Repair or reinstall Microsoft Office if Outlook integration becomes unstable.
Final Note!
James, I understand how discouraging it can feel when a simple task like sending a PDF invoice turns into a technical hurdle, especially when you rely on QuickBooks Desktop Pro 2024 to keep your business moving.
But this issue isn’t permanent. Whether it’s updating your software, resetting folder permissions, repairing Outlook or Adobe Reader, or creating a new Outlook profile—each solution directly addresses the root cause. Once implemented, you’ll be back to sending invoices, reports, and estimates without delays.
To keep things running smoothly in the long term, I recommend a few key habits: keep your QuickBooks, Outlook, and Adobe Reader up to date, set Adobe Reader as your default PDF viewer, and periodically clear your temp folders. These small steps can help you avoid repeat errors and keep your workflow uninterrupted.
And if you ever need help reinstalling, configuring, or optimizing QuickBooks again, don’t hesitate to reach out. Let’s keep your operations efficient and your communication seamless.
FAQ
-
Why does the QuickBooks PDF & Print Repair Tool fail to fix my email attachment issue?
The QuickBooks PDF & Print Repair Tool primarily fixes issues related to the software’s internal components for generating and printing PDFs. If the tool doesn’t resolve the issue, it suggests the root cause lies outside of QuickBooks itself, often requiring further, specific actions.
Further Steps to Investigate:
1. Windows Permissions: Resetting the permissions for the temporary folder (%TEMP%) is the very next recommended step if the tool fails.
2. XPS Document Writer: Checking and ensuring the Microsoft XPS Document Writer is functional is essential for PDF creation.
3. Outlook/MAPI: If printing works but emailing fails, the issue is likely rooted in the communication (MAPI) between QuickBooks and Outlook, requiring advanced troubleshooting like checking the MAPI32.dll file or repairing Outlook. -
Is it safe to give the
%TEMP%folder “Full Control” permissions, and why is this necessary?Yes, granting Full Control permissions to the
%TEMP%folder is a necessary and standard troubleshooting step provided by Intuit.The Role of the
%TEMP%Folder: QuickBooks uses the temporary folder (%TEMP%) as a crucial staging area. It must have Full Control access to quickly create and write the temporary.pdffile before attempting to hand it off to Outlook for attachment and sending.Security Context: This change is localized to the temporary folder on the local machine and is required to overcome permission conflicts that often occur after Windows updates or when security software intervenes. Failure to grant this permission stops the PDF creation process.
-
How do I know if my Microsoft Outlook Profile is corrupted?
A corrupted Outlook profile is a frequent, silent culprit behind QuickBooks emailing failures, especially when QuickBooks gives MAPI errors or fails to launch the email window.
Key Indicators that the Profile is the Issue:
1. You can send normal emails directly from Outlook without issue.
2. The problem only occurs when trying to send reports, invoices, or transactions directly from QuickBooks.
3. Troubleshooting steps focused on QuickBooks components (like the PDF Repair Tool) have failed.The Fix: The most reliable way to rule out profile corruption is to create a new Outlook Profile (Solution 6) and test the QuickBooks email function using the new profile.
-
What is the difference between an Online Repair and a Quick Repair of Microsoft Office?
When repairing your Microsoft Office/Outlook installation (Solution 11), the two options offer different levels of repair depth.
Quick Repair:
1. Method: Faster, checks and replaces corrupted files locally.
2. Requirement: Does not require an internet connection.
3. Best For: Minor file association or startup issues.Online Repair:
1. Method: Comprehensive, downloads a fresh copy of the Office installation files from Microsoft’s servers and effectively performs a full reinstall.
2. Requirement: Requires a stable internet connection.
3. Best For: Deep-rooted problems like integration failures with QuickBooks or MAPI errors, as it replaces all potentially corrupt program files. -
Why do I need the Microsoft XPS Document Writer, and what if it’s missing?
The Microsoft XPS Document Writer (MXDW) is a critical native Windows component that acts as the backbone for QuickBooks’ PDF creation process.
Role in QuickBooks: QuickBooks uses the MXDW as a virtual printer driver. It sends the invoice/report data to this writer, which then converts the output into the final PDF format. If the XPS writer is disabled, QuickBooks cannot complete the PDF generation step.
If it’s Missing/Disabled: The attachment process fails, often resulting in an error message indicating a missing PDF component. You must ensure it is enabled via:
Control Panel > Programs > Turn Windows features on or off.
-
Do I need to uninstall my paid Adobe Acrobat Professional, or is Adobe Reader sufficient?
You generally do not need to uninstall your paid Adobe Acrobat Professional license (Solution 5).
QuickBooks Requirement: QuickBooks primarily requires a functional, stable PDF viewer installed and set as the default to ensure proper file association. The free Adobe Reader fulfills this requirement completely.
Acrobat Professional: This version includes advanced editing and creation tools. If you have it, the focus should be on the Repair option within the Control Panel to fix any internal corruption that might be interfering with system file handoffs. Uninstalling should only be done if the repair fails and you have your license/installer ready for reinstallation.
-
Why should I run QuickBooks as an Administrator, and how does it help with emailing?
Running QuickBooks as an Administrator can resolve communication and permission-based blocks between the accounting software and Windows services, including Outlook.
Elevated Permissions: Running as Admin grants the application elevated privileges, allowing it to:
* Write data to protected system folders (like the
%TEMP%folder, if permissions were an issue).
* Interact with other Windows programs (like Outlook) without being blocked by User Account Control (UAC) or other security settings.The Effect: This ensures the “handshake” required for MAPI communication and PDF file attachment can occur successfully, resolving errors where QuickBooks cannot connect to the email client.
Disclaimer: The information outlined above for “Why Am I Unable to Send Emails With PDF Attachments in QuickBooks Desktop Pro 2024?” is applicable to all supported versions, including QuickBooks Desktop Pro, Premier, Accountant, and Enterprise. It is designed to work with operating systems such as Windows 7, 10, and 11, as well as macOS.
