Highlights (Key Facts & Solutions)
- Mandatory Vendor Configuration: Contractors must be specifically marked as Vendor eligible for 1099 in the Vendor Center for the direct deposit option to be active.
- Transmission Lead Time: Direct deposit submissions must be sent to Intuit by 5:00 PM PT at least two business days before the scheduled payment date to ensure timely distribution (Note: Payroll Assisted may support a one-day lead time).
- 1099 vs. Vendor Distinction: QuickBooks allows direct deposits only for 1099 contractors; standard vendors without 1099 tracking enabled will trigger “Transmission Failed” errors.
- Software Maintenance: Outdated payroll tax tables are a primary cause for payment blocks; users should download the latest updates via the Employees tab to restore functionality.
- Data Repair Protocol: If the software freezes during payment, the Verify Data and Rebuild Data utilities must be used to identify and fix internal company file errors.
- Security Software Interference: High firewall or antivirus settings can restrict QuickBooks server access, necessitating the addition of the software as an exception to allow secure ACH transfers.
- Submission Verification: Checks remain in Online to Send status until the user manually authorizes the transmission through the Send Payroll Data screen using a secure PIN.
“Hi, I’m Shawna. I’ve been using QuickBooks Desktop 2024 to manage payments for my business, but recently I ran into a problem trying to send a vendor payment through direct deposit.
The vendor’s banking info is all set up and verified, and I’ve processed similar payments before without issue. But now, when I try to send the payment, the system either freezes or just refuses to process it — and it doesn’t give me any meaningful error to troubleshoot from.
I’ve already double-checked my payroll subscription status, confirmed that QuickBooks is fully updated, and even ran a company file verification — but still no luck. Everything looks fine on paper, yet the payment won’t go through.
This is time-sensitive because the vendor is expecting payment today, and I don’t have another way to send it right now. If anyone has experienced this in QuickBooks Desktop 2024 or knows a quick fix, I’d really appreciate some immediate help. This delay is putting my vendor relationship at risk, and I need to get this resolved ASAP.”
Hi Shawna,
Thank you for reaching out—and I completely understand how stressful it can be when the system freezes without warning and your vendor is waiting. It’s a high-pressure situation, and it’s absolutely valid to feel overwhelmed.
From what you’ve shared, I can see you’ve already taken all the right steps: verifying your vendor’s banking information, confirming your payroll subscription is active, updating QuickBooks Desktop 2024, and even running a company file verification. That’s a solid checklist, and you’re on the right track.
Despite that, if the issue still persists—where the QuickBooks freezes or won’t process the vendor payment without any clear error, it’s understandable to feel stuck. You’re not alone in this, and we’ll go through a few troubleshooting steps to help you fix it. You’ve already done a lot—now let’s close the gap and get this resolved quickly, so your vendor relationship remains strong and intact.
What’s Causing QuickBooks Desktop 2024 to Block or Delay Vendor Payments?
QuickBooks Desktop 2024 may block or delay vendor payments due to several technical or system-related issues. These include stuck background processes, outdated payroll updates, damaged company files, or interference from antivirus or firewall settings. In some cases, unsent payroll data or a corrupted installation can also prevent payments from going through, even when no error message appears.
- Stuck background processes preventing new transactions.
- Outdated or incomplete payroll tax table updates disrupting payment functions.
- Minor company file damage interfering with processing.
- Unsent or stuck direct deposit data blocking new payments.
- Firewall or antivirus software restricting QuickBooks server access.
- Corrupted QuickBooks installation files causing system instability.
- Damaged or outdated Direct Deposit configuration files are causing errors.
- Incorrect system date/time settings can disrupt secure transactions like direct deposit.
Step-by-Step Guide For Vendor Payment Failures in QuickBooks Desktop 2024!
If QuickBooks Desktop is freezing or refusing to send vendor payments, there are a few system and software-level fixes that can help. To successfully send vendor payments via direct deposit in QuickBooks Desktop 2024, your independent contractors must be properly configured as 1099 vendors. If not set up correctly, QuickBooks will either freeze, show transmission errors, or fail to process the payment.
Solution 1: Enable 1099 Tracking and Add Contractor as Vendors
If a vendor isn’t set up properly for 1099 tracking, QuickBooks won’t process direct deposits for them.
Step 1: Turn on 1099-MISC
- Click the Edit menu and choose Preferences.
- Select the Tax: 1099 menu and click the Company Preferences tab.
- Choose Yes in the Do you file 1099-MISC forms? Section.
- Once done, click OK to save your settings.
Step 2: Add a contractor as a vendor
- Go to the Vendors menu and select Vendor Center.
- Choose the New Vendor dropdown and click New Vendor.
- Fill out the fields on each tab. You can get this information from a W-9. Also edit and change this information later if required.
- When you’re ready, click OK.
Step 3: Track contractor payments for 1099s
- Click the Vendors menu and choose Vendor Center.
- Select a vendor’s name and click Edit.
- Choose the Address Info tab and review the information:
- Make sure you have the correct two-letter state abbreviation and ZIP code.
- If the vendor is a person, the vendor’s legal name must appear in the First Name, M.I., and Last Name fields.
- If you have the company name but not the person’s name, leave the Company Name field blank. This prevents them from showing up twice when you prepare your 1099-MISCs.
- Navigate to the Tax Settings tab.
- Select and check the Vendor eligible for 1099.
- Enter the vendor’s tax identification number under the Vendor Tax ID field.
- Click OK.
- Repeat the same steps for each contractor you want to set up for 1099 payments.
When you start tracking contractors for 1099 payments, QuickBooks will start tracking their payments behind the scenes. When you’re ready to file your 1099s, just add the tracked payments to the form.
Solution 2: Identify and Update Non-1099 Vendors
If you see the error message: “The vendor payment transmission failed”, this is caused by one or more of your independent contractors not marked as 1099 vendors.
Note: You can only send direct deposits to 1099 contractors, not vendors.
- Navigate to Reports, select Vendors and Payables, and 1099 Summary.
- From the 1099 Options, choose Only 1099 vendors. Review the report and check who is missing from the list of 1099 vendors.
- Select All Vendors. Make a note of the vendors who need to be marked as 1099.
Next, mark your vendors as eligible for 1099s:
- Go to Vendors, and choose Vendor Center.
- Click twice on the vendor you need to mark, and select Tax Settings.
- Select the box for Vendor Eligible for 1099, and click OK.
Solution 3: Remove Direct Deposit for Non-1099 Vendors
To remove the direct deposit option for non-1099 vendors, follow these steps.
- Go to the Vendors menu and select Vendor Center.
- Double-click on the vendor you need to mark, and choose Additional Information.
- Select Direct Deposit and uncheck the box for Use Direct Deposit.
- Next, choose Banking, and click Use Register.
- Locate the check for non-1099 vendors, and click twice to open the check.
- Uncheck the box for Online Payment, and choose Save & Close.
Solution 4: Set up Direct Deposit for 1099 Contractors
Before signing up for Intuit Direct Deposit service, make sure your vendor is a 1099 independent contractor and you have an active payroll subscription. If you’re using QuickBooks Desktop Payroll Basic, Standard and Enhanced, direct deposit for paying employees must be active to activate paying 1099 vendors. Follow these steps to sign up direct deposit for independent contractors:
- Navigate to Vendors from the top menu and open Vendor Center.
- Select a vendor and double-click their name.
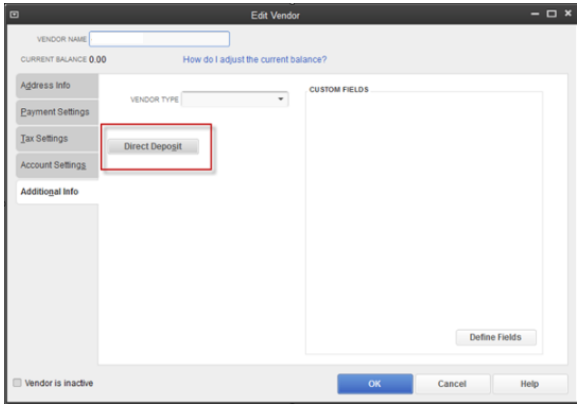
- On the Edit Vendor window, choose the Additional Info tab and click the Direct Deposit button.
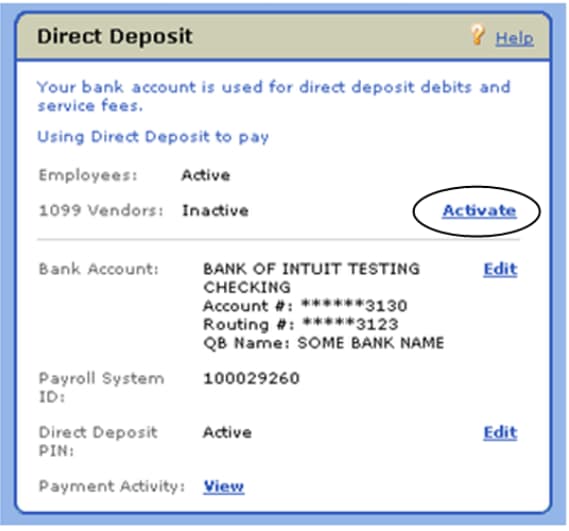
- This will open the Payroll Service Account Information page.

- Click the Activate link under Direct Deposit, next to 1099 Vendors for QuickBooks Desktop Basic, Standard and Enhanced. For QuickBooks Desktop Payroll Assisted, proceed to the next step.

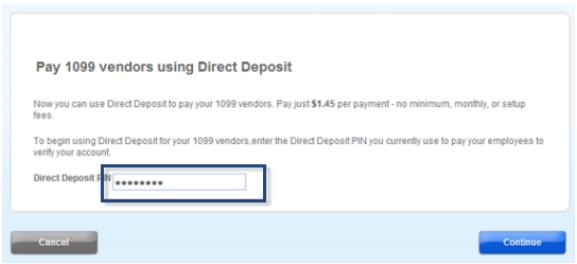
- Enter your Direct Deposit Pin and click Continue.

- Follow the on-screen instructions until you get to the Confirmation screen.
Now, you’ll be able to start setting up your independent contractors for direct deposit.
Important: Before paying contractors, ensure your company is set up for direct deposit and you’ve collected their bank account details.
To add your independent contractor bank info for direct deposit, follow these steps:
- Open the Vendor Center.
- Double-click the vendor you wish to add the direct deposit to.
- Choose the Additional Info tab and click the Direct Deposit button.
- Select the Use Direct Deposit for: [Vendor Name] box, and enter the bank info. Make sure to double check the bank account with your contractor.
Note: Split direct deposit payment isn’t available for independent contractors.
- Click “Send confirmation direct deposits to [email address]” if you want payment confirmation sent. Intuit will email the contractor two days before the deposit, including:
- Your company name
- Payment amount
- Expected deposit date (as shown in the check register)
- Last four digits of the contractor’s bank account.
Note: If you don’t see an email address or the email address is incorrect, update it under the Address Info tab.
- Enter your direct deposit PIN if prompted.
Solution 5: Create Contractor Direct Deposit Payments
Before paying your contractor through direct deposit, ensure you’re using the latest version of QuickBooks Desktop.
- Navigate to the Banking menu and select Write Checks to start the direct deposit.
- Choose the Bank Account dropdown and click the checking account you use to pay contractors.
- Select the Pay to the Order of dropdown menu and choose the contractor.
- In the Date field, enter the date you want to pay the contractor.
Important: To process a direct deposit, the pay date must be set at least two business days ahead. If it isn’t, QuickBooks will automatically adjust it to the next available eligible date to pay via direct deposit.
- Enter the direct deposit amount in the $ field.
- Click the Expenses tab and select the related expense account.
- Make sure the Pay Online checkbox is checked.
Note: QuickBooks selects the Online Payment checkbox If you’ve entered your contractor’s bank details.
- Click Save & Close. This opens the Confirmation and Next Steps window.
- Select Send to Intuit to open the Send/Receive window.
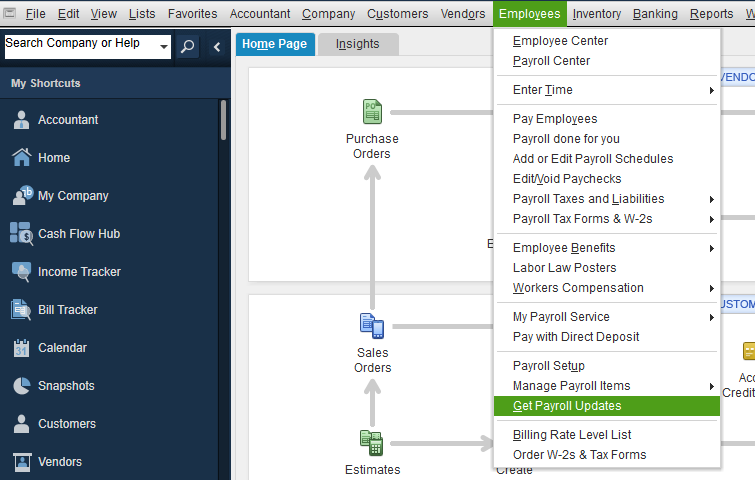
Note: If you accidentally close the window, go to the Employees menu and click on Send Payroll Data.
- Choose Send and enter your direct deposit PIN.
Additional Fixes If Vendor Payments Are Still Failing or Freezing in QuickBooks Desktop 2024!
If your contractor setup is correct but payments still freeze, fail to transmit, or show no error — try these additional technical fixations:
Fixation 1: Update your Payroll Tax Table
Outdated payroll tax table updates can prevent and block vendor payments.
- Choose Get Payroll Updates from the Employees tab.

- To know your payroll tax table version:
- Verify the number next to You are using tax table version:
- To identify if it’s the correct version, go to the latest payroll news and updates.
- Click Payroll Update Info to find more details on your tax table version.
- Select Download Entire Update and click Update.
- An informational window will appear when the download is complete.
Fixation 2: Check Your System Date and Time Settings
An incorrect system date or time on your computer can interfere with the update process.
- Right-click the system clock on your desktop and choose Adjust Date/Time.
- Select Change date and time and specify the current date and time.
- Click OK twice.
- Close and reopen QuickBooks Desktop.
- Run the QuickBooks Desktop update again.
Fixation 3: Verify and Rebuild Company File Data
The verify tool finds the most common issues in a company file, and the rebuild tool fixes them.
Verify your company data
- Navigate to Window, and click Close All.
- Open the File > Utilities.
- Choose Verify Data. If you see:
- QuickBooks detected no problems with your data—your data is clean, and there’s nothing else to do with it.
- An error message—look for it on the QuickBooks Desktop support site for how to fix it.
- Your data has lost integrity—Data damage was found in the file. Rebuild your data to fix it.
Note: Contact the QuickBooks Support Team before you rebuild your data in case you use Assisted Payroll.
Rebuild your company file data
- Navigate to File > Utilities, and select Rebuild Data.
- QuickBooks will ask to create a backup before it rebuilds your company file.
- Click OK. A backup is required before you rebuild.
- Select where you want to save your backup, and click OK. Don’t replace another backup file. Enter a new name in the File name and press Save.
- Choose OK when you receive the message Rebuild has completed.
- Move to File > Utilities > Verify Data again to check for additional damage.
- If the verify tool finds more damage, fix it manually. Look for the error(s) in the qbwin.log on the QuickBooks Desktop support site for how to fix them.
- Restore a recent backup if the error can’t be found. Go to File, and select Open or Restore Company.
Note: Don’t replace your existing company file. You need to re-enter the info into your company file since the backup was created.
Fixation 4: Check Your Direct Deposit Status
Check the different direct deposit (DD) payroll statuses to find out where it’s at in the process.
- Navigate to Employees and choose View Payroll Run Status.
- Select a payroll under the Recent payrolls section.
- Choose the View Payroll Run Status dropdown menu and click on Selected payroll. You’ll see the status of the paycheck in the Payroll status window.
Note: Direct Deposit submissions must be sent by 5 PM PT, 2 business days before payday.
Best Practices to Avoid Vendor Payment Failures in QuickBooks Desktop 2024!
Maintaining smooth vendor payments in QuickBooks Desktop 2024 requires proactive system management and accurate data entry. Follow these future tips to minimize errors, prevent freezing, and ensure your payments are processed without delays.
- Keep QuickBooks Desktop and Payroll updated to the latest release.
- Verify and rebuild your company file at regular intervals to fix hidden data issues.
- Ensure your system date and time settings are always accurate.
- Review and confirm bank account details before sending payments.
- Avoid scheduling direct deposit payments on weekends or holidays.
- Maintain an active internet connection during payment processing.
- Check your direct deposit service status periodically in QuickBooks.
- Use the Vendor Center to keep contractor information up-to-date.
- Back up your company file before processing bulk vendor payments.
- Limit multitasking or running heavy applications while sending payments.
Final Note!
Shawna, handling vendor payments in QuickBooks Desktop 2024 can sometimes feel overwhelming—especially when direct deposits freeze or fail without clear warning. But you’re not alone in this. The key is to stay proactive by keeping your software, payroll tax tables, and direct deposit settings updated. Always verify contractor banking info, and try to schedule payments at least two business days in advance.
Most payment issues have a clear fix—and you’re already well on your way by identifying the causes and applying the right steps. Make it a habit to back up your company file before sending payments, and use the “Send Payroll Data” screen as a final checkpoint.
And If things go wrong again, don’t worry—I’m here to guide you through it. Whether it’s another payment glitch or just a quick follow-up, feel free to reach out for accurate, timely support.
FAQs:
1. Why is the Direct Deposit option grayed out or missing for my vendor?
The Direct Deposit option is unavailable if the vendor is not correctly classified as an independent contractor or if your payroll subscription is inactive. QuickBooks restricts direct deposit specifically to 1099 eligible vendors.
- Primary Requirements:
- You must have an active QuickBooks Desktop Payroll subscription (Basic, Standard, Enhanced, or Assisted).
- The vendor must have the Vendor eligible for 1099 box checked in the Tax Settings tab.
- A valid Social Security Number or Employer Identification Number must be entered in the Vendor Tax ID field.
2. Can I process a same-day direct deposit for a vendor in QuickBooks Desktop 2024?
QuickBooks Desktop 2024 does not support same-day direct deposit for 1099 contractors. The system requires a lead time to ensure funds are verified and transferred through the ACH network.
- Timing Constraints:
- For Basic, Standard, and Enhanced Payroll, you have a 2-day funding time.
- Payments must be sent to Intuit by 5:00 PM PT at least two business days before the scheduled payment date.
- For Payroll Assisted, you may have a Next-day (1-day) lead time, requiring submission by 5:00 PM PT the business day before payday.
3. What should I do if my vendor payment is stuck in “Online to Send” status?
If a check remains in the Online to Send status, it means the transaction is recorded but hasn’t been transmitted to Intuit’s servers for processing.
- Steps to Resolve:
- Navigate to the Employees menu and select Send Payroll Data.
- Review the items in the queue and select Send All.
- Enter your Direct Deposit PIN to authorize the transmission.
- Wait for the confirmation message to ensure the session was successful.
4. Why does QuickBooks freeze when I click “Send” for vendor payments?
Freezing during transmission is often caused by an outdated payroll tax table or interference from background security software blocking the connection to Intuit’s servers.
- Troubleshooting List:
- Update Tax Tables: Go to Employees > Get Payroll Updates and download the latest version.
- System Date/Time: Ensure your computer clock is accurate, as discrepancies can cause security certificate failures.
- Firewall Check: Add QuickBooks as an exception in your Windows Firewall and antivirus settings to allow ACH data transmission.
5. Can I split a vendor’s direct deposit between two different bank accounts?
QuickBooks Desktop currently limits 1099 contractor direct deposits to a single bank account per vendor profile.
- Current Limitations:
- You can only enter one routing and account number per vendor.
- Workaround: If a contractor requires a split, you must issue two separate payments (one direct deposit and one manual check) or create a second vendor profile with a slightly different name to store the second bank account.
6. How do I verify if a vendor has actually received their direct deposit?
You can track the progress of funds through the Payroll Run Status tool to verify that the money was successfully offloaded and distributed.
- Tracking the Status:
- Go to Employees and select View Payroll Run Status.
- Choose the specific payment to see status updates like Processed or Funds Distributed.
- Note that while Intuit sends the funds, the vendor’s bank has until 11:59 PM PT on the check date to post the funds.
7. Why am I getting a “Transmission Failed” error for only one specific vendor?
A single-vendor failure usually indicates an issue with that specific vendor’s bank details or an incomplete 1099 profile.
- Checklist for Individual Failures:
- 1099 Status: Ensure the vendor is marked as 1099 Eligible.
- Bank Routing: Verify the routing number is exactly 9 digits. Some banks use different routing numbers for ACH than they do for paper checks.
- Account Name: Ensure the vendor name in QuickBooks matches the legal name on the bank account.
Disclaimer: The information outlined above for “Why Am I Unable to Process a Vendor Payment Via Direct Deposit in QuickBooks Desktop 2024?” is applicable to all supported versions, including QuickBooks Desktop Pro, Premier, Accountant, and Enterprise. It is designed to work with operating systems such as Windows 7, 10, and 11, as well as macOS.
