Hi I’m Laura, and I’m running into a frustrating issue in QuickBooks Desktop that’s holding me up from finishing my payroll filings. I’m trying to review and print my 941 forms for the year 2024, but every time I go into the payroll center and navigate to the forms section, QuickBooks automatically switches the year to 2025. I’ve double-checked my computer’s system date, made sure I’m selecting the correct quarter, but the form still defaults to the current year and doesn’t give me an option to backdate it to 2024.
This is especially concerning because I need to file amended or corrected 941s for Q1 and Q2 of 2024 — and without access to the proper year, I can’t pull accurate data. I’ve tried updating QuickBooks and the payroll tax table thinking maybe the forms weren’t fully synced yet, but nothing changed. I’m also worried that if I manually fill out the form, it may not match what’s already in the system or accepted by the IRS.
Is this a common problem with year transitions in QuickBooks Desktop payroll? Has anyone found a workaround to view or regenerate older 941 forms when the software forces the current tax year? I really need access to 2024’s data for compliance and audit backup, and it’s crazy that the system just won’t let me select it.
Hi Laura,
It sounds like you’re dealing with one of those incredibly frustrating QuickBooks moments — and I totally get how stressful it can be, especially when payroll filings and IRS deadlines are involved. You’ve already taken all the smart steps: checking your system date, selecting the correct quarter, updating both QuickBooks and the payroll tax table, and even trying to manually access the forms. Yet despite all of that, QuickBooks keeps defaulting to 2025 and refuses to give you access to the 941 forms for 2024.
You’re not alone in this — and more importantly, it’s not your fault. This is a fairly common limitation in QuickBooks Desktop that tends to pop up around year-end or when a new tax year begins. The software is designed to prioritize the latest IRS-approved forms, which unfortunately makes it harder to retrieve or regenerate prior-year forms after a major update.
But here’s the good news: there are workarounds. Whether you’re filing amended forms for Q1 and Q2 or need accurate data for compliance and audit purposes, I’ll walk you through what you can do to access or recreate those older 941 forms without compromising accuracy or IRS acceptance.
What’s Causing 941 Forms for 2024 to Disappear in QuickBooks Desktop?
When QuickBooks Desktop updates to the latest payroll tax table, it replaces older IRS form versions with the current year’s 2025. As a result, 941 forms for 2024 are no longer accessible through the Payroll Center. QuickBooks does this to stay compliant with IRS requirements, which only allow the most recent form versions to be used for filing. If the 2024 forms weren’t saved or printed when they were current, they may not be retrievable through the software.
- QuickBooks automatically updates to the current IRS-approved form (2025) after a payroll update.
- Prior-year forms like 2024 are no longer available through the Payroll Center if the new version is active.
- The IRS restricts use of outdated tax forms for filing, so QuickBooks disables them to stay compliant.
- No manual option is provided in QuickBooks to select older form versions once they’re phased out.
- Forms for past quarters may not regenerate if they were never saved or filed when they were current.
- Corrupted or missing payroll form files can prevent older forms from loading.
- An expired or inactive payroll subscription may restrict access to all tax forms.
- Missing software updates can cause QuickBooks to malfunction when loading past payroll data.
- Company file errors or data corruption can block generation of prior-year tax forms.
- QuickBooks may fail to refresh the form library properly right after a payroll update.
Step-by-Step Guide to Retrieve 941 Forms for 2024 in QuickBooks Desktop
Laura, don’t worry — you’re not out of options. If QuickBooks Desktop is only displaying 941 forms for 2025 and won’t let you access 2024, there are still reliable ways to retrieve or recreate them. The steps below will help you locate saved copies, generate accurate reports, or use official IRS forms to ensure your filings for 2024 are accurate and compliant.
Suggestion 1: Check Your Payroll Service Subscription
An expired or inactive subscription can block access to payroll tax forms, including the 941. If you’re unable to see or file forms for 2024, this is one of the first things worth checking.
- Shut down all your company files and restart your computer.
- Open QuickBooks and navigate to Employees.
- Select My Payroll Service and choose Manage Service Key.
- Your Service Name and Status should be correct and will show as Active.
- Click Edit, and check the service key number.
- Enter the correct service key if it’s incorrect.
- Choose Next, and uncheck the Open Payroll Setup box.
- At last, click Finish.
Suggestion 2: View your Previously Filed Tax Forms in the Payroll Center
QuickBooks Desktop doesn’t automatically store older 941 forms in the Payroll Center once a new IRS version (like 2025) is rolled out. If you had printed or saved the 941 forms for 2024 during the time they were available, you might find them here. If Intuit files the forms for you, all forms are available to view or print approximately 35 days after the end of the quarter. Amended forms are available once your case is complete.
For QuickBooks Desktop Payroll Assisted
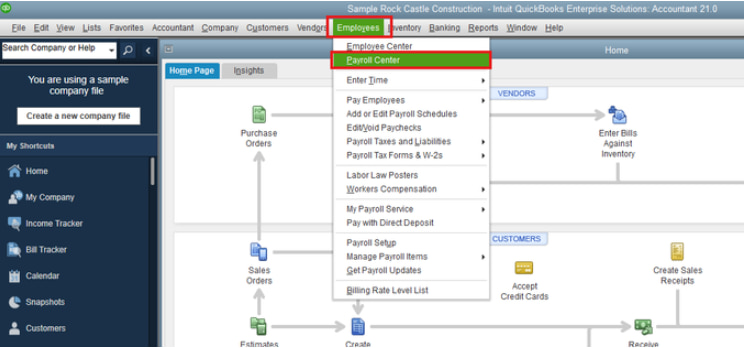
- Navigate to the Employees menu and choose Payroll Center.

- Click the File Forms tab, and View/Print forms & W-2s.

- Enter your Payroll PIN under the Payroll Tax Center window and click OK.
- Choose to Filed Forms.
- Select the forms you want to view, print, or save.
Note: If nothing shows up, it likely means the form wasn’t saved or has been phased out when QuickBooks updated to the 2025 IRS version.
For QuickBooks Desktop Payroll Enhanced
QuickBooks Desktop Payroll Enhanced allows you to create federal and state payroll tax forms. You submit them to the IRS and state agencies electronically or manually. You can print these forms immediately. To view your saved forms:
- Move to the Employees menu and choose Payroll Center.
- Choose the File Forms tab.
- Select the Save Filings or E-Filings tab under the Filing History.
- Click the form to view it.
Suggestion 3: Create a Payroll Summary Report
If you want a quick view of your payroll totals, including employee taxes and contributions, you can run a Payroll Summary report for any date range, or group of employees in QuickBooks.
The payroll summary report gives you the total payroll wages, taxes, deductions, and contributions.
Note: The dates in this report are by paycheck dates only, not pay period dates.
- Navigate to Reports from the top menu.
- Select Employees & Payroll > Payroll Summary.
- In the date range fields, adjust the dates for the quarter you need (e.g., 01/01/2024 to 03/31/2024 for Q1).
- Choose Total only to consolidate data across all employees from the Show Columns dropdown menu.
- Review totals for:
- Gross Pay
- Federal Income Tax
- Social Security Wages & Tax
- Medicare Wages & Tax
Suggestion 4: Run the Tax Form Worksheets Report
If you’re using QuickBooks Desktop with an active Enhanced Payroll subscription and have Microsoft Excel installed, you can also pull and run the Tax Form Worksheets report to get all the previous 941 information.
- Go to Reports at the top menu bar and choose Employees & Payroll.
- Click More Payroll Reports in Excel.
- Select Tax Form Worksheets.
- Choose Quarterly 941, filter the Dates, and click Create Report.
- This will show all the 941 information for the selected quarter.
Suggestion 5: Download IRS Form 941-X
Since QuickBooks Desktop no longer allows you to access or regenerate the 941 forms for 2024, the workaround is to use the IRS’s official Form 941-X, which is specifically meant for correcting or amending past payroll tax filings.
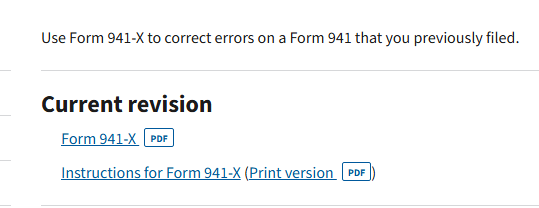
- Go to the official IRS website: https://www.irs.gov/forms-pubs/about-form-941-x
- Click the “Form 941-X” link under the “Current Revision” section.

- You’ll see a fillable PDF version that you can open or download.
- Enter values based on the Payroll Summary Report including:
- Business name, EIN, and address.
- Choose the correct quarter and year.
- In Part 1, check the correction reason.
- In Part 2, explain the error briefly.
- Column 1: Add original reported values.
- Column 2: Add corrected values.
- Column 3 Auto-calculates the difference between these two.
- Review wages, taxes, and liabilities.
- Sign and date the form.
- Print the completed form.
- Mail it to the IRS address listed in the instructions (usually on the last page of the 941-X PDF).
Suggestion 6: Restore a Company File Backup (If Available)
If your computer crashes or you must undo recent changes, use a backup company file to restore your accounting data. This lets you return to one of your save points if you ever encounter problems. When you restore, QuickBooks uses the backup company file (.qbb) to create a new company file (.qbw).
Important: If your backup company file is on an external device like a USB or a hosting service like Box, you need to move it to your local hard drive first. Then follow these steps.
- Navigate to the File menu and choose Open or Restore Company.
- Select Restore a backup copy and click Next.
- Choose Local Backup and click Next.
- Browse your computer for your backup company file. It will appear like this: [Your company name].qbb.
- Click a folder to decide where to save your restored company file and choose Open.
Note: You may overwrite your data in case you open the backup in the same folder as your existing company file. To avoid overwriting anything, rename your existing company file or the backup so the names are unique. Or, save the backup in a completely separate folder.
- Once done, click Save.
- If you see any messages about possibly overwriting your data, choose the option that best fits your needs. Avoid overwriting anything unless you know you want to.
Suggestion 7: Repair QuickBooks Payroll Form Files
When you get an error while opening or generating payroll forms, download the QuickBooks Tool Hub and run Quick Fix My Program to repair damaged files and resolve common payroll form errors right away.
Step 1: Download & Install the QuickBooks Tool Hub
The QuickBooks Tool Hub helps to fix common errors. You’ll need to close QuickBooks to use the tool hub. For the best experience, we recommend you use Tool Hub on Windows 10, 64-bit.
- Close QuickBooks.
- Download and install the most recent version (1.6. 0.8) of QuickBooks Tool Hub.
- Save the file somewhere you can easily find it such as your Downloads folder or your Windows desktop.
- Note: To find out which tool hub version you have, select the Home tab and the version will be on the bottom.
- Open the downloaded file QuickBooksToolHub.exe to start the installation.
- Follow the on-screen steps to install and agree to the terms and conditions.
- When the installation finishes, click twice on your Windows desktop icon to open the tool hub.

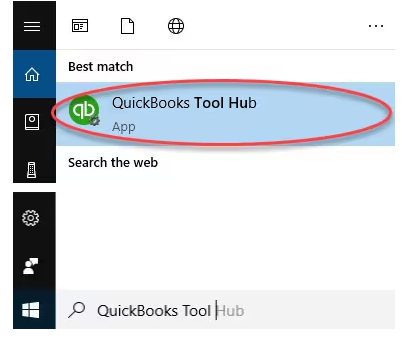
Note: If you are unable to find the icon, do a search in Windows for QuickBooks Tool Hub and select the program.

Step 2: Run Quick Fix My Program

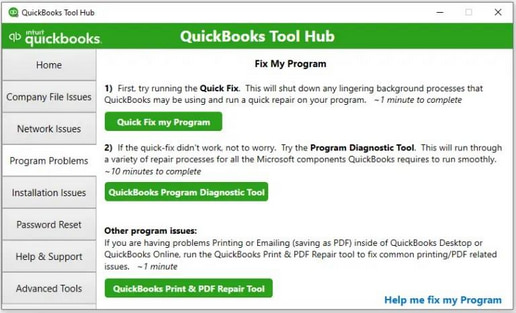
The Quick Fix will shut down any open background processes QuickBooks uses. It’ll run a quick repair on your program.
- From the QuickBooks Tool Hub, choose Program Problems
- Select Quick Fix My Program.
- Start QuickBooks Desktop and open your data file.
Suggestion 8: Download Latest Updates for QuickBooks & Payroll Tax Table
Staying up to date with the latest QuickBooks Desktop and payroll tax table is essential for smooth payroll processing. These updates often include important fixes, compliance changes, and new tax rates. If your software or tax table is outdated, it may trigger reactivation prompts or even block access to payroll features. Downloading the most recent updates ensures your system runs properly and remains compliant with the latest payroll regulations.
Update QuickBooks Desktop to the latest version
An outdated QuickBooks version doesn’t allow you to download the QuickBooks Payroll Updates. Here’s how you can update your software.
- Open QuickBooks Desktop and navigate to the Help menu.
- Choose Update QuickBooks Desktop.
- Hit the Update Now tab. Tip: Tickmark the Reset Update checkbox to clear all previous update downloads.
- Select Get Updates to start the download.
- Once done, close and reopen QuickBooks to install the update again.
Get the Payroll Tax Table Updates
QuickBooks Desktop Payroll provides payroll updates to QuickBooks Desktop Payroll subscribers. These updates include the most current and accurate rates and calculations for supported state and federal tax tables, payroll tax forms, and e-file and pay options.
Note: The latest payroll update number is 22513 released on July 3, 2025.
- Navigate to the Employees menu and select Get Payroll Updates.
- Tickmark the Entire Update checkbox.
- Click Update.
- An informational window appears when the download is complete.
Future Tips to Prevent 941 Form Access Issues in QuickBooks Desktop
- Always update QuickBooks Desktop and payroll tax tables regularly to ensure forms load correctly.
- Save a PDF copy of each 941 form immediately after filing to avoid losing access later.
- File all forms on time each quarter to prevent missed or unavailable versions later.
- Use the Payroll Center or Employee Reports to track and verify form submissions.
- Archive tax filings manually outside QuickBooks for backup, especially at year-end.
- Regularly back up your QuickBooks company file to avoid data loss or form history issues.
- Stay updated with IRS updates—QuickBooks only supports the latest IRS-approved version of the form.
- Renew your payroll subscription on time—an expired service disables access to tax forms.
- Download prior-year forms from the official IRS website if QuickBooks phases them out.
Final Note!
Laura, if your 941 form for 2024 seems to have vanished from QuickBooks Desktop, you’re not alone—and you’re not stuck. These transitions can be confusing, especially when QuickBooks phases out older versions of IRS forms or your system doesn’t retain prior-year data by default.
These issues often come down to IRS form updates or QuickBooks system changes—not anything you did wrong.
The good news is, with the options we’ve walked through—like checking archived filings, pulling payroll reports, or downloading the form directly from the IRS—you’re still fully in control of your next steps. And when QuickBooks gets a little complicated, just remember: you don’t have to figure it all out alone.
Whether it’s resolving this issue, staying compliant, or just navigating updates in the future, I’m here to guide you through it. If anything still feels unclear or you need any help with payroll filings, or year-end prep, you will get support every step of the way.
Disclaimer: The information outlined above for “Why QuickBooks Desktop Won’t Let Me Access 941 Forms for 2024” is applicable to all supported versions, including QuickBooks Desktop Pro, Premier, Accountant, and Enterprise. It is designed to work with operating systems such as Windows 7, 10, and 11, as well as macOS.
