I’m Derek McParlane, and I’ve recently started managing a second business entity. I’m using QuickBooks Desktop both Premier and Enterprise editions and I’ve hit a frustrating wall. I need to copy over all my vendor and customer lists from one company file to the new one I just set up. Seems like something QuickBooks should handle easily, but it’s not going smoothly at all.
“I initially thought I could just export the lists from the old file and import them into the new one. But either the formatting goes wrong, or the system throws errors about missing fields or incompatible data. I tried using the ‘Utilities’ > ‘Export Lists to IIF Files’ feature, but once I attempted to import the IIF file into the new business file, some vendors didn’t show up, and a few customer names got jumbled or skipped.
What’s worse is that I have several custom fields in the vendor and customer profiles like specific terms, tax IDs, and internal notes and those aren’t transferring at all. I’m now stuck manually rebuilding these profiles one-by-one, which is taking forever and opens the door for human error. For someone trying to get the second company off the ground efficiently, this is a major bottleneck.
QuickBooks should offer a cleaner, foolproof way to migrate customer and vendor data between company files especially since I’m using two of their more advanced desktop products. I really need expert guidance to get this done properly without data loss or rework.
Hi Derek McParlane,
Thanks for sharing your situation and it’s completely understandable to feel stuck. You’re in the process of setting up a second business in QuickBooks Desktop (Premier and Enterprise), but transferring your customer and vendor lists from your existing company file to the new one isn’t going as expected.
You’ve already taken the right steps by using QuickBooks’ built-in Utilities > Export Lists to IIF Files feature and then trying to import them into the new company file. But still you’re facing issues like missing vendors, jumbled customer names, and important custom fields like tax IDs, terms, and internal notes aren’t transferring at all. These kinds of problems make it hard to maintain accurate records, especially when you’re trying to launch a second business efficiently and need everything to be accurate from day one.
Right now, this issue is more than just a technical glitch. It’s not just about data entry, it’s about slowing you down, increasing the risk of manual errors, and making it harder to manage consistent records across two business entities. What you need now is a reliable, streamlined method to move your customer and vendor lists with all their details intact without rework or system errors.
The good news? You don’t have to rebuild everything manually. There are better tools and smarter steps available to help you do this smoothly.
Common Reasons Why You Fail to Import Customer and Vendor Lists in QuickBooks Desktop Premier & Enterprise!
Import failures in QuickBooks Desktop usually happen due to missing required fields, unsupported custom fields, incorrect formatting, or duplicate entries. The IIF import tool does not support all data types, especially custom fields like tax IDs or terms. Even small errors in column alignment or field names can cause records to be skipped or imported incorrectly.
- Missing Required Fields: Fields like Name, Type, or Opening Balance must be present for successful import.
- Inconsistent Data Formatting: Incorrect use of commas, tabs, dates, or special characters can cause names or entries to break or misalign.
- Unsupported Custom Fields: Custom fields such as Tax ID, or internal notes aren’t supported in IIF format.
- Improper Column Mapping: If columns aren’t in the correct order or labeled incorrectly, QuickBooks can’t interpret them.
- Duplicate or Conflicting Entries: Entries with the same name or list ID already in the target file can cause skips or overwrites.
- QuickBooks Version Incompatibility: Differences between Premier and Enterprise builds or release years may affect data behavior.
- IIF Syntax Errors: Even a small mistake in the IIF file structure, such as a missing delimiter or extra space can cause the entire import to fail.
- No Field Validation: The IIF format does not validate data, leading to silent failures or incomplete imports.
- Wrong File Encoding: Files saved in unsupported formats (e.g., UTF-8 with BOM) may be unreadable by QuickBooks.
- Character Limit Exceeded: Fields like Name or Address that exceed character limits may be cut off or rejected during import.
What You Can and Can’t Import with IIF Files?
QuickBooks Desktop lets you import a variety of data using IIF files, but with specific limitations. Here are the lists and transactions you can or can’t import:
Importable Lists
- Chart of Accounts
- Employees, Vendors, Customers
- Items, Classes, Payment Terms, Sales Tax Codes
- Vendor Types, Shipping Methods, Customer & Job Types, Other Names
- To Dos, Notes, Customer Messages, Sales Reps
- Price Levels (not per-item), Budgets, Payment Methods
- Account Beginning Balances
Importable Transactions
- Invoices, Payments, Credit Memos, Journal Entries, Checks, Deposits
- Cash Sales to Customers
- Account Transfers of Funds
- Vendor Bills and Bill Refunds
- Credit Card Transactions and Customer Refunds
- Estimates and Purchase Orders
Certain Limitations
- You can’t export transactions using IIF files.
- No auto-linking of transactions (must link manually).
- Custom fields in assembly items aren’t supported.
- Per-item price levels can’t be imported/exported.
- Excel may drop leading zeros unless formatted as Custom.
- IIF files are not compatible across country versions (e.g., US ↔ Canada).
- Payroll export via IIF works only with Core, Premium, or Elite Standalone Payroll.
- There’s a limit to how many list entries you can import, depending on the list type.
Step-by-Step Guide to Resolve Customer and Vendor List Import Failures in QuickBooks Desktop Premier & Enterprise
Importing customer and vendor lists into a new company file can be tricky, especially when dealing with IIF formats and custom data fields. This troubleshooting guide outlines proven methods to help you resolve common import issues in QuickBooks Desktop Premier and Enterprise whether they’re caused by missing fields, mapping errors, encoding problems, or formatting conflicts. Follow each step closely to ensure a clean, accurate, and complete transfer of your list data.
Fixation 1: Create a Company File Backup
Backup company files save everything currently in your company file. This includes your accounting data, templates, letters, logos, images, and related files (QuickBooks Statement Writer, Cash Flow Projector, Business Planner, and Loan Manager).
There are two ways to back up your data. You can either back up your data automatically or do them manually.
Schedule Automatic Backups
Instead of manually backing up your company file, allow QuickBooks to do it automatically.
- Navigate to the File menu and choose Switch to Single-user Mode.
- Open the File menu again and select Back up Company > Create Local Backup.
- In the window, choose Local Backup and click Next.
- Select Browse and click where you want to save your backup company file under the Local Backup Only section.
- Decide the number of backups you want to keep. This is optional.
Tip: No need to pencil it in on your calendar. Use the options in the Online and Local Backup section to set backup reminders.
- Choose Complete verification in the Online and Local Backup section. This runs a test to make sure your backup file is in good condition before you save.
- Once done, click OK.
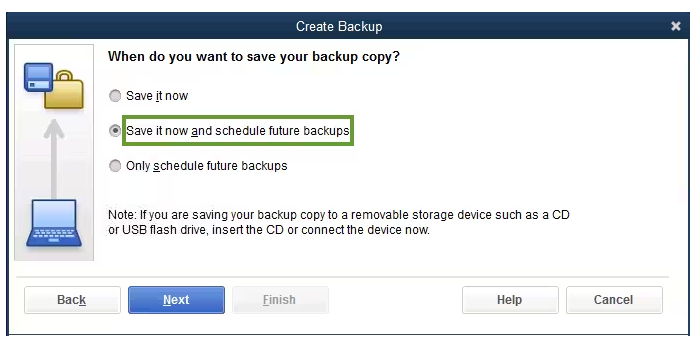
- Select Save it now and schedule future backups and click Next. Or, if you don’t want to save a backup now, choose Only schedule future backups.
- Click the Save backup copy automatically when I close my company file checkbox.
- Now, select the number of times between backups.
- Choose New to create a schedule.
- Fill in the data fields to create a backup schedule. You can set a specific time or day of the week.
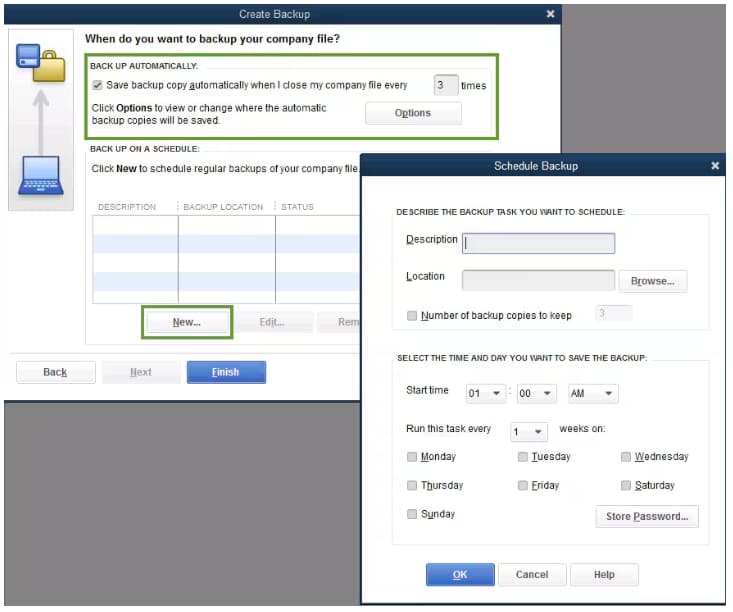
- After setting your schedule, click OK.
- QuickBooks will ask you to enter your Windows sign-in password. This gives QuickBooks permission to run the scheduled backup.
- When you’re ready to create your backup, click Finish.
QuickBooks creates a backup and schedules your future backups at the same time. When done, you’re notified with a confirmation message.
Back up Your Company File Manually
If you prefer, you can back up your company files yourself anytime.
- Navigate to the File menu and choose Switch to Single-user Mode.
- Open the File menu again and select Back up Company > Create Local Backup.
- In the window, choose Local Backup and click Next.
- Click Browse and select where you want to save your backup company file under the Local Backup Only section.
- Decide the number of backups you want to keep. This is optional.
Tip: No need to pencil it in on your calendar. Use the options in the Online and Local Backup section to set backup reminders.
- This runs a test to make sure your backup file is in good condition before you save.
- Once done, click OK.
- Select Save it now and Next.
QuickBooks creates a single backup company file. When it’s done, you’re notified with a confirmation message.
Fixation 2: Export, Import and Edit IIF Files
Use the IIF feature to export lists, make batch edits in Excel, and re-import them into QuickBooks Desktop. This helps manage or correct large volumes of data quickly, especially for custom fields or account details.
Export IIFs
- Log in to your company file as an admin.
Note: If you’re in Multi-user mode, click the File menu, and select Switch to Single-user Mode.
- Navigate to the File menu, and choose Utilities.
- Select Export, and click Lists to IIF Files.
- Choose the lists you want to export, and click OK.
- Under the Save in dropdown menu, select a location to save your IIF file into.
- Enter a file name, and click Save.
Import IIFs
Important: Back up your company file before you import IIF files. If you ever run into problems, you can use your backup to restore your data.
- Log in to your company file as an admin.
Note: If you’re in Multi-user mode, move to the File menu, and choose Switch to Single-user Mode.
- Navigate to the File menu, and choose Utilities.
- Select Import, and click Import IIF.
- Locate the IIF file you want to import, and click Open.
- Click OK to confirm the import.
- When the import is successful, you’ll see the numbers of lists and transactions imported. Then, hit the Done tab.
Edit an IIF file
- Navigate to File in Microsoft Excel and click Open.
- From the File type dropdown, select All Files.
- Choose the IIF file you want to edit, and click Open.
- Under the Text Import Wizard, click Next, then select Next and Finish.
- Make the changes to your IIF file.
- Click the File menu, select Save, and Yes.
- Exit from Excel. You’ll get a prompt to save the IIF file again.
- Select Don’t Save.
Fixation 3: Review the Errors in IIF Files
When you encounter the error “File not imported”, use QuickBooks’ IIF Import Kit or built-in error logs to identify formatting or data issues in your IIF file such as missing headers, incorrect account names, invalid dates, or improperly mapped fields. Always review the import summary for error messages, and cross-check your data structure against the IIF sample templates to ensure accuracy before re-importing.
- Choose Review now.
- Search for ERROR to see what the problem(s) with the file is.
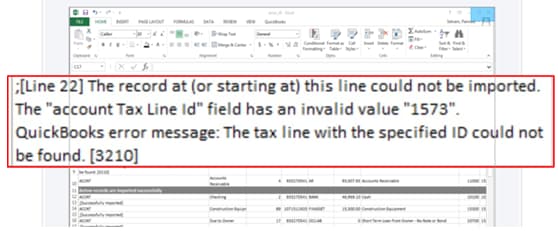
- Correct the errors and select Save.
- Important: If you’re asked to keep the file type, click Yes.
- Close the File not imported window.
- Import the new, corrected .IIF file.
Note: Intuit doesn’t offer assisted technical support for creating or importing IIF files.
Fixation 4: Run Verify and Rebuild Data Tool
Use the Verify and Rebuild Data tool in QuickBooks Desktop to detect and repair data integrity issues that might block IIF imports. This ensures your company file is free from corruption or structural errors before importing.
Verify your company data
- Navigate to Windows > click Close All.
- Open the File menu > select Utilities.
- Choose Verify Data when you see:
- QuickBooks detected no problems with your data—your data is clean, and there’s nothing else to do with it.
- An error message—look for it on the QuickBooks Desktop support site for how to fix it.
- Your data has lost integrity—Data damage was found in the file. Rebuild your data to fix it.
Note: Contact the QuickBooks Support Team before you rebuild your data in case you use Assisted Payroll.
Rebuild your company file data
- Navigate to File > Utilities > select Rebuild Data.
- QuickBooks will ask to create a backup before it rebuilds your company file. Click OK. A backup is required before you rebuild.
- Choose where to save your backup and click OK. Don’t replace another backup file. Enter a new name in the File name and click Save.
- Click the OK tab when the message Rebuild has completed appears.
- Move to File > select Utilities > choose Verify Data again to check for additional damage.
- When the verify tool finds more damage, fix it manually. Look for the error(s) in the qbwin.log on the QuickBooks Desktop support site for how to fix them.
- When your error can’t be found, restore a recent backup. Go to File, then choose Open or Restore Company.
Note: Avoid replacing your existing company file and re-entering the info into your company file after the backup was created.
Fixation 5: Check Imported Custom Field Data
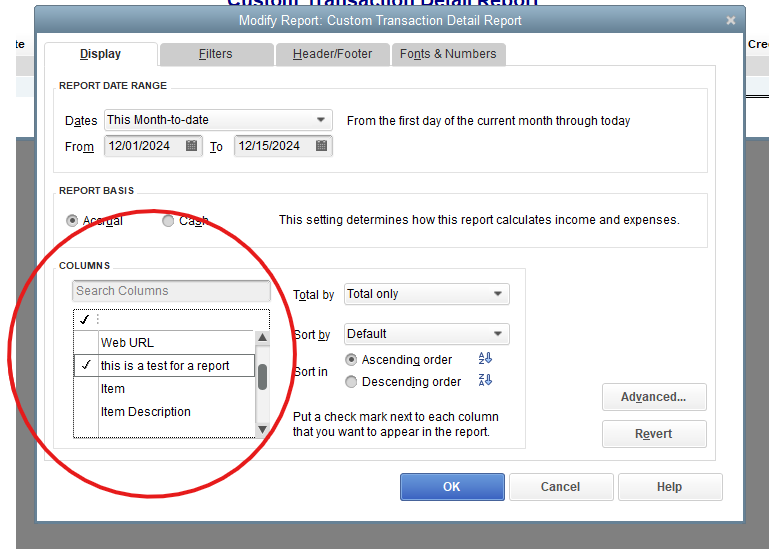
After importing, run a Transaction Detail Report and customize the columns to include your custom fields. This helps ensure that the data was correctly mapped and imported into the right fields.
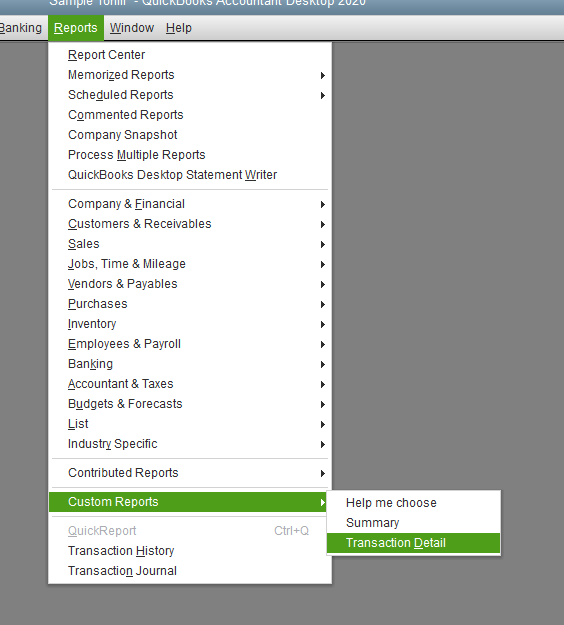
- Navigate to the Reports menu at the top.
- Select Custom Reports, and choose transaction detail.
- Scroll through the columns list and select your custom field you have created when the Modify Report box pulls up.
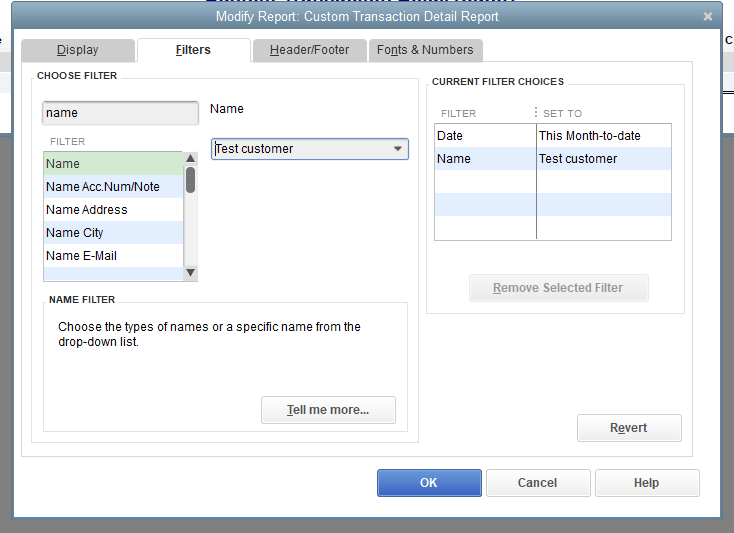
- You can filter out the report to show only the specific customer you need. Just open the Filters tab and apply the appropriate customer filter.
- Search for Name and click OK.
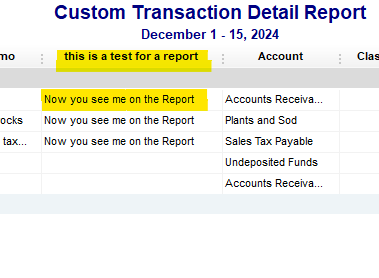
- Your report will now display the custom field as a column, showing the entered values for that field.
Future Tips to Avoid Customer/Vendor List Import Errors in QuickBooks Desktop Premier & Enterprise
To avoid future customer and vendor list import errors in QuickBooks Desktop Premier and Enterprise, always use the latest IIF import templates provided by Intuit and ensure your data structure including headers and formatting aligns perfectly with QuickBooks standards. Even a small mismatch in column headers or missing required fields can cause the import to fail.
- Use the most recent IIF import template from Intuit.
- Match column headers exactly as per QuickBooks format.
- Ensure all mandatory fields are filled before importing.
- Remove special characters and trailing spaces from names.
- Format Excel columns properly for dates, numbers, and text.
- Run a test with a small sample file before importing the full list.
- Back up your QuickBooks company file before every import.
- Review error logs immediately after import for corrections.
- Avoid including duplicate or inactive entries in your import file.
- Regularly clean up and verify your list data for consistency.
Final Note!
Derek, I completely understand how frustrating it can be when your customer and vendor list import doesn’t go as planned even after carefully preparing your data. The good news is, you’ve already taken the right steps by identifying IIF files errors, reviewing custom field mappings, and using built-in tools like the Verify and Rebuild Data utility. That reflects your focus and commitment to getting things right.
To keep things moving smoothly, continue using clean, well-formatted import files, double-check your headers for accuracy, and always test with a smaller dataset before full imports. Backing up your company file regularly also gives you a safety net in case something doesn’t work out as expected.
If you ever feel stuck with name mismatch, “Target not found” errors, or import issues, reach out to us anytime. We’re here to help so you don’t need to worry about data loss or starting over from scratch.
Disclaimer: The information outlined above for “Why Can’t I Copy Customer and Vendor Lists to a New Company File in QuickBooks Desktop (Premier & Enterprise)” is applicable to all supported versions, including QuickBooks Desktop Pro, Premier, Accountant, and Enterprise. It is designed to work with operating systems such as Windows 7, 10, and 11, as well as macOS.
