QuickBooks Error 103 is a common bank-related sign-in issue occurring when a financial institution rejects the login request from QuickBooks Online because of an ID or password mismatch. This critical error prevents transaction updates, bank reconciliation, and may lead to temporary account lockouts. The core of the problem often stems from outdated login credentials in QBO or restrictive browser configurations.
To resolve this, users must first verify their username and password on the bank’s official website using a new browser window, often utilizing Incognito mode to bypass cached data interference. Once credentials are confirmed, they must be manually updated within the QBO Banking menu. Advanced troubleshooting includes adjusting browser settings by clearing the cache and adding Intuit’s domain as a trusted site, or ensuring that the bank’s security settings permit third-party access for data connection, aligning with best practices for seamless financial data management.
Highlights (Key Facts & Solutions)
- Error Definition: QuickBooks Error 103 is a bank error where the financial institution rejects the sign-in request, most often due to an incorrect ID or password entered in QuickBooks Online (QBO).
- Primary Causes: The key factors include login credentials in QBO not matching the bank’s details, connection errors between the bank and QBO, and incorrect browser configurations (e.g., obsolete cookies or saved, old passwords).
- Immediate Precautionary Step: Users must verify the bank login credentials by successfully signing into their bank’s official website outside of QBO, ensuring they know the correct, updated username and password.
- Core Solution: The primary fix involves navigating to the QBO Banking menu and using the Reconnect my account or Edit sign-in info option to input the correct, verified bank credentials.
- Browser Troubleshooting: To isolate issues, users are advised to first attempt troubleshooting in Incognito/Private mode and then proceed to clear the browser’s cache and cookies to remove corrupted data.
- Security Permission Check: Some financial institutions, such as Key Bank, require users to specifically enable Third-party Access or External User Permissions within their online banking user profile/security settings for QuickBooks to connect.
- Escalation Information: If all troubleshooting fails, Customer Care requires specific information, including the bank’s name, the correct login URL, the account type (business/personal), and the exact error code to assist further.
Major Causes Behind the QuickBooks Error 103
Below are the reasons why you often come across QuickBooks bank error 103; let’s take a look:
- You need to select the right financial institution from the result list.
- There’s an error in connection between your bank account and your QuickBooks software.
- When the user ID or password you entered into QuickBooks Online doesn’t match your bank, you may run into this bank-related error.
- You have entered the incorrect login credentials when connecting to your bank account or financial institution for the first time.
- There may be a configuration issue with the web browser you’re currently using, or your web browser is automatically entering the old saved credentials when you log in.
How to determine the effect of QuickBooks Error 103?
When QuickBooks Error 103 takes place, there are several indicators can be seen, which include:
- QuickBooks won’t be able to connect with the bank account and update the transactions.
- You fail to get updated transactions and verify received payments or invoice status.
- Outdated transactions will result in failure to do bank reconciliation.
- Your bank or financial institution may block your account access.
- The login details you have entered to access your financial institution are not accepted by your bank’s official website.
- You may also run into issues at the time of making payments.
Best Possible Solution for QuickBooks Error 103
QuickBooks Error 103 is most likely to happen if the Bank account credentials entered are wrong or if there are problems with permissions and browser configurations. The following is a guide to help you troubleshoot without much trouble and solve this problem.
Precautionary Actions
Before proceeding with troubleshooting, ensure the following precautions are taken:
- Verify Bank Login Credentials: Check to make sure that the username and password you’re entering is correct when accessing your bank account.
- Set Permissions in QuickBooks Online (QBO): You need to ensure that your bank account permits are correct in QBO.
- Update Bank Account Details in QBO: Ensure that the details you used to sign in to your Bank in QBO are up to date with the details on your Bank’s website.
- Select the Correct Bank: Make sure that you have chosen the right financial institution to sync your QBO to.
- Add Intuit as a Trusted Site: On the browser, you should add Intuit’s website to the trusted site list.
- Avoid Guest Mode: It is advised not to operate QBO in guest mode because this mode does not allow users to change browser settings.
Troubleshooting Steps
Solution 1: Verify Your Sign-in Information for the Bank
- Open a new browser window and navigate to your bank’s official website.
- Log in using your username and password.
- If you encounter login errors, follow your bank’s instructions to reset your credentials.
- Note the correct login details and use them in QBO.
Note: If you have separate bank accounts (such as a business account and a personal account), log in to the account you want to fix in QuickBooks. - Once you sign in successfully, you’ll know the user ID and password are correct. But in case you get a sign-in error, follow the bank’s instructions to get your user ID, reset your password, or both.
Solution 2: Restrict and Allow Permissions for External Users
Some bank accounts ask for your permission to connect your account to another software, including QuickBooks Online. When you visit your bank’s website, check if your bank also prompts you to do the same. If yes, adhere to your bank’s instructions to enable it.
- Navigate to key.com or ibx.key.com.
- Log in to the account you wish to connect to QuickBooks.
- Next, choose the User Profile option.
- Enable third-party access under the security section (e.g., Key Bank: User Profile > Password and Security > Third-party Access).
- Press Yes to confirm your acceptance.
Solution 3: Update Bank Sign in Info in QBO
- Go to the Banking menu in QBO and click Update.
- Update your username and password:
- If QB Error 103 appears, click Reconnect my account and enter your credentials.
- If no error appears, select the Edit icon > Edit sign-in info.
- Save and confirm the updated details.
Solution 4: Manually Enter Bank Details
- For existing connections:
- Navigate to Transactions > Bank Transactions.
- Now, select the bank or credit card account you want to update.
- Click the Edit icon, and choose Edit sign-in info.
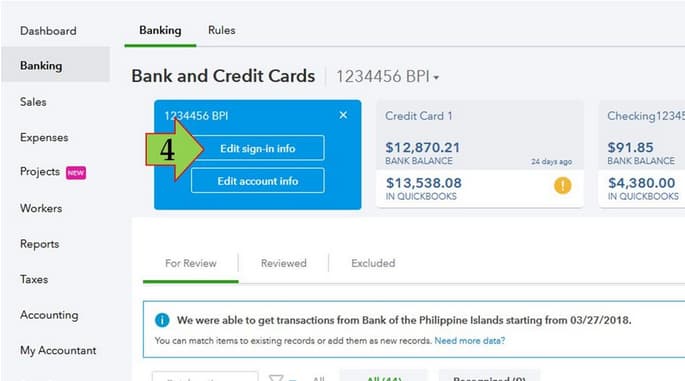
- Manually enter your credentials and save the changes.
- For new connections:
- Go to Transactions > Bank Transactions > Connect account or Link account.
- Search for your bank name or enter its URL.
Note: If you see multiple options for the type of account you’d like to connect, click on the ‘Business’ option. For instance, if you’re attempting to connect your business account, select it if it is available there.
Solution 5: Adjust Browser Settings
Here, we’ll be resetting the configuration in the browser, which can be due to obsolete or outdated cookies and temporary files.
Step 1: Use Incognito Mode
| Web Browsers | Open Incognito Mode | On Screen Mode |
| Web Browsers you often use to visit Intuit’s official website. | Keyboard Shortcuts(When the Browser is open, press the shortcut keys given below to incognito window) | Let’s have a look at the following screenshots for better understanding. You can navigate to the side menu of your browser and click to open an incognito/ private window. |
| Google Chrome | Ctrl +Shift + N |  |
| Mozilla Firefox | Ctrl + Shift + P | 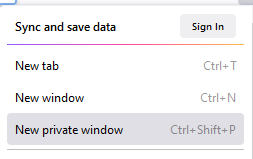 |
| Opera | Ctrl + Shift + N | 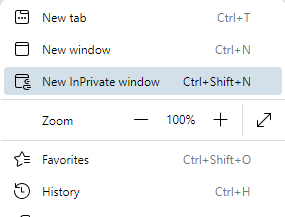 |
| Apple Safari | Shift + ⌘ + N | 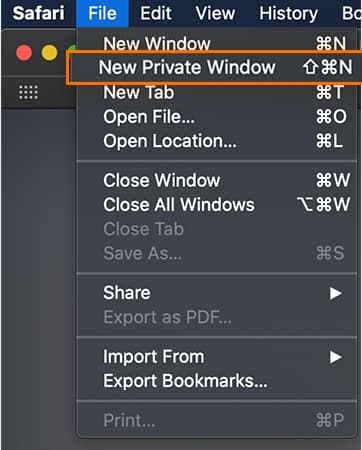 |
| Microsoft Edge | Ctrl+Shift+N | 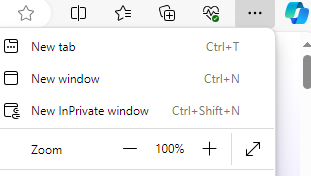 |
Step 2: Restart Your Web Browser
For Google Chrome
- Open the Start menu and search for Google Chrome.
- In Chrome, type chrome://restart in the address bar and press Enter.
- The browser will shut down and restart automatically.
- Once reopened, Chrome will restore your previous session.
For Mozilla Firefox
- Open Mozilla Firefox.
- Type about:profiles in the address bar and press Enter.

- On the “About Profiles” page, find the Restart option in the upper-right corner.

- Select Restart Normally to restart Firefox while keeping all your tabs intact.
Safari (on Mac):
- Simultaneously press Option (ALT), Command, and Esc.
- From the list of applications, choose Safari.
- Click Force Quit to close Safari.
- To reopen Safari:
- Locate the Safari icon (a blue compass on a white background) on your Mac desktop or dock.
- Click the icon to restart Safari.
For Microsoft Edge
- Close all active tabs in Microsoft Edge.
- Exit the browser by clicking the X in the upper-right corner.
- To ensure Edge is fully closed:
- Open the Start Menu and type Task Manager.
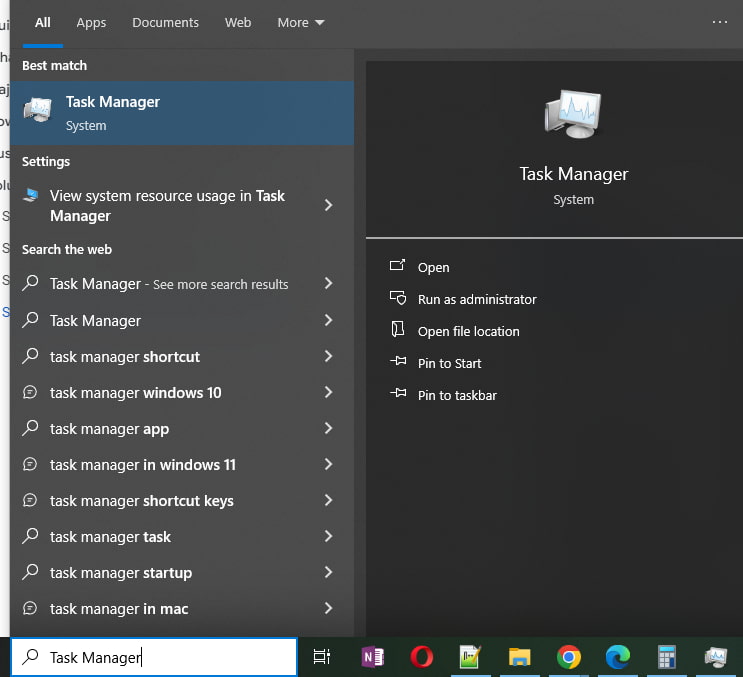
- Launch Task Manager and locate Microsoft Edge in the Processes tab.
- If Edge appears in the list, right-click on it and select End Process.
- To reopen it, either double-click on its icon or look for Edge in the Start Menu.
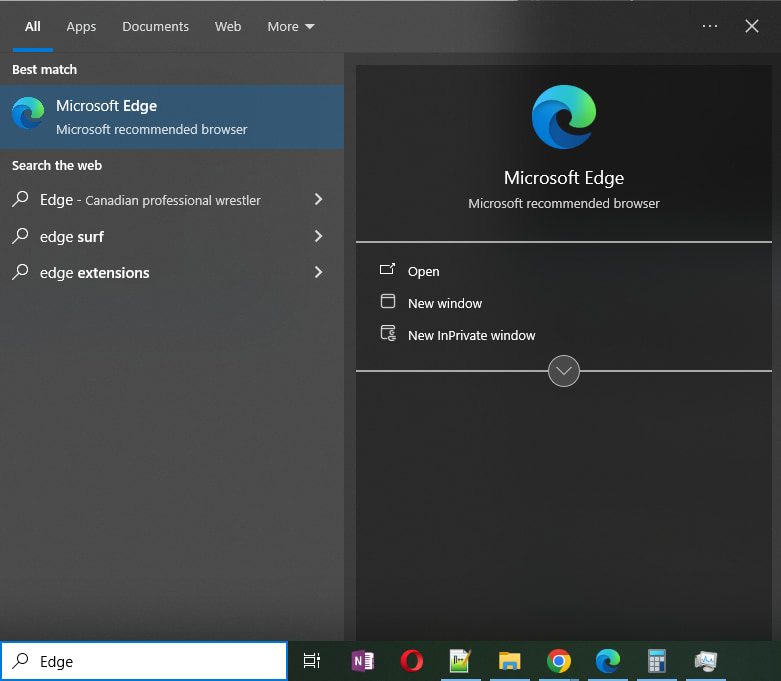
- Also, you can type edge://restart into the address bar and later hit the Enter key to open it again.

Step 3: Clear your Browser’s Cache
Google Chrome
- Open Google Chrome on your computer.
- Click the More icon (three dots) at the top-right corner of the screen.
- Navigate to More Tools > Clear browsing data.
- At the top, choose a time range (e.g., Last hour, Last 24 hours, or All Time for everything).
- Check the boxes next to:
- Cookies and other site data
- Cached images and files
- Click Clear data.
Mozilla Firefox
- Click the Menu button (three horizontal lines) at the top-right corner and select Settings.

- Go to the Privacy & Security panel.
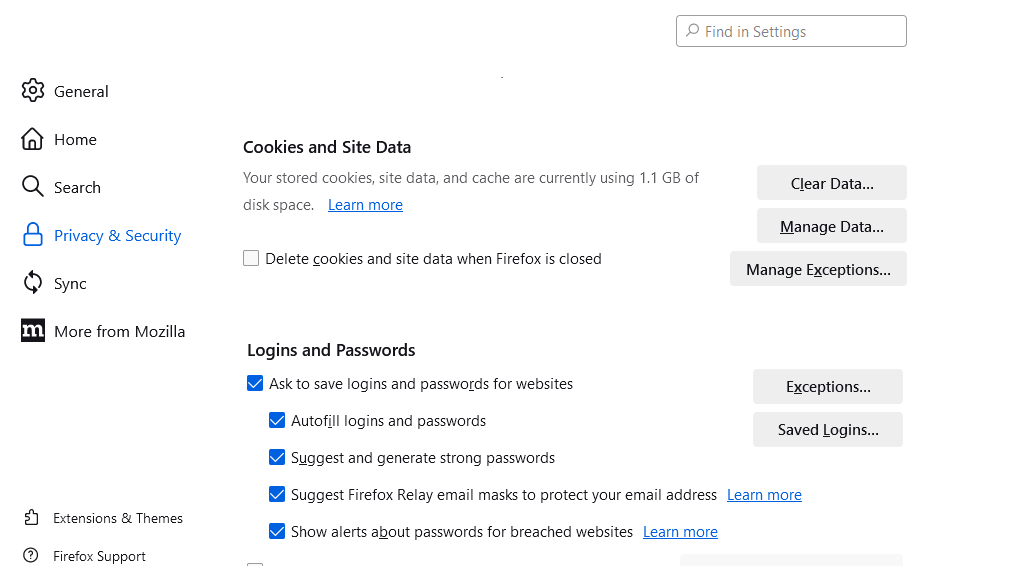
- Under Cookies and Site Data, click Clear Data.

- Uncheck Cookies and Site Data (if you don’t want to clear cookies).

- Ensure Cached Web Content is checked.
- Click the Clear button.
- Close the Settings tab, and your changes will be automatically saved.
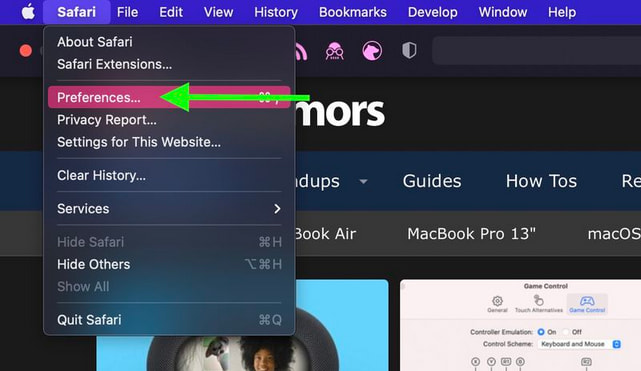
Safari (Mac)
- Open the Safari browser.
- From the top menu, select Safari > Preferences.
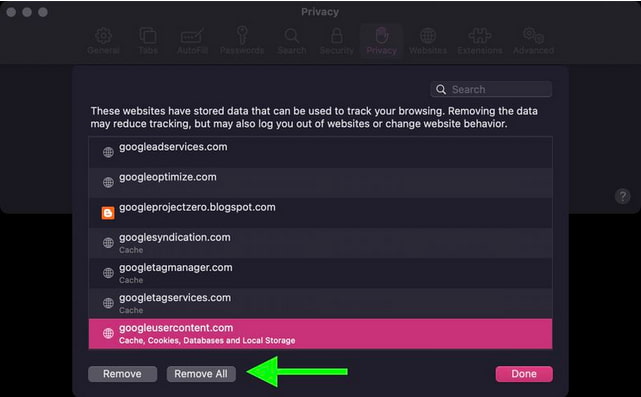
- Navigate to the Privacy tab.
- Click Manage Website Data…

- To clear specific websites, select them and click Remove.
- To remove all data, click Remove All.
Microsoft Edge
- Open Settings > Privacy & Services in Edge.

- Under Clear browsing data, click Choose what to clear.

- Check the boxes for:
- Browsing history
- Cookies and other site data
- Cached images and files

- Click Clear Now.
- Restart your browser.
Shortcut: Type edge://settings/clearBrowserData in the address bar to access the Clear browsing data page directly.
These steps ensure your browsing data is cleared, enhancing privacy and optimizing browser.
Step 4: Add Intuit as a Trusted Site
- Chrome: Settings > Privacy & Security > Site Settings > Cookies and Site Data > Add *intuit.com.
- Firefox: Menu > Settings > Privacy & Security > Permissions > Exceptions > Add *intuit.com.


- Safari: Open payroll.intuit.com, Bookmark > Add Bookmark > Save.
- Edge: Control Panel > Internet Options > Security > Trusted Sites > Add *intuit.com.
Customized Solution for QuickBooks Error 103
QuickBooks Error 103 appears when QuickBooks is unable to download bank statement data and accept the password or username your bank uses to sign in or when your internet connection or browser affects QuickBooks’s bank connection.
This is a step-by-step guide to correcting this problem and many more solutions to Error 310, which often may be coupled with Error 103.
How to deal with QuickBooks Error 10:
1. Inspection Your Internet Connection
Make sure that you have a good internet connection. An unstable connection can also impact the bank feeds or the possibility of linking your bank account to QBO.
2. Use Incognito Mode for Browser Issues
If you encounter browser-related issues:
- Launch QuickBooks again, not in a normal window but in an incognito mode or private browsing.
- It is advisable to set Google Chrome as your preferred browser, as Intuit has noted this will not cause performance problems.
3. Update Your Bank Credentials
Error 103 mostly happens when the bank denies your login request. Follow these steps:
- Touch the Reconnect button, which will be automatically provided, before you receive the message that you have been disconnected from the server.
- Type a good and specific name of your desire, along with a good password.
- Click Update Sign-in Info to attempt signing in again.
4. Verify the Bank URL
Make sure to verify the bank connection by inputting the right login URL. Follow these guidelines:
- Sign in using the URL that you have been using to visit your bank website, such as www.wellsfargo.com.
- In the absence of results, type the URL shown on the screen after entering your bank details.
- Remove further extensions if an,y beyond the slash (/) from the URL if the URL is long rather than direct. For example:
- URL after login: https://www.netteller.com/login2008/Authentication/Views/Login.aspx?returnUrl=%2Floginabc%2FViews%2FRetail%2FAccountListing.aspx
- Simplify to: https://www.netteller.com:443/login2008/Authentication/Views/Login.aspx?returnUrl=%2F
- Type in the shorter URL until you get a match on the page you are searching for.
5. Contact Customer Care
However, if the above-stated steps do not solve the issue of Error 103, then you can contact QuickBooks Customer Care. Provide them with:
- The name of your financial institution or bank.
- The name that the user chose during the creation of the account with the bank.
- The website and the address of the website through which you log in to your banking account.
- Whether the account is a business, personal, or cash management account.
- The number that appears after the ‘0xC0’ element that you experience is the error code.
FAQ
-
What does QuickBooks Error 103 mean, and why did my bank connection suddenly break?
QuickBooks Error 103 is a bank-related sign-in error. It typically means the financial institution rejected the sign-in request sent by QuickBooks Online (QBO). The most common reason for a sudden break is that the user updated their bank or financial institution password or username directly on the bank’s website but failed to update those credentials in QBO. The error often prompts the user to update their login details in the accounting software.
-
My bank uses two-factor authentication. Could this be causing Error 103?
Yes, two-factor authentication (2FA) or multi-factor authentication (MFA) can interrupt the connection and trigger Error 103. QBO uses a saved token to connect automatically to your bank. If the bank requires a code or secondary approval after the initial login, QuickBooks may fail to complete the handshake, resulting in the rejection and the 103 error. You must often bypass or save the device’s login information on your bank’s site for QBO to maintain a stable connection.
-
How long do I need to wait after successfully logging into my bank’s website before trying to update the credentials in QBO?
After you have successfully logged into your bank’s official website using the correct credentials and confirmed they work, you should wait at least five to ten minutes before attempting to update the sign-in information in QuickBooks Online. This short wait time ensures that your bank’s system fully registers the successful, new login session before QBO tries to sync again.
-
Why is using an Incognito or Private browser window often the first step in fixing Error 103?
Using an Incognito or Private browser window immediately eliminates potential interference from your local browsing data, which is a major culprit in connection issues. Specifically, this mode prevents:
1. Old Credentials: The browser’s saved passwords or autofill features from entering incorrect, outdated login details.
2. Corrupted Data: Outdated browser cache and cookies from disrupting the secure connection between QBO and the bank’s server. -
What are the keyboard shortcuts for opening an Incognito window across the most common web browsers?
To quickly open an Incognito or Private browsing window, use the following keyboard shortcuts:
1. Google Chrome: Control + Shift + N
2. Mozilla Firefox: Control + Shift + P
3. Opera: Control + Shift + N
4. Apple Safari: Shift + Command + N
5. Microsoft Edge: Control + Shift + N -
My bank requires special third-party access permission. Where in the bank’s settings do I usually find this option?
If your bank requires explicit permission for third-party access, such as for QuickBooks Online, this setting is almost always located within your User Profile, Security, or Settings section on the bank’s website. The exact wording might vary, but look for:
1. Third-party Access
2. App Permissions
3. Security Preferences
4. Data SharingYou will need to manually Enable or Accept this connection to allow QuickBooks to download transactions.
-
If the troubleshooting steps fail, what information is essential to provide when I call QuickBooks Customer Care?
Before contacting Customer Care, ensure you have the following information ready to expedite the resolution of Error 103:
1. The full, correct name of your bank or financial institution.
2. The exact URL (website address) you use to log into your bank account.
3. Whether the account is a Business, Personal, or Cash Management account.
4. The error code that appears, especially any number after the ‘0xC0’ element if it is a more detailed code.
5. Confirmation that you can successfully log into your bank’s website outside of QuickBooks.
Disclaimer: The information outlined above for “How to Fix QuickBooks Error 103 Due to An ID or password Issue?” is applicable to all supported versions, including QuickBooks Desktop Pro, Premier, Accountant, and Enterprise. It is designed to work with operating systems such as Windows 7, 10, and 11, as well as macOS.
