QuickBooks Desktop and Online provides customizable templates for invoicing. You can track payments, send reminders on due dates, automate recurring invoices, etc.
But if you do create your invoices from scratch using a spreadsheet or word processing software, you may encounter administrative errors. Moreover, if you’re creating invoices manually, you’ll run into challenges tracking them and getting paid.
Using accounting software to create invoices can save you time and ensure consistency across all of your invoices. While it may make sense to manually build your own invoices for one, two, or even five customers, imagine how your efforts will scale across multiple customers. This is where you need to pay a monthly fee to use accounting software.
QuickBooks is an accounting software available in both online and desktop mode, where you can create invoices, accept payments, maintain records of accounts receivable, and do regular bookkeeping and report generation. QuickBooks Online allows small businesses to create invoices that are branded with their company logo and are made to simplify the billing process.
You can also connect QuickBooks to your payment provider for the customers to pay their invoices through a debit/credit card. QuickBooks will automatically update your accounting records after the payment is received.
Need of Invoicing Process for a Small Business Owner
An invoice is a detailed record of a transaction between a buyer and a seller. The Invoice outlines the specifics of the deal and product when goods or services are purchased. It includes the terms and available payment methods. There are various types of invoices, such as paper receipts, bills of sale, debit notes, and sales orders, invoices, and online electronic records. They serve as formal documents that thoroughly record transactions between buyers and sellers.
In addition, invoices serve as essential tax records, providing evidence of your income. You can create invoices with platforms like QuickBooks Invoicing, as it streamlines your process, reduces errors, and optimizes your budget. By the end of this article, you’ll learn the numerous advantages of QuickBooks Invoicing.
The Purpose of an Invoice
An invoice is one of the most crucial documents that your business creates. Well-built invoices are tools for record-keeping and communicating with customers. If you use an invoicing system that integrates with your accounting software, they also serve as a seamless paper trail.
The efficient personalised invoicing can:
- Build better relationships with your customers
- Reinforce your brand
- Boost your cash flow
- Cut the time you spend on bookkeeping
That’s why invoicing software makes the invoicing process easier. Let’s suppose you send 10 invoices per month, and the process takes you an hour apiece. This is time that could be spent fulfilling services or generating new business. Using software, you can trim your invoicing time down from 10 hours to one hour. You can standardize your templates, quickly query information about payments, and answer customer questions as they come up.
An invoice is an important transactional tool with extremely functional applications. It is important for small business owners to create them in a way that reduces the chances of error.
Using QuickBooks Invoicing
QuickBooks Online allows you to generate professional invoices efficiently. You can create customized invoices, add your business logo, and include essential details such as product descriptions, quantities, and prices. This ensures accuracy and professionalism in your communication with clients.
QuickBooks Invoicing provides a clear record of outstanding payments and allows cash flow monitoring to businesses for better financial management. They include important information, such as the sale date, the product or service provided, and the amount charged. These records are valuable for financial reporting, sales tax rate due purposes, and auditing.
Features of QuickBooks Invoice
Below are the features of QuickBooks Invoice:
- Customizable invoice templates: Add your company name, logo, or other information.
- Send invoices directly by mail.
- Track invoices.
- Send invoice reminders on or before the due date.
- Receipt Management
- Automate recurring invoices.
- Classify invoices according to payment status.
- Availability of multiple payment options.
- Get an invoice screen, i.e., a dashboard from where you can track all your invoices.
- Add existing customer data, including tax code, from a drop-down list of saved customer information.
- Create invoices on both Quickbooks online and Quickbooks desktop.
Key Components of an Invoice
An Invoice should be consisted of all the important information that a customer may need them to make a payment.
Below mentioned are the important components that must be included in creating an invoice Invoice:
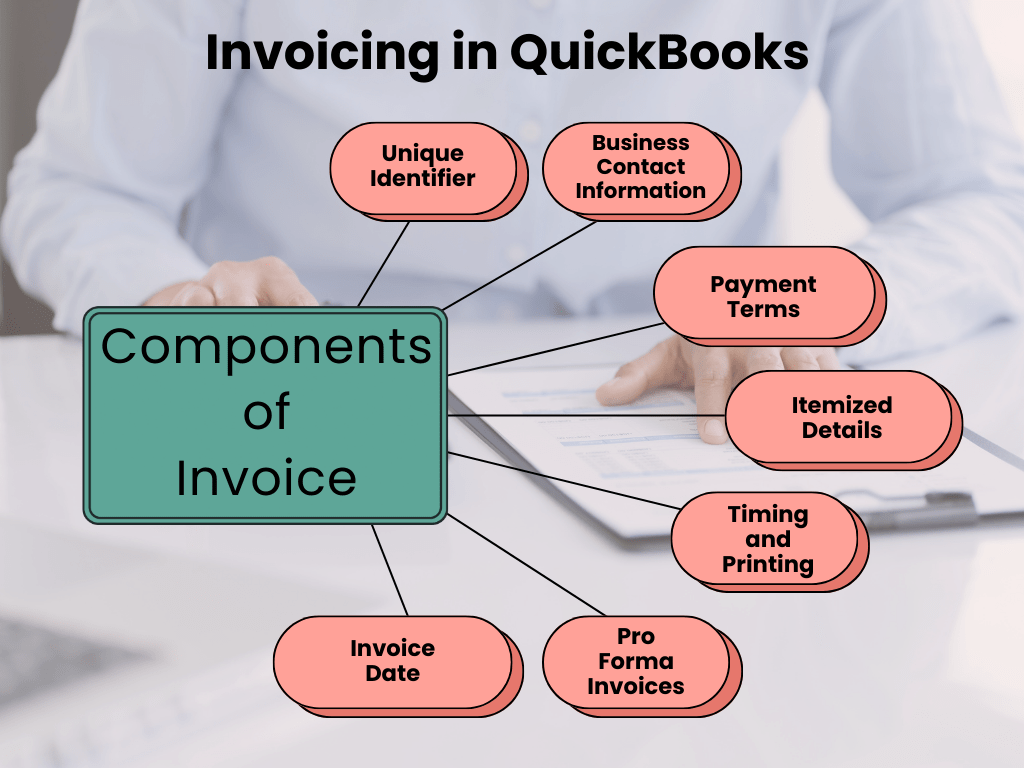
- Unique Identifier: Each Invoice has a distinct invoice number, which is important for internal and external reference.
- Business Contact Information: The Invoice typically includes the seller’s or service provider’s contact details. This information is important in case of billing errors.
- Payment Terms: The Invoice comes with payment terms, including any discounts, early payment details, or any charges for late payments.
- Itemized Details: It presents the unit cost of each item, the total units purchased, and additional charges like freight, handling, shipping, and applicable taxes. The total owed is also specified.
- Timing and Printing: Invoices can be sent as month-end statements for all outstanding transactions. Historically, paper invoices were common, but now computer-generated invoices prevail. These can be printed on demand or emailed to the parties involved. Electronic records facilitate easy search and sorting by number, date, goods, or client.
- Pro Forma Invoices: These preliminary bills of sale are sent to buyers before goods are shipped. Pro forma invoices are especially relevant for international transactions and customs purposes.
- Invoice Date: This timestamp indicates when the goods were billed and the transaction officially recorded, including essential payment information.
Major Benefits of Invoicing Software for Small Businesses
Many businesses start off by creating invoices in Word, then recording them in a spreadsheet and sending them as PDF. This approach might work at first, but as you build up a customer base, your accounting is going to pile up. Accounting software does more than automate the task of invoice creation, it allows you to track how long it takes for customers to make a payment; how many invoices are overdue; when payments are scheduled to hit your bank account and much more.
Create Professional & Personalised Invoices
Create custom invoices to represent your business using a QuickBooks invoice template and personalise it with your company logos and colors. Add discounts, surcharges, GST and payment terms in seconds to let your customers know how you’d like to be paid.
Save Time with Automation
QuickBooks invoicing software takes the manual labour out of invoicing with automatic invoices. Set up recurring invoices for customers you bill regularly and your date will be saved. Send invoices in batches to make your invoicing process more efficient and convenient.
Send Automatic Reminders
QuickBooks identifies your regular late-paying customers, so you never get caught short. We’ll send a personalized reminder email if a customer’s due date is approaching.
What Should be Included in an Invoice?
The elements of an invoice are important so you and your customers are aligned on the total cost of your services and the payment terms and details.
Below are some basic details of an invoice you need to include:
- Your Business Information: Your business name, address, phone number, email address,and website.
- Customer Details: Your client’s name, address, and email including the shipping address and billing address if both are different.
- Invoice Number: The reference number assigned to each invoice you send. This will help you to keep track of recurring invoices.
- Invoice Date: The date the invoice was issued.
- Products and Services Description: Name of the product or description of the service provided and the price or quantity of each.
- Total Cost: The total cost of all the items or services you provided, plus any applicable tax like Sales tax.
- Payment Terms: The date the payment is due, and any penalties for overdue payments.
Some Basic Invoicing Tips
Here are some tips to help you create clear and effective invoices:
- Make sure the product descriptions are easy to follow and understand.
- Create a purchase order.
- Specify your payment terms and due dates.
- Provide contact information for customer questions.
- Automate invoices with QuickBooks Payments.
- Save time with recurring invoices.
- Accept payments online.
How to Create an Invoice in QuickBooks?
QuickBooks Invoicing allows you to create invoices that are both professional and personalized, handle real-time payments, and set up automatic reminders for outstanding payments. If you plan to get paid in the future for products and services you sell, send your customers an invoice. You can add the product or service you’re selling to an invoice and email it to your customer.
Here’s how to create new invoices and how to review unpaid invoices. Also, you can get info on how customers pay their invoices online if you have QuickBooks Payments, or how to handle things if you use an external payment processing platform.
Note: Your estimates or invoices will look different depending on whether you have the old or new estimate and invoice experience.
Step 1: Create and Send an Invoice
If you’re using the new layout
There’s more than one way to create an invoice in QuickBooks. If you send an estimate and the customer approves it, you can convert your estimate to an invoice. You can also create a new invoice from scratch.
Here’s how:
- Click + New.
- Select Invoice.
- Choose Add customer and select a customer from the dropdown menu. Make sure all of their info is correct, especially the email address.
- Review the Invoice date, Due date, and Terms. Type new dates or terms, if you need to. Tip: Under the Terms field, Net refers to the number of days until the payment is due. The default is 30 days, but you can change the due date if required.
- Decide one from the Product/service dropdown menu to add a product or service.
Note: To add another product or service, select Image Alt Text Add product or service.
- Enter a quantity and rate, if needed.
- Tickmark the Tax checkbox if you need to charge sales tax.
- Select Manage to customize the info or design of your invoices. Then, choose the options from the side panel. QuickBooks remembers your choices and applies them to all existing and future invoices.
- Once done, there are several options for saving or sharing the invoice:
- If you’re ready to send the invoice, select Review and send to email the invoice to your customer. Adjust the email if needed, then click Send invoice. You can also send invoices through text messages by choosing Text and following the steps.
Note:
- The text invoice feature is currently only available for payments enabled customers.
- You must have your customer’s permission to send them invoices by text prior to opting-in to text notifications.
- Click Save or Save and close to send the invoice later.
- Select Save and new to close the current invoice and open a new one.
- Hit the Print and download tabs to print a paper invoice.
- Choose Receive Payment if you’ve received a payment from the customer.
- Press Share link to send your customer a link to their invoice through text message.
If you’re using the Old layout
- Click + New.
- Select Invoice.
- From the Customer dropdown menu, choose a customer. Make sure all of their info is correct, especially their email address.
- Review the Invoice date.
- If you need to, click on the Due date. You can also change it by modifying the value in the Terms dropdown menu.
Tip: Net refers to the number of days until the payment is due. The default is 30 days, but you can change the due date if required.
- Choose a product or service from the Product/Service column. You can also select + Add new to create a new product or service right from the invoice.
- Type a Quantity, Rate, and Amount if needed.
- Select a Sales Tax option. If you are unable to find Sales Tax, make sure you have set up sales tax.
- Once done, there are several options for saving or sharing the invoice:
- Click Save and Send to email the invoice to your customer if you’re ready to send the invoice.
- Press Save and close to send the invoice later.
- Hit the Save and new icons to close the current invoice and open a new one.
- Choose Save to print a paper invoice. Then, select Print or Preview and follow the steps to print the invoice.
- Select Save and share a link to send your customer a link to their invoice through text message.
Note: If you’re a project-based business owner, you can create progress invoices to request partial payments during a project.
Step 2: Review Unpaid Invoices
QuickBooks puts unpaid invoices into your accounts receivable account. You can find this account on your Balance Sheet and other financial reports. Any time you want to review your invoices, navigate to Sales and click on Invoices. Check the Status column to view where your invoices are in the sales process.
Here are a few common statuses that you might see:
- Due in [Days]: You haven’t emailed the invoice yet.
- Due in [Days] Sent: You’ve emailed the invoice to the customer.
- Due in [Days] Viewed: Your customer opened the invoice.
- Deposited: Your customer paid the invoice.
- Overdue [Days]: The invoice is past due and unpaid.
- Overdue [Days] Viewed: Your customer opened but didn’t pay the past due invoice.
- Delivery Issue: Invoice was undelivered. Check the email address and resend.
- Voided: The invoice was voided in QuickBooks.
Step 3: Receive Payments for Invoices
If you use QuickBooks Payments, customers can pay their invoices directly via credit card, PayPal, Venmo, or ACH transfer. We process and handle everything for you. When you get paid, QuickBooks puts transactions into the correct accounts.
If you use an external platform to process payments, you can keep track of those payments in QuickBooks.
QuickBooks Online Recurring Invoice
Setup QuickBooks Online Recurring Invoice
Consider the below-mentioned steps to set up a recurring invoice in QuickBooks Online:
- Log into QuickBooks Online
- Navigate to the Sales tab.
- Click on the + New button and select Invoice.
- Fill in the relevant customer details.
- Go to the Items section and include the items that should appear in the recurring Invoice.
- Click on the Schedule button at the bottom of the page.
- Click on the drop-down menu to choose Recurring.
- Specify the frequency (weekly, monthly, etc.) for generating the Invoice.
- Select the start date and end date for the recurring invoice.
- Click Save & Close to finish the setup.
- You can also create a recurring invoice by following these steps:
- Go to the Customers tab.
- Select a specific customer name.
- Click on the Create Invoice button and repeat the steps from 4 to 9.
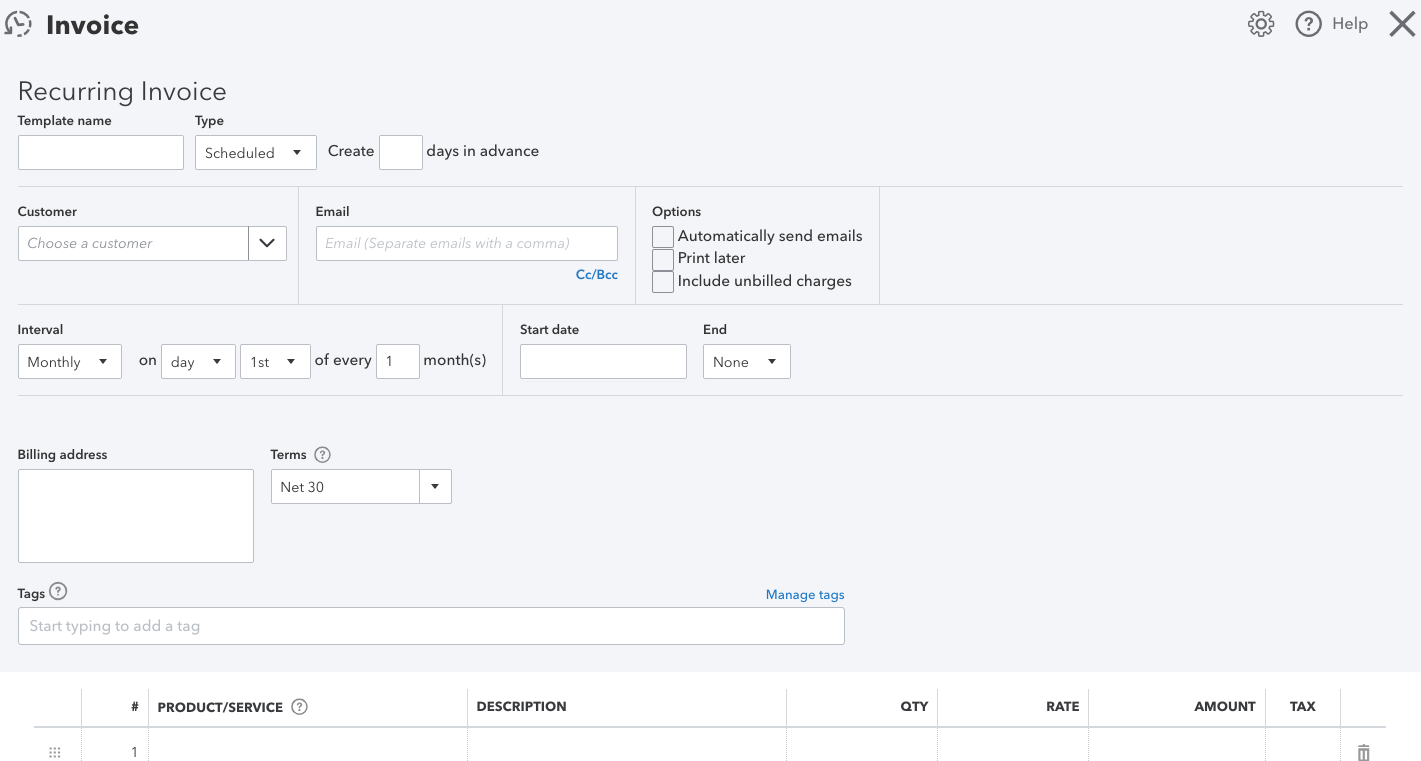
Create a Recurring Invoice in QuickBooks Online
- Click on Gear icon and then select Recurring Transactions > New.
- For Transaction Type, choose Invoice and then press OK.
- Select Scheduled for type.
- Hit Automatically send emails.
- Complete the rest of the form and then press Save template.
- Repeat the same steps for each customer you’d like to create a recurring invoice for.
Automatically cc yourself
As a safeguard, set QuickBooks Online to automatically email you a copy of all sent invoices:
- Choose Gear and then select Account & Settings.
- Click on Sales > Messages > Email me a copy.
Confirm the invoices were created
Here’s how you confirm the invoices were created.
Check your inbox
If you automatically cc’ed yourself, you should have received a copy of every invoice that was sent.
Verify your list of recurring transactions
- Hit Reports from the left navigation bar.
- Select the “Find Report by Name” drop down menu.
- Choose and search for “Recurring Template List” Report.
Review the customer page and invoice
- Click on Customers from the left navigation bar.
- Select the customer with the recurring invoice. You’ll see Open (Sent) under the Status column.
- Hit the invoice. You’ll see a Last Delivery timestamp.
Get Paid Automatically
When your customers want to pay you quickly and easily, they can set up Autopay on recurring invoices. The fees for Autopay are the same as for any payments made through QuickBooks Payments. To enable Autopay, you’ll need a QuickBooks Payments account.
To set up autopay on a recurring invoices, follow the steps below:
- Create an invoice, then choose Make recurring, or you can create a recurring template.
- Navigate to Interval and select how often the invoice should recur. Note: Autopay isn’t available for recurring invoices with a Daily interval or for amounts over $5,000.
- Type the start and end date of the recurring invoice.
- Fill in the rest of the invoice then click on Save template.
If you already have a recurring invoice setup, you don’t need to create a new one.
Important: You can edit recurring templates with Autopay setup. If you change any of these fields, Autopay will be canceled:
- Total amount
- Frequency
- Terms
- Payment options
- Email address
- Customer name
If Autopay gets canceled, your customer will receive a cancellation email for future Autopay transactions.
Edit QuickBooks Recurring Invoices
To edit your recurring template and the way your recurring transactions are entered, you’ll need to move to the Recurring Transaction List.
- Navigate to Settings and then choose Recurring transactions.
- From the Action column, click Edit for the transaction you want to edit.
- Change the template name, type, and the customer or payee name as needed.
- If you’re editing a Scheduled or Reminder type template, you can adjust how far in advance QuickBooks creates the template or sends you a reminder. You can also set the frequency under the Interval section.
- Add or remove any product or service details in the Item details section.
- Once you’re done, select Save template.
How to Create QuickBooks Custom Invoice
Follow the steps to customize invoices with the help of QuickBooks Invoices:
- First, open QuickBooks.
- Then, click on Customers in the main menu bar.
- Select Create Invoices from the drop-down menu.
- Click on Print Preview to see how your invoice template will appear when it is printed or sent through email.
- You can use this preview to decide how you want to customize the template.
- Click Close to exit the preview screen.
- Now click on the Customize drop-down menu and select Manage Templates.
- Click on each thumbnail to check the Template Gallery.
- Preview how each template will look as an invoice.
- Click OK to open your chosen template.
- Add or move your company logo.
- Adjust the position and appearance of your company’s name and contact information.
- Modify the invoice title.
- Add, edit, or remove fields on the Invoice.
- You can include special sections like legal disclaimers, a remittance tear-off sheet, or customer notes.
- Click on Print Preview to see how your customized Invoice looks with the changes you have made.
- Click OK to save the customized template.
How to Create Estimate in QuickBooks Online?
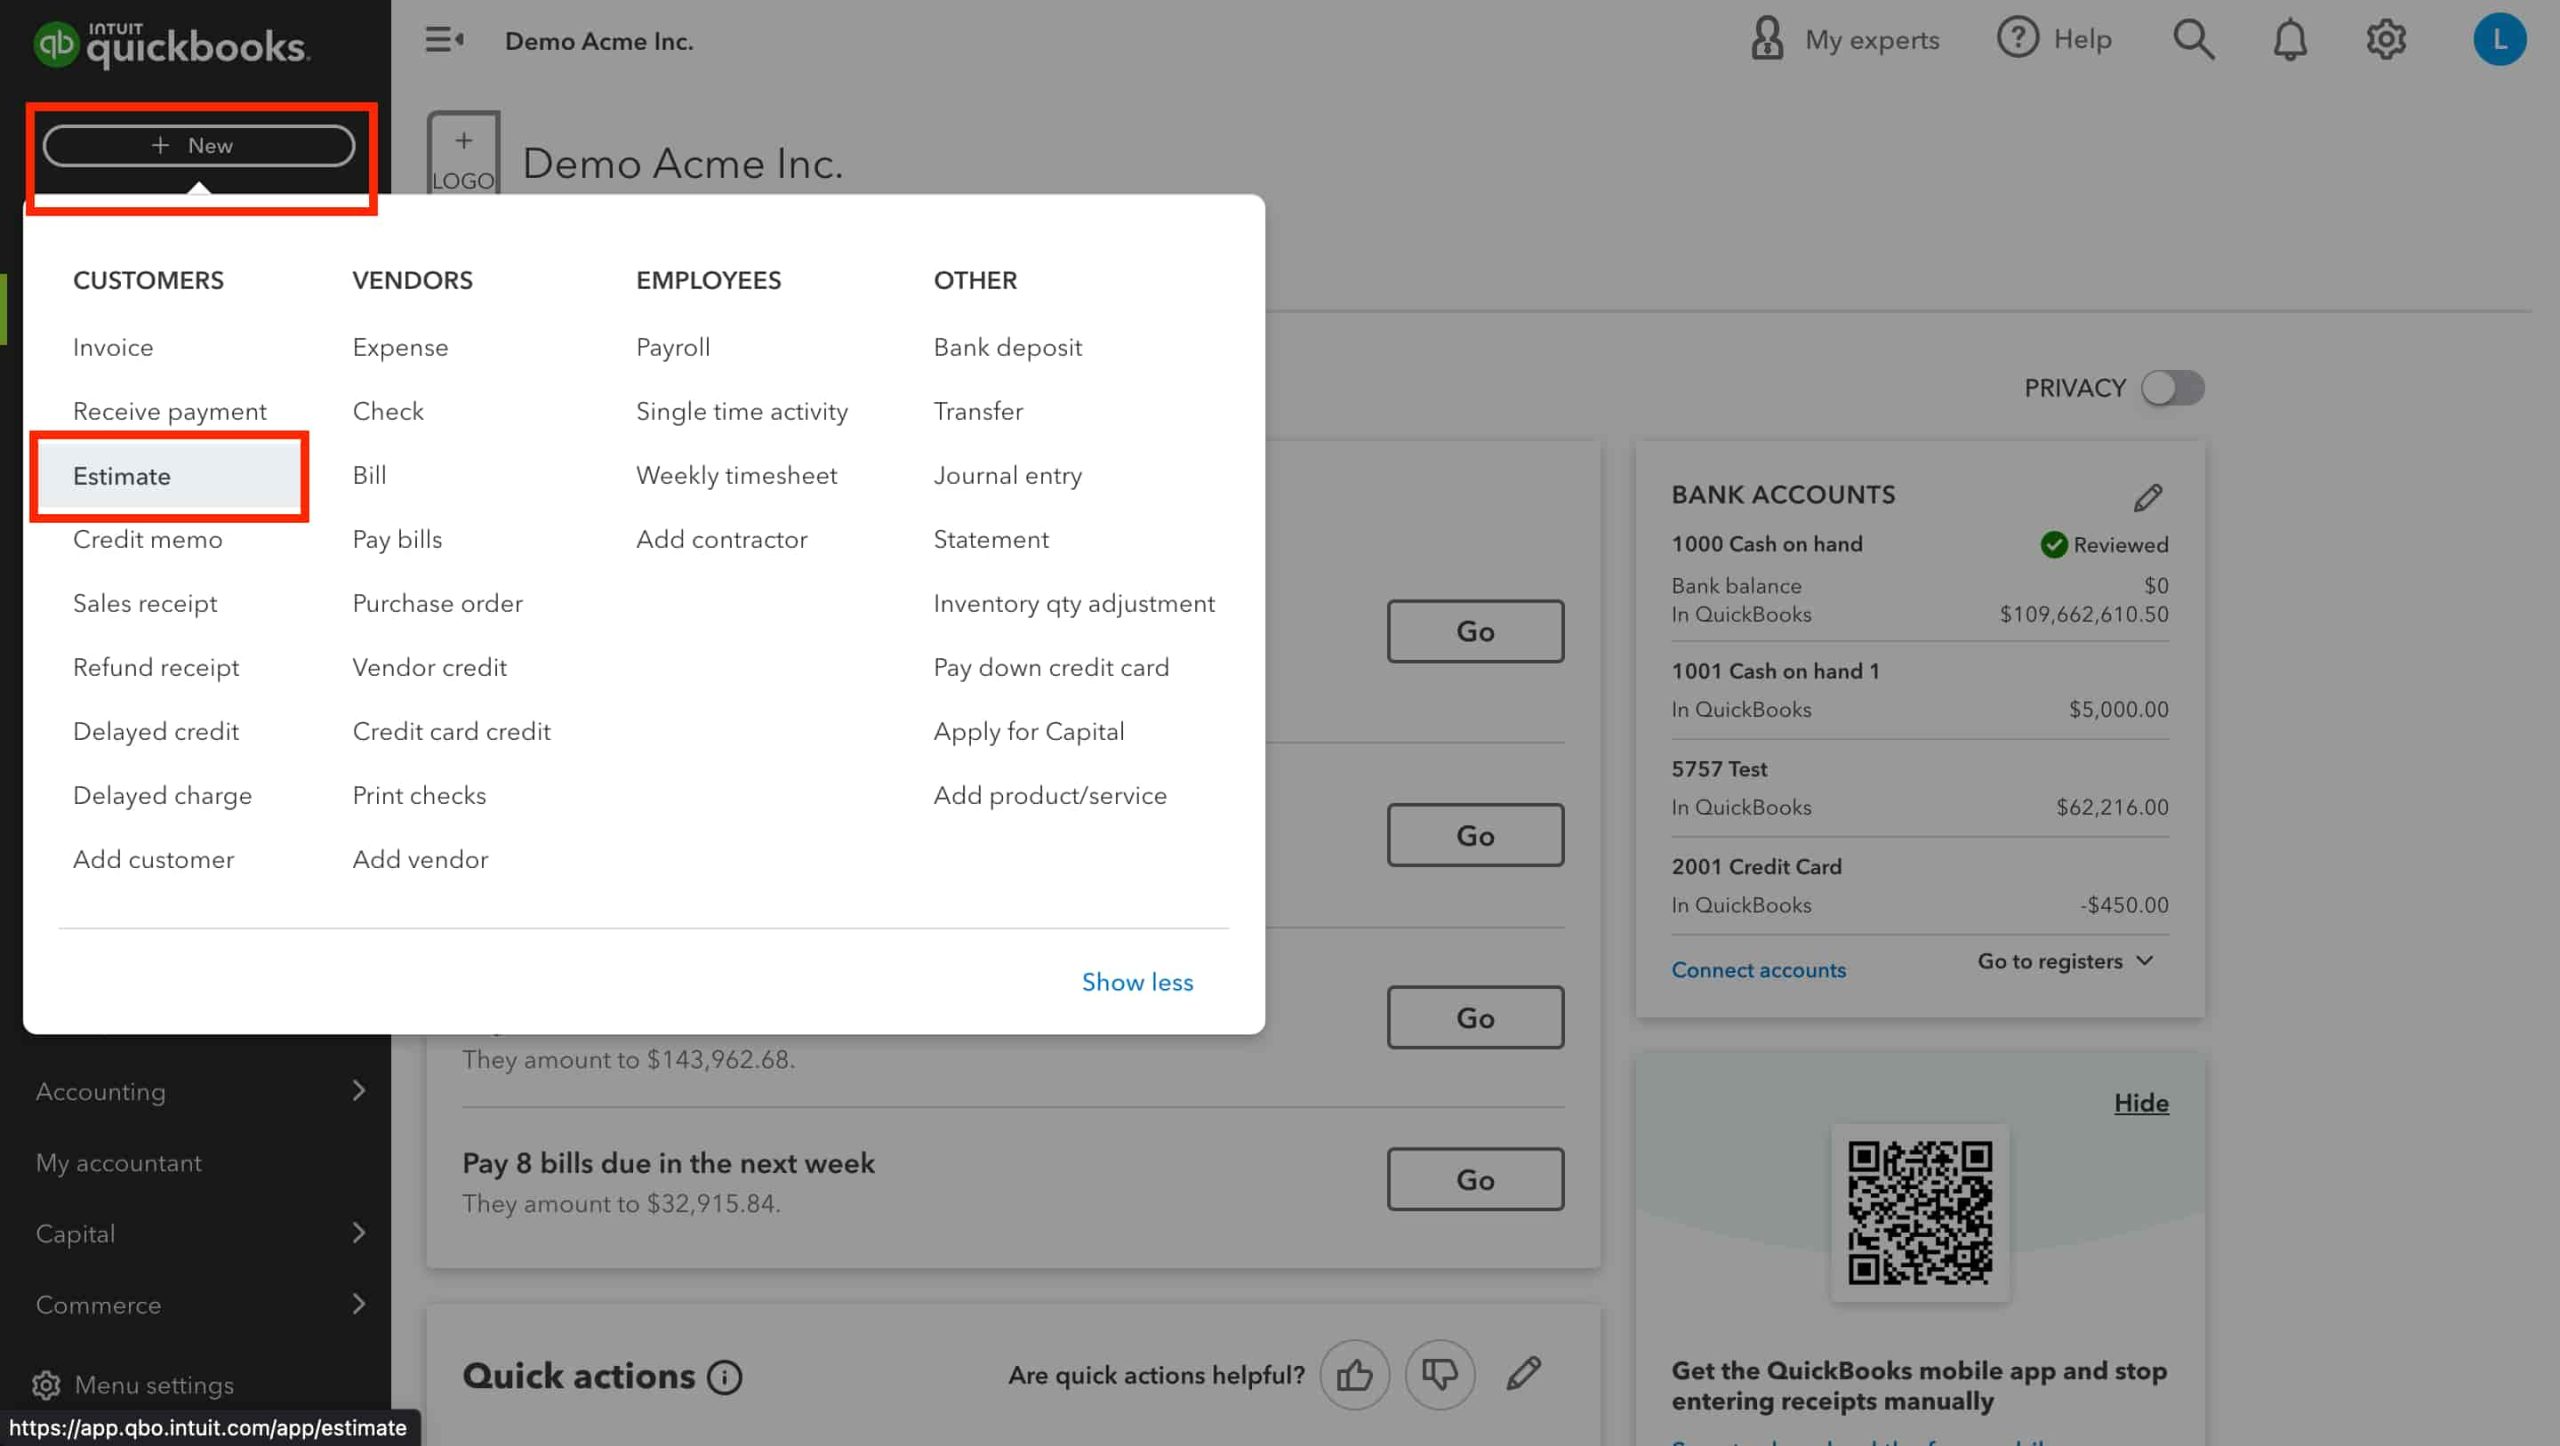
Follow these steps to go through the entire estimate process:
- Find the Estimate window.
- On the left menu bar, find the Customers Menu.
- Scroll down and select the customer for whom you want to prepare the estimate.
- Click on New Customer at the top right of the Invoice screen to create their profile.
- Click on the drop-down menu next to the customer’s name.
- Select Create Estimate.
- Fill in the necessary details such as date, product or service description, quantity, rate, and any other relevant information.
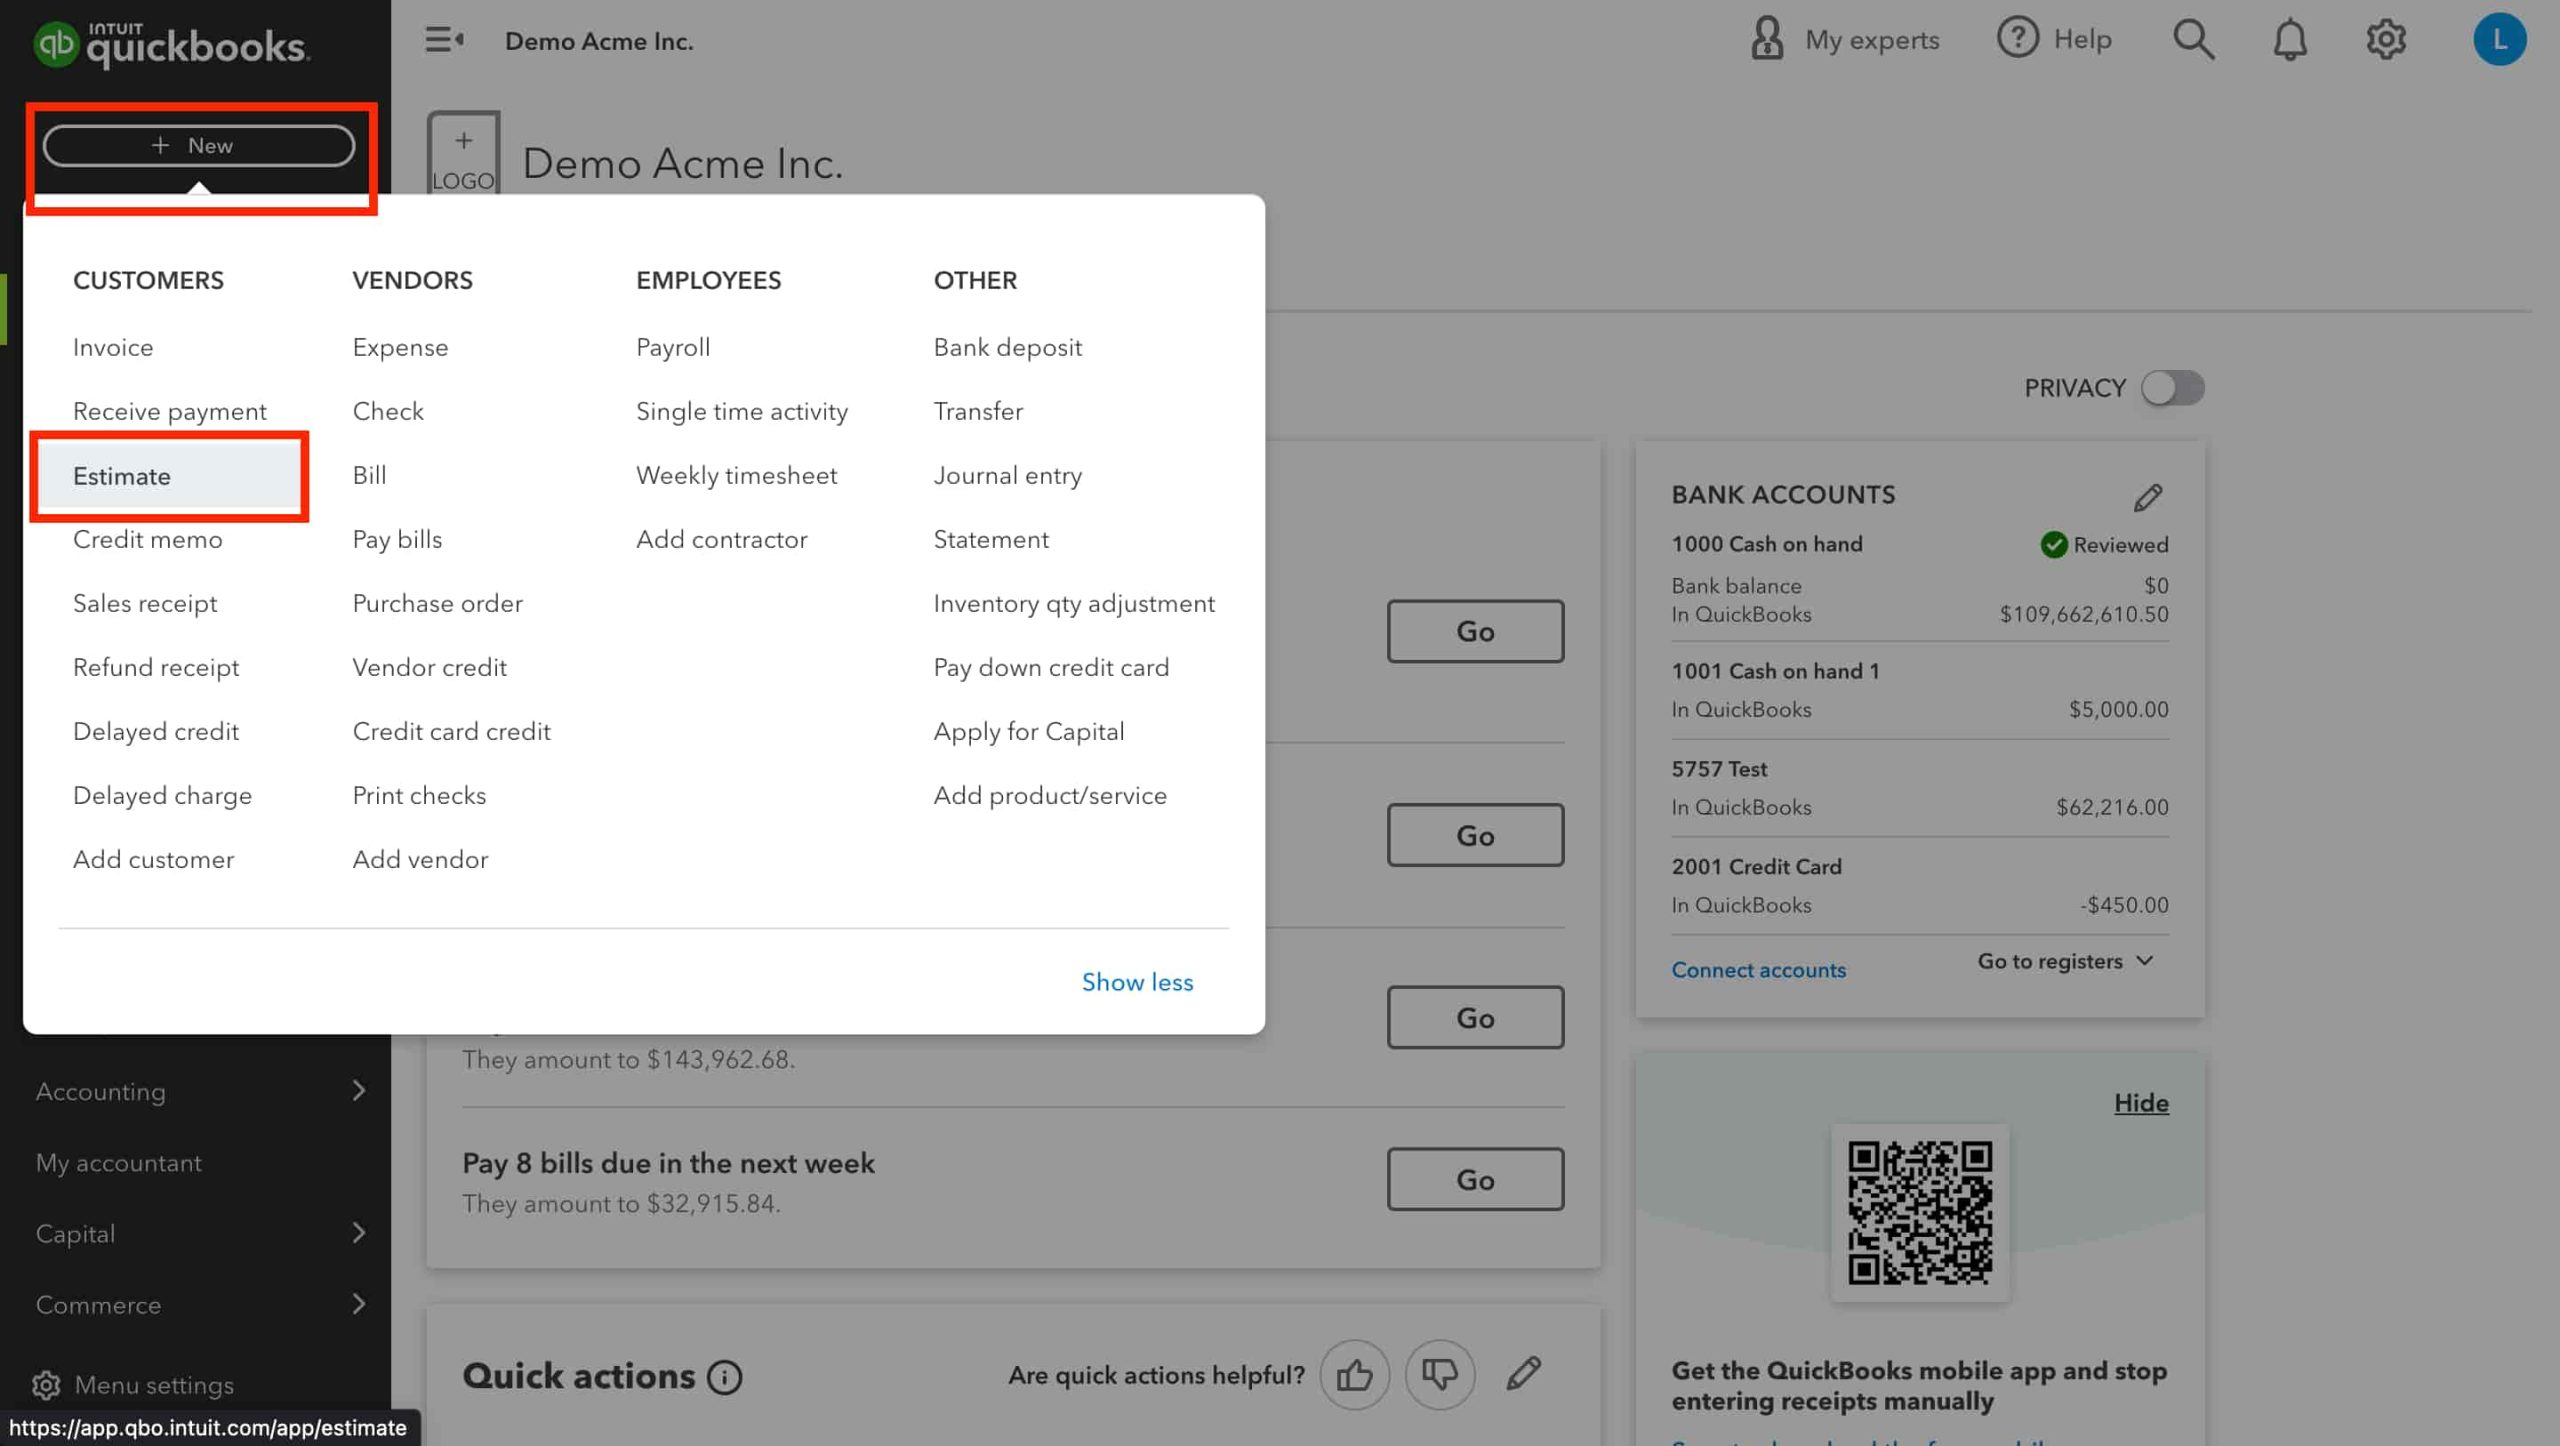
- Click on Save.
- Alternatively, choose Save and send to email the estimate directly.
How to Process Payments in QuickBooks Online with Payments?

If a customer prefers to pay in person, you have two options: either ask them to follow the payment link in the email and complete the transaction online or handle the payment on their behalf and match the invoice immediately on it to their existing Invoice.
- Click on + New.
- Choose Receive Payment.
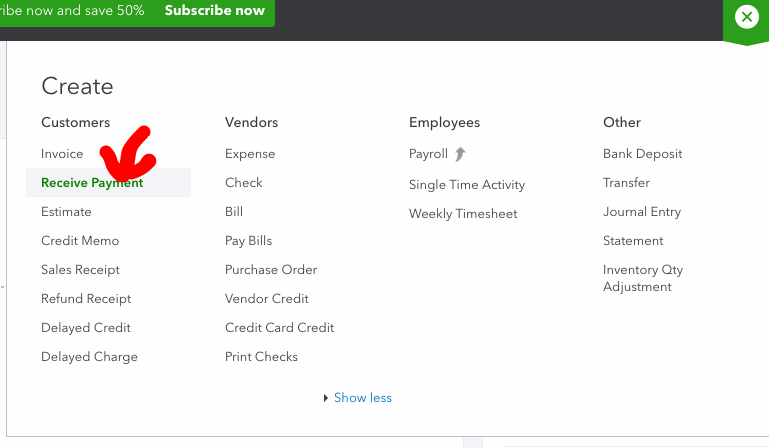
- Enter the customer’s name and the payment date.
- In the Outstanding Transactions section, select the relevant open Invoice to apply for the payment. Adjust the PAYMENT field if it’s a partial payment.
- From the Payment method dropdown, choose Credit Card.
- Enter the credit card details manually or select Swipe Card if available.
- Optionally, save the customer’s credit card for future use.
- Finally, click Save or Use this info.
- Confirm with Got it, then choose Save and Close or Save and New.
How Can I Get Paid on Invoices Faster?
Below are some instructions on how can customers can pay faster:
- Accept all forms of payment: credit cards, debit cards, ACH bank transfers, digital wallets, PayPal, and checks.
- Create clear invoices with specified due dates.
- Send invoices as soon as you complete the work.
- Consider establishing overdue payment penalties.
- Automate reminders–QuickBooks Invoicing software does this for you.
- Incentivize early or on-time payments with rewards or perks.
Final Words
QuickBooks Online is an accounting software which provides an invoicing solution for businesses of all sizes. QuickBooks Online has all the solutions from generating a simple invoice to customizing it to match with your brand. With customizable invoices, seamless payment acceptance, and real-time tracking, QuickBooks simplifies the invoicing process, allowing you to get paid faster.
FAQs!
What is an Invoice?
An invoice, or a bill, is a commercial document sent from a seller to a buyer as a request for payment, indicating what was sold and how much is owed. Invoices, like bills, are issued from a vendor to a customer for something they’ve already received, something in development, or something that’s ready to be created.
However invoices, unlike a restaurant bill, aren’t necessarily due immediately upon receiving them. You may choose to set invoice payment terms of up to 3 months, to give your customers flexibility to manage their cash.
Can I Customize My QuickBooks Invoices?
Yes, you can go ahead and add your personal touch if you need. QuickBooks allows you to customize invoices, estimates and sales receipts with a look that suits your brand.
Is there any Difference Between a Bill and An Invoice in QuickBooks?
An invoice is the payment request that you send to a customer when they buy something. It shows what was bought, the price, and when the customer needs to pay. On the other hand, a bill is a payment request you receive from a supplier or vendor for things you bought or services you used. It shows what was bought, the price, and when you need to pay.
How Can I Automate My QuickBooks Invoices?
QuickBooks uses automation to help you send smarter invoices and get paid faster from chasing overdue invoices to running complex calculations. With QuickBooks Online invoicing software, you can send invoices automatically and schedule recurring invoices, send automated reminder emails and track invoice payments in real-time.
What Type of Invoice Template Should I Use?
You may choose the type of invoice based on your business model and how you’d like to get paid. For small businesses that send invoices after goods or services have been exchanged, a simple commercial invoice, like our free invoice template, will suit your needs. If your business requires payment upfront, you can use a proforma invoice, indicating a fee agreement or estimated costs. With QuickBooks invoicing software, you have an option to choose from many different invoice templates based on your business needs.
How Much Does QuickBooks Charge to Send Invoices?
With QuickBooks, there’s no charge to send an invoice. The rate for taking payments through an invoice is determined by the payment methods your customer uses, and you can decide which ones to include on your invoices. In QuickBooks Money, the rates are determined by the payment method your customer picks to use.
Can I Send Recurring Invoices?
Yes, With QuickBooks Online, you can send recurring invoices on a schedule to minimize missed payments and reduce administrative hassle. It even allows your customers to set up autopay for their regular payments.
Which Invoice Format Should I Use?
Invoices are most commonly sent in a PDF format. However, you may choose to create and customize invoices in Microsoft Word, Microsoft Excel, Google Docs, Google Sheets, or PDF also. MS word is suitable for short and simple invoices while spreadsheets may be better suited for invoices with many line items and details. Whichever format you select to create and edit an invoice, it is recommended that you need to convert the document into a PDF before sending it to your customer.
When is the Best Time to Send an Invoice?
The best time to send an invoice is immediately once you complete a service or project, or deliver a product. The sooner you send an invoice, the sooner the customer can pay. You may choose to send invoices in the morning when most people are checking their emails and establishing their to-do lists. Also, you can send invoices at the end of the work day so that your customers can see them when they’ll check their email next morning.
How Will Someone Pay My Invoice?
Depending on how your business accepts payments, customers can pay right in the online invoice, using credit cards, debit cards or ACH bank transfers–even from their mobile device. No setup or transaction fees required.
Disclaimer: The information outlined above for “Invoicing in QuickBooks – Make and Send Invoices, Process Payments, and More” is applicable to all supported versions, including QuickBooks Desktop Pro, Premier, Accountant, and Enterprise. It is designed to work with operating systems such as Windows 7, 10, and 11, as well as macOS.
