Excerpt:
Managing sales tax in QuickBooks ensures accurate financial records and tax compliance. The Sales Tax Center allows businesses to easily track and record sales tax payments across various jurisdictions. It simplifies payment management, including state, county, and city taxes, while preventing penalties. By keeping tax liabilities up to date, businesses can streamline reporting and ensure timely filings, ultimately improving financial management and regulatory compliance.
Recording sales tax payments in QuickBooks is important for maintaining your financial records accurately and assuring compliance with tax regulations. Whether you’re utilizing QuickBooks Desktop or QuickBooks Online, the procedure is scheduled to be straightforward, authorizing you to track and organize sales tax payments efficiently. In QuickBooks, sales tax is normally collected on taxable sales and paid to the appropriate tax authority. When it’s time to remit the sales tax, it’s essential to document the payment correctly to maintain proper accounts and sidestep any discrepancies in your financial statements.
QuickBooks permits you to enter sales tax payments in a few easy steps, enabling you to remain organized and lowering the risk of errors. By appropriately documenting sales tax payments, you can develop accurate reports, monitor outstanding liabilities, and maintain your business in good standing with tax authorities. Whether you’re paying state, local, or federal taxes, QuickBooks can assist in streamlining the process and guarantee timely and factual payments.
When you collect sales tax from customers on behalf of tax agencies, you will be required to turn those payments over to them. QuickBooks Online Sales Tax Center makes it easy for you to track sales tax liabilities collected, for each tax jurisdiction, the tax payments you have already made, and the balance due.
The Sales Tax Center is the best place to record sales tax payments because you can see all your recent payments on a single page. You can view your sales tax owed monthly, quarterly, or annually, and adjust which period you need. You can also adjust your accounting basis – cash or accrual.
For consumers, Sales tax can impact the final price of goods and services and affect their purchasing. This is where they need to understand the intricacies of sales tax to make informed financial decisions.
The calculation of sales tax involves multiplying the sales tax rate by the purchase amount, resulting in the tax amount to be added to the total cost.
Total Sales Tax = Cost of item x Sales tax rate
This process generally requires determining the applicable tax rate, which depends on location and type of goods or services. Once the rate is established, it’s typically expressed as a percentage, such as 7% or 8.5%. To compute the tax amount, simply multiply the purchase amount by the sales tax percentage. For example, if an item costs $100 and the sales tax rate is 8%, the tax amount would be $8, and the total cost would be $108.
Recording sales tax payments in Quickbooks is crucial for maintaining accurate financial records, ensuring compliance with tax regulations, and facilitating streamlined tax reporting processes. It plays a vital role in ensuring that all sales tax liabilities are accurately accounted for and paid on time, preventing any potential fines or penalties for non-compliance.
By recording sales tax payments within QuickBooks, businesses can easily track and report their financial obligations, ultimately improving their overall financial management. This seamless integration allows for efficient reporting, which is essential for providing a clear picture of the company’s financial health and meeting government regulations.
Sales tax is an additional cost added to the price of goods and services that’s passed on to a governing body.
In QuickBooks, sales tax payments include State Sales Tax, County Sales Tax, City Sales Tax, Liability Sales Tax (total tax owed), and Special Sales Tax categories for specific items.
But not all sales taxes are similar to each other Here are the key types of sales tax payments in QuickBooks:
The tax center has everything you need to manage, adjust or file tax in QuickBooks. You can run reports for your sales tax liabilities, record or edit sales tax payments, and see your payment for different time periods. Here’s how to manage, record, adjust or delete tax sales tax payments in QuickBooks. Let’s get started.
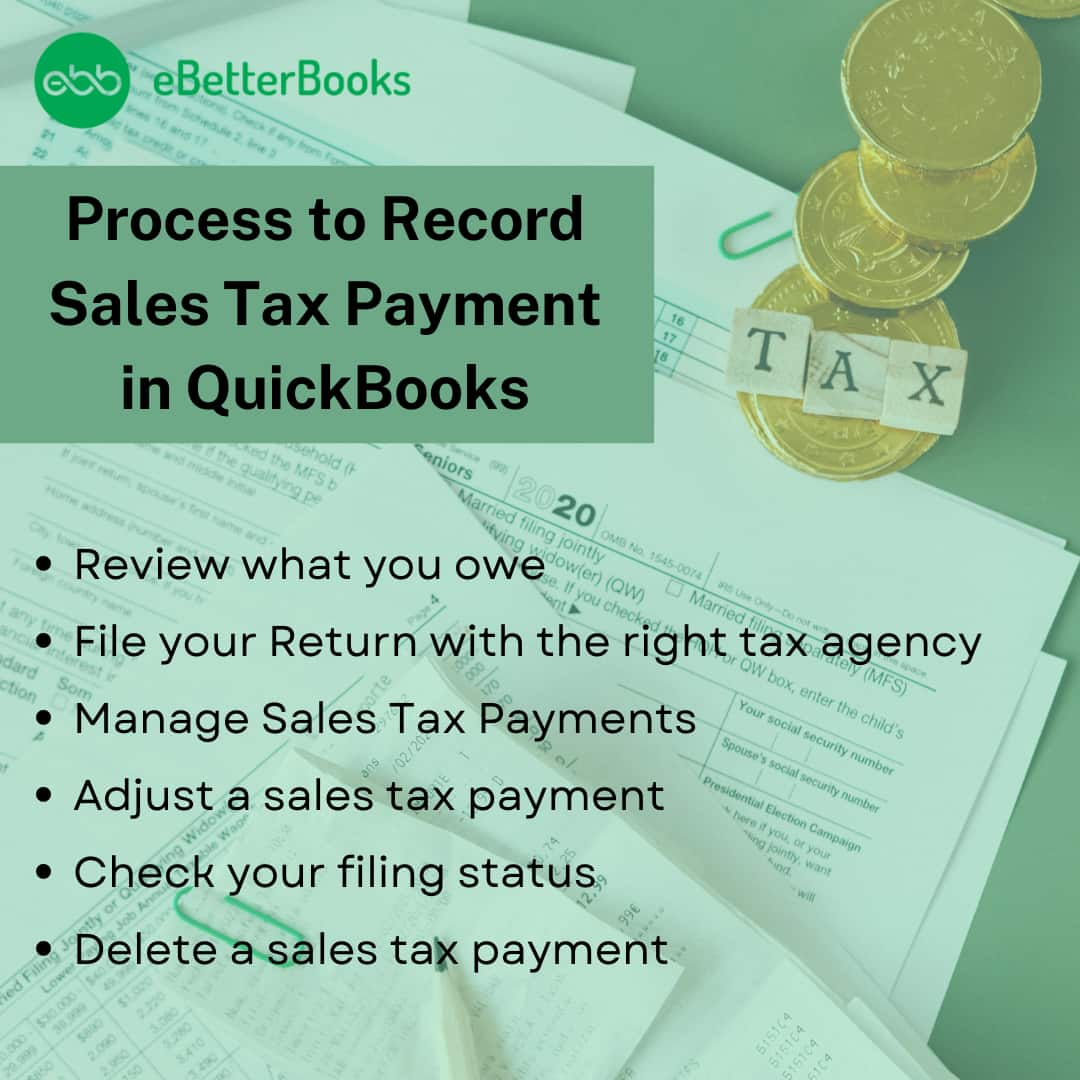
To record a sales tax payment in QuickBooks, review your owed taxes, file your return with the tax agency, and record the payment. Adjust or delete payments as needed to keep records accurate.
Following the step-by-step information below:
If you haven’t already, make sure everything is correct before you file.
Note: If you need a detailed look at what you owe, run your sales tax liability report for the same sales tax period. This is helpful if you want to review your taxable and nontaxable invoices, receipts, and other transactions.
The sales tax report will change depending on the province you choose. For example, if you select sales tax for Quebec, then you can choose the GST/QST Detail report.
Review Sales Tax Reports
Get a Tax liability Report
Note: The report shows each sales tax agency, the taxable amount of sales, and payments.
See all of your Tax Payments
Note: This will open a transaction report that lists all your tax payments in the Recent Sales Tax Payments section. You can adjust the date range or customize to further refine the report.
Once you review your sales tax, you can e-file your return on your tax agency’s website, or file by mail. Most provinces encourage businesses to e-file. But if you can’t file online, you can check your tax agency’s website for more info on how to mail your return. While you can’t e-file right in QuickBooks, you need to manually enter your tax payment in QuickBooks as soon as you file to keep your sales tax info up to date.
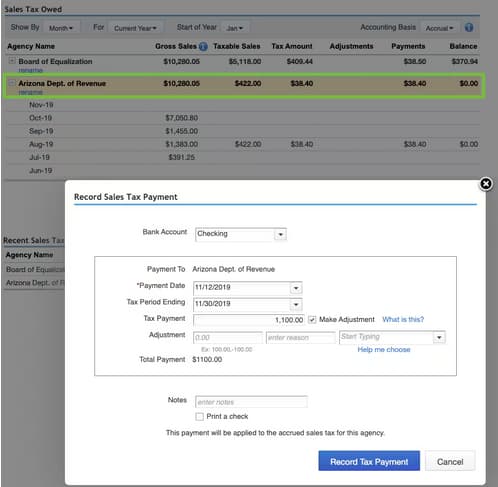
Record a sales tax payment in QuickBooks:
Record a sales tax payment Manually in QuickBooks
Once you’re done filing, it’s time to keep your sales tax info up to date in QuickBooks. Here’s how to manually record your sales tax payment to zero out your sales tax payable.
Note: If you paid for an older return, click on the Tax Period Date dropdown menu to select a tax period or custom date range.
You can make an adjustment while filing your taxes. For this, click on Prepare Return under the Fillings tab. On the Prepare sales tax return page, select Adjust. Use this when you need to decrease or increase the amount of sales tax payment for things like credits, discounts, fines, interest, penalties, and corrections for rounding errors.
If you need to make an adjustment, navigate to Taxes, in the Returns tab, choose the Tax Adjustment option. The Journal Entry window opens and you can use this when you need to decrease or increase the amount of tax payment for things like credits, discounts, fines, interest, penalties, and corrections for rounding errors.
Once done, enter the adjustment amount and reason for the adjustment. You can type a positive or negative amount. Then select an account to track the adjustment.
Don’t select the sales tax Payable account. Instead, use the following:
If you filed online, navigate to your tax agency’s website to check your return’s filing status. However, in case you filed by mail, you can also call your tax agency directly to get an update on your return.
Note: When you delete a payment, the page doesn’t refresh automatically. You have to leave and come back to the Taxes menu; the payment shouldn’t appear anymore.
Recording sales tax correctly in QuickBooks is just the beginning. To truly stay compliant, avoid penalties, and maintain clean financials, you need to go beyond the basics. This section covers 5 advanced topics—like handling overpayments, multi-state tax challenges, and automating tax workflows. Each topic highlights practical steps, real-user issues, and critical numbers to help you stay ahead. Whether you’re a small business owner or a growing enterprise, these subtopics will give you sharper control over your sales tax processes and help you manage tax with more accuracy, speed, and confidence.
Failing to review sales tax liability reports leads to inaccurate filings, missed deadlines, and potential penalties—3 major risks for any business. Entering tax payments without matching tax periods creates reporting mismatches, overstatements, and compliance issues. Ignoring jurisdiction-specific rates affects at least 2 core financial statements and damages credibility with tax agencies. Overlooking adjustments like discounts or credits results in 5–10% reporting errors, often unnoticed until audits. Always verify amounts, cross-check due dates, and double-check filing periods to prevent errors. One small mistake in tax setup can trigger 3 cascading problems—misstated reports, payment delays, and audit complications. Precision is non-negotiable.
To reconcile sales tax payments, match the payment entry in QuickBooks with the exact amount, date, and payee shown on your bank statement—3 details must align perfectly. Use the Reconciliation tool to compare the “Sales Tax Payable” account against cleared bank transactions, identifying discrepancies in real-time. If amounts differ by even $1, investigate for duplicate entries, date mismatches, or unrecorded adjustments—3 common culprits. Monthly reconciliation reduces reporting errors, catches missed payments early, and ensures audit readiness. Cross-verifying each payment with bank records improves transparency, supports clean books, and strengthens tax compliance. Reconcile every 30 days to avoid financial blind spots.
When a sales tax overpayment occurs, act quickly—track the refund amount, confirm the source agency, and record it using a journal entry or credit note. QuickBooks lets you enter refunds directly under the Sales Tax Center, linking them to original payments, liability accounts, and refund dates—3 essential fields for accuracy. Misclassifying a refund can distort your cash flow, inflate liabilities, and create reconciliation errors. Always assign the refund to the correct tax period, verify against agency notices, and tag it for reporting. Handling it right maintains clean records, ensures proper adjustments, and prevents audit red flags—3 outcomes every business needs.
Multi-state sales tax payments require accurate tracking by jurisdiction, due date, and rate—3 variables that change frequently. In QuickBooks, set up each state’s tax agency separately, assign proper tax codes to transactions, and review the Sales Tax Liability report by location. Failing to separate state filings causes misreporting, duplicate payments, and compliance gaps. Use custom reports to monitor obligations per state, check filing calendars, and automate reminders—3 steps that prevent late fees. Always double-check your nexus rules, align your product/service taxability, and keep agency contacts updated. Managing state-wise taxes properly avoids penalties, improves financial forecasting, and ensures multi-state compliance.
Automation tools like Avalara, TaxJar, or QuickBooks Sales Tax automate rate calculation, jurisdiction mapping, and filing schedules—3 time-saving functions. These tools sync with your invoices, apply the right tax rate, and post payments accurately, reducing manual errors by over 70%. They also generate real-time reports, send filing reminders, and auto-adjust for rate changes—3 features that simplify compliance. Without automation, businesses risk outdated rates, misapplied taxes, and delayed remittances. Integrating automation improves accuracy, saves hours monthly, and ensures your tax workflow stays audit-ready. For growing businesses, automated tax tools are essential to scale operations and maintain stress-free tax management.
Sales tax handling goes beyond just recording payments. To stay fully compliant and avoid costly errors, businesses need to understand related concepts like nexus rules, use tax, and the impact of incorrect entries. This section explores 5 essential areas that supplement your QuickBooks strategy—covering expert guidance, third-party tools, and financial reporting accuracy. Each topic adds a deeper layer of clarity, helping you make informed decisions, avoid common traps, and strengthen your tax operations. Whether you’re scaling up or refining existing processes, these insights will support long-term success and smarter compliance.
Sales tax is charged at the point of sale by the seller, while use tax is self-assessed by the buyer on out-of-state or untaxed purchases—2 taxes, 1 responsibility. Businesses often overlook use tax, leading to underreporting, audit risks, and surprise liabilities. In QuickBooks, track use tax manually by creating a separate liability account, tagging applicable purchases, and logging payments to state agencies—3 steps for compliance. Misunderstanding these taxes distorts financial data, affects budgeting, and can trigger penalties. Knowing when to apply sales tax vs. use tax keeps your records clean, your obligations clear, and your business legally protected.
Sales tax nexus is triggered by physical presence, economic activity, or remote sales—3 core factors that define your tax obligations. Once nexus is established in a state, you must collect, record, and remit sales tax for that jurisdiction. In QuickBooks, update your tax settings by adding new tax agencies, assigning location-based rates, and tagging transactions accordingly—3 setup actions that ensure accuracy. Ignoring nexus rules can lead to uncollected taxes, state penalties, and inaccurate liability reports. As your business expands, review nexus thresholds regularly and adjust QuickBooks to reflect new compliance needs—keeping your operations safe, scalable, and legally sound.
You should consult a tax professional when facing multi-state filings, audit notices, or rapid growth—3 scenarios where DIY can lead to costly mistakes. Experts help interpret complex nexus laws, correct reporting errors, and represent you during audits—3 high-value services. In QuickBooks, professionals can customize tax setups, ensure accurate classifications, and guide integration with external tools. Relying only on software limits your defense in legal or high-risk tax matters. When the stakes are high—like penalties, missing documentation, or incorrect filings—expert advice protects your business, validates your records, and reduces compliance anxiety. Timely help prevents long-term damage and financial exposure.
Incorrect sales tax entries distort 3 critical reports—Profit & Loss, Balance Sheet, and Sales Tax Liability. Overstated liabilities inflate expenses, while missed entries create false profit margins and cash flow mismatches. In QuickBooks, one wrong tax code or payment date can ripple into inaccurate filing totals, failed reconciliations, and misleading financial insights. Auditors and tax agencies rely on these reports, so errors can lead to penalties, re-filings, and trust loss. Review all sales tax entries monthly, reconcile with bank data, and run audit trails—3 actions that maintain report integrity. Clean data ensures strategic decisions, audit-readiness, and financial clarity.
Integrating services like Avalara, TaxJar, or Sovos with QuickBooks automates 3 key tasks—rate calculations, jurisdiction assignments, and return filings. These tools sync with sales data, apply the correct tax based on location and product, and push real-time updates to QuickBooks. Manual entry risks include misapplied rates, outdated rules, and delayed filings—3 errors automation eliminates. Setup involves connecting your QuickBooks account, mapping tax codes, and enabling auto-sync. For high-volume sellers or multi-state operations, third-party tools reduce errors, save time, and ensure legal compliance. Integration brings efficiency, scalability, and peace of mind to your sales tax workflow.
Thus, if you have been using QuickBooks for a long time and paid sales tax using a manual method then it’s time to record sales tax payment using the Sales Tax Center for new transactions that charge the new rates you set up. Recording sales tax payment in QuickBooks will help you to track your revenue and cash flow and update your sales and payment records.
The most critical preventative step is running the Sales Tax Liability Report for the exact filing period before the due date. This report provides the official, total amount owed, broken down by jurisdiction. Comparing this report to the amount you are about to pay ensures you do not underpay or overpay the tax agency and guarantees that your QuickBooks records match your tax filing documentation.
If you make the payment outside of QuickBooks, you must manually record the tax payment through the Sales Tax Center (QBO) or the “Pay Sales Tax” function (QBD). When recording it, ensure you select the correct payment date and the bank account from which the funds were electronically debited. This ensures your bank account reconciliation is accurate and zeroes out the related sales tax liability.
This mismatch often indicates one of two issues: either uncategorized transactions (sales or credits) or a wrong tax rate setup was applied to past sales. You must investigate the Sales Tax Liability Report’s detail view to find the specific transactions that caused the discrepancy. Never simply adjust the payment amount without first fixing the underlying error in the sales transaction to maintain audit-proof records.
While you can write a check, it is strongly advised against using the standard Write Checks window. The dedicated “Pay Sales Tax” feature automatically links the payment to the Sales Tax Payable liability account and correctly records the payment against the specific filing period. Writing a manual check risks misposting the payment to an expense account or failing to reduce your liability balance correctly, leading to major reconciliation errors.
If you paid the wrong amount of sales tax, you can either adjust the payment amount in QuickBooks by editing the payment or issue a refund from the tax agency and record the correction in QuickBooks.
Yes, QuickBooks can generate detailed sales tax reports, such as the “Sales Tax Liability Report” or “Sales Tax Summary Report,” which can help you prepare and file your sales tax returns accurately.
QuickBooks automatically tracks sales tax liabilities. You can generate a “Sales Tax Liability Report” in both QuickBooks Desktop and Online to view any outstanding sales tax payments and their due dates.
If your sales tax return reflects discrepancies even after entering all payments correctly in QuickBooks, begin by running a Sales Tax Liability Report for the affected period and compare it against your actual filed return—discrepancies often arise from missing non-taxable sales, unfiled adjustments, or incorrect filing dates. Ensure that all invoices, credit memos, and payments are correctly dated and categorized before the end of the tax period—errors here can result in up to 12–18% reporting inaccuracies. Check for overlooked adjustments, such as discounts or rounding corrections, which are not automatically accounted for unless manually entered. Lastly, confirm that your tax filing status is updated to “filed” in QuickBooks, as unmarked returns may cause recurring discrepancies in future filings.
To ensure accuracy during manual sales tax adjustments in QuickBooks, always document the adjustment reason, link it to the correct non-taxable income or expense account, and avoid using the Sales Tax Payable account, which can distort liability calculations. Use detailed descriptions in the journal entry memo field, as QuickBooks does not prompt warnings for incorrect account mapping—around 22% of adjustment errors stem from wrong account selections. Maintain a consistent naming convention for adjustments (e.g., “Q3_Discount_Adjustment”) to simplify audit tracking. Also, always reconcile adjustments with your sales tax liability report to confirm the post-adjustment figures align with your agency’s expectations.
If your Sales Tax Liability Report still shows overdue payments post-filing, it’s often because the “Mark as Filed” step wasn’t completed in the Sales Tax Center, which prevents QuickBooks from updating the liability status. Another common reason is misalignment between the filing period dates and the actual transaction dates—over 30% of late-payment flags in QuickBooks stem from mismatched reporting periods. Check if any invoices or receipts were backdated into a closed tax period after filing, as QuickBooks includes them retroactively. Lastly, ensure that your payment was recorded using the correct bank account, tax agency, and amount, as any deviation will prevent QuickBooks from matching it with the outstanding liability.
Reconciling sales tax payments monthly in QuickBooks is highly recommended, even if your tax agency requires quarterly filing, as it helps catch errors early—studies show that businesses reconciling monthly reduce audit risks by up to 45%. Monthly reconciliation allows you to detect missing invoices, duplicate entries, or incorrect tax mapping before they accumulate across periods. Additionally, regular review supports better cash flow forecasting by aligning liabilities with actual bank transactions. If you only reconcile quarterly, discrepancies may go unnoticed, causing large cumulative adjustments and increased chances of penalties from state or local tax authorities.
To verify you’re using correct tax rates across jurisdictions in QuickBooks, review your Sales Tax Center settings and ensure each state, county, and city tax rate is updated based on the latest government rates—over 60% of tax errors are caused by outdated or incorrectly mapped jurisdictions. Use the Sales Tax Liability Report to spot anomalies in region-wise collections, like zero tax for taxable zones or excessive charges for non-taxable areas. For businesses operating in multiple states, activating automated sales tax in QuickBooks Online ensures accurate rate syncing tied to your customer’s shipping address. Cross-reference QuickBooks data with official state department websites quarterly to maintain compliance.
Yes, you can record partial sales tax payments for different agencies in QuickBooks by selecting the specific tax agency in the Sales Tax Center and entering the exact amount paid—this is essential when managing staggered payments across jurisdictions with varying due dates or cash flow limitations. Ensure that each partial payment is recorded with accurate payment date, agency name, and associated period, as errors here can lead to reporting mismatches up to 28%. Use the “Record Tax Payment” feature separately for each agency to avoid consolidation, which might confuse liability tracking. Regularly updating payment statuses helps maintain clarity in your Sales Tax Liability Report and prevents overstatement of dues.
If you forget to mark a return as filed in the Sales Tax Center, QuickBooks will continue to treat that tax period as open, causing duplicate liabilities, overdue payment notices, and reporting inaccuracies of up to 35% in your Sales Tax Liability Reports. This also prevents the system from properly reconciling recorded payments, leading to confusion in future tax cycles. Additionally, transactions from previous periods may automatically roll forward into the next filing cycle, inflating next quarter’s payable amounts. To fix this, locate the return and manually select “Mark as Filed” to update your filing records and ensure clean reporting.
Choosing between cash and accrual basis in QuickBooks directly impacts how and when your sales tax liabilities are reported—under cash basis, tax is calculated only when payment is received, while accrual basis records tax at the time of invoice generation. This distinction can alter your taxable amounts by as much as 15–30% depending on sales volume and payment cycles. Businesses with delayed payments often prefer cash basis to avoid prepaying taxes on uncollected revenue. Always align your QuickBooks accounting method with what your tax agency requires, as reporting under the wrong basis may lead to compliance issues and audit penalties.
Deleting a recorded sales tax payment in QuickBooks reopens the tax liability for that period, causing the Sales Tax Center to show it as unpaid, which can inflate your outstanding liabilities by 100% for that cycle. It also disrupts your bank reconciliation, making prior statements inaccurate and possibly triggering mismatches in audits or financial reviews. If the payment was marked as part of a filed return, deleting it without adjusting your records can cause future filings to include duplicate liabilities. Always use the delete function cautiously and cross-check with your Sales Tax Liability Report before and after removal to confirm data consistency.
To review historical tax adjustments in QuickBooks, run a Sales Tax Liability Report for the desired period, and cross-reference it with your Journal Entry history, where all manual adjustments are logged—this is critical since over 40% of audit discrepancies stem from undocumented or improperly categorized adjustments. Use clear descriptions and consistent tags (e.g., “Adjustment_Q1_Discount”) in each entry to simplify tracing. For a more detailed audit trail, filter your Audit Log (QuickBooks Online) or Transaction Detail Report (Desktop) by adjustment type, date, and user. Keeping this documentation organized not only eases audits but also improves internal transparency for multi-period reviews.
While QuickBooks doesn’t offer built-in automation for recurring sales tax payments, you can streamline the process by setting up calendar reminders, leveraging third-party integrations like Avalara or TaxJar, or using recurring journal entries in QuickBooks Desktop—businesses using these methods have reported a 30–50% reduction in late payments. Although the Sales Tax Center tracks liabilities, it doesn’t auto-pay, so linking your tax due dates to your bank calendar or a workflow app ensures consistency. For complex setups, automating parts of the process with synced platforms can ensure timely tax agency filings while reducing manual entry errors across jurisdictions.
Incorrect sales tax setup—such as applying the wrong tax rates, jurisdictions, or item mappings—can distort gross revenue figures by up to 20%, leading to inaccurate profit margins, budgeting, and forecasting. If sales tax is mistakenly counted as income or excluded from liabilities, your reports will show inflated cash flow, which can mislead decision-makers during financial planning. Moreover, these errors often accumulate across periods, affecting trend analysis, seasonal planning, and cash reserve estimations. To prevent long-term forecasting issues, businesses should perform monthly reconciliations and verify tax setups whenever products or services change.
Key red flags of incorrect sales tax mapping in QuickBooks include unexpected zero tax amounts on taxable items, inconsistent tax across similar transactions, and reports showing disproportionately high or low tax collected per jurisdiction—these issues account for over 35% of tax audit triggers in small businesses. Another warning sign is a mismatch between the Sales Tax Liability Report and amounts shown in invoices or receipts, often caused by items not linked to the correct tax category. Frequent manual overrides during invoice creation also suggest misconfigured settings. Regularly auditing your product/service tax codes and customer tax profiles can help catch these errors early.
To handle late payment penalties and interest in QuickBooks, create a sales tax adjustment rather than modifying the original liability—this method ensures that your Sales Tax Liability Report remains intact, while accurately reflecting the additional costs. Use an appropriate expense account like “Tax Penalties” to categorize these charges, as misclassifying them could skew net income reporting by up to 8–12%. Clearly document the reason and period of the penalty in the memo field for audit purposes. If penalties recur frequently, set reminders and review your payment schedule discipline, since chronic delays can escalate compliance risks and attract audits.

