While recording a credit card payment in QuickBooks, you get access to align all your financial records and automate all the recording processes for accurate financial reports.
Recording credit card payments in QuickBooks is essential to ensuring proper cash flow management. By knowing the procedures involved, you can keep track of spending, reconcile accounts, and maintain current financial records.
Why should you enter credit card payments in QuickBooks?
Using QuickBooks to enter credit card payments has various advantages. It streamlines the process of reconciliation first. You can quickly keep your QuickBooks records and credit card bills in sync by learning how to enter credit card payments in QuickBooks. This guarantees that you keep track of and account for every transaction, which is essential to keeping correct records and promptly identifying inconsistencies. Billing problems are simpler to identify when credit card transactions are entered into QuickBooks.
The main reason is that QuickBooks minimizes the need for human data entry, which is especially advantageous in cases where you process a lot of credit card transactions. Finally, QuickBooks can be integrated with other programs, to improve its functionality. Because you can easily manage financial transactions across many platforms, this makes it easier to run your business and collect payments.
How do you record the credit card payment in QuickBooks Online?
Learn how to set up a credit card account and record payments in QuickBooks Online. Follow a step-by-step guide to create the account, categorize payments, and apply them to bills accurately. Ensure your credit card transactions are seamlessly integrated into your financial records.
Setting Up a Credit Card Account in QuickBooks Online
Creating a credit card account in QuickBooks Online allows you to include credit card purchases in your accounting records easily.
To activate your credit card account, take the following actions:
Step 1: Log in to your QuickBooks Online account, select “Accounting,” and then choose “Chart of Accounts.”
Step 2: Select “New” from the menu.
Step 3: Click the “Account Type” drop-down option and choose “Credit Card.”
Step 4: Give this credit card account a name you can remember.
Step 5: As of the day you begin tracking it in QuickBooks, the opening balance you enter should correspond to the current outstanding balance shown on your credit card statement.
Step 6: After completing the required fields, click “Save and Close” to complete the account setup.
A step-by-step guide to recording credit card payments in QuickBooks
Follow these steps to record credit card payments in QuickBooks: access the credit card register, enter payment details, categorize expenses, apply payments to bills, and save the transaction.
Following the step-by-step information below:
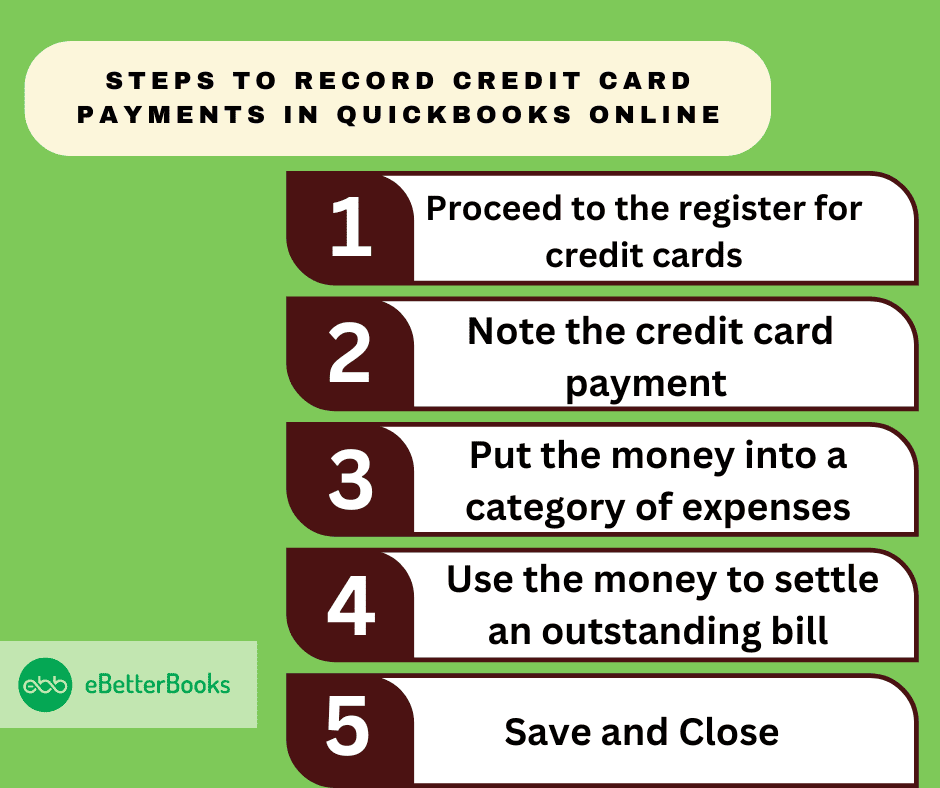
Step 1: Proceed to the register for credit cards
- Open your QuickBooks Online account and log in.
- On the left sidebar, choose the “Accounting” option and choose “Chart of Accounts.”
- Once you locate the credit card account for which you wish to record a payment, scroll through the list of accounts.
- To access the credit card register, click “View register” next to the credit card account.
Step 2: Note the credit card payment
- Click the “Add transaction” button located inside the credit card register.
- You’ll see a new row where the payment information is entered. First, fill in the “Date” section with the payment date.
- Choose the Vendor or payee to whom the payment was made in the “Payee” column.
- Enter the amount that was paid in the “Payment” section.
Step 3: Put the money into a category of expenses
- There is a column labeled “Category” in the register.
- Choose the category of expenses that best matches the payment.
Step 4: Use the money to settle an outstanding bill
- If there is a bill in QuickBooks related to this credit card payment, you can find it by selecting the “Expenses” tab.
- To view the bill, click on it. Next, select “Make payment” by clicking on it. In the payment window, make sure the right credit card account is chosen and the payment amount matches the bill.
- To apply the credit card payment to the bill, click “Save.”
Step 5: Save and Close
- Go over every detail one last time to make sure everything is accurate before saving.
- To save the transaction, click the “Save” button located at the end of the credit card register.
- Click “X” or “Close” to close the credit card register after saving.
Record payments you make to your credit cards
To record credit card payments in QuickBooks: go to “+ New,” select “Pay down credit card,” enter payment details, choose the bank account, add notes or attachments, and save.
Step 1: Choose + New.
Step 2: Choose Pay down credit card under Money Out (if you’re in Business view) or Other (if you’re in Accountant view).
Step 3: Choose the credit card that has the payment on it.
Step 4: Put the amount of the payment in.
Step 5: Put the payment date.
Step 6: Choose the bank account that you used to pay for the credit card.
Step 7: Choose “I made a payment with a check” using a check if that is how you made the payment.
Step 8: Enter the check number (or, if you paid online, the EFT number) in the “Check no.” area.
Step 9: Choose Memo and Attachments and follow the on-screen directions to add notes or file attachments.
Step 10: Choose Save and close the transaction.
Different methods to record credit card payments
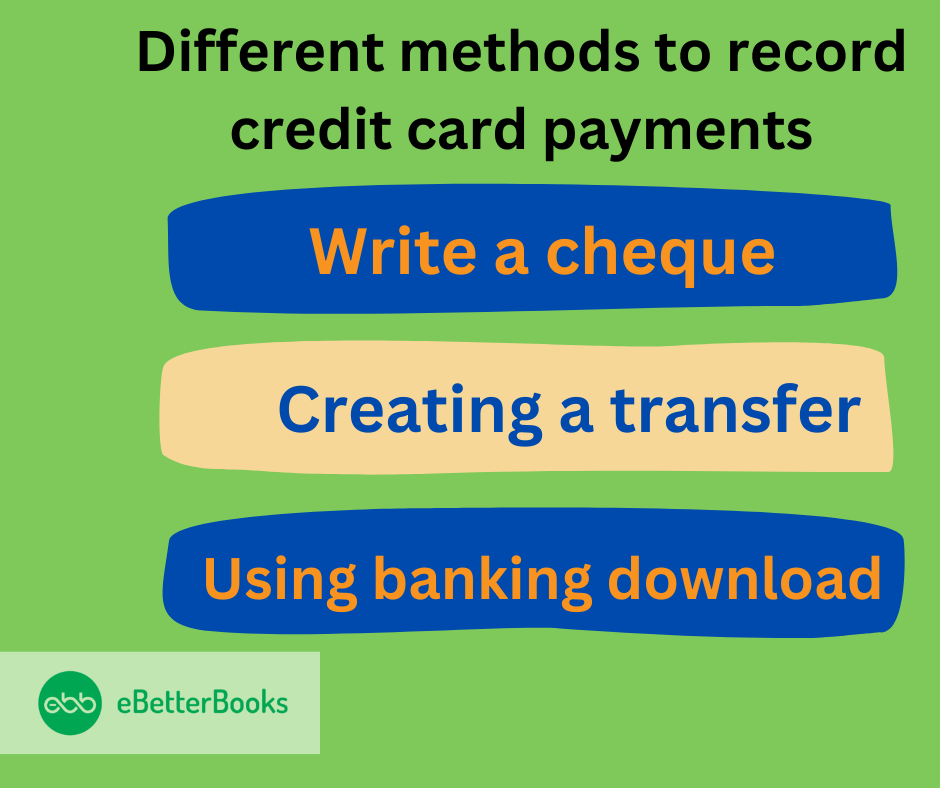
Explore various methods to record credit card payments in QuickBooks Online. Whether writing a check, creating a transfer, using banking downloads, reconciling your credit card, or recording personal expenses on a business credit card, follow these detailed steps to ensure accurate financial tracking.
Write a cheque
Follow the below-mentioned steps to record a credit card payment if you are making the payment using a check:
Step 1: Select + New on the screen.
Step 2: Under the Vendors option, select Check.
Step 3: Select the Vendor’s name for the credit card payment under the Payee Field.
Step 4: Select the account from which the payment will be made under the Bank Account Field.
Step 5: Put the mailing address and select the payment date.
Step 6: Enter the cheque number or EFT number, along with all the necessary details.
Step 7: Uncheck the Print Later option on the screen if the check was already issued.
Step 8: Put the Category details and the payment amount.
Step 9: Enter the notes under the Memo option.
Step 10: Click on Save and then close.
Creating a Transfer
Step 1: Select the + New option on the screen.
Step 2: Under the Other option, choose Transfer.
Step 3: Choose the bank account and credit card for the Transfer.
Step 4: Enter the transfer amount and date.
Step 5: Click on Save and then close.
Using Banking Download
If your bank account and credit card are connected, you can easily record the payment by transferring the record.
You need to follow the below-mentioned steps:
Step 1: Click on the Bookkeeping, then select the Transactions, and then click on Expenses.
Step 2: Select the account and then transfer the payment.
Step 3: Now, match the transaction with the new account.
Step 4: After choosing the transaction, choose the radio button labeled “Record as transfer.”
Step 5: To send the transaction to a specific account, select it from the Transfer Account dropdown menu.
Step 6: Click Confirm.
Make a payment after reconciling your credit card
After reconciling your credit card in QuickBooks, correct transactions, mark them as cleared, and finish reconciling. Then, choose a method to pay your credit card balance.
Following the step-by-step information below:
Step 1: Sort through the transactions on your credit card
- Navigate to Settings and choose Reconcile.
- Choose Get Started, and let’s get started if this is your first time.
- Choose the credit card number.
- Correct any inaccurate transactions, if any, and enter any missing transactions from the statement.
- Select “Start reconciling” after the difference has reached zero.
- To mark a transaction as cleared, check the box next to each one that matches the transactions on your statement in the Reconcile screen.
- After choosing Finish now, choose Done.
Step 2: Make payment for any credit card purchases
Now it’s time to decide on a method for paying your bills:
- Make a quick payment of the whole amount due: Make a complete payment or a portion of it.
- Add an item for later payment: Transfer the credit card amount to Accounts Payable so that it can be settled later.
- Completed: If you choose not to reconcile bills or credit card balance payments.
Record a personal expense on a business credit card
To record a personal expense on a business credit card in QuickBooks, select “+ New,” record the expense, and categorize it. Then, reimburse the company through a bank deposit.
Following the step-by-step information below:
Step 1: From a company account, record a personal cost
- Choose + New.
- Pick either Expense or Check.
- From the drop-down menu, pick a Payee.
- Choose the credit card, bank account, or cash account that you used to make the purchase.
- To choose the appropriate tax category, use the drop-down menu located in the Category Information section.
- Put the purchase amount in here.
- Choose between Save and New and Save and Close.
Step 2: Reimburse the Company
- Choose + New.
- Choose Bank Deposit.
- Choose the Date and the Account to which the refund should be added.
- Proceed to the “Add money to this deposit” area. Enter the individual who incurred the personal expense in the Received From column, then choose the account.
- Enter the reimbursement amount and select the payment method.
- Choose between Save and New and Save and Close.
Reviewing Credit Card Transactions
Step 1: Open QuickBooks Online, go to the left sidebar, and click on the” Accounting tab.”
Step 2: Select the “Chart of Accounts”.
Step 3: Search for the credit card account you wish to review by scrolling down the list.
Step 4: You will get all the transactions related to that credit card. Now, you can sort the transactions by payee, amount, or date.
Step 5: You can edit the transactions if you find any errors.
How to record the credit card payment in QuickBooks Desktop?
Learn how to manage credit card transactions in QuickBooks Desktop. This guide covers entering charges, reconciling accounts, recording payments, handling overpayments, and managing payments from personal accounts. Follow the step-by-step instructions to ensure accurate and efficient financial tracking.
How to enter credit card charges in QuickBooks Desktop?
Step 1: To enter credit card charges, navigate to the “Banking” menu and click “Enter.”
Step 2: From the credit card drop-down menu, select the appropriate card account. The type is set to “Purchase/charge” by default. Choose “Refund/credit” to record a credit or refund.
Step 3: Choose the appropriate Vendor by looking through the “Purchased From” drop-down menu.
Step 4: Decide on the transaction date.
Step 5: You can optionally include a memo explaining the charge or credit card refund.
Step 6: Enter the information about the expenses or things you want to track under the “Expenses or Items” tab.
Step 7: Choose “Save & Close” to document the transaction once you’ve finished working with the Expenses page.
How do you reconcile your credit card account?
Step 1: Make sure your opening balance is correct.
Step 2: Make sure all of the transactions for the statement period have been entered.
Step 3: Using the “Banking” menu bar, choose “Reconcile.”
Step 4: Compare the transactions in QuickBooks with those on your bank statement, marking each one as you go.
Step 5: You’re done when the difference between the data in QuickBooks and your statement is $0.00.
How to record credit card payments in QuickBooks Desktop?
Step 1: Go to the “Banking” menu and choose “Write checks.”
Step 2: Select the bank account you want to use to pay for the credit card from the dropdown menu.
Step 3: Choose the payment date for the bank account.
Step 4: From the “Pay to the order of” menu, select the credit card provider.
Step 5: Put the amount of the payment in.
Step 6: Click on the “Expenses” tab and choose your credit card.
Step 7: Close and save the transaction.
How to record a credit card payment from an overpayment?
You have two options for modifying the reconciliation process in the event of a credit card overpayment.
- To roll over the ending balance to the following month, enter it as a negative sum during reconciliation.
- Divide the financial transaction by designating several recipients and amounts as required.
To record a credit card payment from an overpayment, kindly follow the below-mentioned steps:
Step 1: In your QuickBooks Desktop ledger, locate the transaction that represents the overpayment.
Step 2: Decide whether to “Split” the deal.
Step 3: Assign any necessary portions of the overpayment money to various payees or expenditure categories in the split transaction window. You can designate the overpayment, for instance, if it is to be used toward future costs.
Step 4: To appropriately indicate how the overpayment should be distributed, provide the right amounts to each division.
Deposit Payments into the Undeposited Funds Account
By default, all the payments are deposited in the Undeposited Funds account. You can modify the default account so that the payments don’t go automatically to the Undeposited Funds Account.
How to do it is as follows:
Step 1: Click on the Edit menu, then choose Preferences.
Step 2: Pick Payments from the drop-down menu. Next, select the tab for Company Preferences.
Step 3: The Use Undeposited Funds as a Default Deposit to Account checkbox should be selected and unchecked.
Step 4: Click “OK.”
Directly from the Sales Receipt screen, you may also modify the account. How to do it is as follows:
Step 1: Choose Create Sales Receipt from the Homepage.
Step 2: From the Customer drop-down menu, select the customer.
Step 3: Select Undeposited Funds from the Deposit drop-down menu.
Step 4: Completion of the form is required.
Step 5: Either choose Save & New or Save & Close.
Remember to always check the “Deposit to” column to see where your money is being sent.
Record a payment made from a personal account
Step 1: Select the Chart of Accounts option after clicking the Gear icon.
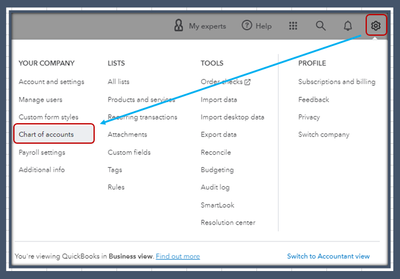
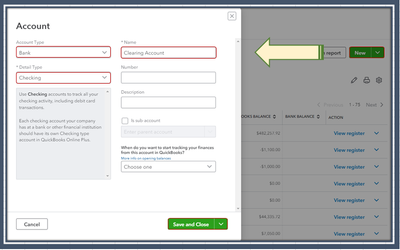
Step 2: Click the New tab on the Chart of Accounts screen.
Step 3: Select “Bank” under “Account Type.” You can select any detail for your clearing account.
Step 4: Enter the clearing account’s name.
Step 5: Make sure there is no balance before selecting Save and Close.
Step 6: After that, enter the credit card payment into the newly established account.
Step 7: After selecting Add New, select Pay down a credit card.
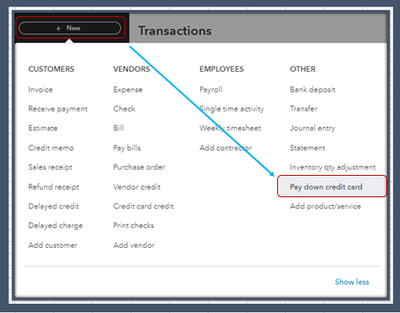
Step 8: Pick the credit card with which you made the purchase.
Step 9: Put the amount in.
Step 10: Include the payment date.
Step 11: Select the clearing account that you used to pay for the credit card.
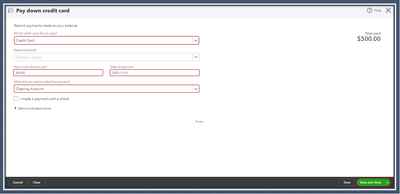
Step 12: Click Save and Close when finished.
Step 13: Next, record a deposit into this fictitious bank account:
Step 14: Select “Bank deposit” from the + New menu.
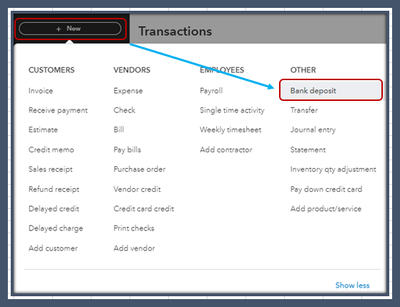
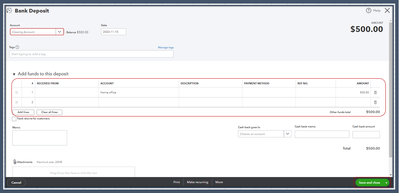
Step 15: Click Account and choose Clearing.
Step 16: Add the purchase and its amount in the Add funds to this deposit area.
Step 17: After finishing, close and save.
Mastering Credit Card Payments in QuickBooks
Recording credit card payments in QuickBooks isn’t just about marking a transaction—it’s about ensuring accuracy, control, and clarity in every financial move. This section dives into overlooked yet critical aspects of handling credit card entries. From fixing common errors to understanding their impact on reports, these insights help you avoid costly mistakes, strengthen your record-keeping, and optimize your financial workflow. Each subtopic below adds a focused layer of control, making your QuickBooks processes sharper, faster, and more reliable.
Common Mistakes to Avoid While Recording Credit Card Payments in QuickBooks
Here is a concise, direct, and informative paragraph of around 100 words, with short sentences and clearly numbered points:
- Entering payments in the wrong account leads to mismatched balances, inaccurate financial reports, and failed reconciliations.
- Skipping memo fields or missing attachment uploads causes confusion during audits, delays in verification, and poor documentation.
- Recording both bank and credit transactions manually creates duplicates, inflates expenses, and skews profit margins.
- Using incorrect payment dates results in cash flow mismatches, misleading reports, and broken transaction sequences.
- Forgetting to match downloaded transactions leads to unlinked records, unreconciled accounts, and manual clean-up.
How to Handle Partial Credit Card Payments in QuickBooks
Handling Partial Credit Card Payments in QuickBooks requires precise entries to maintain accurate financial tracking.
To ensure smooth bookkeeping, follow these best practices:
- Select “Pay down credit card” and enter only the partial amount—this keeps payment records accurate, reflects true cash flow, and avoids full balance assumptions.
- Use correct payment dates to reflect real-time activity, prevent reporting lags, and maintain daily cash balance accuracy.
- Tag the memo field as “partial payment” for clarity, transaction tracking, and audit readiness.
- Always reconcile the remaining balance to catch missed entries, avoid discrepancies, and prepare for future payments.
- Repeat the process for every installment to track progress, monitor liabilities, and maintain full control of your credit obligations.
Steps to Edit or Delete Incorrectly Recorded Credit Card Payments
Incorrectly recorded credit card payments in QuickBooks can lead to reporting errors, reconciliation issues, and audit discrepancies.
To correct such entries effectively, follow these step-by-step actions:
- Go to “Chart of Accounts” > Select the credit card account—this helps locate the error quickly, ensures you’re in the right ledger, and keeps workflow smooth.
- Click the transaction and choose “Edit” to update payment amount, date, or account—this maintains data accuracy, aligns reports, and avoids confusion.
- To delete, select “More” > “Delete”—this removes the error entirely, prevents double entry, and cleans up the ledger.
- Re-enter the correct transaction immediately to maintain continuity, prevent missing entries, and ensure audit trails.
- Reconcile the updated entry to validate totals, eliminate mismatch, and confirm a balanced statement.
Difference Between Credit Card Charges and Payments in QuickBooks
In QuickBooks, users often confuse credit card charges with credit card payments, which can lead to incorrect reporting and mismanaged accounts.
Here’s how they differ and why it’s crucial to treat them separately:
- Credit card charges record what you owe—this increases liabilities, reflects spending, and updates vendor balances.
- Payments reduce the liability—they lower outstanding balances, affect cash flow, and clear pending dues.
- Charges appear under expenses or items—they track purchase types, show category-level spending, and impact profit margins.
- Payments are recorded from bank accounts—this reflects real cash movement, impacts bank reconciliation, and confirms settlements.
- Confusing the two creates financial errors—it leads to overstated debt, wrong cash flow insights, and flawed reports.
Impact of Credit Card Payments on Financial Reports in QuickBooks
Credit card payments in QuickBooks directly affect how your financial reports reflect liabilities, cash flow, and business expenses. To maintain accurate records and support better decision-making, consider the following reporting impacts:
- Payments reduce liability balances—this reflects accurate debt position, improves balance sheet clarity, and supports lender trust.
- Cash outflows appear in expense reports—they reveal payment trends, affect budgeting decisions, and highlight liquidity usage.
- Timely payments improve reconciliation—this ensures clean records, avoids statement mismatches, and supports faster month-end closing.
- Correct categorization affects P&L statements—this separates personal vs. business costs, maintains tax compliance, and supports financial planning.
- Inconsistent entries distort reports—they create reporting gaps, mislead stakeholders, and increase correction workload later.
Smart Add-ons: Enhance Your Credit Card Workflow in QuickBooks
Beyond recording payments, managing credit cards in QuickBooks demands smarter workflows, tighter controls, and expanded features. This section brings you five practical enhancements to level up your process. From setting payment reminders to securing card data and tracking employee expenses, each topic is designed to increase efficiency, reduce risk, and give you more control. These actionable tips fill the gaps left by standard processes—so your QuickBooks setup isn’t just functional, but optimized for growth and accuracy.
How to Set Up Credit Card Payment Reminders in QuickBooks
Setting up credit card payment reminders in QuickBooks ensures timely payments, avoids late fees, and streamlines your financial workflow.
To configure these reminders properly, follow these steps:
- Go to “Gear Icon” > “Recurring Transactions”—this helps automate reminders, reduce missed payments, and improve consistency.
- Create a new recurring expense or bill—it sets fixed schedules, tracks due dates, and organizes vendor payments.
- Set the interval as monthly/weekly based on billing cycle—this ensures timely alerts, avoids late fees, and supports cash flow planning.
- Add memo notes like “Reminder Only” if you prefer manual review—this gives you control, avoids auto-processing, and enhances clarity.
- Review reminders regularly under Recurring Transactions to manage due dates, update amounts, and cancel outdated entries.
Understanding Credit Card Reconciliation Reports in QuickBooks
Credit Card Reconciliation Reports in QuickBooks help verify financial accuracy by matching records. To effectively use these reports, follow these steps:
- Reconciliation reports match statements with QuickBooks—they confirm transaction accuracy, highlight discrepancies, and ensure ledger integrity.
- Go to “Accounting” > “Reconcile” > “History by account”—this gives access to past reports, tracks reconciliation status, and flags unresolved issues.
- Each report lists cleared vs. uncleared transactions—this helps detect missing entries, duplicate charges, or wrong dates.
- Use filters to analyze specific periods or accounts—this improves review speed, narrows focus, and aids in audit preparation.
- Export reports to PDF or Excel for sharing, record-keeping, or external review—this strengthens compliance, transparency, and documentation.
Linking Credit Card Accounts with Online Banking in QuickBooks
Linking Credit Card Accounts with Online Banking in QuickBooks involves a series of structured steps that ensure smooth integration, real-time data syncing, and accurate financial tracking.
To link your credit card account properly, follow these essential steps:
- Go to “Banking” > “Link account”—this connects your credit card directly, automates imports, and saves manual entry time.
- Search and select your credit card provider—this ensures compatibility, secures syncing, and pulls correct data.
- Login with your bank credentials securely—this enables real-time data flow, transaction visibility, and account control.
- Set up the correct account type as ‘Credit Card’—this avoids misclassification, organizes statements, and supports proper reporting.
- Review downloaded transactions regularly—this helps maintain accuracy, spot unauthorized charges, and stay updated daily.
Security Best Practices for Managing Credit Card Data in QuickBooks
Protecting sensitive financial data in QuickBooks is critical for maintaining compliance and safeguarding customer trust. To enhance the security of credit card information, follow these recommended best practices:
- Enable two-factor authentication (2FA)—this adds account protection, reduces breach risk, and ensures only authorized access.
- Limit user permissions by role—this prevents unauthorized edits, controls data visibility, and protects sensitive transactions.
- Avoid storing full card numbers manually—this minimizes exposure, supports compliance, and reduces liability.
- Use encrypted connections and secure browsers—this defends against phishing, data leaks, and session hijacks.
- Regularly audit user activity and access logs—this identifies suspicious behavior, enforces accountability, and strengthens data monitoring.
How to Track Employee Expenses Made via Business Credit Cards
Tracking employee expenses efficiently helps prevent misuse and simplifies reconciliation. To ensure clear, accountable financial records, follow these best practices:
- Create a separate credit card account for each employee—this isolates spending, improves oversight, and simplifies reconciliation.
- Use classes or tags for each transaction—this links expenses to teams, enhances reporting, and ensures accountability.
- Assign proper categories during entry—this supports accurate financial statements, tracks spend types, and helps with tax prep.
- Review transactions weekly for errors or policy violations—this maintains control, prevents misuse, and enforces expense rules.
- Reconcile employee card statements individually—this ensures accuracy, catches inconsistencies, and strengthens audit readiness.
Conclusion!
Accurate financial record-keeping requires knowing how to enter credit card payments in QuickBooks Online. By using the techniques described, you can effectively monitor your credit card transactions and ensure that your financial records are current.
Still have questions? Explore our detailed FAQs.
Disclaimer: The information outlined above for “How Do You Record Credit Card Payments in QuickBooks Online/Desktop – Learn the Process” is applicable to all supported versions, including QuickBooks Desktop Pro, Premier, Accountant, and Enterprise. It is designed to work with operating systems such as Windows 7, 10, and 11, as well as macOS.
