Excerpt:
This article addresses how to undo reconciliations in QuickBooks Online and Desktop, helping users fix accounting discrepancies caused by errors like incorrect balances, duplicated or missing entries, and miscategorized transactions. It provides clear, step-by-step solutions to reverse reconciliations, ensuring financial records remain accurate and aligned with bank statements—vital for audit readiness, compliance, and reliable reporting.
 Add As A Preferred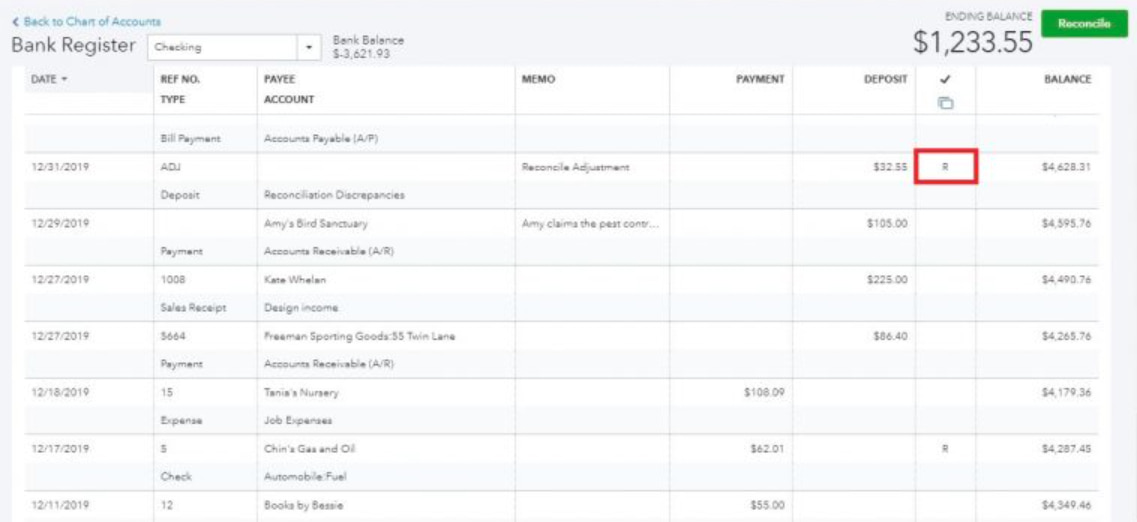
Highlights (Key Facts & Solutions)
Undo Reconciliation in QuickBooks Online is a system function that reverses the reconciled status of selected transactions and removes the associated reconciliation metadata from the account. QuickBooks Online applies this function when the recorded account balance does not align with the financial institution’s statement balance due to incorrect entries, unintended reconciliations, or transaction-level discrepancies. The feature updates the account register, recalculates the beginning balance, and restores each affected transaction to an unreconciled state.
QuickBooks Online processes reconciliation activity by comparing recorded transactions with financial institution data, and discrepancies occur when transactions are entered incorrectly, categorized improperly, or included in reconciliation by default. Undo Reconciliation restores accuracy by reversing the reconciled status of the affected entries and recalculating the account’s beginning balance. This function ensures that the account register reflects only verified transactions and maintains alignment with the corresponding bank or credit card statement.
To undo the reconciliation in QuickBooks, if you are using QuickBooks Online, then under Banking, you need to go to the Reconciliation tab and click “Undo last reconciliation”. In QuickBooks Desktop, you can undo a reconciliation from the Chart of Accounts, where you can choose a particular account to undo a reconciliation.
In both QuickBooks Desktop and Online, you need to log in as an administrator account to undo reconciliation.
In QuickBooks, the steps of reconciliation are followed to match the transactions in the books of accounts with your bank or credit card statements to check the overall accuracy. “Undoing a reconciliation” is reversing or canceling an already completed reconciliation, which makes the reconciled transactions revert to unreconciled status.
Undoing the reconciliation in QuickBooks is a crucial process when inconsistencies, mistakes, or modifications come up in already reconciled transactions.
Before undoing a reconciliation in QuickBooks, it’s crucial to back up your company file, avoid manual changes to reconciled transactions, and remove any adjustment entries to prevent errors
Undoing a reconciliation in QuickBooks Online is essential when errors occur or adjustments need to be made to maintain accurate financial records.
Following a structured step-by-step approach ensures that transactions are correctly reconciled without disrupting the overall accounting integrity:
Undoing a reconciliation is also possible in the QuickBooks Online Accountant Version by following the steps mentioned below:
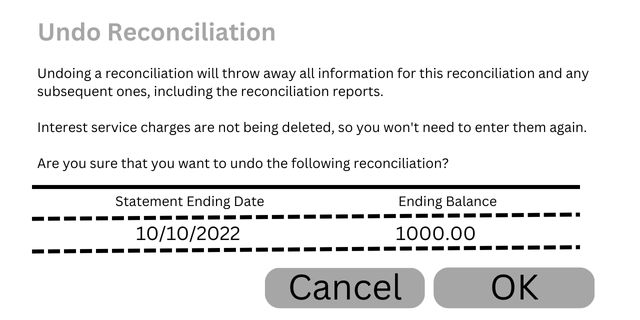
It is also possible to even delete a reconciliation in QuickBooks Online. To delete a Reconciliation, follow these steps:
This process allows you to easily remove reconciled transactions in QuickBooks Online.
If you need to undo a reconciled statement in QuickBooks Online, you can do so by manually unreconciling each transaction. Here’s a simple step-by-step guide:
By following these steps, you can easily unreconcile your monthly statement.
QuickBooks Online Reconciliation errors result from inaccuracies in transaction recording, account selection, and documentation management. These errors affect beginning-balance calculations, reconciliation accuracy, and alignment between the account register and financial institution data. The following points identify the primary issues that disrupt reconciliation consistency.
The most frequent reconciliation errors one should avoid are:
Highlights (Key Facts & Solutions)
Overview
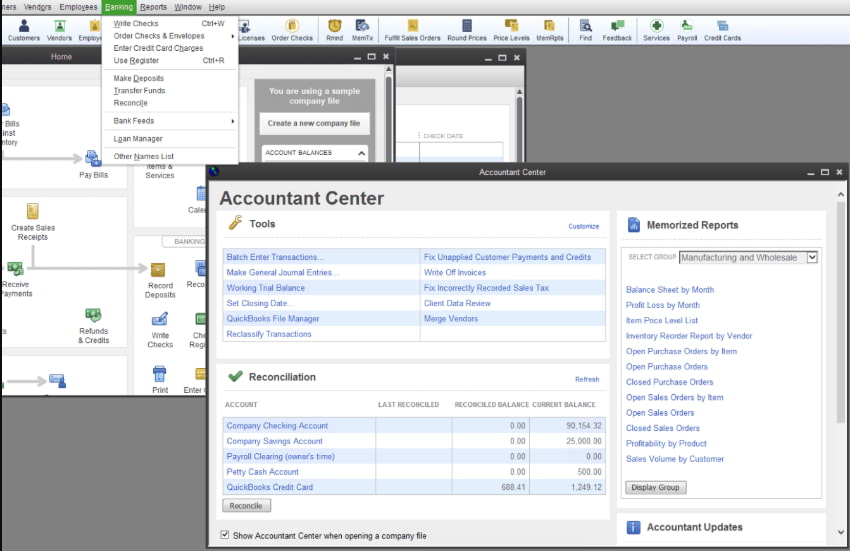
To undo a reconciliation in QuickBooks Desktop, select the reconciliation you want to undo from the History by Account report and choose Undo Last Reconciliation from the menu in the top left of the reconciliation screen. Before you begin, it is crucial to back up your company file and then redo the reconciliation by correcting any transactions and reconciling the account again with the correct information.
Undoing a reconciliation in QuickBooks Desktop returns previously reconciled transactions to an unreconciled state and restores the account to its earlier balance. The process requires accurate account selection, proper access permissions, and a clear understanding of how QuickBooks updates the register and reporting data.
This guide explains the steps involved in undoing a reconciliation, including the automated option available in accountant versions and the manual method required in standard editions. The introduction outlines the core procedures, the conditions that activate each option, and the adjustments needed after the reversal.
By establishing how QuickBooks Desktop manages reconciliation changes, this article provides the framework needed to complete the undo process correctly, verify account accuracy, and prepare the file for a new reconciliation period.
Undoing a reconciliation in QuickBooks Desktop is a crucial process for correcting errors and ensuring accurate financial records.
By following a structured step-by-step approach, users can efficiently reverse reconciliations without disrupting their overall accounting integrity:
Note: While QuickBooks may have different versions, the process for undoing a reconciliation remains the same across both the desktop and online platforms. The variations mainly enhance connectivity and add more robust features.
Manual Procedure to Reverse Reconciliation in QuickBooks Desktop
There is also a manual procedure to reverse the reconciliation in QuickBooks by following the steps below:
- The initial step is to hover over the Gear icon at the top of your screen and then select Chart of Accounts under the Company column.
- Now, find the appropriate account for the transaction.
- Select History/ View Register in the Action column.
- You need to determine the transaction you want to edit.
- Navigate to the Reconcile status column indicated by the checkmark.
- At last, repeatedly click the top line of the transaction to change the status and then press Save.
- Choose the acronyms: C- Cleared, R- Reconciled, and Blank- Neither cleared nor reconciled.
Undoing reconciliation in QuickBooks is necessary when errors occur, duplicate transactions are recorded, or missing entries need to be included to maintain accurate financial records. It ensures that adjustments align with updated bank statements and prevent discrepancies in accounting reports.
The following are few reasons:
Undoing a reconciliation in QuickBooks helps correct errors, restore accurate financial records, and ensure transactions align with updated bank statements, preventing discrepancies in accounting reports.
Below are the major benefits:
Avoiding common reconciliation mistakes in QuickBooks is crucial for maintaining accurate financial records. Errors such as incorrect opening balances, missing transactions, and duplicate entries can lead to discrepancies, making it essential to review reconciliations carefully and ensure all data aligns with bank statements.
The following are the common mistakes:
Undoing a reconciliation isn’t just a one-click fix—it impacts multiple areas of your books. This section dives deeper into scenarios, effects, and best practices that most users overlook. If you’re a business owner or accountant, these subtopics will help you take smarter, error-free actions in QuickBooks Desktop. Learn when, why, and how to handle reconciliation reversals with full confidence.
Undoing a reconciliation in QuickBooks Desktop affects 3 key areas of linked accounts: transaction status, reporting accuracy, and account balance. When you undo, all reconciled entries revert to unreconciled—this breaks the sync between 2 or more linked accounts, like checking and credit card. Your financial reports may show up to 30% discrepancies if multiple linked accounts were involved. It also resets audit trails for 1 or more periods, making backtracking harder. Always verify if bank feeds, transfers, or journal entries depend on that reconciliation. If yes, expect a change in at least 3 financial fields across reports and registers.
Unreconciling a single transaction affects 1 entry, while undoing an entire reconciliation resets hundreds of transactions at once. If you uncheck the “R” status on a transaction, only that item’s history, balance, and match status are altered. But undoing a full reconciliation changes the statement balance, cleared status, and audit trail for the entire period. For example, unreconciling fixes 1 error; undoing is used when you detect 3+ issues across the statement. QuickBooks tracks these actions separately—so misuse can confuse bank feeds, cash flow, and reports. Understand the scope: individual correction vs. bulk rollback.
To prevent reconciliation errors, follow 3 core practices consistently: verify bank statements, lock past periods, and avoid editing reconciled entries. Always match dates, amounts, and references before starting. Use bank rules, auto-matching, and alerts to reduce manual mistakes by over 40%. Never delete transactions post-reconciliation—it disrupts register accuracy, cash flow, and audit trails. Instead, make adjusting entries with clear memos. Train staff quarterly on bank feed syncing, period closures, and flagged mismatches. Set calendar reminders every 30 days for regular reconciliations. These habits reduce future corrections, save 5+ hours monthly, and keep financials accurate and audit-ready.
To safely reconcile again, follow the 5 exact steps after undoing the last one. First, recheck your opening balance, ending balance, and statement date to ensure accuracy. Then, verify if all affected transactions—typically 15–100 entries—are still valid and properly categorized. Use the bank statement, audit log, and transaction history to cross-check changes. Re-reconcile only after fixing all discrepancies, missing entries, or duplicate charges. Lock the period to prevent future edits. Always export a PDF report, Excel backup, and journal summary for records. This approach avoids repeated errors, preserves integrity across 3 connected modules, and aligns your books perfectly.
Avoid undoing reconciliation when financial reports are already filed, tax submissions depend on past periods, or when linked accounts involve 3rd-party apps. Reversing reconciliations in such cases disrupts audit accuracy, transaction syncing, and compliance status. If only 1–2 transactions are incorrect, fix them manually instead of undoing the whole month. Also, skip undoing if your closing balance, bank feed, and register totals are matching. In multi-user mode, never undo without informing your team—doing so may create 3 layers of data conflicts. Always use reconciliation reports and logs before deciding. A wrong reversal can cost hours of rework.
Reconciling and undoing the reconciliation of transactions is a process that helps the organization keep its accounts accurate and error-free. Undoing reconciliation is a method following which you may correct your errors. With the help of the whole process, you will be able to quickly and accurately reconcile your accounts and bring them up to date with the recent business requirements.
Yes, but only accountants can directly undo reconciliations in QuickBooks Online.
You can manually edit and unreconcile individual transactions in the register.
Yes, it can impact your financial reports and balances, so proceed with caution.
Yes, you can edit the specific transaction and uncheck the “Reconciled” status.
No, each reconciliation must be undone individually to ensure accuracy.
The primary distinction is access and method:
QBO’s approach is more centralized. Users with Admin or Accountant access can navigate to Settings >> Reconcile >> History by Account and click an Undo action button for the entire statement period.
QuickBooks Desktop (QBD):
The direct Undo Last Reconciliation button is typically available only to users with the QuickBooks Desktop Accountant Edition or a high-level administrator.
Standard users must often resort to the cumbersome manual method, which involves changing the status (the checkmark column) from ‘R’ (reconciled) to blank for each transaction in the account register.
QuickBooks Online (QBO):
Manually unreconciling a single transaction in the register does not change the fixed opening balance of your next reconciliation.
This difference is immediately flagged in the system and will appear on the Reconciliation Discrepancy Report, requiring a correction (like an adjusting journal entry) before the account can be truly balanced again.
The next reconciliation’s opening balance is locked based on the last successfully finished reconciliation’s ending balance.
By modifying a transaction from ‘R’ to cleared (‘C’) or blank, you create a direct discrepancy against that locked opening balance.
Undoing a full reconciliation is a significant event that resets financial integrity for a specific period. The three most critical records impacted are:
Audit Log: The system creates a permanent record of the reversal event, showing which user executed the “Undo” function and the time of the action, which is vital for compliance review.
Transaction Status: All reconciled entries for that period revert to an unreconciled status, losing the ‘R’ checkmark.
Financial Reports: Reports generated after the reversal, such as the Balance Sheet and Profit and Loss, will temporarily show inaccurate, unadjusted balances until the period is correctly re-reconciled.
Given the risk of irreversible data loss or corruption, experts recommend three nonnegotiable steps before a major reversal:
Switch to Single-User Mode (QBD): For QuickBooks Desktop, ensuring no other users are logged into the company file prevents multi-user data conflicts, which can be triggered by critical functions like undoing reconciliation.
Create a Company File Backup (.QBB): This is the single most important step. A complete backup provides a safe restoration point should the reversal or subsequent adjustments cause data damage.
Obtain the Reconciliation Report: Print or save the PDF copy of the previous successful reconciliation report to use as a roadmap for the correct re-reconciliation process.
Deleting a reconciled transaction is strongly discouraged in financial bookkeeping because:
Irrecoverability: Once deleted, the only way to recover the transaction details is by sifting through the Audit Log and manually re-entering the entire transaction, which is time consuming and error prone.
Audit Trail Compromise: Deletion removes the transaction completely, whereas unreconciling leaves the transaction in the register and creates a traceable record in the Audit Log, maintaining transparency.
Register Integrity: Deleting an item throws the beginning balance of the affected account out of sync with the reconciled history, which is difficult to fix without performing a complex journal entry.
QuickBooks Desktop users who have the specialized Accountant Edition gain access to the Client Data Review (CDR) tool.
This feature saves significant time for accountants who need to fix client books, as it avoids the manual process of individually unchecking hundreds of transactions in the register.
The CDR tool is designed for professional cleanup and includes the necessary administrative permissions to execute the Undo Last Reconciliation command in a single step, reversing an entire period’s reconciliation batch.
For strong internal controls and superior audit readiness, three core documents must be retained after any reconciliation correction:
The Bank Statement: The physical or electronic statement confirming the period’s opening and ending balances match the final QuickBooks report.
The Final Reconciliation Report: The report confirming the successful, corrected reconciliation, showing a zero difference.
The Audit Trail/Log Report: A filtered report proving who, when, and how the original reconciliation was undone and the subsequent new transactions were entered or modified.


