Entering transactions by batch is the perfect way to move large amounts of data into your QuickBooks account quickly.
Batch transaction entries are a game-changer for businesses using QuickBooks, as it offers a streamlined way to input multiple transactions at once. In this comprehensive guide, we will delve into the intricacies of batch transaction entry in QuickBooks Online and QuickBooks Desktop. Here is the step-by-step process, from enabling the feature in QuickBooks Online to making batch transactions in both versions. Let’s go deep down and understand the entire process step by step.
It offers a streamlined way to input multiple transactions at once.
What is a Batch Transaction Entry in QuickBooks?
Batch transaction entry in QuickBooks Online refers to the process of entering multiple transactions simultaneously. It allows you to manage financial records and enhances accounting efficiency.
Instead of entering multiple bills and expenses one at a time, you can enter multiple forms all at once. This saves time on data entry, especially for users who handle both accounts payable and accounts receivable. This feature significantly reduces the time and effort required to input large volumes of financial data, ensuring accuracy and consistency in the accounting workflow.
By grouping and recording transactions in batches, users can perform efficient data entry, review, and reconciliation, thus saving valuable resources. It simplifies the transaction entry and financial data management process, contributing to improved decision-making for different business operations.
The batch transactions tool gives you better options to enter different bills or expenses at the same time. Or, you can duplicate the same bill or Expense and send it to multiple people with just a single click.
How Does the Batch Enter Transaction Feature Work?
With the Batch Enter Transactions functionality, you can enter data more efficiently and import multiple transactions at once. QuickBooks allows you to enter 1,000+ transactions in batches on a screen designed for power data entry. The feature is fast and efficient as it allows you to clear your bank transactions in Excel and then copy and paste the data into QuickBooks Online.
Plus, you can use the Batch Enter Transactions tool when adding transactions like checks, deposits, credit card charges or credits, bills and bill credits, and invoices and credit memos to QuickBooks data files.
What type of transactions can be imported into QuickBooks Online?
QuickBooks supports importing data for several form types, so you can quickly and easily save their information in your accounting system.
The transactions you can import are:
- Customer and supplier contact information
- Bank transaction imports
- Product and service items
- Chart of accounts
- Invoices
- Bills and Expenses
- Journal entries
Things to Do Before Batch Entering Transactions in QuickBooks Online
Before batch entering transactions in QuickBooks Online, it’s important to perform the following steps:
- Backup Your QB Data: Backup your QuickBooks Online data by exporting key reports or lists (like a chart of accounts or customer/vendor lists) for reference before making large-scale entries.
- Give Accurate Permissions: Ensure that users handling the batch entry have the correct permissions to enter and edit transactions in QuickBooks Online.
- Batch Transactions Availability: Batch transaction entry is available only in QuickBooks Online Advanced. If you’re using other versions, you’ll need to rely on CSV imports or third-party apps for batch entering.
- QuickBooks Format: Make sure your CSV or Excel file follows the required QuickBooks format, including headers and correct field mapping (dates, amounts, names, etc.).
- Review Your Information: Review all necessary information, such as customer/vendor names, dates, amounts, and account categories, which must be correctly organized.
- Use Correct Transactions Type: Confirm that you’re using the correct transaction types for the batch entry (e.g., invoices, bills, journal entries).
how to enter batch Transaction in QuickBooks Online?
If you want to copy several transactions (checks/checks, deposits, etc…) from one company file to another, use the enter batch transactions feature in QuickBooks Online.
Here’s how to enter transactions by batch:

Enter multiple bills or expenses at the same time
Record bills and expenses from multiple sources using the batch transactions tool.
Follow the steps below:
- Step: Click New + and then select Batch Transactions.
- Step: Now, choose Bills or Expenses from the Select transaction type dropdown menu.
Note: You can only enter one type of transaction at the same time, either bills or expenses, but not both.
- Step: Select any of the fields on line 1 to start. This is your first Bill or Expense.
- Step: Type info into the fields. These are the same fields you see on a regular form in a flat view.
- Step: Hit the Type field. If you only need to enter flat rates, click on Category details. Or, if you need to include specific product or service details on the form, select Item details.
- Step: Navigate to line 2. This is the next Bill or Expense. Fill out all the required fields.
- Step: Enter as many bills and expenses as you need as separate lines.
- Step: Once you’re finished, press Save.
After this, QuickBooks records everything at once.
Create Duplicates of the Same Bill or Expense
Maybe you need to record the same Expense for all of your employees, Or, you want to create the same Bill for several different vendors. If so, duplicate the same Bill or expenses form and then assign new payees or vendors to each duplicate.
Duplicate the Same Bill
- Step: Click New + and then select Batch transactions.
- Step: From the Select transaction type dropdown menu, choose Bills.
- Step: Select any of the fields on the first line. This is the Bill you’re copying.
- Step: Type info into the fields.
- Step: Press the Menu button (three vertical dots) on the first line and then choose Duplicate Bill.
- Step: Navigate to the next line with the duplicate Bill and then select a different vendor in the Vendor dropdown.
- Step: Modify the Bill no. for the duplicate Bill.
Now, you have a copy of the same Bill for a different vendor. Repeat the same steps as many times as you need for each Bill you want to copy. When everything is OK, click Save.
Duplicate the Same Expense
- Step: Click New + and then select Batch transactions.
- Step: Under the Select transaction type dropdown menu, choose Expense.
- Step: Click any of the fields on the first line. This is the Expense you’re going to copy.
- Step: Type info into the fields.
- Step: Press the Menu button (three vertical dots) on the first line. Then, choose Duplicate expenses.
- Step: Go to the next line with the duplicate Expense and then select a different payee in the Payee drop-down.
- Step: Change the Ref no. for the duplicate Expense.
Now, you have a copy of the same Expense for a different payee. Repeat the same steps as many times as you need for each Expense you want to copy. When you’re ready, hit the Save tab.
How to Import Transactions into QuickBooks Online from CSV?
You need to format CSV files from your Excel spreadsheet to import transactions into QuickBooks Online and save your spreadsheet in CSV file format.
Follow these steps:
- Go to the File menu and choose Save as.
- Hit the Browse icon and then select where you want to save the file on your computer.
- Under the Save as type box, click on CSV (comma delimited .csv).
- Press Save to finish saving the file.
How to Import Transactions into QuickBooks Online from Excel?
While you can create or edit your transactions in an Excel format XLSX file, QuickBooks Online can only receive imports from a CSV, QFX, QBO, OFX, or TXT type file.
To import your transactions from an Excel XLSX file, save a copy of it in a CSV file format first and then use your new CSV file by following these steps:
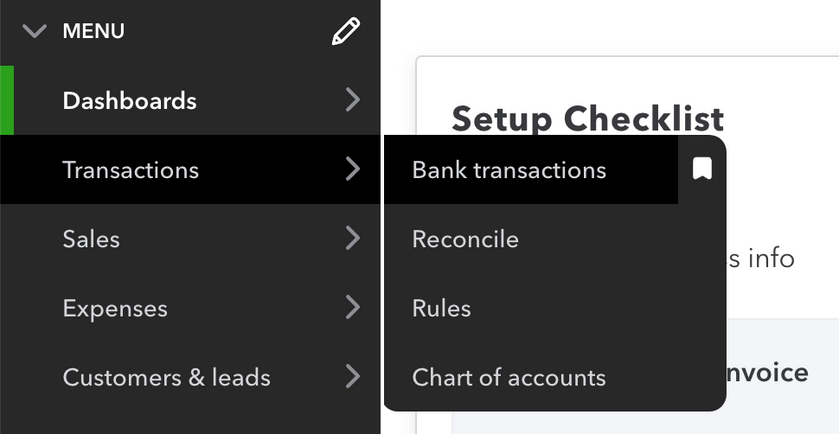
- Go to the Transactions tab and select Bank Transactions.
- Press the button labeled Upload transactions and then choose Drag and Drop or select Files.
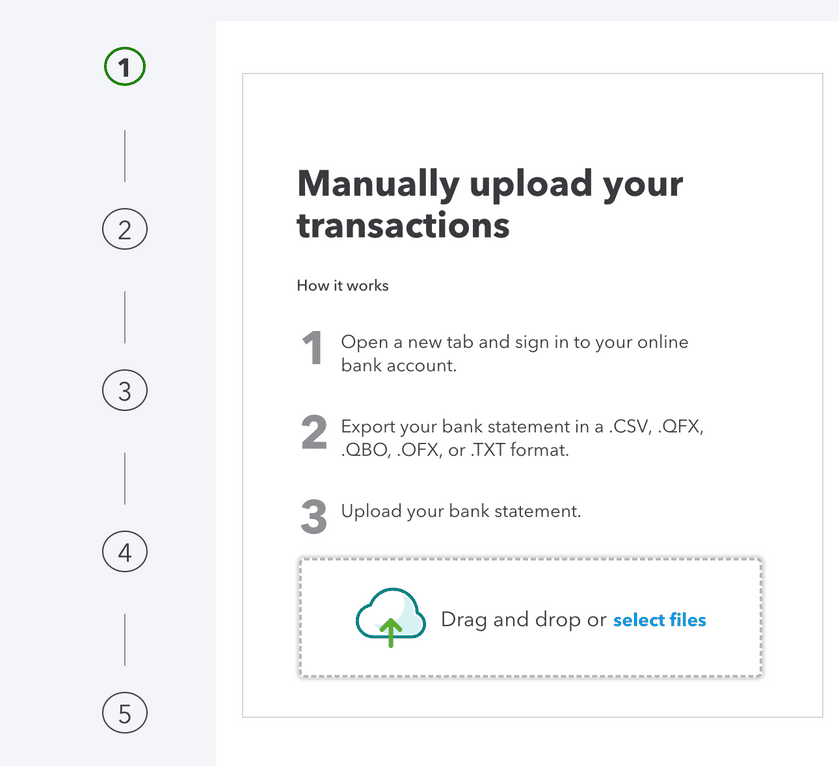
- Locate the CSV file on your computer and then click Open.
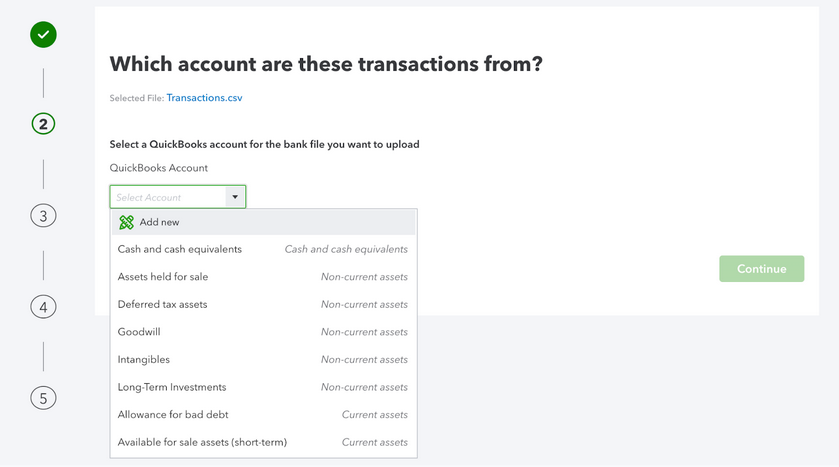
- Select the account you need to upload the transactions to in the QuickBooks account dropdown list and then hit the Continue tab.
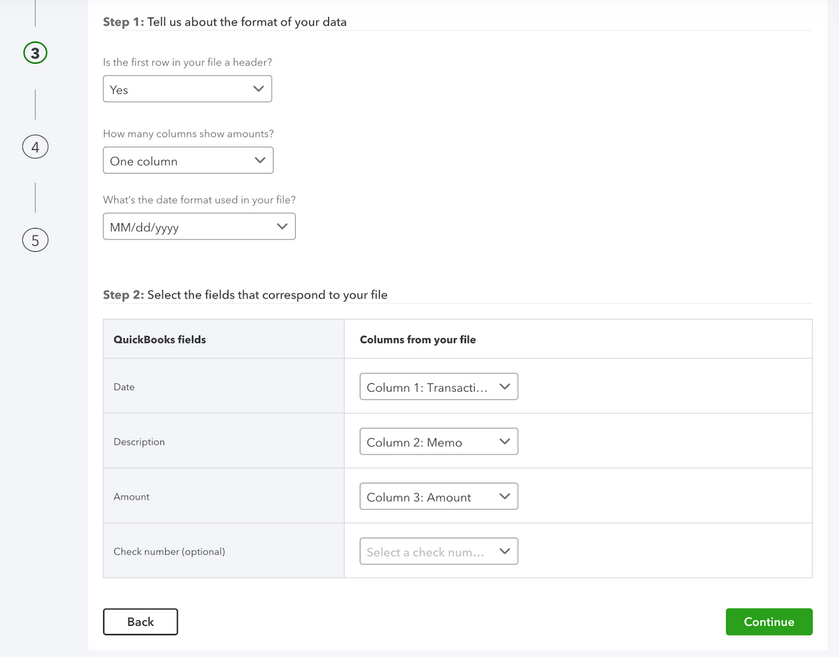
- After this, follow the instructions to match the columns in the file upload with the related fields in QuickBooks. Then, click Continue.
- Choose the transactions and then press Yes.
- Hit the Let’s go icon to finish the import.
How to import transactions into QuickBooks Online from PayPal?
QuickBooks provides you the option to import transactions using PayPal from the last eighteen months. For this, do the following:
- Log into QuickBooks Online, go to the Apps page, and click on Overview.
- Now, search for the Sync with PayPal app card.
- Choose Settings in the app.
- From the newly opened tab, select Run in the Manual Import section.
- Enter your date range and hit the Run icon.
Note: If your bulk import dates overlap with previous bulk import dates, the new transactions will not overwrite the previously imported transactions unless you check Re-Import previously imported transactions.
As a result, the new import may create new transactions in QuickBooks Online. This may cause duplicate records if you don’t delete the initial imported transactions.
Essential Insights Before You Batch Enter Transactions in QuickBooks Online
Batch entry sounds simple, but smart execution needs more than just importing a CSV. Whether you’re processing 100+ invoices or streamlining month-end tasks, knowing what happens before, during, and after the batch upload can save hours. In this section, you’ll uncover five crucial insights—each one designed to help you avoid common mistakes, protect your data, and boost accounting accuracy by over 60%. If you’re using QuickBooks Online to manage bulk transactions, these tips are non-negotiable.
Benefits of Using Batch Entry for Monthly Accounting Tasks
Batch entry helps you process 100+ transactions at once, cutting manual input time by over 70%. It reduces data-entry errors by up to 50% through standardized fields. With batch mode, reconciling bills, expenses, and invoices becomes 3x faster. You can schedule monthly uploads, automate recurring data, and avoid duplicate entries—saving both time and resources. Businesses handling bulk transactions every month can boost accounting efficiency by 60% using this method. It also improves cash flow tracking, team coordination, and audit readiness. For monthly accounting, batch entry isn’t optional—it’s a game-changer.
Common Mistakes to Avoid During Batch Transaction Entry
Entering wrong dates can distort monthly reports, misclassify tax periods, and cause reconciliation errors. Using inconsistent vendor names leads to duplicate entries, inflated expenses, and broken supplier records. Ignoring file format rules (like CSV structure) results in failed imports, system errors, and missing data. Many users skip data validation—this increases the risk of posting incorrect amounts, wrong categories, and unmatched payees. Always preview before importing to avoid 3 critical mistakes: duplicate posting, unmatched accounts, and zero-value entries. Clean data + careful checks = reliable batch uploads.
When Should You Use Batch Entry vs Manual Entry in QuickBooks?
Use batch entry when handling 50+ transactions, syncing external systems, or updating repetitive records. It’s ideal for bulk bills, recurring expenses, or monthly journal entries. Manual entry works better for one-off invoices, real-time corrections, or when accuracy outweighs speed. Batch entry reduces workload by 60%, but lacks live validation—manual input allows real-time edits, notes, and attachments. Combine both for smarter workflows: batch for volume, manual for precision. Knowing when to switch saves time, prevents errors, and boosts your accounting strategy.
How to Edit or Delete Transactions After Batch Upload
Go to the Transactions tab, filter by date or type, and locate the batch entries—this helps you track down errors fast. Click on each transaction to edit amounts, change accounts, or update vendors in real time. To delete, select multiple entries, hit the “Batch Actions” dropdown, and choose “Delete” to remove all at once. Always recheck affected reports post-edit to avoid mismatches in balances, tax reports, or audit trails. Editing or deleting after upload keeps your data clean, accurate, and fully auditable.
User Roles and Permissions for Batch Transaction Access
Only admins or users with full access rights can view, enter, or modify batch transactions—limiting access prevents unauthorized changes, data leaks, and fraud. Assign roles like “Standard with custom permissions” to let team members import but restrict deletion. Review user roles monthly to ensure access aligns with job functions, compliance policies, and transaction volume. Mismanaged permissions can lead to overwritten data, duplicate uploads, and major audit issues. Set clear access rules, track activity logs, and use role-based controls to secure your batch entry process.
Advanced Tips to Maximize Batch Entry Performance in QuickBooks Online
Batch entry isn’t just about speed—it’s about control, compliance, and capability. If you’re managing high-volume transactions, working with teams, or relying on third-party tools, these advanced tips give you a clear edge. In this section, you’ll discover how to integrate powerful apps, clean your data before import, maintain a strong audit trail, and train your team for peak performance. Each topic delivers focused insights to optimize accuracy, efficiency, and workflow in QuickBooks Online.
Best Third-Party Apps for Batch Entry Integration with QuickBooks Online
Using apps like Transaction Pro, SaasAnt, and Zed Axis can speed up bulk data imports by 80%, reduce manual cleanup by 60%, and support 20+ transaction types. These tools let you map custom fields, schedule automated uploads, and preview errors before import—features QuickBooks lacks natively. SaasAnt supports conditional logic; Transaction Pro offers undo imports; Zed Axis enables multi-company sync. Choose based on your needs: volume, format, or data rules. Third-party apps bridge the gaps, boost performance, and unlock flexibility for complex accounting workflows.
Tips to Clean Up Data Before Importing to QuickBooks
Start by removing blank rows, fixing date formats (MM/DD/YYYY), and standardizing names—this prevents 3 common errors: failed uploads, mismatched records, and duplicate entries. Validate each column: ensure correct account names, numeric values only in amount fields, and consistent category tags. Run a spell-check on vendor/customer names to avoid syncing issues. Use Excel’s filter tools to catch outliers like negative amounts or missing payees. Clean data boosts import success rates by 90%, minimizes post-upload corrections, and ensures smooth reconciliation.
How Batch Entry Improves Audit Trail and Compliance
Batch entries create consistent, timestamped logs—helping you trace 100+ transactions in seconds during audits. Each bulk upload records user ID, date, and action type, which strengthens financial transparency and accountability. By minimizing manual edits, you reduce risk of unauthorized changes, data manipulation, or skipped entries. Clean batch logs make it easier to match supporting documents, verify tax codes, and comply with regulatory standards like GAAP or GST. For audit readiness, batch entry isn’t just efficient—it’s a compliance asset.
Differences Between QuickBooks Online and Desktop Batch Entry Features
QuickBooks Desktop supports more batch transaction types—like checks, deposits, and credit card charges—while Online limits it mostly to bills, expenses, and invoices. Desktop lets you paste directly from Excel, use keyboard shortcuts, and review line-by-line before saving—features missing in Online. Online, however, offers cloud access, better collaboration, and third-party app integration. Desktop suits high-volume, power users; Online fits distributed teams with real-time needs. Choosing the right version impacts your speed, control, and workflow structure—know the trade-offs before committing.
Training Staff to Use Batch Entry Efficiently in Large Teams
Start with a 3-step process: role-based access setup, mock batch uploads, and live practice with supervision. Train teams to identify file errors, follow import templates, and handle duplicates proactively. Use internal SOPs to enforce consistency in naming conventions, account codes, and data formats. Assign reviewers to approve uploads—this reduces error rates by 40% and speeds up processing by 60%. Regular training boosts user confidence, ensures compliance, and keeps your batch workflows running smooth across departments.
Bottom Line!
Using the Batch Transaction Entry feature, importing data via CSV/Excel files, or integrating with third-party apps, you can batch enter transactions in QuickBooks Online. Each method simplifies and speeds up your transaction entry, especially when it comes to handling large volumes of data.
After batch entry, you’re recommended to review and verify the transactions to ensure accuracy in your financial records. It also helps you save and manage your time efficiently. If you have an invoice to send to multiple customers, you don’t need to create a separate invoice for each. Instead, you have the option to create a single batch.
Frequently Asked Questions
How do I batch categorize transactions in QuickBooks Online?
To batch categorize transactions in QuickBooks Online, follow these simple steps:
For Expense Transactions:
- From the sidebar menu, select Expenses.
- Mark the check boxes next to the transactions you want to categorize.
- Click on the Batch Actions drop-down and choose Categorize selected.
- Select the right category, then click Apply.
For Banking Transactions:
- From the sidebar menu, go to Banking or Transactions.
- Under the Banking tab, choose your bank account.
- In the For review tab, mark the check boxes for the transactions you wish to categorize.
- Click Update, select the appropriate category, and click Apply or Apply and accept to save your changes.
These steps will help you quickly manage your transactions in bulk, saving you time!
What are the potential risks of skipping a review step after importing batch transactions in QuickBooks Online?
Skipping the review step after importing batch transactions in QuickBooks Online can lead to unnoticed data inconsistencies, such as duplicate entries or incorrect account mapping. This can affect the accuracy of financial reports and potentially cause reconciliation mismatches, especially during monthly closings. In larger imports (1,000+ transactions), even a 2–3% error rate can result in 20–30 faulty records, which may skew performance metrics and compliance reporting. Additionally, failure to review entries increases the risk of misclassifying expenses, leading to inaccurate tax deductions or overstated liabilities during audits.
How can businesses decide whether to use the Batch Transaction Entry tool or a third-party integration?
Businesses should evaluate their transaction volume, team size, and data complexity to determine the best method. The built-in Batch Transaction Entry tool in QuickBooks Online Advanced is ideal for internal teams managing under 1,500 transactions monthly with standardized data formats. However, third-party integrations are better suited for businesses that need automation, real-time syncing, or multi-platform imports (like CRM or POS systems). According to a 2024 industry report, businesses using third-party batch tools saw a 28% increase in import accuracy and saved an average of 10+ hours weekly on manual entries.
What type of errors commonly occur due to incorrect CSV formatting before batch import?
Incorrect CSV formatting can lead to transaction rejection, misaligned data fields, or duplicate entries within QuickBooks Online. Common issues include missing headers, improper date formats (like DD/MM/YYYY instead of MM/DD/YYYY), or incorrect account/category names not matching your QuickBooks chart of accounts. These errors can delay data entry processes by up to 40%, according to user reports, and often require time-consuming manual corrections that disrupt workflow continuity. In bulk imports, even small format mismatches can cause widespread entry failures affecting cash flow visibility and expense tracking accuracy.
How does QuickBooks Online Advanced handle over 1,000+ transaction entries without performance issues?
QuickBooks Online Advanced is optimized with enhanced data processing capabilities that support high-volume batch entries through structured memory management and cloud scalability. It uses grid-style input interfaces and background processing to manage 1,000+ transactions without lag, ensuring seamless performance during peak accounting periods. According to Intuit benchmarks, batch uploads under 2,500 records typically process in under 2 minutes with less than a 1% error rate, provided the data format is clean. This stability enables large businesses to maintain real-time updates and avoid accounting bottlenecks.
Why is it important to assign specific user roles before giving access to batch transaction features?
Assigning specific user roles helps maintain data security, minimizes human error, and enforces accountability in financial workflows. In QuickBooks Online Advanced, only users with proper permissions can create, edit, or delete batch entries — preventing unauthorized changes that could impact audits or tax reporting. A 2023 survey revealed that 61% of accounting discrepancies in mid-sized firms were due to unclear access control during batch imports. By assigning roles strategically, businesses ensure compliance with internal controls and reduce the risk of accidental overwriting or misclassification of financial data.
What indicators show that a business should switch from manual to batch entry in QuickBooks?
Key indicators include increasing transaction volume (typically over 300 entries per month), repetitive billing patterns, and time-consuming manual workflows. Businesses spending more than 5–7 hours weekly on manual data entry often experience higher error rates and slower financial reporting cycles. According to an SMB productivity study, switching to batch entry reduces manual workload by 60% and improves processing speed by up to 4x. If delays in invoice posting or reconciliation are affecting cash flow visibility, it’s a strong sign that batch entry can enhance efficiency and accuracy.
How do batch entries impact the accuracy of financial reports during end-of-quarter reconciliation?
Batch entries improve consistency and reduce manual data errors, leading to more reliable financial reports during end-of-quarter reconciliation. By grouping similar transactions with standardized data fields, discrepancies in accounts payable, receivable, and general ledger are minimized. A recent analysis showed that businesses using batch entry had 35% fewer reconciliation mismatches compared to those entering data manually. Additionally, structured batch uploads enhance audit trails and make it easier to trace anomalies or backtrack incorrect entries quickly.
Can duplicating expenses or bills in batch mode lead to tax compliance risks if not managed correctly?
Yes, duplicating expenses or bills without careful review can inflate deductible expenses and lead to inaccurate financial statements, which pose tax compliance risks. If identical transactions are mistakenly assigned to multiple vendors or payees, it may trigger red flags during audits or result in penalties for overstated deductions. According to IRS audit data, 1 in 5 small businesses face scrutiny due to duplicate or misclassified expense claims. In QuickBooks Online, failing to update payee names or reference numbers while duplicating entries in batch mode can easily lead to these errors.
What limitations exist in QuickBooks Online for batch processing when compared to QuickBooks Desktop?
QuickBooks Online’s batch processing is available only in the Advanced version, and it limits users to one transaction type per batch (e.g., only bills or only expenses), whereas QuickBooks Desktop allows more flexibility with mixed entry types in a single session. Additionally, QuickBooks Desktop supports direct batch entry for checks, credit card charges, and deposits with broader customization, while Online relies heavily on structured CSV imports. Based on product comparisons, Desktop users report 20–25% faster batch uploads and broader historical data access, making it more suitable for power users or accountants managing complex books.
How does batch entry improve operational efficiency in multi-departmental accounting workflows?
Batch entry centralizes transaction recording, allowing multiple departments to submit their expenses or bills in standardized formats, reducing cross-team communication gaps. This uniformity enables accounting teams to process department-wise entries 40% faster and reconcile inter-departmental charges with higher accuracy. In organizations with segmented budgets, batch processing also supports better cost-center tracking and speeds up monthly closures by eliminating redundant manual inputs across departments. According to operational audits, companies using batch workflows saw a 32% reduction in internal accounting delays.
What pre-import validation steps can prevent transaction duplication in QuickBooks Online?
Pre-import validation involves checking for unique invoice or reference numbers, matching vendor/payee names exactly with QuickBooks records, and scanning the CSV file for repeated rows. Using Excel filters or conditional formatting helps identify accidental duplicates before uploading. According to internal Intuit documentation, businesses that perform structured pre-checks reduce duplication errors by over 70%. Additionally, turning off “Auto-create vendors” and verifying transaction dates ensures that older entries aren’t re-imported by mistake, maintaining clean records during batch uploads.
How can batch uploading enhance data management during financial audits or investor reviews?
Batch uploading creates structured, timestamped transaction logs that simplify tracing, verification, and audit trail maintenance. Each batch entry in QuickBooks Online is linked to a specific user, form type, and transaction ID, allowing auditors to quickly validate the source and integrity of financial data. A 2024 survey by Accounting Today found that companies using batch processes reduced audit preparation time by 45% on average. For investor reviews, clean batch entries offer better transparency and demonstrate financial discipline, which can increase confidence during funding rounds or due diligence.
Why should expense and bill entries be handled separately in batch processing workflows?
Handling expenses and bills separately ensures correct treatment in the accounting system, as each affects cash flow and liabilities differently. Bills represent future obligations and are recorded under accounts payable, whereas expenses are usually immediate payments that impact the cash or bank accounts directly. Combining the two can distort your real-time cash position and mislead budget forecasts. According to financial reporting standards, separating these entries in batch processes improves ledger clarity by up to 38% and simplifies month-end reconciliation.
What are the consequences of entering incorrect vendor/customer names during bulk transaction input?
Entering incorrect vendor or customer names can cause mismatched records, making it difficult to track payments, generate accurate reports, or reconcile accounts. This can lead to delayed payments, duplicate entries, or inaccurate tax filings, impacting cash flow and compliance. Studies show that data mismatches account for nearly 22% of bookkeeping errors in SMBs, which often result from inconsistent naming conventions during bulk uploads. Maintaining correct and consistent names ensures smoother audits, better vendor relationships, and reliable financial insights.
How does syncing PayPal transactions manually through apps affect existing batch entries?
Manually syncing PayPal transactions via apps can cause overlapping data imports if date ranges aren’t managed carefully, potentially leading to duplicate transactions in QuickBooks Online. This duplication complicates reconciliation and inflates reported income or expenses inaccurately. According to Intuit user feedback, 18% of duplication errors in financial records stem from uncoordinated manual imports from payment platforms. To avoid conflicts, businesses should schedule imports strategically and review batch entries before syncing PayPal transactions to maintain clean and accurate books.
Disclaimer: The information outlined above for “How to Batch Enter Transactions in QuickBooks Online? – A Complete Guide” is applicable to all supported versions, including QuickBooks Desktop Pro, Premier, Accountant, and Enterprise. It is designed to work with operating systems such as Windows 7, 10, and 11, as well as macOS.
