 Add As A Preferred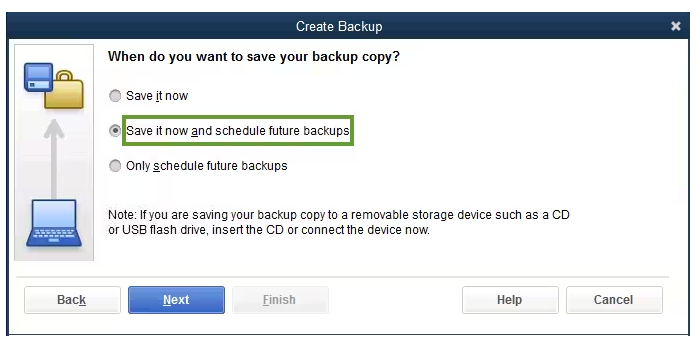
I’m Tara Michael, and I’m honestly frustrated at this point. I’ve been trying to cancel my QuickBooks cloud hosting service, but the process isn’t as straightforward as I expected. All I want is to cleanly disconnect from the hosted environment and securely download all of my company data but I keep hitting roadblocks.
I’ve already decided to move away from cloud access for internal reasons, and I no longer need remote logins or server-based collaboration. However, every time I try to start the cancellation process, it’s either not clear where to go, or I’m redirected between Intuit support and the hosting provider.
What’s more concerning is my company fileI need to make sure I can download it in full, including all backups, attachments, and payroll data, before the account gets deactivated. I also want to ensure there’s no data loss during the transition back to a local setup. But there’s very little clarity on the steps to safely retrieve everything.
This delay is costing me time and making it harder to plan the shift to an on-premise workflow. I need instant help now how do I cancel cloud access without losing anything? And where exactly do I go to download all the data in a usable QuickBooks Desktop Enterprise format before the cloud access shuts down? I need resolution ASAP I can’t afford to be locked out of critical accounting data.
Hi Tara Michael,
Thank you for explaining your situation so clearly. You’ve already made a smart and intentional decision to move away from QuickBooks Desktop Enterprise cloud hosting and bring your accounting operations back in-house. That kind of planning especially when it comes to protecting business-critical data is truly commendable.
Your frustration is completely valid. At this stage, you’re facing two key tasks: canceling your QuickBooks cloud hosting the right way, and securely downloading all your company data in a usable format before the service is deactivated. The good news? You can absolutely do both without losing a single byte as long as the transition is handled carefully.
What you’re aiming for is exactly right: cleanly disconnect from the hosted environment before the account gets shut down, and securely download everything your company file, backups, payroll data, and even attachments without risking data loss or system errors. You just need a clear, step-by-step plan so you’re not left locked out of your accounting system when the cloud access ends.
Let me walk you through the steps so you can disconnect from the cloud, access all your important files and get back to running things locally, just the way you want.
Canceling QuickBooks Desktop Enterprise cloud hosting and retrieving your data isn’t always straightforward. It often occurs due to unclear responsibilities between Intuit and the third-party hosting provider, limited user permissions, or difficulty locating where your files are stored. In some cases, users don’t have direct access to download backups, attachments, or payroll data. Delays in provider response or missing cancellation steps can also block the process. Below are the most common issues that can prevent a smooth transition.
To successfully disconnect from your cloud hosting service without losing any critical accounting data, you’ll need to follow a structured process. Since hosting is managed by a third-party provider, cancellation and data retrieval steps must be handled carefully to avoid errors, missed files, or permanent loss. Follow these steps to cancel your hosting service and securely download your company data.
Before you can cancel your QuickBooks Desktop Enterprise cloud hosting access, you need to know which third-party provider is managing your account. Here are lists of Intuit-authorized hosting providers.
Note: While these companies are authorized to host QuickBooks, Intuit doesn’t endorse, certify, sponsor, or guarantee these hosts’ services.
| AbacusNext | MyVao | Rightworks |
|---|---|---|
| Ace Cloud Hosting | Nerds Support Inc. | SKYLINE Cloud |
| Apps4Rent | Netgain | Summit Hosting |
| Coaxis | Network Alliance | Swizznet |
| CloudVara | Productive Computing | Tandem CloudTop |
| Infinitely Virtual | ProSource | Virtual Systems |
| Itopia | Proxios | XenWingo |
If your QuickBooks Desktop Enterprise license or payroll services are directly billed through Intuit not the hosting provider, you’ll need to cancel those separately through your Intuit Customer Account Management Portal (CAMPs). This ensures you aren’t billed after leaving the hosted setup and avoids any future subscription conflicts.
A confirmation message will display on your screen, and you’ll receive an email notification.
Note: If you’re within the 60-day money-back guarantee and purchased directly from Intuit, you’ll automatically receive a full refund within two weeks.
Transferring your data from the cloud to a local QuickBooks Desktop environment ensures continued access after hosting cancellation. This step helps you retain full control over your financial records, attachments, and payroll files by exporting them securely and restoring them into a desktop-based setup. It’s essential for preventing data loss and ensuring a smooth transition. If you haven’t yet, download QuickBooks Desktop. You’ll need to open it when moving your data.
Note: Keep this page open on your browser.
Note: You can either choose All financial data or All financial data without transactions. For products and services, inventory isn’t exported.
Note: Email confirmation can take some time depending on the amount of data you want to migrate. Check your QuickBooks Online homepage for updates.
Important: Need more information about this tool? Check out QB Desktop Migration Tool FAQs.
After exporting your data, run a profit and loss report in QuickBooks Online and QuickBooks Desktop to compare your books.
Note: Run reports on an accrual basis in QuickBooks Online and QuickBooks Desktop to match and compare them.
If the reports don’t match
Reports can’t match due to export limitations, or the using unsupported versions of Internet Explorer. In some cases, exporting your file and running reports again helps to resolve the issue.
Note: If your reports still don’t match, try to enter manual adjustments for QuickBooks Online and QuickBooks Desktop.
Creating a local backup ensures you always have access to your QuickBooks company file—even if your cloud account is deactivated or hosting access is revoked. Save the latest backup (.QBB file) to an external hard drive or USB to protect against data loss and simplify future restoration. This step is crucial for long-term data security and protecting your records after canceling cloud hosting.
Backup company files save everything currently in your company file. This includes your accounting data, templates, letters, logos, images, and related files (QuickBooks Statement Writer, Cash Flow Projector, Business Planner, and Loan Manager).
There are two ways to back up your data. You can either back up your data automatically or do them manually.
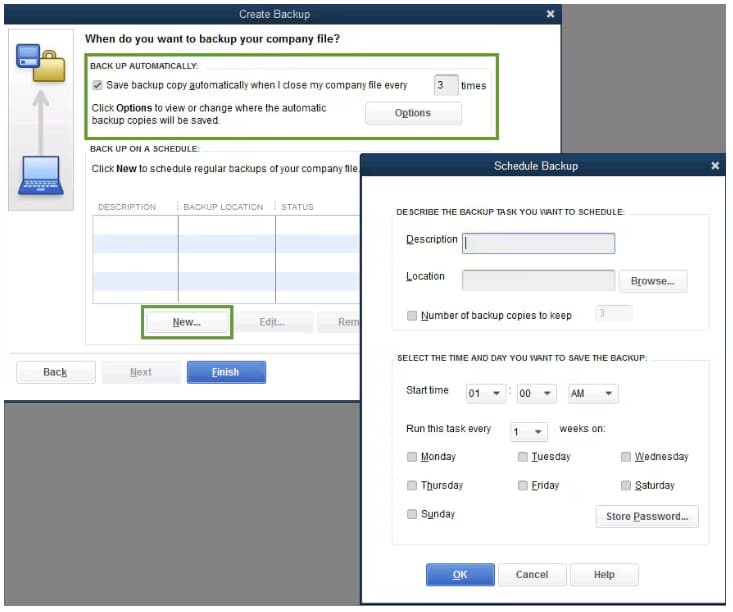
Schedule Automatic Backups
Instead of manually backing up your company file, allow QuickBooks to do it automatically.
Tip: No need to pencil it in on your calendar. Use the options in the Online and Local Backup section to set backup reminders.
QuickBooks creates a backup and schedules your future backups at the same time. When done, you’re notified with a confirmation message.
Back up Your Company File Manually
If you prefer, you can back up your company files yourself anytime.
Tip: No need to pencil it in on your calendar. Use the options in the Online and Local Backup section to set backup reminders.
QuickBooks creates a single backup company file. When it’s done, you’re notified with a confirmation message.
To see when you last backed up your company file, navigate to the File menu and select Back up Company. You’ll see the time and date at the top of the menu. If you want to change your backup preferences:
Installing QuickBooks Desktop Enterprise on your local system ensures uninterrupted access to your company data after canceling cloud hosting. This step allows you to manage your books directly from your computer without relying on a third-party hosting environment, giving you full control over storage, backups, and software updates.
These steps are used to install QuickBooks on either a dedicated server or computers that access the data on a server. This can also be a Terminal server or a server that hosts both QuickBooks and your company file. When you access your company file from a server, make sure to use the direct path to your company file.
After the installation, QuickBooks will ask you to activate and update it.
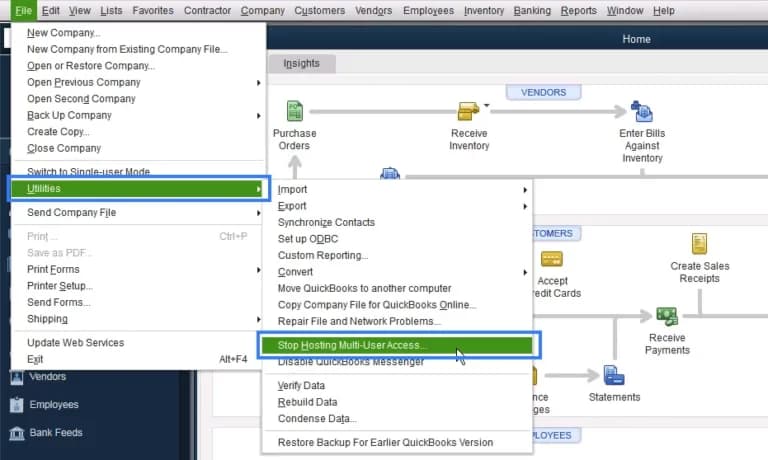
Disabling multi-user hosting access ensures your QuickBooks Desktop file no longer syncs with the cloud environment. This step is essential after moving your data locally, as it prevents further changes from other users and helps to maintain the integrity of your company file during the transition.
Whether you’re managing renewals, migrating data, or working with a third-party provider, staying informed helps you avoid unexpected disruptions. Always keep a local backup of your company file, regularly verify billing and subscription details, and maintain updated contact information with your hosting provider. These practical steps help you to avoid last-minute issues and keep your QuickBooks Desktop Enterprise hosting experience smooth.
Tara, I completely understand how frustrating this process has been, and you’re absolutely right to expect a clean, secure transition away from QuickBooks cloud hosting. To successfully cancel your hosting service and protect your company data, you’ll first need to contact your third-party hosting provider directly, not Intuit since they manage your server access and can officially process the cancellation.
Before your hosting access is disabled, make sure to sign in and download a complete backup of your QuickBooks Desktop company file in .QBB format. Also, don’t forget to export any payroll data, attachments, or linked documents that you may need later on. Once everything is safely stored, install QuickBooks Desktop Enterprise on your local computer and disable multi-user hosting so you can operate fully offline without cloud dependencies.
If you need help at any point whether it’s downloading backups, exporting data, reinstalling QuickBooks locally, or ensuring nothing gets lost along the way, I’m here to guide you through every step. You’re not alone in this, and I’ll make sure your transition is smooth, safe, and stress-free.


