Excerpt:
Repairing the Microsoft .NET Framework, a vital Windows component required for many applications, involves a structured, multi-step process that starts with fundamental system checks before escalating to component-specific fixes. The official Microsoft .NET Framework Repair Tool should be the first targeted solution, but it must be preceded by running the DISM and System File Checker (SFC) command-line scans to ensure the core Windows system files are not corrupted. If the automatic tool fails, the guide offers advanced, authoritative methods, including using PowerShell for targeted package management, or manually forcing a fresh install by turning the feature off, restarting, and then back on via the Windows Control Panel. Throughout these complex procedures, users must use elevated (administrator) permissions to execute the system-modifying commands, with the ultimate goal being to restore application functionality without necessitating a full operating system overhaul.
 Add As A Preferred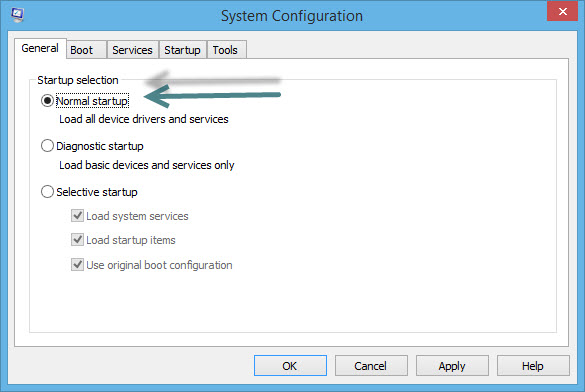
Highlights (Key Facts & Solutions)
checkhealth is diagnostic only (reports corruption status), while restorehealth performs the actual system image repair.msconfig) to confirm the fix is stable and permanent, without interference from third-party services.Overview
The .NET Framework is a software development framework provided by Microsoft Windows that offers a runtime environment and a set of libraries and tools for building and running applications ( Linux, macOS, Windows, iOS, Android) on Windows operating systems. Any issues with the framework result in a malfunction where either the applications (or software) will not be able to run or some of their functionality gets restricted.
Net Framework is the most significant component of the Windows Operating system. By default, it comes with Windows Operating System 10 and 11. Microsoft provides a dedicated repair tool that you can use to repair issues with the .NET Framework and get your apps to run again.
Note:
Before moving ahead with other error-specific solutions, first, go through these two quick fixes for .Net Framework, which are highlighted below:
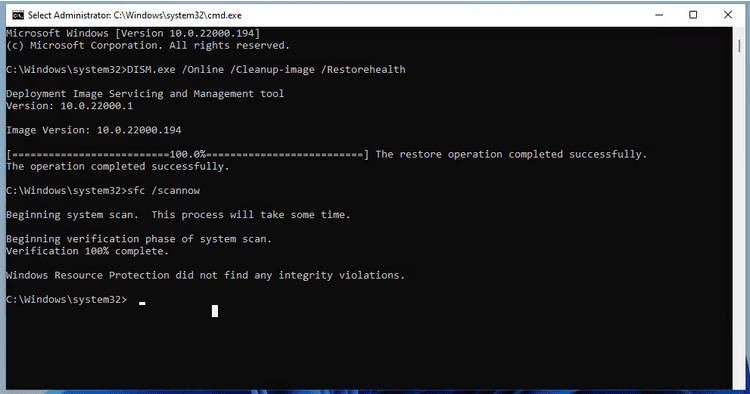
DISM (Deployment Image Servicing and Management) can be used to repair the Windows image, which contains the core components of the Windows operating system, including Net Framework.
The DISM scan is run using Windows Command Prompt (DOS). This scan tool is available in DOS and can be initiated by running a command. Before running the command, you need elevated permissions for the command prompt. This scan will highlight any possible errors or missing files in the Net Framework.

For the elevated permissions, you either need to login as an administrator or have to contact your system administrator. Here’s a command to run DISM scan:
Open an elevated Command Prompt and type DISM /online /cleanup-image /checkhealth
Windows updates are important to stay up to date with all the latest fixes, security patches, and overall improvements offered by Microsoft. Hence, we recommend installing all the latest updates, as they may have fixes to resolve the errors with the .NET Framework. For this, do the following:
Below, we have listed what else you can do to fix Microsoft .NET Framework errors except running the repair tool. Let’s have a look:
Running the .NET Framework Repair Tool helps to identify and automatically fix common issues related to the .NET Framework installation. It detects problems, repairs corrupted files and registry entries and provides a user-friendly interface for effective troubleshooting which makes it an essential first step in resolving .NET errors.
Follow the below given steps to run the .NET Framework Repair Tool:
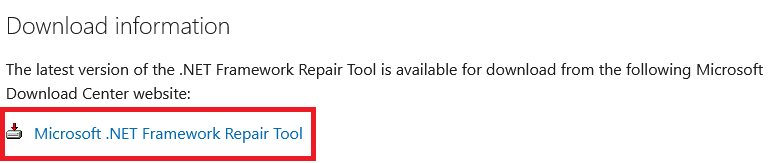
Step 1: Firstly, navigate to the Microsoft .NET Framework Repair Tool page and then download the tool from the official Microsoft Download Center website.
Step 2: Now, scroll down to the Download information section.
Step 3: Click on the Microsoft .NET Framework Repair Tool link to download the executable file.
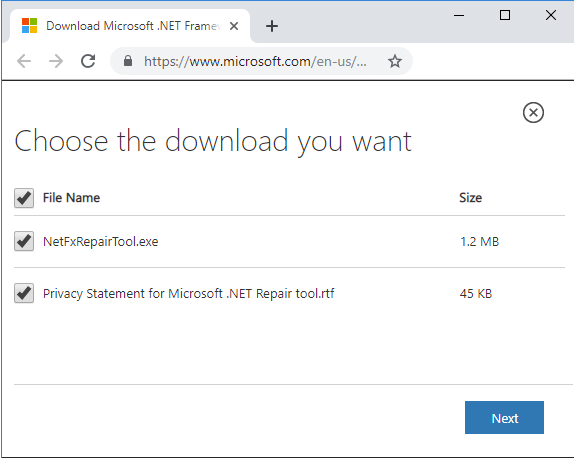
Step 4: After this, choose the file you want to access and then press Next.
Step 5: Click twice on the Netfxrepairtool.exe to run the repair tool. Then, hit the Yes tab if prompted by User Account Control.
Step 6: Tickmark the I have read and accept the license terms checkbox and click Next.
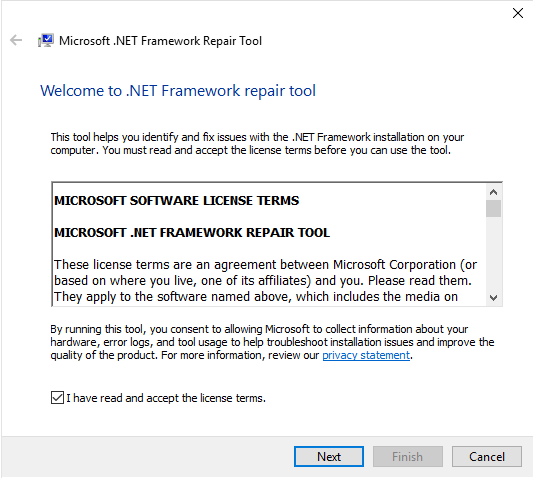
Step 7: Once done, the repair tool will start performing a few tests to diagnose and fix the issues. This will recommend a few changes. Read the description and Press Next to apply the changes.
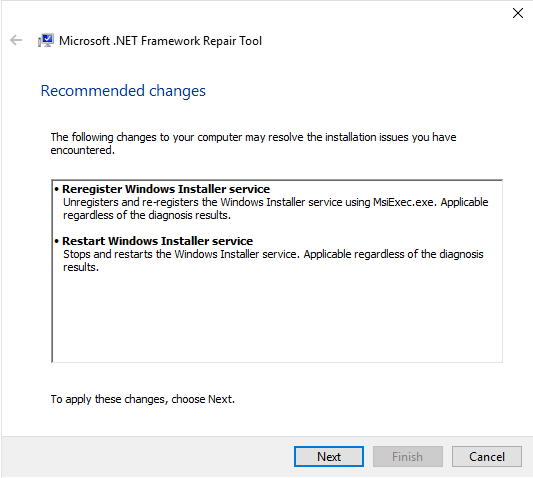
Step 8: After making the changes, instead of selecting the Finish button, click Next.
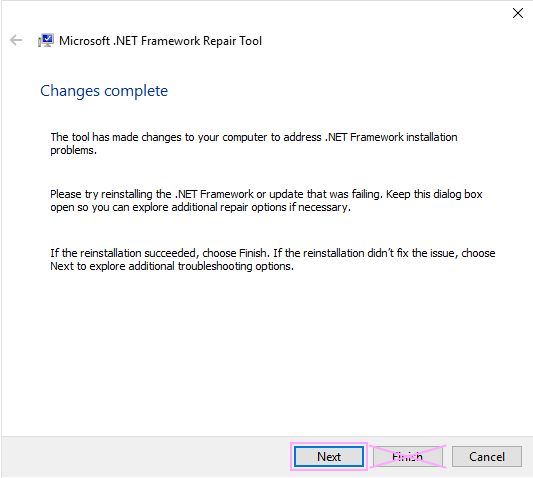
Step 9: At last, hit the Finish icon to close the repair tool.
Repairing the .NET Framework using PowerShell allows for efficient identification and reinstallation of missing or corrupted components through automated commands. This method streamlines the troubleshooting process, making it easier for administrators to manage and fix .NET-related issues across multiple systems with minimal manual intervention.
Follow the below given steps to repair the .NET Framework using PowerShell:
Step 1: To begin with, hold and press the Windows + S keys on your keyboard to open Windows Search and then type PowerShell in the text field.
Step 2: Now, hit right-click on PowerShell and choose Run as administrator.
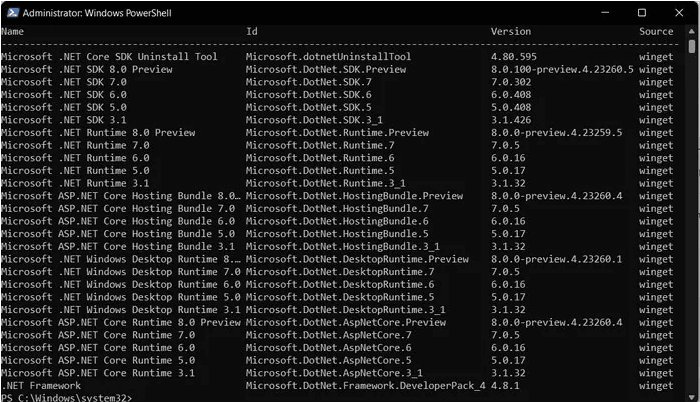
Step 3: Under the PowerShell window, type the following command and then hit the Enter key:
Step 4: After this, if you are prompted to install NuGet – a package manager by .NET Framework, type Y and click Enter.
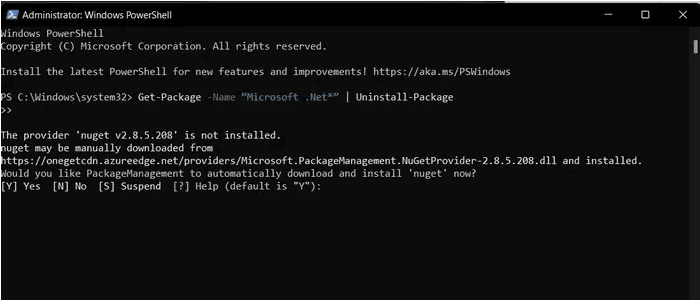
Step 5: PowerShell will now start to uninstall the .NET Framework from your system.
Step 6: Next, execute the following command to install the latest version of Microsoft .NET Framework:

Step 7: Write down the .NET version ID you want to install and then perform the following command. Replace [PackageID] with the ID you noted.
![Replace [PackageID]](https://ebetterbooks.com/wp-content/uploads/2024/06/image-15.png "How to Repair the Microsoft .NET Framework For Windows? 4")
Step 8: Once done, PowerShell will download and extract the package. Then, you will see a successfully installed message on your screen when the process is complete.
Step 9: Finally, close PowerShell and restart your computer to apply the changes, then check for the error status.
Installing an older version of the .NET Framework manually can resolve compatibility issues with legacy applications that require specific versions to function correctly. It can also replace corrupted files in the current installation and help bypass problems introduced by recent updates, restoring application functionality.
Follow the steps given below:
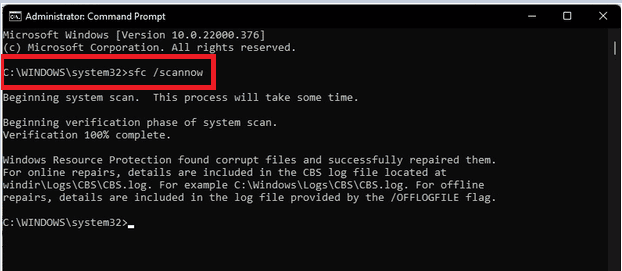
Using the System File Checker (SFC) tool helps repair Microsoft .NET Framework errors by scanning for and replacing corrupted or missing system files. This process restores the integrity of essential components, ensuring that applications relying on the .NET Framework can function properly and efficiently.
To run the System File Checker tool, adhere to the steps below:

Performing a System Boot Configuration in Normal Startup helps resolve .NET Framework errors by ensuring that all essential Windows services and drivers are loaded correctly. This process eliminates potential conflicts from third-party applications, allowing for a clean environment to identify and troubleshoot issues effectively.
Follow the below given steps :
QuickBooks Desktop basically uses Microsoft programs to run web-based apps, and Microsoft .NET Framework is one of them. The application won’t work properly if there’s an issue with .NET Framework software.
Windows 10 and Newer
Note: Don’t worry; you are not uninstalling anything.
Check for both the .NET Framework 4.5 (or later) and .NET Framework 3.5 SP1 Settings.
Note: To fix .NET. Framework 4.5, 4.6, 4.7, and 4.8, you are required to follow the same steps.
Check NET Framework 4.5 (or later)
If the .NET Framework 4.5 (or later) checkbox is unmarked:
If the .NET Framework 4.5 (or later) checkbox is already marked:
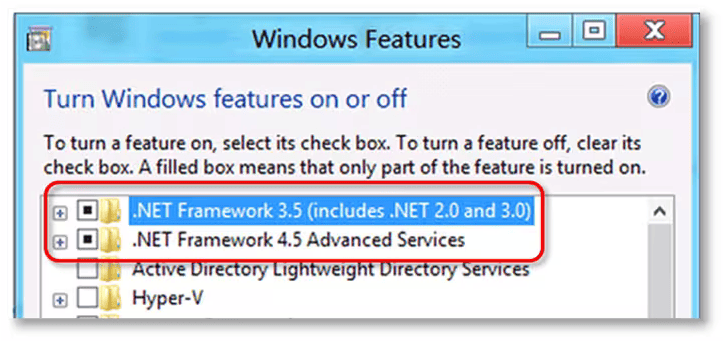
Check NET Framework 3.5 SP1
If the .NET Framework 3.5 SP1 checkbox isn’t marked:
If the .NET Framework 3.5 SP1 checkbox is already tickmarked:
Recommendation: Immediately contact an IT Professional or Microsoft expert if you encounter the errors when turning .NET Framework on or off, as the issue may be regarding your operating system, not QuickBooks.
The DISM (Deployment Image Servicing and Management) and SFC (System File Checker) scans are recommended first because they are designed to address the root cause of many .NET Framework issues: corruption within the core Windows operating system files.
/restorehealth command) repairs the fundamental Windows component store, which holds the original, clean files needed to repair system elements like .NET.sfc /scannow) subsequently checks for and replaces corrupted or missing individual system files.By running these tools first, you ensure the underlying Windows installation is healthy, which significantly increases the likelihood of the specific .NET Repair Tool succeeding.
“Elevated permissions” means running the Command Prompt or PowerShell with Administrator privileges. This is necessary because commands like DISM and SFC modify core system files and protected areas of the operating system.
If you do not run with elevated permissions, the commands will return an “Access Denied” or “You must be an administrator” error, and the repair will fail, as the system protects these critical file operations from standard user accounts.
This manual process forces the Windows operating system to perform a complete re-installation of the core .NET components, which is a powerful troubleshooting method.
The PowerShell method is for advanced users and offers greater, granular control over the software components, specifically allowing for precise uninstallation and version management.
You need to manually install an older version primarily for compatibility with legacy software.
The checkhealth command is the initial diagnostic step within the DISM utility. It quickly scans the integrity of the Windows Component Store.
The subsequent command, typically DISM /online /cleanup-image /restorehealth, is the one that actually attempts to fix the detected corruption by accessing file sources like Windows Update.
Using “Normal Startup” is a critical verification step used after performing system fixes to confirm that the repair is stable and not being masked by conflicts.
msconfig) ensures that all essential Windows services and drivers, along with all third-party programs, load correctly. This verifies that the .NET repair was successful and has eliminated the underlying system instability, confirming the permanent fix.

