Excerpt:
This article provides a comprehensive guide on how to view journal entries in QuickBooks, both online and desktop versions. It explains the process of accessing journal entries through various tools such as the Advanced Search, Audit Log, and Reports menus. Whether you're tracking specific transactions or reviewing past entries, the step-by-step instructions ensure easy access and management of journal entries to support efficient financial recordkeeping.
 Add As A Preferred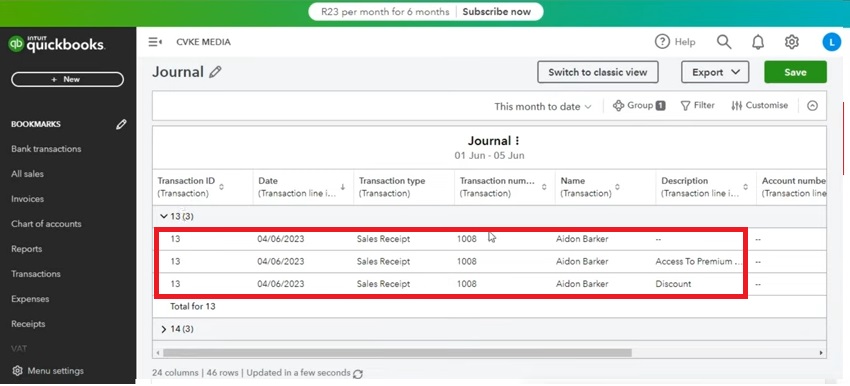
How to View Journal Entries in QuickBooks Online and Desktop? We’re here to simplify it. It is crucial to understand what journal entries are, how to find or make them in QuickBooks desktop/ Online, and why they are created. But before we get to the crux of the matter, let’s take a step-by-step approach.
A journal entry is used to record a company transaction in accounting records. Every business transaction must be recorded in at least two locations for a journal entry (double entry accounting) to make sense. You may manage your business accounts with the help of the QuickBooks software, which automates some accounting and financial management functions.
Basic QuickBooks online journal entry Format
| Account number/name | Debit | Credit |
| XXX | $xx ,xxx | |
| XXX | $xx ,xxx |
To maintain the balance of the accounting equation (Assets = Liabilities + Shareholders’ Equity), the debits and credits for each journal entry must be equal.
We must constantly take into account four aspects when creating journal entries:
To view journal entries in QuickBooks Online, use the Advanced Search option or access them via the Audit Log. The Advanced Search allows for detailed filtering, while the Audit Log tracks all system events, making it easy to find and review specific journal entries. Follow Step by Step Guide Listed Below:
Navigate to the QuickBooks Online website and enter your credentials to log in to your QuickBooks Online account.
If you manage multiple companies, ensure you choose the correct one to view its journal entries.
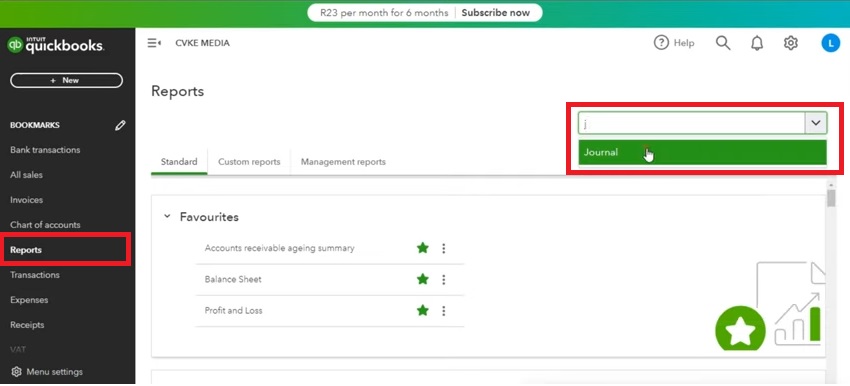
Look for the “Reports” option in the left-hand menu on the dashboard and click on it to access various reporting tools.
In the ‘Standard’ tab, scroll down to the ‘For my accountant.’ It contains reports that are particularly useful for accounting purposes, including journal entries.
Selecting the journal report option will open a detailed report specifically for journal entries, which will allow you to view all relevant transactions.
Use the date filters to customize the reports according to the specific period you want to analyze.
Once the report is generated, you can see all journal entries within your specified date range, including details such as dates, amounts, and accounts involved.
Users can access journal entries through the audit log. It is a systematic process which allows users to track changes made to the journal entries and provides transparency and accountability.
Steps to view journal entries via audit log:
Click on Settings at the top right corner of your interface. Choose Audit Log to open the audit log interface from the drop-down menu.
Utilize filter options to simplify your search. You can filter results by:
After setting your desired filters, click Apply to view the relevant records.
The audit log will present a complete history of changes made to journal entries, which contains details such as:
Select View in the History column adjacent to individual entries for a deeper dive into specific entries. This action will provide detailed insights into what changes were made.
QuickBooks offers the Advance Search option to view the journal entries in QuickBooks Online via Advance Search:
Open the QuickBooks Online application on your device.
Find the magnifying glass icon, typically located at the top right corner of the interface.
Click on the magnifying glass icon, then choose the Advanced Search link from the dropdown menu.
In the advanced search menu, look for the option to select Journal Entries. Select Journal Entries from the available options.
You can further refine your search by:
After setting your filters, click on the search button to display the relevant journal entries that match your criteria.
Become An Expert With QuickBooks Training & Certification and master the above skills in no time. With the following course you can easily learn to view the journal entries in QuickBooks.
You can run Journal reports to see your saved journal entries in QuickBooks Online, follow further simple steps below:
This process ensures you can easily locate and see any saved journal entries in QuickBooks Online.
How to View All Journal Entries in QuickBooks Online Finding all journal entries in QuickBooks Online is simple using the Reports feature. Here’s how:
To find past journal entries in QuickBooks Online, you can use the Journal Report. This report provides details like dates, accounts, amounts, and memos for all journal entries.
To see journal entries in QuickBooks Online, follow these simple steps:
search journal entries in QuickBooks Online
To run a journal entry report in QuickBooks Online:
Exporting journal entries from QuickBooks Online is simple. Follow these steps:
That’s it! You’ve successfully exported journal entries from QuickBooks Online. Let me know if you need further assistance.
Accidentally deleted a journal entry in QuickBooks Online? Don’t worry! You can still review deleted transactions using the Audit Log. Follow these steps to find and review deleted journal entries:
Journal entries help keep your books accurate, but sometimes, you may need to make changes to correct errors or update records. QuickBooks Online allows you to edit or modify journal entries easily.
If an entry is incorrect beyond simple edits, it’s best to delete and re-enter it.
By following these steps, you can easily manage and correct journal entries in QuickBooks Online, keeping your financial records accurate and up to date.
To view journal entries in QuickBooks Desktop, go to the Reports menu and select “All Journal Entries.” For older entries, use the Journal Entry option under “Create,” then click the counterclockwise arrow and “View More” to access and filter past entries. Follow step by step Instructions below:
All of your journal entries are saved in your account by QuickBooks. The simplest method is to go to the Reports menu and choose All Journal Entries. You may access the relevant journal entries from this point.
You might need to verify the old QuickBooks journal entries if you find an issue during account reconciliation.
To view list of journal entries in QuickBooks Online, follow these simple steps:
Start by navigating to the Reports section from the left-hand panel of your QuickBooks Online dashboard.
In the search bar or within the reports menu, find and click on the Journal report. This report will provide a complete overview of your journal entries.
Once the report window opens, click on the Customize button to filter specific journal entries. This allows you to customize the report to your needs.
In the customization options, set the Date range to include old journal entries for your desired reporting period.
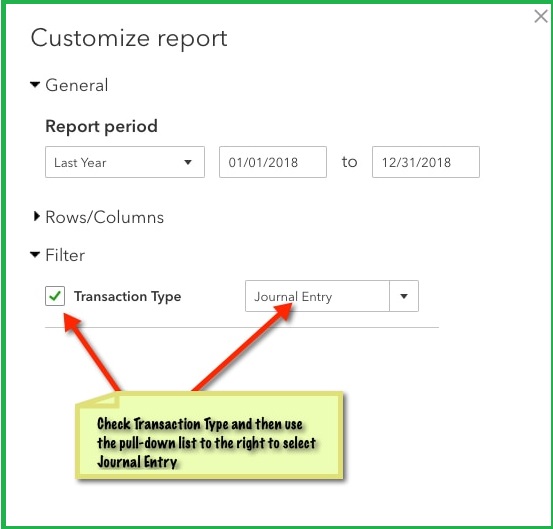
From the Filter dropdown, check the box for Transaction Type, then select Journal Entry type to focus solely on journal entries.
After applying your filters, click on Run Report. This will generate a list of all journal entries that match your criteria, including any notes in the MEMO/DESCRIPTION column.
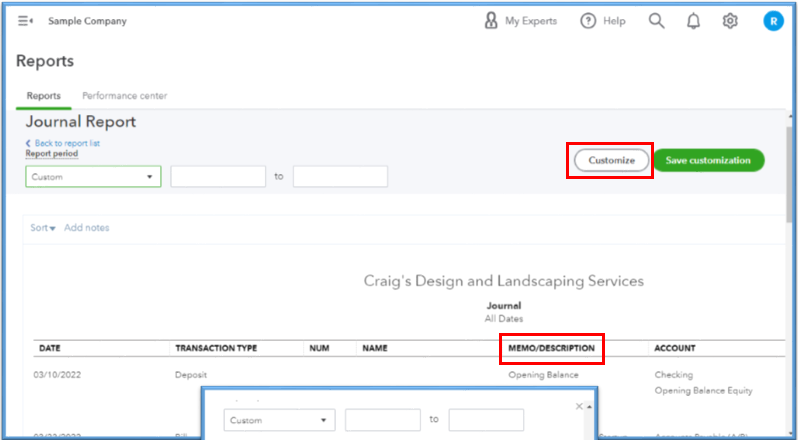
Once the report is generated, you can easily see a list of your journal entries in one place for better financial management.
In QuickBooks, the journal entry plays a significant role. This makes it easier for you to record many transactions and upload them straight to the general ledger. If you wish to access a journal entry after generating or removing it, use the following methods.
The use of the Advanced Search, Audit Log, and Reports menus to view journal entries in QuickBooks Online and QuickBooks Desktop has been covered in this blog. You should now be able to comprehend the specifics, in case of any doubts feel free to connect with Accounting and Bookkeeping experts.
Still have questions? Explore our detailed FAQs.


