Excerpt:
This article provides a step-by-step guide to effectively track and manage employee, owner, and client reimbursements in QuickBooks. By recording and reimbursing business expenses paid with personal funds, it helps businesses maintain accurate financial records, avoid cash flow disruptions, and ensure tax compliance. QuickBooks simplifies the reimbursement process, making it easier to stay organized and save money.
 Add As A Preferred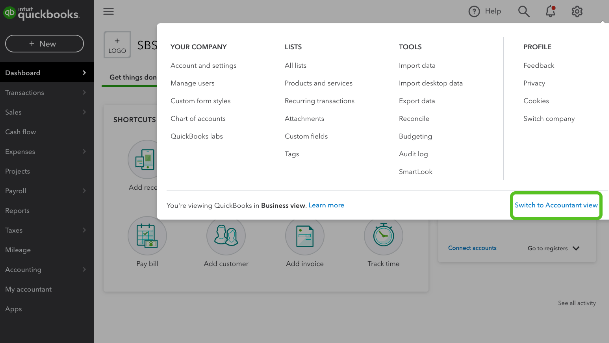
Tracking expenses is one of the keys to good budget management and profit growth. If you don’t track your expenses correctly, you can underestimate or overestimate your revenue as a result, you’ll miss out on deductibles during tax season and disrupt your cash flow.
Expense tracking affects your employees as well, particularly when you reimburse them for their out-of-pocket business expenses, such as business meals, industry education, supplies for in-office or remote work, travel costs, and much more. Managing these employee reimbursements properly is also a way to save money.
With QuickBooks, you can simply record expenses and reimbursements as well as balance your expense budget before it becomes too complicated to control.
Reimbursement is non-taxable payments you pay to your employees if they’ve paid business expenses out of their own pockets. This type of payment doesn’t appear on any of your payroll tax forms. For guidelines on reimbursements, check the Employee business expense reimbursements section of IRS Publication 15, Circular E — Employer’s Tax Guide.
Reimbursement generally refers to the process of compensating an employee for expenses they have incurred on behalf of the company. This can include travel expenses, office supplies, or other business-related costs. Recording reimbursement is crucial for accurate financial reporting and better cash flow management.
In QuickBooks, reimbursed expenses can be categorized and linked to specific employees, making it easier to manage and monitor the company’s expenses. This tracking helps in maintaining transparency and accountability in financial transactions. It also ensures that all reimbursed funds are accurately reflected in the financial records.
Here is a step-by-step process of how we record reimbursement in QuickBooks Desktop:
| Features | QuickBooks Desktop | QuickBooks Online |
| User Interface | Menu driven navigation | Dashboard and gear icon navigation |
| Attachment Handling | Limited attachment features | Easy drag and drop for recept |
| Automation | Requires manual entry for recurring | Easier to automate with recurring options |
By following these steps, you can accurately record and reimburse expenses in either version of QuickBooks, ensuring your financial records stay up to date.
If you want to reimburse a personal expense, it is recommended to record it as a check or an expense. To record a reimbursement in QuickBooks Online, first use a Journal Entry to record the business expense paid with personal funds. Then, choose to reimburse via Check or Expense, selecting the appropriate bank account and entering the amount. Save and close.
Let’s see how:
To record a business expense paid with personal funds in QuickBooks Online, create a Journal Entry. Debit the expense account and credit Partner’s or Owner’s equity with the same amount, then save and close.
Follow the step-by-step information given below:
Step 1: Select Journal Entry
Step 2: Add the Expense account for the purchase
Step 3: Type the Purchase amount
Step 4: Opt for Partner’s equity or Owner’s equity
Step 5: Enter the same Purchase amount
Step 6: Finishing up
You have two options for reimbursements. To reimburse personal funds in QuickBooks Online, select + New > Check, choose the bank account, add Partner’s or Owner’s equity in the Category column, enter the amount, and save.
Option 1: Record the Reimbursement as a Check
Step 1: Select Check
Note: If you’re in a Business view or want to switch to the Accountant view, follow these steps:
Step 2: Go for the bank account used to reimburse the personal funds
Step 3: Add Partner’s equity or Owner’s equity
Step 4: Type the Reimburse amount
Step 5: Finishing up
Option 2: Record the Reimbursement as an Expense
Step 1: Select Expense
Step 2: Go for the bank account used to reimburse the personal funds
Step 3: Add Partner’s equity or Owner’s equity
Step 4: Enter the Reimbursement amount
Step 5: Finishing up
Record an owner’s expense reimbursement in QuickBooks Online, first use a Journal Entry to debit the expense account and credit Owner’s Equity. Then, record the reimbursement via Expense, choosing the appropriate bank account and Owner’s Equity, and save.
Follow the step-by-step information given below:
To record a business expense paid with personal funds in QuickBooks Online, create a Journal Entry, debit the Expense account, credit Owner’s Equity or Partner account, and save.
Step 1: Go for the Journal Entry
Step 2: Add an Expense account
Step 3: Select Owner’s Equity or a Partner account
Step 4: Finishing up
Press the Save and Close buttons.
To record an owner’s reimbursement in QuickBooks Online, go to + New > Expense, select the bank account used, choose Owner’s Equity, enter the amount, and save.
Step 1: Navigate to Expense
Step 2: Go for the Bank account used for the Reimbursement
Step 3: Select Owner’s Equity or a Partner account
Step 4: Finishing up
You can make a retainer deposit to track the cash you’ve received from your client and then record the money you spend in which your clients reimbursed you as a reimbursable expense transaction.
For this, go through the steps listed below:
Once done, create an invoice and then link the billable expense.
Let’s see how:
If your employees used their personal funds to pay a business expense, you can pay them now or record the expense first and pay them later.
Below are the steps you must follow:
To pay your employee, go to + New > Check or Expense, select the employee’s name from the Payee drop-down, choose a liability account, and save.
Step 1: Select Check/Expense
Step 2: Locate the employee’s name
Step 3: Opt for the liability account
Note: If you don’t have one yet, you can choose a new account. However, if you’re using Online payroll, you have the option to create a reimbursement account.
Here are the steps to be followed:
Add a New account
To add a new account, go to Settings > Chart of Accounts, click New, enter the account name, select Account and Detail types, optionally set it as a sub-account, enter the opening balance, add a description, and save.
Step 1: Go for the Chart of Accounts
Step 2: Click New & Type your Account name
Step 3: Select an Account type and Detail type
Step 4: Mark Make this a Sub Account
Step 5: Enter the Opening Balance and fill out the starting date
Step 6: Write a Description
Step 7: Finishing up
Create a taxable reimbursement item, go to Payroll > Employees, select the employee, click Start/Edit, choose Reimbursement, add a new pay type if needed, enter the amount, rename if desired, and save. Add additional details like billable status and customer if applicable.
Step 1: Navigate to Payroll & Employees
Step 2: Select the Employee
Step 3: Click Start/ Edit
Step 4: Opt for Reimbursement
Step 5: Add a new Reimbursement pay type
Step 6: Enter the amount
Step 7: Rename the pay type
Step 8: Finishing up
Type other details
Enter some other information, including:
Note: The Customer and Billable fields are not available in QuickBooks Online Simple Start, but in QuickBooks Online Plus and Advanced, you may enable this feature.
Step 5: Finishing up
To record an expense for future payments, create a Journal Entry. Credit the liability account for the amount owed, debit the expense account for the purchase, and save.
Step 1: Select Journal Entry
Step 2: On the first line
Step 3: On the Second line
Step 4: Finishing up
After recording your Journal Entry, you can now pay them using a check/expense.
If you haven’t paid your Employee in full, you can run a Transaction detail report to know how much you still owe them. To check unpaid employee amounts, run a Transaction Detail by Account report: customize the report, set the period, group by Employee, select the liability account, add the employee’s name, and run the report.
Adhere to the following steps:
Step 1: Look for Transaction Detail by Account
Step 2: Click Customize
Step 3: Select the Report Period drop-down and the range of your transaction
Step 4: Choose the Group By drop down and Employee
Step 5: Opt for the Distribution Account drop-down and set up the Employee Reimbursement account/ the liability account
Step 6: Hit the Employee drop-down & add your employee name
Note: If you want the report to show what you owe all employees, leave this set to All.
Step 7: Finishing up
If your employees used their personal funds to pay a business expense, it is advisable to record the expense when it is accrued and pay them later.
Here’s how:
You need to first record the expense before paying your employees. Set up a Liability Account to record expenses when employees report them.
Follow these steps to set up a new account:
Step 1: Add the Account
Step 2: Save your Account
Step 3: Set your tax form
Step 4: Give your Account a unique name
Step 5: Finishing up
Step 1: Select Journal Entry
Step 2: On the first line
Step 3: On the Second line
Step 4: Finishing up
After recording the expense, you can now pay your employee through Payroll.
You are recommended to set up employee reimbursements in your Payroll. To set up employee reimbursements in QuickBooks, go to Payroll & Expenses, select the employee, and choose Reimbursement under Pay Types. Review your reimbursement mapping in Payroll Settings, then add the reimbursement amount during payroll processing.
Follow the step-by-step information given below:
To add or edit pay types in QuickBooks, go to Payroll & Expenses, select the employee, choose Reimbursement under Common Pay Types, leave the recurring amount blank, and click Save.
Step 1: Navigate to Payroll & Expenses
Step 2: Select the Employee
Step 3: Click Start/ Edit
Step 4: Go for Reimbursement
Step 5: Leave Recurring Amount Blank
Step 6: Finishing up
To review reimbursement mapping, go to Payroll Settings, edit Wage Expenses, select your Reimbursement liability account, and save. When running payroll, add the reimbursable amount to ensure payment.
Step 1: Go to Payroll Settings
Step 2: Click on the Pencil icon
Step 3: Browse to Wage Expenses
Step 4: Scroll down to Reimbursements & select the liability account
Step 5: Finishing up
When you next run Payroll, add the amount to be reimbursed under the Reimbursements box. So, your employees will then be paid.
Bottom Line!
Reimbursement is when a business pays back an employee, client, or other people for money they spent out of their pocket or for overpaid money. Some examples are getting money back for business costs, insurance premiums, and overpaid taxes. Whether you are a small business owner, accountant, or bookkeeper, recording reimbursements is essential for maintaining accurate financial records and transparency in the books.
When an employee or owner pays for a business expense with personal funds, the business’s eventual payment to them is a reimbursement, not a true expense that affects your Profit & Loss (P&L) statement. The expense should be categorized to the relevant Expense Account (e.g., “Travel,” “Office Supplies”). The reimbursement is then typically recorded against the same expense account, effectively making the net impact on the P&L accurate. For the owner, the transaction might flow through an “Owner’s Draw” or “Owner’s Equity” account initially, depending on the setup.
Mileage reimbursement is typically calculated using a standard rate (like the IRS standard mileage rate). In QuickBooks, you should create a specific Expense Account (e.g., “Vehicle Mileage Reimbursement”) or a Payroll Item (if processing through payroll). You record the total dollar amount of the reimbursement, often using a Journal Entry or a Check/Expense transaction, and then pay the employee. Do not post the reimbursement against an asset account like “Automobile”.
The choice depends on your workflow:
➜Checks/Expenses: Use a Check or Expense transaction immediately if you are paying the employee right away after they submit their expense report.
➜Bills: Use a Bill if the expense report is submitted now, but you plan to pay the employee later (e.g., waiting for the next pay run). This correctly shows the liability on your books until the payment is made
These are typically referred to as job costing or pass-through expenses.
➜First, record the original expense using your money, marking it as “Billable” to the customer/job.
➜Next, create an Invoice for the client and select the previously marked “Billable” expense to include it.
➜When the client pays the invoice, the money is recorded as a payment against the Account Receivable, not as business income. This ensures the expense and the reimbursement cancel each other out on your Profit & Loss (P&L) report.
Generally, an employee reimbursement paid under an “Accountable Plan” is not considered taxable wages.
An Accountable Plan requires three things: the expenses must have a business connection, they must be adequately substantiated (with receipts/details), and any excess reimbursement must be returned to the employer within a reasonable time. If your plan is not accountable, the reimbursement must be reported as taxable income on the employee’s W-2.
Reimbursements can impact multiple reports differently depending on whether they are recorded as expenses, liabilities, or billable income. In QuickBooks, expense accounts will show the original purchase, while reimbursed amounts may appear under income (for client reimbursements) or reduce liabilities (for employee/owner reimbursements). Users often ask how these reflect on tax reports, and Intuit documentation covers how expense and reimbursement entries appear in financial statements.
The method depends on the reimbursement type.
➜Owner reimbursements: Often tracked using equity accounts.
➜Employee reimbursements: Typically use a check or expense tied to an employee/vendor profile.
➜Client reimbursements: Usually noted as billable expense income.
Intuit advises using the method that directly ties back to the payee/vendor for clearer audit trails.


