 Add As A Preferred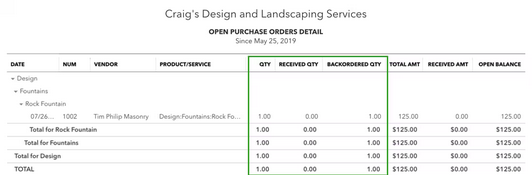
Managing inventory in QuickBooks, covering both Desktop and Online versions, is essential for accurate financial reporting and operational efficiency. The article provides a detailed, step-by-step methodology for setting up inventory items, focusing on the critical distinction between an Inventory Part, which tracks quantity and holds cost as an Inventory Asset until sale, and a Non-Inventory Item, which is typically expensed immediately upon purchase and not stocked. This guidance extends to advanced scenarios often encountered by business owners, such as correcting physical inventory count discrepancies by using a dedicated Inventory Adjustment Expense account to avoid distorting the Cost of Goods Sold (COGS). Furthermore, the content offers expert advice on using the mathematically sound formula to establish Reorder Points and clarifies that automatic inventory tracking requires the QuickBooks Online Plus or Advanced subscription tiers, ensuring users implement these tools with technical and financial precision.
Highlights (Key Facts & Solutions)
QuickBooks inventory tracking is a powerful tool designed to simplify your business management stock. It’s a comprehensive solution for adding, monitoring, and managing Inventory. When adding Inventory to QuickBooks, it’s important to note that you’re not just organizing your stock. You’re tapping into a system that automates your tasks.
This is especially beneficial if you require multiple location tracking, as this is when you allocate items to different locations. It has the ability to provide real-time insights into your stock levels for better inventory management.
Adding items to QuickBooks Online Inventory ensures accurate tracking of stock levels and financial reporting. It helps in managing Inventory efficiently, so you can:
When recording inventory items, you typically must provide details, such as the item name or number, description, cost, income account, expense account, asset account, and initial quantity on hand. Plus, you can also include additional details like the manufacturer’s part number, reorder point, preferred vendor, and tax codes.
QuickBooks Online Essentials, Advanced, and Plus customers have the opportunity to add on QuickBooks Commerce, an all-in-one platform that provides you total control over your multi-channel businesses.
QuickBooks Commerce is a cloud-based inventory management system that you can access on the go. This platform makes tracking Inventory easier by allowing you to stay on top of your inventories from different sales channels and locations on one single platform.
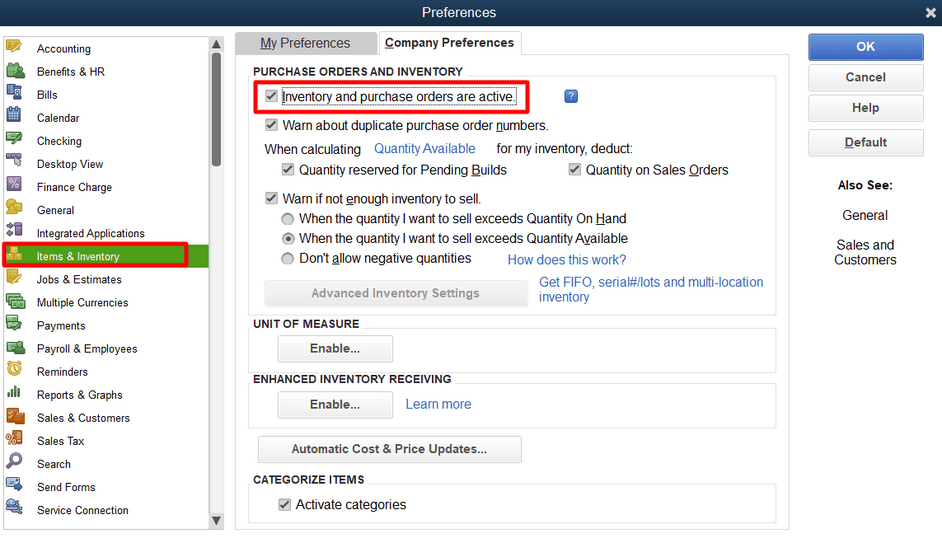
To begin using the QuickBooks inventory feature, you’ll first have to check your subscription plan and then enable inventory tracking in the settings. QuickBooks Online inventory is only available to QuickBooks Online Plus, Essentials, and Advanced customers. If you’re unable to see the option to add Inventory, you may need to upgrade your plan. Make sure to turn on inventory tracking so you can add your inventory items. Here’s how:
Tip: You can also turn on price rules if you need to set up flexible pricing for the things you sell.
Once you’ve updated your settings, you can start adding Inventory to QuickBooks Online.
Now, you can add your inventory items as well as other products and services you sell into QuickBooks. This allows you to quickly add them as line items to your sales forms. Follow these steps to add different Inventory, non-inventory, and service items into QuickBooks.
Tip: You can organize your goods and services into categories or item types to make them easier to find instead of scanning an entire item list.
Note: If you’re new to QuickBooks, the initial quantity on hand depends on what date you plan to start tracking your business. For example, if you’ll start tracking from the beginning of your fiscal year, write down your products’ quantities at that time.
However, if you’re simply adding a new product from a supplier/vendor, enter “0” as its initial quantity. Then, after saving, track how many of these products you receive from suppliers. This ensures you don’t double its initial quantity.
If you want to track how much you spend on a product or service, do the following:
If you start selling new products, you can use the same steps to set them up.
When Inventory is added to QuickBooks Online without a Bill associated, it is supposed that inventory items have already been to the Cost of Goods Sold account prior to the customer using QuickBooks Online.
Whenever Inventory needs to be added to QBO, and the customer wants to assign a Cost of Goods Sold Value to the Inventory items, a Bill will need to be created for the inventory items, and backdated if necessary. Any Inventory items that don’t have Bills related to them, will be assigned a zero dollar value for Cost of Goods Sold.
You only have to create a product or service once. After creating them, you can add them to sales forms as many times as you need.
Tip: Already keeping track of your products and services in a spreadsheet? Save time and import them all at once.
To add service or non-inventory items, follow these steps:
Note: You can leave this data field blank if you charge a variable rate for services. Instead, add the price when you fill out the invoice or sales receipt.uu
Tip: You can use an income account QuickBooks has already set up for you, or click + Add new to create a new income account.
Important: Changing an Income account mapping is not retroactive. The change will only affect future transactions.
Once you’ve set up all your inventory products, you can track your sales to analyze how they’re performing and adjust Inventory as needed. Inventory analysis is a great way to determine the number of products your business should carry to keep your company profitable and increase sales. To keep track of your sales, follow these steps:
With QuickBooks, you can monitor your inventory levels to determine when to restock, analyze your Inventory carrying costs, and determine which items are bestsellers. QuickBooks allows you to reorder inventory right on the platform so you can track what you receive from vendors and what’s still on order.
As you receive inventory items, the quantity on hand will automatically update. However, once you add or remove items from your Inventory, QuickBooks automatically increases or decreases both the number of items available as well as the inventory value.
Check what’s running low or out of stock
You can prioritize ordering the products you need the most. Once you’ve set up your reorder points, here’s how to verify if you have inventory items that are running low or out of stock.
Note: If you need to reorder both low stock and out of stock products from the same vendor, don’t use any of the filters from the top.
Use reports to get helpful insights on the things you buy and sell, as well as the status of your inventory. You can access reports to instantly see your best sellers, what’s on hand, the cost of goods, and more. To get started, navigate to Reports and then choose Standard. Once you’re there, here’s what you can do.
See your Best Sellers
Check what’s in stock
Check what’s still on order
This shows you how many items are still on order and how many you’ve received so far.
How to check what’s in stock and what’s on order as you work?
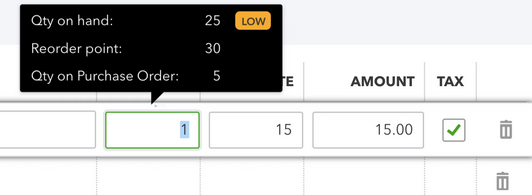
Check what’s on hand and what’s still on order as you work on an invoice, sales receipt, or another type of transaction. Just hover your pointer over the quantity you entered on any transaction.
If you set reorder points, QuickBooks will also let you know when something is running low.
Below are the steps to set up Inventory in QuickBooks Desktop.
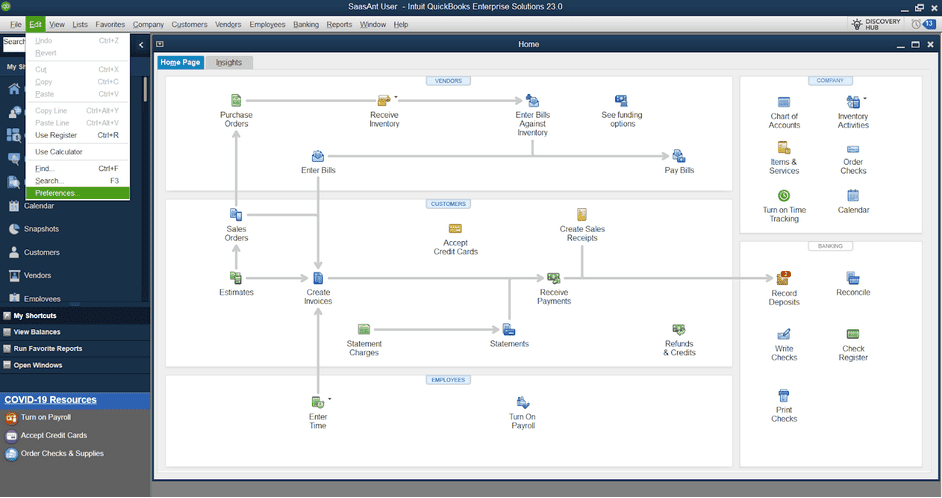
Begin with opening QuickBooks Desktop and then your company file. When you log in, QuickBooks Desktop will direct you to its home screen.
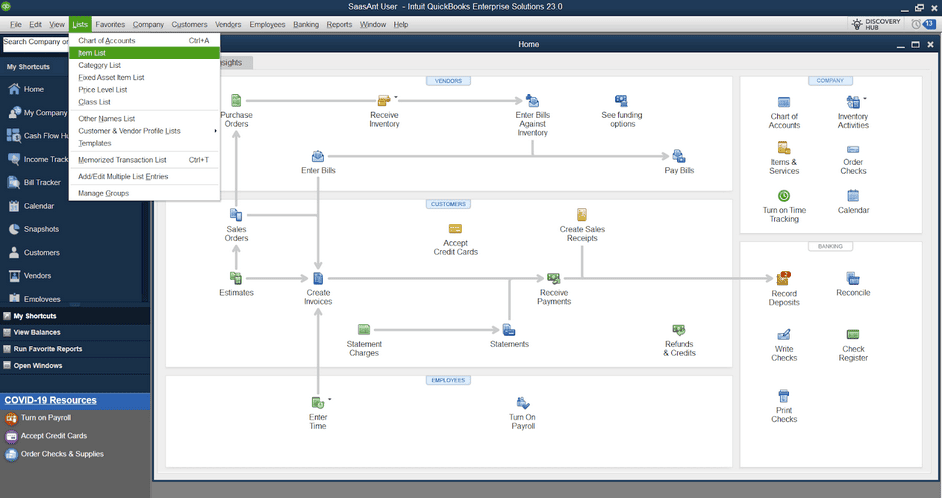
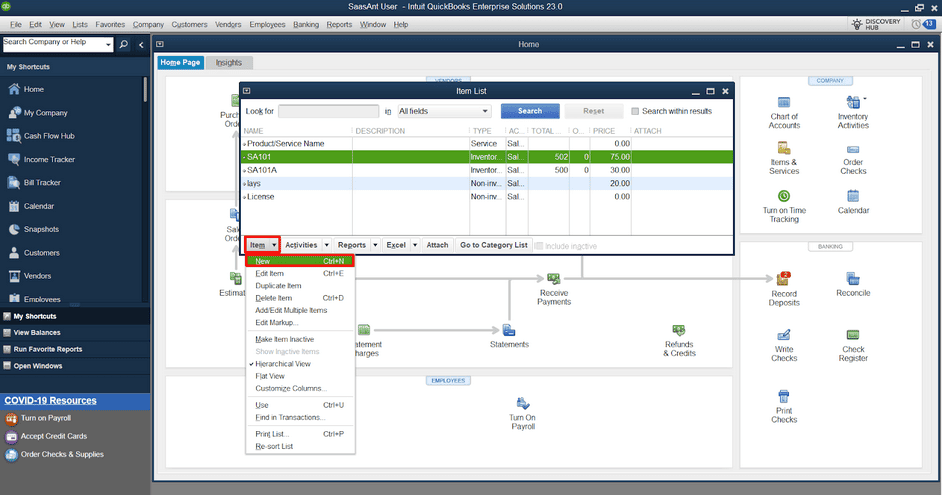
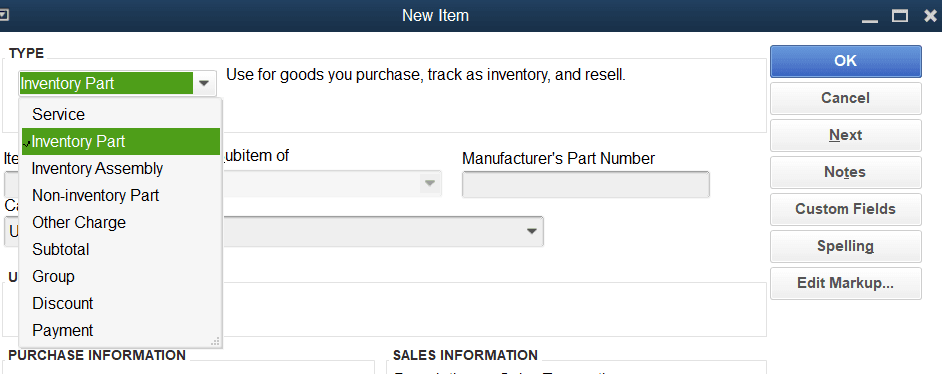
Fill out the required information for your inventory item. Here’s what you need to provide:
QuickBooks Desktop offers additional fields to capture more information about your inventory item. You can answer the following details if applicable:
Entering inventory in QuickBooks is just the start. For growing businesses, accuracy, adjustments, and product structure matter more over time. This section covers 5 practical scenarios: correcting physical stock errors, understanding item types, handling returns, setting correct opening balances, and managing manufactured goods. Each subtopic gives you actionable steps, real-use relevance, and avoids common mistakes — so your inventory remains aligned with reports, tax logic, and real-world stock flow.
Inventory discrepancies affect reporting accuracy, profit margins, and reorder planning. To correct them in QuickBooks, go to Inventory > Adjust Quantity/Value on Hand, select the correct adjustment type, and match it with your physical count sheet. Always specify a reason, like damage, theft, or miscounts. Use the right adjustment account to avoid distorting COGS or balance sheet. Record date-specific changes to maintain audit trails. Run an Inventory Valuation Summary before and after changes to verify accuracy. This method ensures your stock levels, cost values, and reports stay reliable, compliant, and decision-ready.
An Inventory Part tracks quantity on hand, COGS, and inventory asset value in real time. In contrast, a Non-inventory Item does not track stock levels, has no asset linkage, and is mainly used for drop shipments or one-time purchases. Inventory Parts affect the balance sheet, income statement, and valuation reports, while Non-inventory Items only impact sales and expense accounts. Choosing the wrong type can distort financial data, lead to stock mismatches, and trigger reporting errors. Always align item type with business use-case, tracking need, and cost relevance to avoid operational inefficiencies.
To adjust opening inventory without impacting Cost of Goods Sold, use the inventory adjustment tool with a dedicated equity or clearing account instead of COGS. This keeps profit margins intact, maintains historical accuracy, and prevents tax discrepancies. Go to Inventory > Adjust Quantity/Value on Hand, set the “Adjustment Account” to Opening Balance Equity or a custom non-expense account. Enter accurate initial quantities, backdate if needed, and always document with reason codes. Avoid adjusting through purchase entries unless tied to vendor bills. This method ensures clear separation between opening stock setup, expenses, and business performance metrics.
To manage returns or damaged goods, create a Credit Memo, use the Refunds & Credits feature, or apply inventory adjustments based on condition. For resellable returns, restock using “Returned to Inventory” checkbox and update available quantity. For damaged or unusable items, reduce stock via Inventory Adjustment using a Loss/Damage expense account to avoid inflating COGS. Always record the reason, date, and linked customer/vendor to maintain traceability. Regularly audit return patterns, write-off frequency, and vendor issues to refine purchasing and quality control strategies, minimizing inventory waste and maintaining reporting accuracy.
Use Inventory Assembly in QuickBooks Desktop to manage bundled products, manufacturing processes, and component-level stock. Go to Lists > Item List > New > Inventory Assembly, then add raw materials, define quantities per build, and set the build point. Each assembly tracks finished goods, reduces component inventory, and updates the COGS for accurate financials. This is ideal for manufacturers, assemblers, or businesses selling kits. You gain control over production costs, multi-level components, and real-time tracking of build status. Always use the Build Assemblies function to keep your item counts, values, and reports fully aligned.
Inventory management isn’t just about data entry — it’s about precision, planning, and performance. This section focuses on five high-impact practices to level up your QuickBooks inventory usage: from setting accurate reorder points to avoiding costly setup errors, optimizing inventory reports, integrating advanced tools, and shifting from manual to digital tracking. Each topic gives you clear, actionable steps to prevent common pitfalls, increase efficiency, and turn your inventory system into a strategic business asset.
Reorder points prevent stockouts, reduce overstocking, and streamline reorder timing. To set them right in QuickBooks, analyze your average sales velocity, lead time, and safety stock buffer for each item. Use the formula:
(Average Daily Usage × Lead Time) + Safety Stock = Reorder Point.
Set this under each item’s inventory details for real-time alerts. Avoid static values—review reorder points monthly, especially for seasonal items or fast-movers. Use Inventory Stock Status by Item report to monitor low-stock trends and ensure your replenishment strategy supports customer demand without tying up capital unnecessarily.
Incorrect inventory setup causes financial mismatches, COGS errors, and reporting confusion. Common mistakes include selecting the wrong item type (Inventory vs. Non-inventory), skipping the initial quantity on hand, or mapping to incorrect accounts like Sales instead of Inventory Asset. Many users forget to enable inventory tracking in settings, leading to incomplete data. Avoid entering values without checking the start date—this can skew historical reports. Always use a dedicated adjustment account for opening balances to avoid distorting profit margins. Reviewing setup with the Inventory Valuation Summary ensures your stock records align with actuals.
Optimizing inventory reports in QuickBooks helps uncover bestsellers, track stock movement, and monitor profitability. Start with reports like Inventory Valuation Summary, Sales by Product/Service Summary, and Open Purchase Order Detail. Filter by date range, location, or category to extract relevant patterns. Customize columns to include average cost, gross margin, and reorder status. Schedule reports to auto-run weekly or monthly for real-time decision-making. Use insights to fine-tune pricing, reduce holding costs, and avoid dead stock. Regular report analysis gives a clear view of stock efficiency, vendor performance, and product demand trends.
QuickBooks ko third-party apps se jodne se aapko 5x visibility, multi-channel sync, aur automated forecasting milti hai. 1. Pehle app jaise SOS Inventory, Fishbowl, ya Cin7 choose karein for barcode scanning, order routing, aur stock sync. 2. API ya built-in connector se QuickBooks ko link karein; data flow, stock levels, aur sales orders real time update honge. 3. Use demand forecasting tools, safety stock calculators, aur vendor lead-time tracking se reorder efficiency badhayein. 4. Har month 3 reports (sales velocity, stock aging, and fulfillment lag) ko compare karke integration accuracy check karein. 5. Failover ke liye sync logs aur backup schedule rakhein taaki data loss 0 rahe.
Transitioning from manual tracking to QuickBooks improves accuracy, speed, and financial control. Start by cleaning your spreadsheet: remove duplicates, verify SKU consistency, and confirm starting quantities. Use the import tool in QuickBooks to upload items in bulk—map fields like item name, initial stock, and asset account correctly. Set reorder points based on past usage, not assumptions. Train your team to use Products & Services, not free-text entries, for consistency. Monitor the Inventory Valuation Detail weekly to spot mismatches early. This shift minimizes manual errors, improves audit trails, and boosts confidence in your real-time inventory data.
Recording Inventory in QuickBooks allows you to track stock levels, sales, and cost of goods sold. It helps you to maintain accurate records, make informed business decisions, and streamline inventory management processes. QuickBooks is a best choice for adding automated inventory tracking to your accounting and bookkeeping software solutions.
With this, you can easily manage multiple locations and warehouses, product listings and pricing across multiple channels, Inventory, orders, and accounting all in one platform, reordering with automated purchase orders, and much more.
Still have questions? Explore our detailed FAQs.


