Excerpt:
Managing debit card transactions in QuickBooks ensures accurate financial tracking and reporting for businesses. This article provides step-by-step instructions on how to record, track, and manage debit card purchases and refunds, both in QuickBooks Desktop and Online. By following the outlined methods, users can maintain up-to-date records of expenses, vendor payments, and refunds, ensuring smooth financial operations and precise accounting for businesses of all sizes.
 Add As A Preferred
Recording debit card transactions in QuickBooks or any other accounting software is crucial to keeping a record and organizing accounting. Both QuickBooks Desktop and Online users can benefit from tracking these transactions to stay informed about your business’s cash flow. In this guide, you will learn about the record of the debit card transactions in QuickBooks so that the account would always tally.
Classifying Debit Card Transactions
If the services or items are paid on the spot, then you can utilize a cheque or expense to record a transaction.
Alternatively, if the transitions are supposed to be paid afterward, you can record them as bills and pay them using the Bill payment feature. Always remember that bill payments can only be utilized to mark your open bills as paid. If you record your transactions using the Expense feature, then they are considered paid.
Following are the things that you’re required to know if you want to record this as a bill:
Recording debit card transactions in QuickBooks Desktop involves a few straightforward steps. Here’s how you can do it:
There are two methods through which you can record debit card transactions in QuickBooks Desktop:
This method enables you to record the debit transaction as a check entry while distinguishing it as a debit card purchase.
This strategy focuses on classifying the transaction as a monetary expenditure.
Recording debit card transactions in QuickBooks Online is essential for maintaining accurate financial records. Below are the steps for various scenarios.
If your debit card purchase resembles a cheque transaction, record it as follows:
Note: If saved, the cheque will automatically appear in the bank register.
To record a debit card payment for an existing bill:
If the debit card payment was made for an expense without an associated bill:
To track QuickBooks debit card purchases for offset tendered bills, go to the vendor’s section, select “Pay One Vendor,” enter details, and save the payment information.
You can track these bills easily for your merge vendors. Follow the steps mentioned below:
There are times when the payment does not go through and is cancelled. It can be because there are some issues in the deal, and the deal is cancelled. In this situation, you will receive a refund of the money that has already been paid with a QuickBooks Debit Card.
Follow the steps below to include them back into your books:
Both QuickBooks Desktop and QuickBooks Online require debit card transactions to be recorded accurately to keep records accurate. Whether you need to log all purchases, control vendors, or refunds, these software tools offer rather obvious ways of entering debit cards.
You must Match the transaction, not “Add” it. When QuickBooks downloads the transaction from your bank, it looks for a manually entered transaction with the same amount and a similar date.
➜In the Bank Feeds (or “Transactions”) window, look for the green “Match” icon next to the downloaded transaction. Clicking this links the bank data to your manual entry, preventing a duplicate. If you click “Add,” QuickBooks will create a second transaction, and your bank balance will be incorrect.
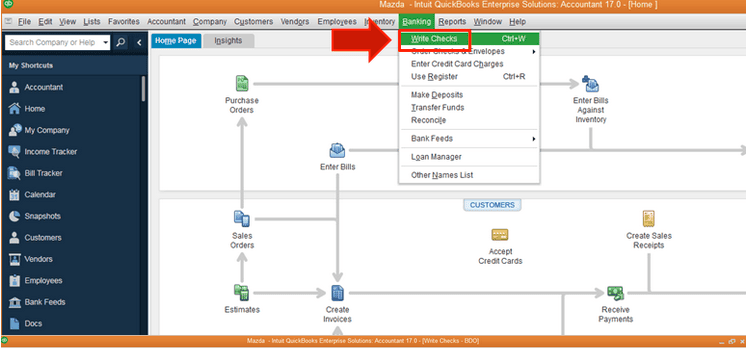
In QuickBooks Desktop, the “Write Checks” window is the designated tool for any money leaving your bank account immediately, which includes debit card swipes, wire transfers, and actual paper checks.
You should use the Split feature to ensure accurate tax categorization. Do not create two separate transaction entries for one bank swipe. Instead:
➜In QBO: Enter the total amount, then click on “Split” (or use the Category details section) to add multiple lines. Assign the specific amount to “Office Expenses” and the rest to “Janitorial Expenses.”
➜In QBD: In the “Write Checks” window, use the “Expenses” tab at the bottom to list multiple accounts and amounts that total up to the transaction value.
Record the debit transaction as you normally would, but for the “Account/Category,” select Owner’s Draw (for Sole Proprietorships) or Shareholder Distribution (for S-Corps). This reduces your business bank balance without reducing your taxable business income, keeping your books tax-compliant.
This is normal and is usually due to the difference between the Transaction Date and the Posting/Clearing Date. You likely entered the date the swipe occurred (Transaction Date). The bank feed shows the date the funds actually left the account (Clearing Date), which can be 1-3 days later.
Best Practice: When matching transactions, QuickBooks usually tolerates a small date range difference. However, for accurate bookkeeping, generally stick to the date the purchase was made (the receipt date) when entering manually, as this reflects when the liability was incurred.


